Table of Contents
Advertisement
Quick Links
Advertisement
Table of Contents

Summary of Contents for Octtel ODC Series
- Page 1 ODC series Wireless VoIP Router User’s Manual Version 1.0 (July 2014)
-
Page 2: Table Of Contents
Contents 1. Introduction ................................ 1 1-1 Product Overview ............................1 1-2 Hardware Description ..........................2 2. VoIP Wireless Router Web Configuration......................4 2-1 Status................................5 2-1-1 Current Status ..........................5 2-1-2 RTP Packet Summary........................5 2-1-3 System Information .......................... 6 2-1-4 Routing Table ........................... - Page 3 2-7 System Settings............................70 2-7-1 NTP ..............................70 2-7-2 Language ............................70 2-7-3 Login Account..........................71 2-7-4 Backup / Restore..........................72 2-7-5 System Log ............................ 73 2-7-6 Save / Restart..........................73 2-7-7 Software Upgrade .......................... 74 2-7-8 Logout ............................74 3.
-
Page 4: Introduction
VoIP Wireless Router User’s Manual 1. Introduction 1-1 Product Overview The VoIP Router is designed to carry both voice and facsimile over the IP network. It uses the industry standard SIP call control protocol so as to be compatible with free registration services or VoIP service providers’ systems. As a standard user agent, it is compatible with all common Soft Switches and SIP proxy servers. -
Page 5: Hardware Description
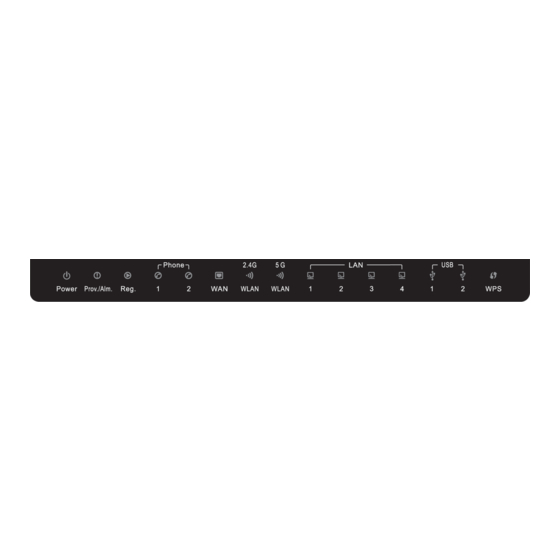
VoIP Wireless Router User’s Manual 1-2 Hardware Description Front Pannel ODC-202AC / OD-202AC ODC-202N / OD-202N Location Color Status Description Solid Light Power On Power Green Light off Power Off The device can not register with SIP Server or cannot get the Blink IP address. - Page 6 VoIP Wireless Router User’s Manual Rear Panel ODC-202AC ODC-202N OD-202AC OD-202N 1. Power Switch:to power on the device. 2. Power Plug:connect to power adaptor came with the device. 3. Phone 1~2:connect to phone sets. 4. WAN:connect to broadband Networks such us ADSL, Cable Modem or router. 5.
-
Page 7: Voip Wireless Router Web Configuration
VoIP Wireless Router User’s Manual 2. VoIP Wireless Router Web Configuration The VoIP Router allows users to configure its settings using a web interface (Web UI). You can access the Configuration Menu by opening a web-browser (e.g., Internet Explorer or Netscape Navigator) and entering the factory default LAN IP address: 192.168.8.254. -
Page 8: Status
VoIP Wireless Router User’s Manual 2-1 Status 2-1-1 Current Status Status → Current Status For Port Status, it includes if each port registers to Proxy successfully, the last dialed number, how many calls each port has made since the VoIP Router is start, etc. For Server Registration Status, it shows the registration status of DDNS, STUN and FXS Represent Number. -
Page 9: System Information
VoIP Wireless Router User’s Manual 2-1-3 System Information Status → System Information For WAN Port Information, it shows IP address, subnet mask, default gateway and DNS server. If you use PPPoE to obtain IP, you will know if the IP is obtained through this method. If IP address, subnet mask, default gateway is blank, it means that the VoIP Router does not obtain IP. -
Page 10: Routing Table
VoIP Wireless Router User’s Manual 2-1-4 Routing Table Status → Routing Table It displays routing table of VoIP Router. 2-1-5 LAN Client The DHCP Clients table displayed LAN device that has already been assigned an address from VoIP Router. You can check if the DHCP client has obtain an IP address. Status →... -
Page 11: Fxs Line Diagnostics
VoIP Wireless Router User’s Manual 2-2 FXS Line Diagnostics 2-2-1 FXS Outward Test FXS Line Diagnostics Outward Test It allows operator to verify whether it is some problem on the cable between Phone Sets and VoIP Router. Enable: Select the lines you want to test. Enforced Test: Since the line test will interrupt a talking call, that VoIP Router will ignore the in used line. -
Page 12: Fxs Inward Self Test
VoIP Wireless Router User’s Manual 2-2-2 FXS Inward Self Test FXS Line Diagnostics Inward Self Test It allows operator to verify if it is some problem on the FXS chip set. Enable: Select the lines you want to test. Enforced Test: Since the line test will interrupt a talking call, that VoIP Router will ignore the in used line. -
Page 13: General Settings
VoIP Wireless Router User’s Manual 2-3 General Settings 2-3-1 WAN WAN (Wide Area Network) Settings are used to connect to your ISP (Internet Service Provider). The WAN settings are provided to you by your ISP and oftentimes referred to as "public settings". Please select the appropriate option for your specific ISP. - Page 14 VoIP Wireless Router User’s Manual General Settings → WAN DHCP: Select this option if your ISP (Internet Service Provider) provides you an IP address automatically. Cable modem providers typically use dynamic assignment of IP Address. The Host Name field is optional but may be required by some Internet Service Providers.
- Page 15 VoIP Wireless Router User’s Manual General Settings → WAN PPPoE: Select this option if your ISP requires you to use a PPPoE (Point-to-Point Protocol over Ethernet) connection. Enter the PPPoE Account, PPPoE Password and re-enter Password to confirm. General Settings → WAN PPTP: Point-to-Point Tunneling Protocol (PPTP) is a WAN connection.
- Page 16 VoIP Wireless Router User’s Manual General Settings → WAN WAN Link Speed: Select WAN port link speed. General Settings → WAN VoIP Connection Interface: Select a WAN interface for VoIP traffic bound with as WAN 2 is enabled. General Settings → WAN Factory Default MAC Address: The original MAC address of the VoIP Router.
-
Page 17: Lan
VoIP Wireless Router User’s Manual 2-3-2 LAN General Settings → LAN LAN IP / LAN default Gateway : Enter the LAN IP address of the VoIP Router. It is also the default gateway for DHCP clients. Subnet Make: Enter the subnet mask for DHCP clients. General Settings →... - Page 18 VoIP Wireless Router User’s Manual Enable Port: Tick the box to enable LAN Port Incoming Rate Limit: Use the drop-down menu to select the proper rate limit for the specific LAN port. The flow is from LAN to WAN, and the rate limit can not exceed the real upstream bandwidth. Outgoing Rate Limit: Use the drop-down menu to select the proper rate limit for the specific LAN port.
-
Page 19: Sip
VoIP Wireless Router User’s Manual 2-3-3 SIP As there are various Proxy Server providers, according to RFC standard, it has designed the gateway to be compatible with them. If any registration problem occurs, please consult your Internet telephony Server Provider. General Settings →... - Page 20 VoIP Wireless Router User’s Manual General Settings → SIP Each line registers to Proxy independently: Number: Enter the number, text or number and text in this field. It is the Caller ID for the called party when you make a VoIP call. If you register the VoIP Router to a SIP proxy server, then it should be the number that provided by SIP proxy server.
- Page 21 VoIP Wireless Router User’s Manual General Settings → SIP Proxy Server IP/Domain: Enter the IP address or URL (Uniform Resource Locator) of SIP proxy server or soft switch. Proxy Server Port: Enter the SIP proxy server’s listening port for the SIP in this field. Leave this field to the default if your VoIP Service Provider did not give you a server port number for SIP.
- Page 22 VoIP Wireless Router User’s Manual General Settings → SIP Outbound Proxy Support: Check the box to send all SIP packets to the destined outbound proxy server. An outbound proxy server handles SIP call signaling as a standard SIP proxy server would do. Further, it receives and transmits phone conversation traffic (media) between two communication parties.
- Page 23 VoIP Wireless Router User’s Manual For example (Example in Taiwan), If Server 1 is local VoIP Service Provider you can refer to Digit Map page for general settings. If Server 2 is global VoIP Service Provider (VoIP STUN, free to dial to some cities free charge) you can set individual dialing plan for VoIP STUN in Number Translation field.
-
Page 24: Sip Advanced
VoIP Wireless Router User’s Manual 2-3-4 SIP Advanced General Settings → SIP Advanced Listen Port UDP: Enter the VoIP Router’s listening port in this field. Leave it as default settings, unless it conflicts with ports used by other device in your network. RTP Starting Port UDP: Enter the starting port number or transmitting voice data among VoIP devices. - Page 25 VoIP Wireless Router User’s Manual General Settings → SIP Advanced Session Expiration: This field will set the time that the VoIP Router will allow a SIP session to remain die (without traffic) before dropping it. Session Refresh Request: Select UPDATE or re-INVITE to send refresh requests to the Server. Session Refresher: This determines which side of an expired call session will initiate the session refresh.
- Page 26 VoIP Wireless Router User’s Manual General Settings → SIP Advanced VoIP Call Out Notification: Check the box to enable the function of playing a tone to notify user that the call is through VoIP. Enable Built-in Call Hold Music: Check the box to enable the function of playing music when receiving Call Hold request.
- Page 27 VoIP Wireless Router User’s Manual SIP Caller ID Obtaining: Select the part of the SIP packet from the VoIP Router to obtain Caller ID. There are several places where the Caller ID is located. Remote-Party-ID Display Name - It is located at SIP → Remote-Party-ID → Before [<sip:] Remote-Party-ID User Name - It is located at SIP →...
-
Page 28: Caller Id
VoIP Wireless Router User’s Manual 2-3-5 Caller ID General Settings → Caller ID FXS Caller ID Generation: DTMF – Sending Caller ID in DTMF signaling. FSK – Sending Caller ID in FSK signaling. FSK + TypeII – Send Caller ID in FSK signaling. As the phone set supports Call Waiting Caller ID that FXS will send third party’s number. -
Page 29: Hot Line
VoIP Wireless Router User’s Manual 2-3-6 Hot Line General Settings → Hot Line Enable: Tick the check box to enable a line. If some lines are not used, disable them (Pause Function) to avoid unnecessary waiting when an incoming call is diverting to the line. Hot Line: Check to direct the call automatically to a pre-configured destination without any action when the FXS is off-hook. -
Page 30: Line Settings
VoIP Wireless Router User’s Manual 2-3-7 Line settings General Settings→ Line settings Listening Volume: Use the drop-down menu to adjust the hearing (listening) volume. Speaking Volume: Use the drop-down menu to adjust the speaking volume. Tone Volume: Use the drop-down menu to adjust the tone volume. It will apply to all tones generated by the VoIP Router including Dial Tone, Ring Back Tone and Busy Tone. - Page 31 VoIP Wireless Router User’s Manual General Settings→ Line settings Ring (Early Media) Time Limit[10 - 600secs]: Enter the timeout to cancel a call if no one answers the phone. Enable End of Digit Tone: Check the box to activate the function of playing a “Beep-Beep” tone to notify the user that the call is in progress.
- Page 32 VoIP Wireless Router User’s Manual General Settings→ Line settings FXS / FXO Impedance: Select different impedance from the drop-down menu. Drop Inactive Call: This feature is a call drop standard for a VoIP Router to determine whether or not to hang up the phone. The VoIP Router will disconnect the call automatically to avoid keeping the line engaged if the detected volume is below the Silence Detection Threshold or the time exceeds the Drop Silent Call Timeout.
-
Page 33: Fax
VoIP Wireless Router User’s Manual 2-3-8 FAX General Settings → FAX Disable - Select it if you are not sending fax, but it is still accepted fax by the VoIP Router. T.38 Fax - Select it if you are using T.38 as the protocol for fax transmission. T.38 is used for reliable and efficient facsimile transmission over network. - Page 34 VoIP Wireless Router User’s Manual General Settings → FAX High Speed Redundancy:Set redundancy packets for FAX image. It could repair FAX image for non-continuous packets lost. The higher redundancy the higher bandwidth required. Low Speed Redundancy:Set redundancy packets for FAX handshaking signaling. FAX Codec: Select G.711 a-law, G.711 u-law, or G.726 for T.30 from the drop-down menu.
-
Page 35: Calling Features
VoIP Wireless Router User’s Manual 2-3-9 Calling Features General Settings → Calling Features Do Not Disturb: Check the box to reject (busy tone played) incoming calls. Unconditional Forward: Check the box to forward incoming calls to the assigned “Forwarding Number” automatically. - Page 36 VoIP Wireless Router User’s Manual Enable Call Feature Code Enable Call Feature Code: Check the box to enable the advanced function for Call Features, such as Call Pickup, Automatic Redial and Unattended transfer. Calling Feature Instructions: Call Hold: The call will be held after the FLASH button is pressed on the phone set. The VoIP Router will play music on hold (provided by your ITSP or VSP) to the remote end.
-
Page 37: Phone Book
VoIP Wireless Router User’s Manual Examples of establishing a Three-Way call: Phone1 dials to Phone2, Phone2 answers the call. Phone1 presses Flash then calls Phone3 (Phone2 is on hold) and Phone3 answers the call. Phone1 presses Flash to start the conference call. Phone1 dials to Phone2, Phone2 answers the call. -
Page 38: Cdr Settings
VoIP Wireless Router User’s Manual 2-3-11 CDR Settings The user can set up a CDR Server to record call details for every phone call. General Settings → CDR Send record to CDR Server: Tick the check box to enable the call detail recording. CDR Server IP / Domain: Enter the IP address of the CDR server. -
Page 39: Wireless Settings
VoIP Wireless Router User’s Manual 2-4 Wireless Settings 2-4-1 Basic Settings Wireless Settings → Basic Settings Enable Wireless LAN Interface: Enable wireless basic settings on LAN interface. Wireless Network Name (SSID): SSID is the name of your wireless network. All wireless-equipped devices share the same SSID to communicate with each other. - Page 40 VoIP Wireless Router User’s Manual AP to AP connectivity in which allows two LAN network to make a connection without the need of a wired backbone to link them. WDS AP is deigned to communicate with a specific AP and do not accept wireless stations to access them.
-
Page 41: Advanced Settings
VoIP Wireless Router User’s Manual 2-4-2 Advanced Settings This section introduces advanced configuration for the wireless access point. If you are not familiar with the following functions, keep the default parameters. In some cases, incorrect settings may reduce wireless performance. Wireless Settings →... - Page 42 VoIP Wireless Router User’s Manual Wireless Settings → Security Settings Select the type of WPA-PSK (WPA-PSK, WPA2-PSK, WPA2 Mixed-PSK), choose the proper security mode according to your wireless network. WPA Authentication Mode: Select Personal (Pre-Shared Key). WPA Cipher Suite: WPA Cipher Suite is used for the configuration of WPA or WPA2 Mixed. TKIP - TKIP is the security protocol used in WPA.
- Page 43 VoIP Wireless Router User’s Manual Wireless Settings → Security Settings Select the type of WPA (WPA, WPA2, WPA2 Mixed), choose the proper security mode according to your wireless network. WPA Authentication Mode: Select Enterprise (RADIUS). WPA Cipher Suite: WPA Cipher Suite is used for the configuration of WPA or WPA2 Mixed. TKIP - TKIP is the security protocol used in WPA.
-
Page 44: Access Control
VoIP Wireless Router User’s Manual 2-4-4 Access Control Wireless Settings → Access Control Disable: The VoIP Router does not response to any access rules. You are not allowed to make configuration changes on this page. Allow Listed: When Allow Listed is enabled, only those wireless clients whose MAC addresses are in the Access Control List have rights to connect to your Access Point. -
Page 45: Wds Settings
VoIP Wireless Router User’s Manual 2-4-5 WDS Settings The WDS feature can make connection wirelessly between two access points. To add one more access point, the range of the network can be extended. Wireless Settings → WDS Settings Enable WDS: Click the Enable WDS check box to enable wireless bridging and repeating operation. Encryption: Select the encryption type: WEP or WPA. - Page 46 VoIP Wireless Router User’s Manual Wireless Settings → WDS Settings Encryption: Select WEP 128. WEP Key Format: Select the preferred WEP Key Format according to which WEP encryption you choose. When WEP 128bits is enabled, you can select ASCII (13 characters) and Hex (26 characters). WEP Encryption Key: You can manually input key value.
-
Page 47: Site Survey
VoIP Wireless Router User’s Manual MAC: Enter the MAC addresses of one or more Access Point in this filed for WDS connection. Comment: The space is reserved for comment or notation. 2-4-6 Site Survey When wireless client mode is enabled, click the Refresh button to display any Access Point on your wireless network so that a wireless client can obtain SSID, BSSID, Channel, Type, Encryption, and Signal through scanning using this Site Survey tool. - Page 48 VoIP Wireless Router User’s Manual Example for setting Wireless profile via WPS method on Windows 7. Enter [Network and Sharing Center] Click [Set up a new connection or network] Click [Connect to the Internet]...
- Page 49 VoIP Wireless Router User’s Manual Click [Wireless] Select a Wireless AP.
- Page 50 VoIP Wireless Router User’s Manual Click [OK] to start setup. Enter the 8-digit PIN from VoIP Router label then click Next.
- Page 51 VoIP Wireless Router User’s Manual Type network name(SSID) then click Next. Wait for Windows 7 setting up wireless network.
- Page 52 VoIP Wireless Router User’s Manual Configuration finished, you could connect to VoIP Router at present. You could also print security key of save this profile for another computer to add this wireless network manually. Note: VoIP Router supports WPS work with Windows○ Vista and Windows○...
-
Page 53: Advanced Settings
VoIP Wireless Router User’s Manual 2-5 Advanced Settings 2-5-1 Codec setting Advanced Settings→ Codec settings Jitter Buffer: Enter the jitter of receiving packets. Silence Detection / Suppression: Check the box to enable the silence packets and send less voice data (package) during the silent period while talking. -
Page 54: Digit Map
VoIP Wireless Router User’s Manual 2-5-2 Digit Map Digit Map supports multiple dial plans which help users to arrange least cost route. Each Proxy Server has individual dial plan which combines the original feature of Digit Map and Speed Dial. You can use “?” or “%” in the column of Scan Code and VoIP Dial-out. - Page 55 VoIP Wireless Router User’s Manual Advanced Settings → Digit Map Scan Code: Enter the digits for the VoIP Router to scan while user is dialing. VoIP Dial-out: Enter the actual dialing number rule for the VoIP Router to call through the Internet. User Dial Length: Enter the total number of digits that user dialed.
- Page 56 VoIP Wireless Router User’s Manual Methods of Digit Map: Method 1- Single mapping: Fill a short code into the Scan Code column, and enter the desired phone number into the VoIP Dial-out column. For example, Scan Code: 09 VoIP Dial-out: 0911888997 User Dial Length: 2 Route: VoIP VoIP Route Profile: Route # 1...
- Page 57 VoIP Wireless Router User’s Manual For example, Scan Code: 0% VoIP Dial-out: 1805% User Dial Length: Disable Route: VoIP VoIP Route Profile: Route # 3 Pick up the handset and dial 0423456789. The VoIP Router will dial 1805423456789 and go through Internet first and follow Route # 3.
-
Page 58: Dtmf & Pulse
VoIP Wireless Router User’s Manual 2-5-3 DTMF & PULSE Advanced Settings → DTMF & PULSE Dial Wait Timeout: Enter the timeout duration after the user picks up the phone set. Inter Digits Timeout: Enter the timeout duration between the intervals of each key pressed. When exceeding the set timeout duration without entering further digits, the numbers entered will be dialed out. -
Page 59: Cpt / Cadence
VoIP Wireless Router User’s Manual 2-5-4 CPT / Cadence Advanced Settings → CPT / Cadence CPT # 1 Enable Setting 1: The CPT has a set of parameter table. Please adjust the CPT based on the local PSTN or PBX settings and requirements. Advanced Settings →... -
Page 60: Provision Settings
VoIP Wireless Router User’s Manual 2-5-5 Provision Settings Provisioning is a function that automatically updates your VoIP Router’s configuration by using a TFTP, FTP, or HTTP server located on the Internet. If you have access to such service, you will need to know the URL or IP address of the Provisioning Server. - Page 61 VoIP Wireless Router User’s Manual Auto Provision Interval: Enter the time for auto provisioning. Random Offset: Enter the offset of the time for auto provisioning. Provision Retry Times: Enter the retry time if a provisioning attempt fails. Retry Interval: Enter the interval for retrying. Suspend Service: Check the box to stop VoIP call service.
-
Page 62: Caller Filter
VoIP Wireless Router User’s Manual 2-5-6 Caller Filter This function allows you to accept or reject any incoming call from the IP address listed in the filter rule. The call from the IP address of SIP proxy server is always accepted, despite Deny is selected or the IP address of SIP proxy server is not in the filter rule of Allow. -
Page 63: Static Route
VoIP Wireless Router User’s Manual 2-5-7 Static Route Build static routes within an internal network. These routes will not apply to the Internet. Advanced Settings → Static Route Route: Destination network of the route. Route Mask: Subnet mask to apply on destination network. Next Hop IP: The next hop IP address to the specified network. -
Page 64: Qos Settings
VoIP Wireless Router User’s Manual 2-5-8 QoS Settings Advanced Settings → QoS Enable WAN QoS : Check the box to guaranty the voice quality. Voice packets have the highest priority in IP networks, and the data transmission is distributed to less bandwidth. Downstream Bandwidth - Select the downstream bandwidth that is the same as the actual bandwidth subscribed from the drop-down menu. -
Page 65: Ddns
VoIP Wireless Router User’s Manual 2-5-9 DDNS Advanced Settings → DDNS Enable Dynamic DNS: Check the box to enable DDNS function. It is only necessary when the VoIP Router is set up behind an Internet sharing device that uses a dynamic IP address and does not support DDNS. Server address: Accept the default setting or fill a correct DDNS Service FQDN. -
Page 66: Nat Traversal
VoIP Wireless Router User’s Manual 2-5-10 NAT Traversal If your VoIP Router is set up behind an Internet sharing device, you can select either the NAT or STUN protocol. Advanced Settings → NAT Traversal Enable(NAT Public IP): Check the box to use the IP address of the Internet sharing device if the VoIP Router is set up behind an Internet sharing device. -
Page 67: Dos Protection Settings
VoIP Wireless Router User’s Manual 2-5-11 DoS Protection Settings Advanced Settings → DoS Protection Settings Enable DoS Prevention: Check the box to prevent DoS attacks from WAN. There are various types of DoS attacking. Leave settings in this field to the default if you are not familiar with it. 2-5-12 DMZ / ALG Advanced Settings →... -
Page 68: Ip Filtering
VoIP Wireless Router User’s Manual 2-5-13 IP Filtering Advanced Settings → IP Filtering Use IP Filters to deny particular LAN IP addresses from accessing the Internet. You can deny specific port numbers or all ports for a specific IP address. The screen will display well-known ports that are defined. To use them, click on the edit icon. -
Page 69: Port Filtering
VoIP Wireless Router User’s Manual 2-5-14 Port Filtering Port filtering enables you to control all data that can be transmitted over routers. When the port used at the source end is within the defined scope, it will be filtered without transmission. Note: When the port used at the source end is within the limited scope, it will be filtered without transmission. -
Page 70: Virtual Server
VoIP Wireless Router User’s Manual 2-5-16 Virtual Server Enable users on Internet to access the WWW, FTP and other services from your NAT. It is also known as port forwarding. When remote users are accessing Web or FTP servers through WAN IP address, it will be routed to the server with LAN IP address Advanced Settings →... -
Page 71: Tools
VoIP Wireless Router User’s Manual 2-6 Tools 2-6-1 Ping Test Use “Ping” to verify if a remote peer is reachable. Enter a remote IP address and click “Test” to ping the remote host. The result would be shown on Result Table Tools →... -
Page 72: Stun Inquiry
VoIP Wireless Router User’s Manual 2-6-2 STUN Inquiry Use “STUN Inquiry” to detect your IP sharing device’s NAT type and communication between a STUN server and client. Tools → STUN Inquiry NAT Type: It shows the NAT type of your router. STUN Server IP/Domain: Enter the IP address or URL of the STUN server for query. -
Page 73: System Settings
VoIP Wireless Router User’s Manual 2-7 System Settings 2-7-1 NTP System settings → NTP Automatically synchronize with Internet time servers: The VoIP Router should automatically sync up with time servers. First NTP time server: Select the desired domain name of a NTP server as first priority. Second NTP time server: Select the domain name of a NTP server as second priority. -
Page 74: Login Account
VoIP Wireless Router User’s Manual 2-7-3 Login Account System settings → Login Account Note: There are two operating levels when entering the Web UI. Logging-in as the ADMIN allows you to change all settings. A Web UI USER only has access to some settings. Password: It is highly recommended that you create a password to keep your VoIP Router secure. -
Page 75: Backup / Restore
VoIP Wireless Router User’s Manual 2-7-4 Backup / Restore Backup Configurations File System settings → Backup and Restore The current system settings can be saved as a file onto the local hard drive. Click the Backup Settings button to save your current settings to a file. Configuration File: It is to backup the all settings. -
Page 76: System Log
VoIP Wireless Router User’s Manual 2-7-5 System Log System settings → System log Enable: Check the box to send event notification messages across IP networks to the Server. Server Address: Enter the System Log Server’s IP address. Port: Enter the System Log Server’s listening port. Leave this field to the default if your VoIP Service Provider did not provide you a server port number for System Log Server. -
Page 77: Software Upgrade
VoIP Wireless Router User’s Manual 2-7-7 Software Upgrade The VoIP Router supports a software upgrade function from a remote server. Please consult your VoIP Service Provider for information about the following details. System settings → Software upgrade Upgrade Server: Select the upgrade type: TFTP, FTP, or HTTP. Software Upgrade Server IP: Enter the server’s IP address. -
Page 78: Configuring The Voip Router Through Ivr
VoIP Wireless Router User’s Manual 3. Configuring the VoIP Router through IVR Preparation Connect the power supply, telephone set, telephone cable, and network cable properly. If a static IP is provided, confirm the correct IP settings of the WAN Port (IP address, Subnet Mask, and Default gateway). - Page 79 VoIP Wireless Router User’s Manual Save Settings When all setting procedures are completed, dial 509 (Save Settings) from phone keypad. Wait for about three seconds, you should hear a voice prompt “1 (one).” You can now hang up the phone and please reboot the VoIP Router to enable the new settings.
-
Page 80: Ip Configuration Settings
VoIP Wireless Router User’s Manual 3-2 IP Configuration Settings Static IP Settings Note: Complete static IP settings should include a static IP (option 1 under 114), IP address (111), Subnet Mask (112), and Default Gateway (113). Please contact your Internet Service Provider (ISP) if you have any question. - Page 81 VoIP Wireless Router User’s Manual 3-2-1 Character Conversion Table: The table below provides a list of conversion codes. The first row (high-lighted) of each pair of the column lists the numbers, alphabets or symbols and the second row (high-lighted) of each pair of the column (“Input Key”) represents the codes to be entered for the corresponding numbers, alphabets or symbols.
-
Page 82: Dialing Principles
VoIP Wireless Router User’s Manual 4. Dialing Principles The VoIP Router provides the registration for multiple VoIP Service Providers, and each VSP has a private digit map. Hence, the routing and number translation may vary. We use two part, Routing and Number Translation, to explain the dialing principle of the VoIP Router. - Page 83 VoIP Wireless Router User’s Manual Routing To achieve maximum flexibility, the number dialed will be looked up in several tables defined by the VoIP Router. If no match is found from Digit Map Table, it will then look up the number from another table and to the registered VSP.
- Page 84 VoIP Wireless Router User’s Manual Start Enter a phone number (D#) Is (D#) Dial the number defined in Speed defined in Dial table? Speed Dial table Is (D#) defined in Extension table? Is (D#) defined in Phone Book table? Is (D#) defined in Phone Book Manager? Is (D#)
- Page 85 VoIP Wireless Router User’s Manual Regulatory Statement Federal Communications Commission Statement This device complies with Par 15 of the FCC Rules. Operation is subject to the following two conditions: (1) This device may not cause harmful interference, and (2) this device must accept any interference received, including interference that may cause undesired operation.
Need help?
Do you have a question about the ODC Series and is the answer not in the manual?
Questions and answers