
Related Manuals for Parkmate RVK-43SW


Summary of Contents for Parkmate RVK-43SW
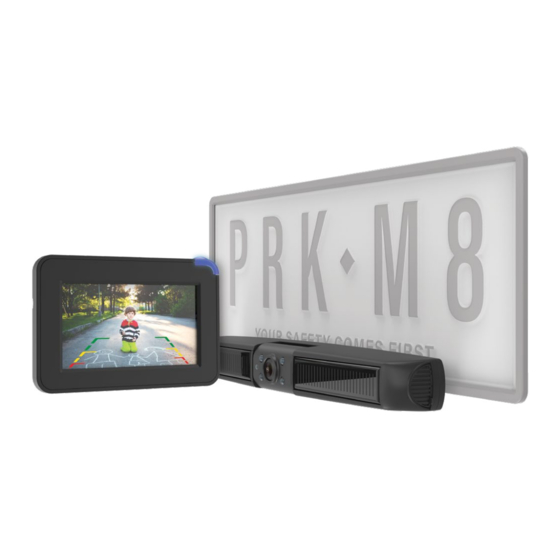
- Page 1 RVK-43SW 4.3" Solar Powered Reverse Camera Kit with wireless transmission USER MANUAL ™ YOUR SAFETY COMES FIRST...
-
Page 3: Table Of Contents
CONTENTS INTRODUCTION ..............................4 Packaging Contents ............................. 5 Product Overview ............................6 GETTING STARTED .............................. 7 Charging the Rear Camera Built-In Battery ....................7 Testing the System ............................8 INSTALLATION ..............................9 Mounting the Monitor ..........................10 OPERATION .................................11 Monitor Operation ............................12 Menu Items .............................. - Page 4 Mirror / Rotate Camera Image: ........................15 Pairing, Time Out & Split Screen Display ....................16 4.5.1 Pairing Selection ........................... 16 4.5.2 Time Out Selection: ........................17 4.5.3 Splitscreen Selection: ........................17 Turning Guidelines ON/OFF: ........................18 CARE AND MAINTENANCE ..........................20 SPECIFICATIONS ..............................
-
Page 6: Introduction
DISCLAIMER Parkmate's RVK-43SW Reverse Camera Kit is designed as a driver assistance device. Although this is a visual aid and will allow you to view what is behind the vehicle, it does not remove the responsibility of driving the vehicle from the driver. -
Page 7: Packaging Contents
PACKAGING CONTENTS 4.3” Rear Licence Monitor Camera Plate Mount USB Charging Suction Mount 12/24V Adaptor Cable for Monitor Cable Needle User Accessory Guide... -
Page 8: Product Overview
PRODUCT OVERVIEW Horizontal Monitor Slide Wake Up Button Angle Dial Menu Button Vertical Up Button Angle Dial Power /OK Button Down Button Locking Lever 4.3" Screen IR LEDs Charging Port Charging Cable Solar Panel Light Sensor Rear Camera Needle Accessory Mounting Plate DC 12/24V Charger... -
Page 9: Getting Started
GETTING STARTED CHARGING THE REAR CAMERA BUILT-IN BATTERY The included rear camera and solar panel will need to be charged before being installed onto your vehicle. Connect the included USB cable to the Micro USB port of the solar battery unit. Plug the USB cable into any standard USB charger with an output rating of 1A or higher. -
Page 10: Testing The System
ATTENTION: 1. If the vehicle is parked for more than 2 months, turn off the solar battery unit switch to disable the camera and prevent the battery from discharging. (Refer to image on next page). 2. If you use a power bank or a jump starter to charge the device, make sure that its battery capacity is no less than 4000mAH. -
Page 11: Installation
• Please ensure the rear camera is fully charged before first time use. Please refer to section "Charging the Rear Camera Built-In Battery" on page 7. INSTALLATION Remove the licence plate from your vehicle. Please do not throw away the original screws as they are required to mount the bracket for this wireless backup camera. -
Page 12: Mounting The Monitor
MOUNTING THE MONITOR When choosing a location to mount the monitor, make sure the monitor is in an area that will not obstruct your vision while driving. Before mounting the monitor, clean the mounting surface well. Position the suction mount to a smooth surface that suits your requirement. Press the suction cap against the smooth surface and press the lock down to attach and fix the mount to the surface. -
Page 13: Operation
NOTE: • Before mounting the monitor, test the reception of the camera signal in several selected locations within easy reach as one may have better reception than another. Finally, choose the best location with the best signal reception. Clean and dry the mounting surface before fixing the suction cup bracket. Press the suction cup bracket against the mounting surface and push the suction cup lock lever down to lock the suction cup. -
Page 14: Monitor Operation
• Please ensure the rear camera is fully charged before first time use. Please refer to section "Charging the Rear Camera Built-In Battery" on page 7. • Make sure the slide switch on the back of the camera unit is switched to the ON position. •... -
Page 15: Menu Items
MENU ITEMS Press the MENU Button to enter the menu Interface. Use the UP/DOWN Button to select the desired menu. Press the POWER/OK Button to enter the selected menu option. A. Hand Icon: Indicates which Menu item is currently selected. B. -
Page 16: Brightness, Contrast & Colour Display
BRIGHTNESS, CONTRAST & COLOUR DISPLAY Please enter the Main Menu and then enter Menu settings by pressing the MENU Button Please select desired Brightness, Contrast or Colour display. COLOUR 4.3.1 BRIGHTNESS SELECTION: Press the POWER/OK Button to enter Brightness control. Press UP/DOWN Button to increase or decrease the Brightness. -
Page 17: Colour Selection
4.3.3 COLOUR SELECTION: Press POWER/OK Button to enter Colour settings. Press UP/DOWN Button to increase or decrease colour. Press the MENU Button to enter the previous menu or press the MENU Button 3 times to return to the Main Menu. MIRROR / ROTATE CAMERA IMAGE: Please enter Main Menu and select Icon. -
Page 18: Pairing, Time Out & Split Screen Display
Pairing will start and the monitor will indicate that it is pairing, the monitor will turned OFF after Pairing is complete. Press the MENU Button to enter the previous menu or press the MENU Button 3 times to the return to Main Menu. NOTE: • The Provided RVK-43SW Camera is paired with the monitor by Default. -
Page 19: Time Out Selection
4.5.2 TIME OUT SELECTION: Press the UP/DOWN Button to Select Time Out and then press POWER/OK Button to enter the Time Out Settings. Time Out is the duration of when the Monitor Screen stays powered on. Select Options are 30 Sec / 45 Sec and 60 Sec. Press the UP/DOWN Key to select Screen On time and then press the POWER/OK Button to select. -
Page 20: Turning Guidelines On/Off
TURNING GUIDELINES ON/OFF: Guidelines gives you a visual aid to see the distance of objects behind your car. To turn ON/OFF Guidelines, long press the Wake Up Button for 5 seconds. NOTE: • Guidelines is ON by default. • To power OFF - Long Press POWER/OK Button to power OFF the monitor. The Monitor will not turn ON when ignition is turned ON but will turn On if the Wake up button is pressed. - Page 21 TROUBLESHOOTING ISSUES POSSIBLE CAUSES SOLUTIONS / REPAIR The monitor does not The signal If the indicator light flickers twice within a few seconds after display images within connection between pressing the Wake Up Button but there are still no images a few seconds after the monitor to displayed even when you press any button on the monitor,...
-
Page 22: Care And Maintenance
CARE AND MAINTENANCE Please do not use solvents or chemicals to clean or wipe the camera. If necessary, use a soft cloth dipped in neutral detergent to clean the dirt or stains. DISPOSAL The system is designed to provide years of service and should be recycled or safely disposed of at a local recycling center. -
Page 23: Specifications
SPECIFICATIONS CAMERA Operational Current (when transmitting) <420mA Pixels Field of View 480 x 272 110° Image Sensor 1/3” CMOS VGA Minimal Illumination 0.1Lux Image Quality Water Resistance Max 25 fps IP 65 RF Transmission Distance Up to 60M (unobstructed) Operation Temperature -20°to 65°C Storage Temperature -20°to 65°C... -
Page 24: Warranty Terms & Conditions
Directed Electronics Address: 115-119 Link Road Melbourne Airport, 3045 Victoria. Australia Ph: +61 03 8331 4800 Email: service@parkmate.com.au To view the complete Parkmate range or for details on how to contact us, please visit our website at www.parkmate.com.au | www.parkmatehd.co.nz... - Page 25 LIMITED TO, CLAIMS ALLEGING NEGLIGENCE, INVASION OF PRIVACY, COPYRIGHT INFRINGEMENT AND/OR TRADEMARK INFRINGEMENT AGAINST PARKMATE AND ITS SUBSIDIARIES AND AFFILIATES OR THE PARKMATE SERVICES, RELATING TO OR ARISING OUT OF YOUR BREACH OF ANY PROVISION OF THESE TERMS, YOUR MISUSE OF THE PARKMATE OR PARKMATE SERVICES, OR YOUR UNAUTHORIZED MODIFICATION OR ALTERATION OF PRODUCTS OR SOFTWARE.
- Page 26 MIRROR DASH CAMERAS, FRONT, REAR AND REVERSING CAMERAS AND MIRROR MONITOR DEVICES, COMPUTER SOFTWARE, OR OTHER HARDWARE. YOU AGREE THAT PARKMATE IS NOT AN INSURER AND THAT PARKMATE IS NOT PROVIDING YOU WITH INSURANCE OF ANY TYPE. ANY AMOUNTS THAT YOU PAY PARKMATE FOR THE PARKMATE SERVICE ARE NOT INSURANCE PREMIUMS AND ARE NOT RELATED TO THE VALUE OF YOUR VEHICLE OR PROPERTY, ANYONE ELSE’S PROPERTY LOCATED IN YOUR VEHICLE OR PREMISES, OR ANY RISK...
- Page 27 A PARTICULAR PURPOSE, OR NONINFRINGEMENT OF THIRD PARTY RIGHTS. BECAUSE SOME JURISDICTIONS DO NOT PERMIT THE EXCLUSION OF IMPLIED WARRANTIES, THE LAST SENTENCE OF THIS SECTION MAY NOT APPLY TO YOU. PARKMATE HEREBY FURTHER EXPRESSLY DISCLAIMS ALL LIABILITY FOR ANY CLAIMS FOR SERVICE FAILURES THAT ARE DUE TO NORMAL PRODUCT WEAR, PRODUCT MISUSE, ABUSE, PRODUCT MODIFICATION, IMPROPER PRODUCT SELECTION OR YOUR NON-COMPLIANCE WITH ANY AND ALL APPLICABLE FEDERAL, STATE OR LOCAL LAWS.
- Page 28 LIMITATIONS OF PARKMATE LIABILITY UNDER NO CIRCUMSTANCES WILL PARKMATE BE LIABLE IN ANY WAY FOR ANY CONTENT, INCLUDING, BUT NOT LIMITED TO, THE LOSS OF CONTENT, ANY ERRORS OR OMISSIONS IN ANY CONTENT, OR ANY LOSS OR DAMAGE OF ANY KIND INCURRED IN CONNECTION WITH USE OF OR EXPOSURE TO ANY CONTENT POSTED, EMAILED, ACCESSED, TRANSMITTED, OR OTHERWISE MADE AVAILABLE VIA THE PARKMATE APP.
-
Page 30: Notes
NOTES... - Page 32 V1.0 All Images, Information and Content are Copyright © 2020 www.directed.com.au Directed Electronics Australia Pty Ltd. All Rights Reserved. www.directed.co.nz www.parkmate.com.au | www.parkmatehd.co.nz...