
Summary of Contents for ABLEGRID JH-A620
- Page 1 HEARING AMPLIFIER Instruction Manual Model: JH-A620 Please read this user manual thoroughly and completely before using the product.
-
Page 2: Table Of Contents
CONTENTS I.IMPORTANT SAFETY INSTRUCTIONS 1.CONTRAINDICATION 2.WARNINGS 3.NOTICE II.DO NOT USE IF ANY OF THE FOLLOWING APPLY TO YOU III.MATTERS NEEDING ATTENTION, WARNINGS AND TIPS IV.HOW TO USE YOUR DEVICE 1.QUICK GUIDE 2.HOW TO APPLY DOMES 3.LEFT & RIGHT HEARING AMPLIFIER MARKINGS 4.WEARING/REMOVE HEARING AMPLIFIER 5.TURN ON/TURN OFF 6.VOLUME ADJUSTMENT... - Page 3 7.HEARING AMPLIFIER CHARGING 8.HOW TO USE THE CHARGING CASE 9.CLEANING V.MAINTENANCE AND CLEAN VII.HEARING AMPLIFIER CARE VII.TROUBLESHOOTING GUIDE VIII.TIPS FOR BETTER COMMUNICATIO IX.TECHNICAL SPECIFICATION X. ACCESSORIES LIST XI.NORMALIZED SYMBOLS XII.MAINTENANCE, STORAGE, AND DISPOSAL XIII.WARRANTY...
-
Page 4: Warnings
I.IMPORTANT SAFETY INSTRUCTIONS Read all the information in this instruction manual and any other literature included in the box before using the device. 1. CONTRAINDICATION The device should not be used in the following situations: - Patients with chronic suppurative otitis media (CSOM),congenital ear atresia, or any type of ear discharge - Anyone under 6 years old 2. - Page 5 - Routine maintenance to keep the device clean is required. Ensure that ear domes are free of debris and moisture at all times. - Avoid shocks or dropping the product. - Do not store or use the product in environments of high humidity or temperature (such as sauna room), to avoid damage.
- Page 6 can result and will void the warranty. - Do not store your devices in a hot/humid locations. You should never leave your hearing amplifiers near heating appliances or in direct sunlight. - Do not leave your hearing amplifiers in the car as inside tempera- tures can reach dangerous levels which could damage the devices.
-
Page 7: Ii.do Not Use If Any Of The Following Apply To You
II. DO NOT USE IF ANY OF THE FOLLOWING APPLY TO YOU: 1) Congenital atresia of external ear or deformity of any part of the ear canal 2) Deafness is unstable, and the degree of hearing loss often fluctuates 3) Persistent headaches, dizziness, earaches, tinnitus or other symptoms that are not suitable for adaptation 4) Sudden onset of hearing loss within the past 3 months;... -
Page 8: Iii.matters Needing Attention, Warnings And Tips
III. Matters needing attention, warnings and tips 1. Do not immerse the hearing amplifier in any liquid. Remove the hearing amplifier before swimming or bathing. After swimming or washing, wait for the ear canal to dry before wearing the hearing amplifier. -
Page 9: Iv.how To Use Your Device
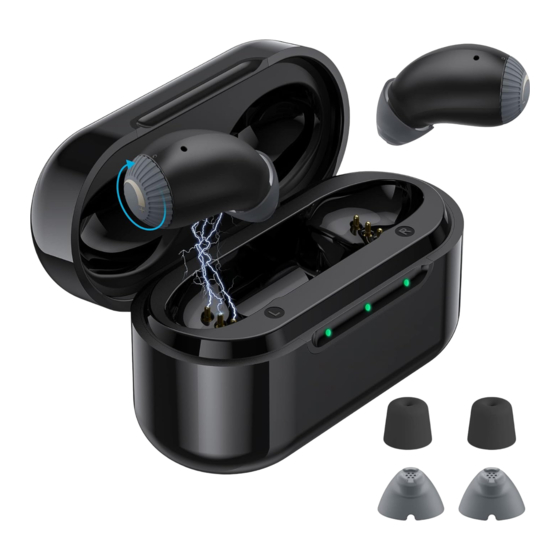
IV.HOW TO USE YOUR DEVICE 1. Volume Control 2. Microphone 3. Ear Dome 4. In Ear Detection Sensor 5. Charging Contacts 1.【QUICK GUIDE】 1.Charging your hearing amplifiers. * Before using your hearing amplifier for the first time, it is recom- mended to charging when it light in green and the light turn off in dicates charging is complete. - Page 10 After placing your hearing amplifier in the charger, the indicator will show the charging state of the battery until the hearing amplifier is fully charged. When fully charged the indicator will be constantly on, i.e. solid green light. 2.Turn ON/OFF Turn ON: Take the hearing amplifier out of the charging case, it will enter the standby status.
-
Page 11: How To Apply Domes
2.【HOW TO APPLY DOMES】 Please follow these steps to mount domes, because Incorrect dome replacement could result in the dome being left in the ear when you remove the hearing amplifier. Step 1: Choose a suitable size ear dome. Step 2: Push the ear dome rim membrane outward. Step 3: Hold on to the end of the hearing amplifier and push firmly to ensure that the dome is fastened securely. -
Page 12: Left & Right Hearing Amplifier Markings
Notes: After the ear dome is installed, pull the ear dome gently to see if it is firmly installed and ensure the ear dome does not fall off easily. 3.【LEFT & RIGHT HEARING AMPLIFIER MARKINGS】 There is a L or R marking on the hearing amplifier. This will tell you if it is a left or a right hearing amplifier. - Page 13 4.1 Wearing hearing amplifier Step 1: Hold the hearing amplifier body (hard part), place in the ear (Make sure it is in right direction like picture). Step 2: Move the body slightly into auricle for holding. 4.2 Removing the hearing amplifier Step 1: Grasp the protruding hearing amplifier and remove it.
-
Page 14: Turn On/Turn Off
2. Before the hearing amplifier is appropriately secured, it may give out the creak sound, which is a normal phenomenon. The creak sound can be used as a reference to determine whether the hearing amplifier is secured. If the hearing amplifier gives out squeaking, please check if it is taken on correctly;... -
Page 15: Volume Adjustment
Turn Off: The hearing amplifier will automatically enter the standby status when you have remove it from your ear. Put the hearing amplifier back into the correct slot of the charging case , they will automatically turn off and start charging. Note: The hearing amplifier built in with ‘delay turn on’... - Page 16 Micro USB Cable 1. Lip 2. Hearing amplifier charging inserts with left/right indicators 3. Left-side hearing amplifier charging indicator 4. Charging case charging indicator 5. Right-side hearing amplifier charging indicator 6. Battery check button 7. Micro USB connection to external power supply -15-...
-
Page 17: Hearing Amplifier Charging
7.【HEARING AMPLIFIER CHARGING】 Put the hearing amplifier back into the correct slot of the charging case, they will automatically turn off and start charging. Orange light will indicate hearing amplifiers are charging. After fully charged, they will light in green and the light turn off in dicates charging is complete. - Page 18 8.2 The indicator light will show the charging status of the battery until the hearing amplifier is fully charged. When the case is charging, the indicator shows a orange solid light, and fully charged the indicator light will shows a solid green light will be constant and the light turning off indicates charging is complete.
- Page 19 8.4 The charging process will automatically stop when the case and hearing amplifiers are fully charged, so the hearing amplifiers can be safely left in the charger. Place it on a flat even surface away from exposure to moisture, dust, or extreme temperatures. *The fully charged case offers 3 full charging cycles for a pair of hearing amplifiers.
- Page 20 8.5 Charging case Turn ON/OFF Press and hold the lower part of button for 5 seconds until the solid orange light indicates the charging case is off. Indicator will flash in Charging case is turn on green once a second, flashing by 1 second alternately and lasting by 3 times...
-
Page 21: Cleaning
4.When the hearing amplifier and case is not functioning properly, please check the “troubleshooting guide”. If none of the solutions work, please contact our after-sales service team. 9.【CLEANING】 9.1. Cleaning the ear domes Remove any earwax buildup using the enclosed tool. Wipe clean with a tissue or soft cloth. -
Page 22: V.maintenance And Clean
All data in this manual, such as service time, charging time, continuous working time, and charging times are derived from our internal laboratory testing and meant for reference purposes only. Your exact usage and times may differ depending on various conditions and use patterns. -
Page 23: Vii.hearing Amplifier Care
Take care not to poke the microphone holes with any sharp objects to avoid damage. Do not disassemble or attempt any repairs by yourself. Doing so will void your warranty. 3. Cleaning 1) Cleaning the ear tips Remove any earwax buildup using the enclosed tool. - Page 24 Charging Case Care - Keep your charger clean. Heat, moisture and foreign materials can result in poor performance. - Using the provided cleaning brush keep the charging ports clear of debris. - Do not use water, solvents or cleaning fluids to clean the charging ports.
-
Page 25: Vii.troubleshooting Guide
VII.TROUBLESHOOTING GUIDE SYMPTOM POSSIBLE CAUSES SOLUTIONS Incorrect wearing, the in Remove the hearing amplifier, ear detection sensor failure wear it correctly Volume too low Increase volume if volume control available Device is not charged Place charging the hearing amplifier until the indicator is No Sound lighted in green color. - Page 26 Inconsistent Place aids in charger until charging Restart required performance begins and remove-this will power cycle your hearing amplifiers Distorted sound Incorrect orientation Ensure the USB cable is connected to the Charging Case plugged into power. The Case power status lights will flash orange to indicate Hearing Amplifiers charging.
- Page 27 Low battery Connect the hearing amplifier to the charging case for charging The voice is very Volume is set too low Increase volume if volume control weak and unclear available Ear Domes are too loose Hearing Amplifier not inserted correctly into ear , wear it correctly Hearing Amplifier plays Indication for low battery Charge hearing amplifier...
-
Page 28: Viii.tips For Better Communicatio
Low battery Connect USB cable to charge Hearing Amplifier indicator lights Dirty charging contacts Clean the contacts of the hearing are dark or dim aid and the charger Hearing Amplifier not Insert hearing amplifier correctly Charging does inserted correctly into into charger not start charger... - Page 29 - Try out different locations to find the optimal places to listen - Minimize distractions - Background noises may be frustrating at first; remember, you have not heard them for a while - Let others know what you need; keep in mind that people cannot “see”...
-
Page 30: Ix.technical Specification
IX.TECHNICAL SPECIFICATION Model JH-A620 Output. OSPL Max. ≤120dB+3dB AVG gain 27dB+5dB EQ Input Noise ≤29dB+3dB 450Hz~4000Hz Frequency Range (Not narrower than ) Working Current Total Harmonic Distortion ≤7%+3% Working voltage d.c.3.7V Item Charging Case Charging case Input voltage d.c.5.0V Charging case input current... -
Page 31: Xi.normalized Symbols
XI. NORMALIZED SYMBOLS Follow operating instructions B type applied part Disposal in accordance with Directive 2002/96/EC (WEEE) CE Labeling This product satisfies the requirements of the applicable European andnational directives Manufacturer information: The manufacturer is: Huizhou Jinghao Medical Technology Co.,Ltd. Date of manufacture Serial number Warning/ Danger: Improper use might cause serious injuries. -
Page 32: Xii.maintenance, Storage, And Disposal
XII.MAINTENANCE, STORAGE, AND DISPOSAL Maintenance 1) We do not authorize any institution or individual to maintain and/or repair the product. If you suspect that the products may be in question, please contact us immediately. 2) The user must not attempt any repairs to the device or any of its accessories. -
Page 33: Xiii.warranty
XIII.WARRANTY This limited warranty covers defects in material and workmanship for a period of two (2) years from the date of purchase, which includes the hearing devices, charger case, and cord within the warranty period. Any damage caused by improper handling and care, exposure to elements or chemicals, or unauthorized service will not be covered by the warranty. - Page 34 VER: A620-20210609-V01...