
Subscribe to Our Youtube Channel
Related Manuals for Santa Barbara Instrument Group ST-237

Summary of Contents for Santa Barbara Instrument Group ST-237
- Page 1 PRICE $10.00 Operating Manual for the ST-237 Advanced CCD Camera Santa Barbara Instrument Group...
- Page 2 Santa Barbara Instrument Group 1482 East Valley Road - Suite 33 PO Box 50437 Santa Barbara, CA 93150 PHN (805) 969-1851 FAX (310) 969-4069 Note: This equipment has been tested and found to comply with the limits for a Class B digital device pursuant to Part 15 of the FCC Rules.
-
Page 3: Table Of Contents
Table of Contents INTRODUCTION TO CCD CAMERAS....................3 1.1..........................3 1.2..................4 PPLIED TO STRONOMICAL MAGING 1.2.1. Cooling ............................. 4 1.2.2. Dark Frames ............................. 5 1.3. CCD P ..........5 ARIOUS ARAMETERS AND OW THEY FFECT MAGING 1.3.1. Pixel Size ............................ - Page 4 3.4.4 General Purpose ..........................30 3.5......................30 MAGE NALYSIS OUTINES 3.5.1 Histogram ............................31 3.5.2 Cross Hairs ............................. 31 3.6..........................31 ETUP UNCTIONS 3.6.1 Camera Setup..........................31 3.6.2 Graphics Setup..........................32 3.6.3 Communications Setup ........................32 3.7..................32 ENERAL URPOSE AMERA...
- Page 5 D.3..........................65 URTHER EADING...
- Page 6 Introduction Congratulations and thank you for buying the SBIG ST-237 Advanced CCD Camera. This camera offers incredible performance in a small package for a moderate cost. Using the camera will expand your astronomical experience by allowing you to easily take images like the ones you've seen in books and magazines, but never seen when peeking through the eyepiece.
- Page 7 Introduction images?", etc. While it doesn't discuss every nuance of each command (that's reserved for Section 4) it will give you a good feel for the flow of the software. • Section 4 presents some more detailed information about how you use the camera for some slightly more advanced tasks.
-
Page 8: Introduction To Ccd Cameras
Film has the advantages of a much larger format, one-step color, and independence of the wall plug (the ST-237 camera can be battery operated in conjunction with a laptop computer, though). After some use, you will... -
Page 9: Ccds Applied To Astronomical Imaging
Section 1 - Introduction to CCD Cameras pixels. This register collects a line at a time and then transports the charge packets in a serial manner to an on-chip amplifier. The final operating step, charge detection, is when individual charge packets are converted to an output voltage. -
Page 10: Dark Frames
CCD from room temperature (25°C) down to 0°C results in an eight-fold reduction in dark current. The ST-237 uses a thermoelectric (TE) cooler to cool the CCD. The TE cooler is a solid- state device that acts like a heat pump. By running electrical current through the TE cooler, heat is pumped out of the CCD through the TE cooler. -
Page 11: Full Well Capacity
Section 1 - Introduction to CCD Cameras While having small pixels may seem advantageous in terms of offering "higher resolution", large pixels gather more light and are thus "more sensitive". You can also adjust your telescope configuration to accommodate various size pixels, using faster telescopes to increase the speed of small pixel CCDs or longer focal lengths to increase the resolution of larger pixel CCDs. -
Page 12: Frame Transfer
Section 1 - Introduction to CCD Cameras of the target and the exposure time, not the CCD's read noise. For example, the read noise in your CCD camera is 15 electrons RMS, and when your signal has built up to 225 electrons (15 electrons RMS squared) the read noise is no longer the dominant noise in the final image. -
Page 13: A/D Bits And Digitization Rate
Section 1 - Introduction to CCD Cameras drain off 99% of the excess charge, allowing a pixel to overexpose to 100-fold before blooming occurs. There is a price to pay however with Antiblooming protection and that's why manufacturers produce both protected and unprotected CCDs. First off, the process of Antiblooming protection causes a nonlinearity in the response of a CCD. -
Page 14: Binning
Section 1 - Introduction to CCD Cameras 1.3.8. Binning Binning is a process where multiple pixels in the CCD are combined to form a single larger pixel. This reduces the CCD's resolution but increases the sensitivity. Different CCDs from various manufacturers support different types of binning. Some CCDs support on-chip binning, where all the pixels in the group are combined in the CCD itself. -
Page 15: Camera Hardware Architecture
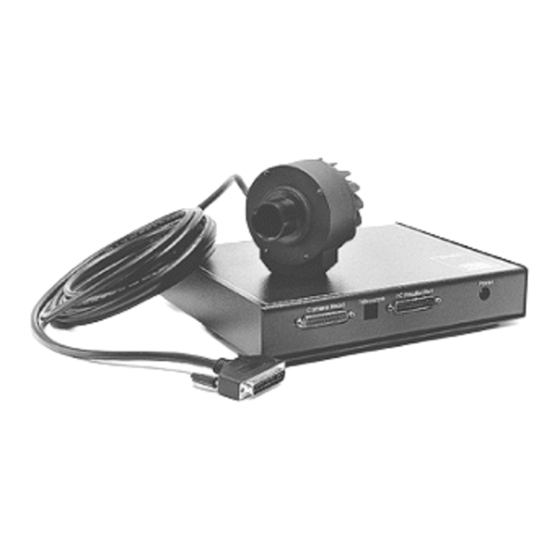
Host Computer Figure 1.3 - CCD System Block Diagram The ST-237 camera is a two piece system consisting of an Optical Head and a CPU. The Optical Head houses the CCD and Preamplifier and the CPU contains the Readout and Control... - Page 16 It is unequaled in the industry. Also, third party software packages such as Software Bisque's SkyPro for Windows will support the ST-237 Advanced CCD Camera and open up a whole realm of capabilities including integrated Telescope and Camera control.
-
Page 18: The First Day With The Camera
Section 2 - The First Day with the Camera The First Day with the Camera This section takes you step-by-step through your first use of the software and camera. 2.1. Setting up the System This section tells you how to install the CCDOPS software and establish a communications link with the camera. - Page 19 Section 2 - The First Day with the Camera amera isplay tility rack Alt-O Menu Bar Alt-s Display Menu Display mode: Analysis Photo Auto contrast: Yes Background: 100 [ Enter ] Dialog Status Welcome to the CCDOPS Software Status Box Data Buffer Name:M27.237 Camera...
- Page 20 Section 2 - The First Day with the Camera standard defaults. You are now viewing a library of images created with the TC-237 chip in your camera. These will run until you hit Esc. You can adjust your monitor's brightness or contrast for best view. If you find an image you wish to freeze, hit the Space bar.
-
Page 21: Connecting The Camera To The Computer
Section 2 - The First Day with the Camera executing the Save command. No problem, just hit Esc or be sure to rename the modified Jupiter file before saving it so as not to modify the original file. Display the sharpened Jupiter image again using the Display Image command and hit Esc. -
Page 22: Establishing A Communications Link With The Camera
Section 2 - The First Day with the Camera Important Note: Never connect or disconnect the CCD head from the CPU box unless the power switch on the rear side of the CPU box is turned OFF. Damage to the CCD head, or the CPU could occur. - Page 23 Section 2 - The First Day with the Camera Next, cover the nosepiece of the camera and use the Grab command again, only this time select Dark frame:Also and hit Enter. This image has a much lower background and range, and represents a dark subtracted image. Still, pixel intensity variations fall between 50 and 250.
-
Page 24: The First Night With The Camera
Section 2 - The First Day with the Camera saved image as long as it is viewed by any CCDOPS software such as a friend's or a magazine's. Repeat the above procedures to capture, display and save images until you are confident enough to take the next step of coupling your CCD camera to a telescope at night. -
Page 25: Focusing The Camera
Section 2 - The First Day with the Camera telescope chip DEC (Y) cord RA (X) Figure 2.3 - Camera Orientation If you haven't done so already, power up the CCD camera and computer. Under the Misc menu use the Telescope Setup command to enter your telescope information. For the Aperture item enter the clear aperture in square inches (for example an 8"... -
Page 26: Finding And Centering The Object
Section 2 - The First Day with the Camera Now, reposition the telescope on a dimmer star, 5th or 6th Magnitude should work well. We want to do the critical focus on a star that won't saturate the camera. Reenter the Focus command using a 3 second exposure and the Planet frame mode. - Page 27 Section 2 - The First Day with the Camera trying your acquisition and focusing technique. Refer to section 3.2.2 for the "dated directory" saving short cut. If you now have questions, read on through section 3. When you are through for the night don't forget to use the Shutdown command in the Camera Menu before you power down the CPU.
-
Page 28: Software Flow
Section 3 - Software Flow Software Flow This section describes the CCDOPS software from a work flow standpoint. Rather than discuss each command in every detail which is done in the separate Software Manual, this section lets you see the forest through the trees, describing at a high level what each command does and why you would use it. -
Page 29: Track And Accumulate
Section 3 - Software Flow You can also program the Focus command for the Dim mode where the camera is switched into low resolution mode. With the use of binning, the image resolution is reduced and pixel size increased to 22.2 x 22.2 microns. This is handy for finding faint objects, as larger pixels gather more light, or for generally improving the image throughput (if binning is selected from setup mode, don't forget to change resolution prior to imaging at Hi-Res). -
Page 30: Color Grab
Section 3 - Software Flow With the Auto Grab feature you must pick a file name for the series of images and the software automatically adds an index to the name for you as the images are being logged. In addition to the file name, you also specify whether to save the images in the SBIG, TIFF or FITS formats discussed below. -
Page 31: File Path And Filter
Section 3 - Software Flow images the CCDOPS software will attach a .001, .002, etc. to mark the image sequence. Finally, for Color Grab images the CCDOPS software will attach the .R, .G and .B extensions etc. 3.2.2 File Path and Filter For convenience MS-DOS allows you to divide your hard disk into different sub-directories. -
Page 32: Loading Images
Section 3 - Software Flow display the image to get a suitable display and then save the 8 bit data. In that way you have told CCDOPS how to reduce the 16 bit data to 8 bits. 3.2.4 Loading Images You use the Open command to load SBIG compressed and uncompressed images from the disk into CCDOPS. -
Page 33: Slide Shows
Section 3 - Software Flow 3.3.3 Slide Shows The CCDOPS software allows you to create Slide Shows of images you have acquired. A slide show is just what it sound like: a series of images is displayed in photo mode at a periodic interval. -
Page 34: Depixelize And Reduce
Section 3 - Software Flow images. Note that the image processing commands that are part of the Analysis display mode (Horizontal and Vertical Flip and Crop/Zoom) have already been discussed as part of the Display Commands. 3.4.1 Depixelize and Reduce The Depixelize Image command enlarges the image 2 times and fills in the missing pixels using pixel interpolation. -
Page 35: Image Corrections
Section 3 - Software Flow 3.4.3 Image Corrections The commands in this section are generally used to correct the images for one type of artifact or another, whether they be from the camera or the telescope. Dark Subtract The Dark Subtract command is used when you are manually taking and storing light frames and dark frames as opposed to auto Dark-Subtracted images. -
Page 36: Histogram
Section 3 - Software Flow 3.5.1 Histogram The Histogram command displays the image histogram in a graphical format. The histogram is an analysis of the image on a pixel-by-pixel basis where an accounting of the number of pixels at a given intensity is made. It's sort of like a census count of the pixels. How many pixels have intensities between 1 and 10? How many between 10 and 20? Simply stated it is a graph of the number of pixels having a given intensity (this is also referred to as the frequency) vs. -
Page 37: Graphics Setup
Section 3 - Software Flow the Full Frame Focus mode, where it uses Low res mode. This is handy for speeding up finding objects and focusing the camera. You can also configure the CCDOPS software to reuse dark frames. With that option enabled, the software will remember when you take a dark frame of equal duration to light frame and try to reuse that dark frame for future exposures rather than taking a new one. -
Page 38: Autoguiding
Section 3 - Software Flow 3.7.4 Autoguiding The commands in the Track menu allow you to use your camera as an autoguider. The Calibrate command is used first and it lets the CCDOPS software measure your drive's correction speeds so that it can make calibrated corrections. The Autoguide command is then used to do the autoguiding. -
Page 40: Advanced Imaging Techniques
Section 5 - Camera Software Reference Advanced Imaging Techniques The following sections describe some of the advanced uses of CCD cameras. While you may not use these features the first night, they are available and a brief description of them is in order for your future reference. -
Page 41: Autoguiding
Section 5 - Camera Software Reference designed with color imaging in mind with the ability to easily upgrade the camera with an internal color filter wheel in place of the standard shutter wheel. The color filter wheel allows conveniently placing colored interference filters in front of the CCD in order to take multiple images in different color bands. -
Page 42: Field Operation
4.5. Field Operation The ST-237 Advanced CCD Camera is supplied with a wall transformer for operation off 110 VAC that provides 12 VDC output to the camera. You can run the camera off of a car battery when operated in the field. If you are interested in this please contact SBIG or refer to Appendix A for the power jack pinouts. -
Page 44: Glossary
Section 5 - Glossary Glossary Antiblooming Gate - When a CCD pixel has reached its full well capacity, electrons can effectively spill over into an adjoining pixel. This is referred to as blooming. The Antiblooming gate can be used to help stop or at least reduce blooming when the brighter parts of the image saturate. - Page 45 Section 5 - Glossary Focal Reducer - A Focal Reducer reduces the effective focal length of an optical system. It consists of a lens mounted in a cell and is usually placed in front of an eyepiece or camera. With the relatively small size of CCDs compared to film, focal reducers are often used in CCD imaging.
- Page 46 Section 5 - Glossary at the beginning and again at the end of an exposure due to frame transfer. The readout streaking is usually very faint with respect to the overall image and can sometimes be eliminated from the display image by slightly raising the background level. Resolution Mode - The resolution of a CCD camera is determined by pixel size.
- Page 47 Section 5 - Glossary once with each color filter. The three images are then co-added and color balanced with the appropriate software. Vignetting - Vignetting is obstruction of the light paths by parts of the instrument. It results in an uneven illumination of the image plane. The effects of vignetting can be corrected using flat field images.
-
Page 48: Hints And Tips
Section 6 - Hints and Tips Hints and Tips This section contains hints and tips to get the most use out of your camera and software. There is a section of Question and Answers to the most common questions followed by several sections of tips. - Page 49 Section 6 - Hints and Tips and that effect can be removed with flat fielding your images or clean the window with an "air duster". Q. My images have dark tendrils in the corners. What can I do? A. These are caused by the CCD frosting and you need to replace the desiccant as described in Appendix C.4.
-
Page 50: Ccdops Use Tips
Section 6 - Hints and Tips Q. Which laptop is best for CCD use? A. Nearly any laptop will work, however you should take a copy of CCDOPS with images and run it from any units you are considering. Color LCD isn't necessary unless it is your only computer. -
Page 51: Telescope Tips
Section 6 - Hints and Tips • You can stack your laptop directly on top of the CPU for a compact package. You could make a custom 8" ribbon type cable to couple the CPU to the laptop. The cable is wired pin 1 to pin 1, etc. - Page 52 Section 6 - Hints and Tips intensity and then come back to the peak's setting. You may not see the exact high value, but will see the trend at best focus position. Again, don't guess at focus. • Focusing on planets is difficult since seeing can uniquely blur each frame. If a planet's moon is present, use the slow motion hand control to move over to it.
- Page 53 Section 6 - Hints and Tips just scale results like a larger format 6x7 camera compared to a 35mm camera. A TC-237 and 8" SCT can offer years of imaging capability before plunging into bigger/better with more money. Tricolor should be the next progression before scaling up. •...
-
Page 54: Appendix A - Specifications
Appendix A - Specifications Appendix A - Specifications This appendix lists the specifications for the ST-237 CCD camera. Texas Instruments TC237 Active Area 4.7 x 3.6 mm (.186" x .140") Field of View 8.0 x 6.1 arc minutes at 80 inch focal length (8" F/10) 2/3°... -
Page 55: Telescope Port
Appendix A - Specifications Telescope Port 1 2 3 4 5 6 1 = +RA (Right) 2 = +DEC (Up) 3 = -DEC (Down) 4 = -RA (Left) 5 = Ground 6 = No Connect Figure A.3 - Telescope Port Note that the four outputs are active-low, open-drain outputs without internal pull-ups and are capable of sinking 250 mA DC to ground when activated. -
Page 56: Appendix B - File Formats
Appendix B - File Formats Appendix B - File Formats This appendix describes the file format used by the CCDOPS software including the SBIG Compressed and Uncompressed, TIFF and FITS formats. SBIG Compressed and Uncompressed Formats This section describes the file formats used to save SBIG images on both the IBM PC and compatible computers and the Macintosh computers. - Page 57 Appendix B - File Formats Table 1 Type 3 Parameters PixCel237 Compressed Image File_version = 1 Data_version = 1 Exposure = xxx Focal_length = xx.xxx Aperture = xx.xxx Response_factor = xx.xxx Note = xxxxxxxx Background = xxx Range = xxx Height = xxx Width = xxx Date = xx/xx/xx...
- Page 58 Appendix B - File Formats ??? Image - This indicates the type of camera used to take the image and that the image data is not compressed and is saved as N rows of M pixels where N and M are specified by the Height and Width entries in the header.
- Page 59 Appendix B - File Formats E - Cool pixels removed. F - Flat field corrected. G - Image smoothed. H - Image sharpened. I - Image pseudo flat field J - Image quantized or posterized corrected. to less than 16 bits precision. K - Warm pixels removed.
- Page 60 Appendix B - File Formats X_pixel_size - This field indicates the width in millimeters of the pixels in the image. Y_pixel_size - This field indicates the height in millimeters of the pixels in the image. Pedestal - This field indicates any pedestal (constant value) that has been subtracted from each pixel in the image.
-
Page 61: Tiff Format
Appendix B - File Formats data. The 1st pixel of the actual image data is written using two-bytes and is the actual pixel value. Subsequent pixels are written as follows depending on the difference between that pixel and the previous pixel ( = pixel (m,n) - pixel (m, n-1)): If -127 127 then write as a single byte in 2's complement format, otherwise write hex 80 (-128) followed by the actual pixel value using two-bytes (least... -
Page 62: Appendix C - Maintenance
Appendix C - Maintenance Appendix C - Maintenance This appendix describes the maintenance items you should know about with your CCD camera system. C.1. Replacing the Fuse The CPU is internally fused with a 2 amp fast blow fuse. The fuse is located inside the CPU box on the printed circuit board. -
Page 63: Cleaning The Optical Windows
C.3. Cleaning the Optical Windows The design of the ST-237 allows for cleaning of the CCD. The optical heads are not evacuated and are quite easy to open and clean. Follow the instruction in the section above to gain access to the CCD and clean it using one of the following 3 methods: 1. -
Page 64: Appendix D - Advanced Image Processing Techniques
Appendix D - Advanced Image Processing Techniques Appendix D - Advanced Image Processing Techniques This Appendix describes advanced image processing techniques including making Astrometric and Photometric measurements and how to flat field Track and Accumulate images. D.1. Astrometry and Photometry Using the crosshair mode enables examination of images on a pixel by pixel basis for such measurements as Stellar and Diffuse Magnitude, and measurement of stellar positions. -
Page 65: Photometric Measurements
Appendix D - Advanced Image Processing Techniques advantage of using the centroid is that the zero position can be set between pixels resulting in a more accurate measurement. 4) Move the cursor to the desired location of the second point. Each time the cursor is moved, the separation between the 1st point and the current pixel coordinate of the cursor is calculated and displayed. - Page 66 Appendix D - Advanced Image Processing Techniques 1) Move the cursor to an area that is representative of the background surrounding the object you wish to measure. For example, if you're trying to determine the magnitude of a star buried in nebulosity, you would select a background area with roughly the same brightness as the nebulosity surrounding the star.
-
Page 67: Calculation Of Centroids
Appendix D - Advanced Image Processing Techniques calculated magnitude. Each press of the '+' and '-' keys adjusts the magnitude by 0.1 or 0.01 depending on whether the Shift key is held down. 4) When the calculated magnitude is correct, note the settings of the response factor parameter in the Edit Parameters command and copy it to the settings in the Camera Setup command so it will be used in future images If you're interested in the nuts and bolts of the photometric calculations, read on. -
Page 68: Calculation Of Separation
Appendix D - Advanced Image Processing Techniques w −1 h−1 ∑ ∑ j × (P(i, j) − Threshold) i =0 j =0 Ycentroid = Y w−1 h−1 ∑ ∑ P(i, j) − Threshold i = 0 j = 0 where in the formulas above should the quantity P(i,j) - Threshold be less than zero, zero is substituted on a pixel-by-pixel basis. -
Page 69: Calculation Of Diffuse Magnitude
Appendix D - Advanced Image Processing Techniques 1000 × R − / AD Count D.1.6 Calculation of Diffuse Magnitude Diffuse Magnitude is the magnitude per square arcsecond of subtended area. The calculation uses the Magnitude calculated above and the area of the box as shown below ... - Page 70 Appendix D - Advanced Image Processing Techniques 3. Take your Track and Accumulate image using the Track and Accumulate command and save it on the disk using the Save command. In the following discussions this Track and Accumulate image file will be referred to as IMAGE. 4.
- Page 72 Index Color Grab..............25 Communications Setup........17, 32 Convert Track Log File ..........32 Dark Subtract............29 A/D converter..............8 Depixelize Image ............28 analysis mode ..............27 Display Slide Show...........27 antiblooming .............7, 37 Establish COM Link ..........17 Antiblooming Gate (def) ..........37 Establish Link............32 astrometric measurements........37, 57 Eyepiece ..............24 Astrometry (def) ............37 Flat Field ..............30...
- Page 73 Index file formats ..............49 file path.................26 film ................3 Filter Commands ............32 magnitude filter wheels ..............32 diffuse ............57, 58, 62 filters................57 stellar ............57, 58, 61 finding objects ...............21 maintenance ..............55 FITS format..............54 Make Slide Show Command..........27 FITS format (def)............37 moon ................19 flat field ..............33, 62 Mounts...
- Page 74 Index TC255 .................1, 9 TE cooler................ 5 TE Cooler..............10 TE Cooler (def) .............39 Saturation (def) .............39 telescope ...............21 seeing................33 telescope hand controller .........21, 34 Seeing (def)..............39 telescope port ..............1 separations ..............57, 61 Telescope port ...............34 Sharpen Command ............29 thermistor............... 5 Shutdown Command............32 TIFF format..............54 shutter wheel ..............
Need help?
Do you have a question about the ST-237 and is the answer not in the manual?
Questions and answers