
Summary of Contents for Sgooway ZC-GSM015
- Page 1 MOBILE CALL GSM Alarm System ZC-GSM015 User’s Manual Profile For a better understanding of this product, please read this user manual thoroughly before using it.
- Page 2 Function Instruction: 7 wired and 99 wireless defense zones; LCD screen with time clock display; Voice prompt for all operations; 3 groups of timely arm and disarm; Can store 6 phone numbers: when alarming, system will make alarm call to these numbers automatically; Can store 3 SMS numbers: when alarming, system will send alarming SMS automatically;...
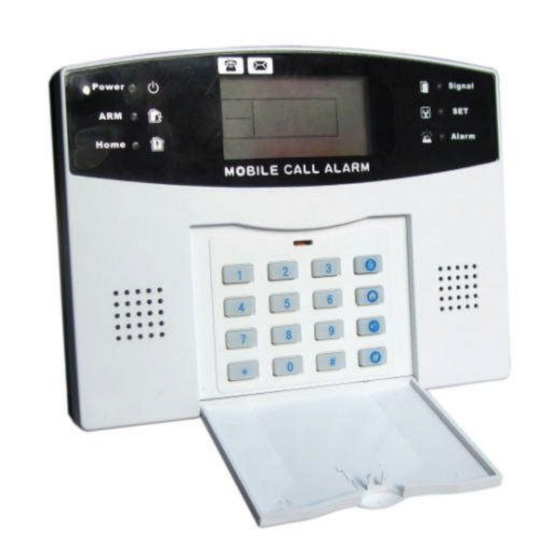
- Page 3 Alarm Panel front schematic diagram: Alarm Panel back schematic diagram: Wired terminal block:...
- Page 4 Negative of two-way speaker (black cable) Positive of two-way speaker (red cable) Ground Wired sensor 1: support NO and NC Ground Zone 2 Wired sensor 2: support NO and NC Zone 3 Wired sensor 3: support NO and NC Ground Zone 4 Wired sensor 4: support NO and NC Zone 5...
- Page 5 LCD display: Function Settings Initialization Please insert SIM card and plug in power adaptor, and then power on the system, all the LED lights will be on for 2 seconds and you will hear a long beep; the system comes into initialization. After the time clock displays on the LCD screen, the [SGM] starts flashing and the main unit starts to detect the GSM network until a long beep.
- Page 6 Note:In setting status,press can delete the numbers input. The system default password is [8888]. Operating method: [XXXX] [#] X indicates the new 4-digit password. LCD display: Exit Settings Press [*] and [#] buttons, the main unit emits a long beep and exits settings.
- Page 7 You can add maximum 8 remote controllers. LCD display: Delete Remote Controller The remote controller can’t control the main unit after it’s deleted. In setup state, use keypad to input [21], then input the remote controller number [1-8], and then press [#] to confirm. The main unit emits a long beep and the [Signal] indicator flickers once.
- Page 8 main unit emits a long beep and the defense zone indicator flickers once. You will hear a voice prompt “ delete completed” . Operating method: [24] [XX] XX indicates: 01 ~99 defense zones number Change Password 1) Change Operation Password Operation password is the password used to disarm or remote control.
- Page 9 10. Clock Setting In setup status, use keypad to input [32], then input the last 2 digits [AA] of the present year, the two digits [BB] of the month, the two digits [CC] of the date, the two digits [DD] of the hour (24-hour system), the two digits [EE] of the minute, the two digits [FF] of the second, and finally enter [#] to confirm.
- Page 10 2 ) Timely Disarm In setup status, use keypad to input [36~38], then input the hour [AA] and minute [BB] of the time you want to set to disarm, and finally input [#] to confirm. You will hear a long beep and a voice prompt “ setting completed”...
- Page 11 13. Time Setting for Alarm Delay (Default: 40sec) In setup state, input the command: 45+(XX) + # XX indicates: the delay time of out arm: XX=01-99:1 sec to 99 sec Note:The setting is effective only when a zone is set as Alarm Delay Zone Note:Before the system enters arm or alarm status It will emit a “...
- Page 12 16. SMS Receiving Number Setting SMS Receiving number means when system is alarming, it will only send SMS to this mobile number. You can set maximum 3 SMS numbers. In setup state, input [57] ~ [59], then input the SMS receiving number, and then press [#] button to confirm.
- Page 13 19. Defense Zone Programming If you want to change the alarm attribute of defense zone, such as turn off the siren when system alarms, you can do it by defense zone programming. In setup state, first input [60], then the defense zone number [01~99], then input defense zone type [1~4], then input defense zone location number [1~8], and then select siren on/off [0/1], at last press [#] to confirm.
- Page 14 For example: set defense zone 12 as Home arm but not alarm Operating method: [61] [12] 21. Voice Recording In setup state, use keypad to input [701], and then press [#] to confirm. The main unit will emit a beep and the [ ] indicator is on, and after 10 seconds countdown, recording starts: record at 30cm away from the main unit with moderate tone;...
- Page 15 [1] : siren on in “ Emergency Help” mode System default: [0] siren off Operation Instructions 1. System status.There are 4 status as following: Arm: defense zone 1~99 will alarm when detectors are triggered Home Arm: in arm status, the defense zone which is set as [Home Arm] will alarm when detectors are triggered.
- Page 16 Operation Password (Default: 1234) + [1] After the setting,the main unit makes a “ Di” Sound,ARM LED is on and you will receive a SMS: System armed. Home Arm It means, for the safety, while somebody is at home, you need to enable the peripheral door, window, balcony and boundary detectors of the alarm system while prevent from triggering the indoor detectors, which may cause improper warning;...
- Page 17 Answer Alarm Call When the main unit sounds alarm, it will dial the preset numbers. If no one answers the call, the system will call the next user number automatically. The system will call each preset numbers for 3 times in order.
- Page 18 Emergency Help Press [Emergency ] button on keypad, or [ ] button on remote controller or wireless panic button, the main unit will alarm and make call to the preset user numbers. System Dialing Function In disarm status; you can use the main unit to make any call just like a land-line telephone.
- Page 19 state, input [81] #, the main unit will make a long beep and display 00+XX (XX indicates the intensity of the signal). And the intensity should be within the range of 07-31; if it’s less than 07, you should change place. For example: if the signal intensity is 12, it will display as: Maintenance 10.
- Page 20 Technical Parameters List 1: Input Voltage DC12V/1A Standby Current <55mA Alarming Current <450mA 433/315MHz, 2262/4.7MΩ Wireless Frequency GSM Frequency 900/ 1800/ 1900MHz Back-up Battery NI-HI AAA*6 DC7.2V Siren Volume 110dB List 2: Home Alarm Defense Zone Type Siren Information Zone 1 effective invalid real-time...
- Page 21 Components list Main panel 1 pc, Remote controller 2 pcs, PIR sensor 1 pc, Door sensor 1 pc, Power adapter 1 pc, User manual 1 pc.
Need help?
Do you have a question about the ZC-GSM015 and is the answer not in the manual?
Questions and answers