Table of Contents
Advertisement
Available languages
Available languages
ALLEN + ROTH and logo design are trademarks or
registered trademarks of LF, LLC. All rights reserved.
Serial Number _______________ Purchase Date _______________
Questions, problems, missing parts? Before returning to your retailer, call our customer
service department at 909-287-0730, 8 a.m. - 5 p.m. PST, Monday - Friday.
You may also contact us anytime at service@permasteel.life.
SS22003
EMERALD COVE
60 QT ROLLING
ATTACH YOUR RECEIPT HERE
1
ITEM #
PATIO COOLER
MODEL # PS-213-60-EC
Français p. 10
Español p. 19
5193365
Advertisement
Chapters
Table of Contents

Summary of Contents for Allen + Roth EMERALD COVE PS-213-60-EC
- Page 1 ITEM # 5193365 EMERALD COVE ALLEN + ROTH and logo design are trademarks or 60 QT ROLLING registered trademarks of LF, LLC. All rights reserved. PATIO COOLER MODEL # PS-213-60-EC Français p. 10 Español p. 19 ATTACH YOUR RECEIPT HERE...
-
Page 2: Table Of Contents
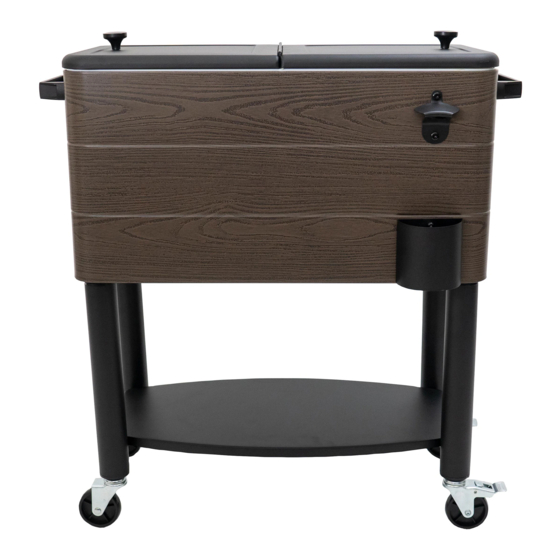
TABLE OF CONTENTS Package Contents………………………………………………………………………………………. Hardware Contents.…………………………………………………………………………………….. Safety Information..……………………………………………………………………………………… Preparation..…………………………………………………………………………………………...… Assembly or Installation Instructions………………………………………………………………….. Care and Maintenance.………………………………………………………………………………… Warranty……………………………………………………………………….………………………..PRODUCT SPECIFICATIONS SPECIFICATIONS 29.6in L x 16.8in D x 32.8in H Steel construction 60 QT capacity... -
Page 3: Package Contents
PACKAGE CONTENTS ITEM # DESCRIPTION PART # ITEM # DESCRIPTION PART # Knob PP21360-G Body (Basin) PP21360-A Bottle Opener Leg Frame PP21360-B PP21360-H Cap Catcher PP21360-I Bottom Shelf PP21360-C Drainage Plug PP21360-J Cross Member PP21360-D Caster PP21360-K Handle PP21360-E Caster with Brake PP21360-L PP21360-F... -
Page 4: Hardware Contents
HARDWARE CONTENTS M6 x 13 mm Bolt M6 x 15 mm M6 x 16 mm Shoulder Bolt Bolt Qty: 6 M6 x 25 mm Qty: 2 M4 x 32 mm Bolt Qty: 4 Screw Qty: 4 Qty: 2 (Note: Pre-attached to lid knobs) Tools included: Double open-end wrench... -
Page 5: Safety Information
SAFETY INFORMATION Please read and understand this entire manual before attempting to assemble, operate or install the product. CAUTION • Hand tools only, use of power tools could damage product. • Remove all components, hardware and tools from box before assembly. Inventory and separate each of the hardware and components included. -
Page 6: Assembly Or Installation Instructions
ASSEMBLY INSTRUCTIONS Attach the bottom shelf (C) to the leg frames (B) using four M6 x 25 mm bolts. Note: Do not fully tighten the bolts until the bottom shelf is aligned with the holes on the leg frames. Hardware Used M6 x 25 mm Bolt Insert and thread casters (K) into leg frame (B) with the provided open end wrench. - Page 7 ASSEMBLY INSTRUCTIONS Attach the body handles (E) to body (A) using four M6 x16 mm bolts, and tighten with the provided Allen wrench. Hardware Used M6 x 16 mm Bolt Allen wrench Gently placed the body (A) onto the fully assembled bottom cart.
- Page 8 ASSEMBLY INSTRUCTIONS Attach the bottle opener (H) to body (A) using two M6 x 13 mm bolts, and tighten with the Allen wrench. Hardware Used M6 x 13 mm Bolt Allen wrench Please remove the knobs (G) using a Phillips head screwdriver and re-assemble them on the lid (F) right-side up.
-
Page 9: Care And Maintenance
CARE AND MAINTENANCE • Cooler must be drained of water and completely dried in and out with a soft-clean cloth after every use. • When cooler is not in use for prolonged periods, it is recommended to store it in an enclosed dry place such as a storage shed or garage. - Page 10 ARTICLE # 5193365 GLACIÈRE ROULANTE ALLEN + ROTH et le logo sont des marques de POUR TERRASSE 60 QT/56 commerce ou des marques de commerce déposées de LF, LLC. Tous droits réservés. L EMERALD COVE MODÈLE # PS-213-60-EC Anglais p. 1 Español p.
- Page 11 TABLE DES MATIÈRES Contenu de l’emballage..………………………………………………………………………..…. Quincaillerie incluse………………………………………………………………………………..….. Consignes de sécurité…………………………………………………………………………………. Préparation...……………………………………………………………………………...………….… Instructions pour l’assemblage ou l’installation...…………………………………………………… Entretien………………..……………………………………………………………………………….. Garantie.……………………………………………………………………….……………………..CARACTÉRISTIQUES DE L’ARTICLE CARACTÉRISTIQUES TECHNIQUES 73,66 cm L x 40,67 cm p x 81,28 cm h Fabrication en acier Capacité de 56 L...
-
Page 12: Contenu De L'emballage
ARTICLE CONTENU DANS L’EMBALLAGE ARTIC ARTIC DESCRIPTION PIÈCES # QTÉ DESCRIPTION PIÈCES # QTÉ LE # LE # Corps (Bassin) PP21360-A Bouton PP21360-G Armature de montant PP21360-B Décapsuleur PP21360-H Tablette inférieure PP21360-C Récipient pour bouchons PP21360-I Support PP21360-D Bouchon de vidange PP21360-J Poignée PP21360-E... -
Page 13: Quincaillerie Incluse
QUINCAILLERIE INCLUSE Boulon M6 de 13 mm Boulon à Boulon épaulement M6 de 16 mm Qté : 6 M6 de 15 mm Boulon M6 de 25 mm Qté : 4 Qté : 2 M4 de 32 mm Qté : 4 Qté... -
Page 14: Consignes De Sécurité
CONSIGNES DE SÉCURITÉ Assurez-vous de lire et de comprendre l’intégralité du présent manuel avant de tenter d’assembler, d’installer ou d’utiliser l’article. ATTENTION • Outils à main uniquement, l'utilisation d'outils électriques pourrait endommager le produit. • Retirez tous les composants, la quincaillerie et les outils de la boîte avant l’assemblage. Inventoriez et séparez la quincaillerie et les composants inclus. -
Page 15: Instructions Pour L'assemblage Ou L'installation
INSTRUCTIONS POUR L’ASSEMBLAGE Fixez la tablette inférieure (C) aux armatures de montant (B) à l’aide de quatre boulons M6 de 25 mm. Remarque : Ne serrez pas complètement les boulons tant que la tablette inférieure n’est pas alignée avec les trous des armatures de montant. - Page 16 INSTRUCTIONS POUR L’ASSEMBLAGE Fixez les poignées du corps (E) au corps (A) à l’aide de quatre boulons M6 de 16 mm et serrez-les avec la clé hexagonale fournie. Quincaillerie utilisée Boulon M6 de 16 mm Clé Hexagonale Placez délicatement le corps (A) sur le chariot inférieur entièrement assemblé.
- Page 17 INSTRUCTIONS POUR L’ASSEMBLAGE Fixez le décapsuleur (H) au corps (A) à l’aide de deux boulons M6 de 13 mm et serrez-les avec la clé hexagonale. Quincaillerie utilisée Boulon M6 de 13 mm Clé hexagonale Veuillez retirer les boutons (G) à l’aide d’un tournevis cruciforme et les réassembler sur le couvercle (F) à...
-
Page 18: Entretien
ENTRETIEN • La glacière doit être vidangée de son eau et complètement séchée à l’intérieur et à l’extérieur avec un linge doux et propre après chaque utilisation. • Lorsque la glacière n’est pas utilisée pendant des périodes prolongées, il est recommandé de la ranger dans un endroit clos et sec, comme une remise ou un garage. - Page 19 ARTÍCULO # 5193365 NEVERA PORTÁTIL ALLEN + ROTH y el diseño del logotipo son marcas CON RUEDAS PARA comerciales o marcas registradas de LF, LLC. Todos los derechos reservados. PATIO EMERALD COVE DE 56.8 L MODELO # PS-213-60-EC Inglés p. 1 Français p.
- Page 20 ÍNDICE Contenido del paquete..…….…………………………………………………………………..…. Aditamentos…………………………………………………………………………………….…..….. Información de seguridad.……………………………………………………………………………. Preparación.……………………………………………………………………………...………….… Instrucciones de ensamblaje o instalación…..…………………………………………………… Cuidado y mantenimiento…………………………………………………………………………….. Garantía.……………………………………………………………………….……………………..ESPECIFICACIONES DEL PRODUCTO ESPECIFICACIONES 75.2 cm de l. x 42.7 cm de p. x 83.3 cm de alt. Fabricación en acero 56.8 L de capacidad...
-
Page 21: Contenido Del Paquete
CONTENIDO DEL PAQUETE ARTÍCULO ARTÍCU ARTÍCU DESCRIPCIÓN PIEZA # CANT. DESCRIPCIÓN PIEZA # CANT. LO # LO # Cuerpo (recipiente) PP21360-A Perilla PP21360-G Estructura de patas PP21360-B Abridor de botellas PP21360-H Estante inferior PP21360-C Recogedor de tapas PP21360-I Travesaño PP21360-D Tapón de drenaje PP21360-J Manija... -
Page 22: Aditamentos
ADITAMENTOS Perno M6 x 13 mm Perno de resalto Perno M6 x 15 mm M6 x 16 mm Cant.: 6 Perno Cant.: 2 Tornillo M6 x 25 mm Cant.: 4 M4 x 32 mm Cant.: 4 Cant.: 2 (Nota: preinstalados en las perillas de la tapa) Herramientas incluidas:... -
Page 23: Información De Seguridad
INFORMACIÓN DE SEGURIDAD Lea y comprenda completamente este manual antes de intentar ensamblar, usar o instalar el producto. PRECAUCIÓN • Utilice solamente herramientas manuales, el uso de herramientas eléctricas podría dañar el producto. • Retire todos los componentes, aditamentos y herramientas de la caja antes del ensamblaje. Separe y haga un inventario de cada uno de los aditamentos y componentes incluidos. -
Page 24: Instrucciones De Ensamblaje O Instalación
INSTRUCCIONES DE ENSAMBLAJE Fije el estante inferior (C) a las estructuras de las patas (B) con cuatro pernos M6 x 25 mm. Nota: no apriete completamente los pernos hasta que el estante inferior esté alineado con los orificios en las estructuras de las patas. Aditamentos utilizados Perno M6 x 25 mm Inserte y enrosque las ruedas (K) en la... - Page 25 INSTRUCCIONES DE ENSAMBLAJE Fije las manijas del cuerpo (E) al cuerpo (A) con cuatro pernos M6 x 16 mm y apriete con la llave Allen provista. Aditamentos utilizados Perno M6 x 16 mm Llave Allen Coloque suavemente el cuerpo (A) en el carro inferior completamente ensamblado.
- Page 26 INSTRUCCIONES DE ENSAMBLAJE Fije el abridor de botellas (H) al cuerpo (A) con dos pernos M6 x 13 mm y apriete con la llave Allen. Aditamentos utilizados Perno M6 x 13 mm Llave Allen Retire las perillas (G) con un destornillador de cabeza Phillips y vuelva a ensamblarlas en la tapa (F) con el lado derecho hacia arriba.
-
Page 27: Cuidado Y Mantenimiento
CUIDADO Y MANTENIMIENTO • Se debe drenar el agua de la nevera portátil y se debe secar completamente por dentro y por fuera con un paño limpio y suave después de cada uso. • Cuando la nevera portátil no se usa por períodos prolongados, se recomienda guardarla en un lugar cerrado y seco, como una caseta de almacenamiento o un garaje.
Need help?
Do you have a question about the EMERALD COVE PS-213-60-EC and is the answer not in the manual?
Questions and answers