Advertisement
Advertisement
Table of Contents

Related Manuals for Vestal Guide


Summary of Contents for Vestal Guide
- Page 1 instruction manual...
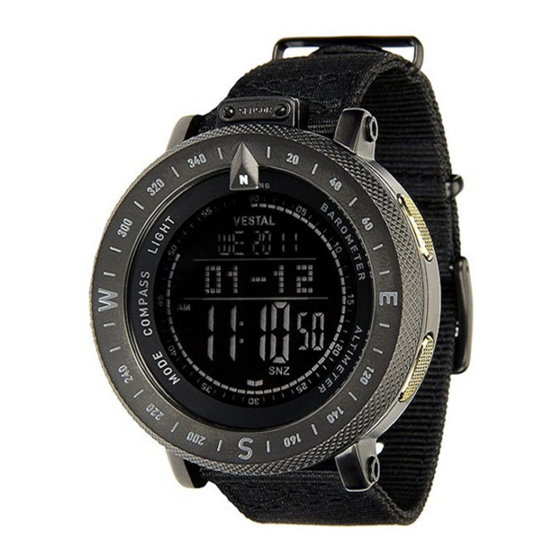
- Page 3 THE GUIDE ALTITUDE - BAROMETER - COMPASS The Guide is a premium, multi-sensor digital movement surrounded by a 48mm 316L surgical-grade stainless steel case with an ultra, scratch-resistant K1 crystal. The movement features an instant Altitude read out along with an elevation-gain graph. The Barometer is ready to alert you if your summit attempt is a poor decision with the storm warning indicator.
- Page 4 SPECIFICATIONS TABL CASE: 48MM WIDE 316L STAINLESS STEEL CASE BAND: 22MM WIDE PU WITH THROUGH BOLTS BUCKLE: THROUGH BOLT 316L STAINLESS STEEL CRYSTAL: K1 MINERAL CRYSTAL MOVEMENT: DIGITAL ALTITUDE BAROMETER COMPASS WATER RESISTANCE: 10 ATM / 100 METERS WRIST: MEDIUM OTHER: ALTIMETER BAROMETER WITH WEATHER FORECAST...
-
Page 5: Table Of Contents
TABLE OF CONTENTS 6..... Diagram of buttons and functions 7..... Time Setting 9....Alarm Setting 11....Stopwatch 12....Countdown Timer 13....Worldtime 14....Barometer 17....Altimeter 20....Compass 22....Notes 28....Warranty Information... -
Page 6: Diagram Of Buttons And Functions
DIAGRAM OF BUTTONS AND FUNCTIONS LIGHT BUTTON BAROMETER BUTTON HOLD TO SET INCREASE ( + ) COMPASS BUTTON MODE BUTTON ALTIMETER BUTTON ADVANCE DECREASE ( - ) Light button: In all modes and functions press and hold the light button to set the mode. Compass button: Accesses the COMPASS from TIME mode. -
Page 7: Time Setting
TIME SETTING 1- In TIME mode, press and hold Light button for 5 seconds to enter TIME setting mode. Press the light button at any time during the setting process to exit. TER BUTTON 2- Select your nearest city by using the Barometer and E ( + ) Altimeter buttons to cycle through the list of cities, this will affect the World Time function. - Page 8 Altimeter button to increase the contrast. 12-Press the Light button to exit or press Mode to restart at step 2. * If no buttons are pressed after 60 seconds, the Guide will automatically exit the setting mode.
-
Page 9: Alarm Setting
ALARM SETTING ubtract. When viewing TIME mode, press Mode button once to enter the ALARM mode. eter Once in ALARM mode SIG will be displayed. You can select e to whether or not you would like the hourly chime to be on or off. Press the Barometer button to activate/deactivate the function. - Page 10 ALARM SETTING The next four alarms (A2A, A3A, A4A, A5A) can be set for specific dates if activated. Press and hold the Light button for 2 seconds to enter the setting mode. - Month: Select using the Barometer/Altimeter buttons to increase or decrease the month.
-
Page 11: Stopwatch
STOPWATCH STOPWATCH can time up to 23 hours, 59 minutes, 59 sec- et for onds. It can record up to 99 laps. on for 2 To use: - Enter the STOPWATCH mode by pressing the Mode button 2 times - Use the Barometer button to start and stop the timer. ncrease - To record laps, press the Altimeter button while the timer is running... -
Page 12: Countdown Timer
COUNTDOWN TIMER The TIMER can count down from 99 hours, 59 minutes, 59 seconds. Alarm will sound for 30 seconds at the end of the countdown. 2 modes available, countdown/repeat & countdown/countup - Enter the TIMER mode by pressing the Mode button 3 times. - Set the time you would like to count down from by pressing and holding the Light button. -
Page 13: Worldtime
WORLDTIME s, 59 Select from 28 cities around the Globe. - Enter the WORLDTIME mode by pressing the Mode button 4 times. down. - Select from 28 cities with the Barometer and Altimeter untup buttons. - Turn DST on or off per city by holding the light button for 5 3 times. -
Page 14: Barometer
BAROMETER mode, you will see the Weather Forecast icon, the Temperature, and the Air Pressure. *NOTE: The Guide is shipped with a Factory default mode and needs to be adjusted in order to display your air pressure accurately. For an accurate Altimeter reading, the Air pressure must be accurate as well. - Page 15 - FDEF: this is the factory default setting - Press Barometer or Altimeter buttons to adjust - Select either YES or NO - NOTE: Vestal suggests selecting NO to turn this setting off. - Press the Light button to exit. AIR PRESSURE INPUT: - Look up your local weather to find out the current Air Pres- sure in your location.
- Page 16 BAROMETER continued ALTIMETE - Repeat until you have your Air Pressure inputted. To enter - Press the Light button to exit. Altimete mode, y - Press MODE button to return toTIME mode. *NOTE and need curately. be accur To adjus - To alte >...
-
Page 17: Altimeter
ALTIMETER To enter ALTIMETER mode (height measurement) press the Altimeter button when in TIME mode. Once in ALTIMETER mode, you will see the Altitude and the Temperature. *NOTE: the Watch is shipped set with a Factory default mode and needs to be adjusted in order to display your Altitude ac- curately. - Page 18 - Press Mode to advance. - Repeat until the correct temperature is displayed. - Press the Light button to exit. - NOTE: Vestal suggests not adjusting this at first. RELATIVE HEIGHT: - Press and hold the Light button. - Press Mode button 1 time.
- Page 19 - FDEF: This is the factory default setting. usting - Press Barometer or Altimeter buttons to adjust. - Select either YES or NO. - Press the Light button to exit. - NOTE: Vestal suggests selecting NO to turn this setting off.
-
Page 20: Compass
COMPASS To enter COMPASS mode (direction measurement), press the Compass button when in TIME mode. Once in COMPASS mode, you will see the direction, time, and the direction in degrees. This compass points to magnetic north and may need to be adjusted for declination to point to true north. If the compass is incorrect you must go outside, away from power lines or other magnetic objects, and calibrate it. - Page 21 - Press the Barometer or Altimeter button to enter the Auto Correction Mode. pass for - Hold the Guide watch level and rotate 2 times in the same direction (clockwise or counter clockwise) t or - The Guide will automatically exit back to the COMPASS mode.
-
Page 22: Notes
NOTES After entering the compass measurement mode, the measure- ment will stop after 30 seconds. In the last 30 seconds, it will lock up and exit this mode, and then return back to time mode. After entering air pressure, temperature and weather forecast- ing measurement mode, it will measure once every second. - Page 23 goes up gradually,it indicates that the weather will turn better. If the air pressure value goes down gradually, it indicates that the weather will turn bad. There are 4 kinds of weather status (from asure- good to bad): Fine, Cloudy, Overcast Sky, Rain. t will mode.
- Page 24 will absorb the magnetic force from the electrical appliance. Preservation If this watch is magnetized, the definition of the direction sen- sor will be reduced. Thus please don’t put this watch in a place near a magnet or any object which gives off strong magnetic force.
- Page 25 Why problem occurs when measure direction indoor? TV set, personal computer, speaker or other objects will inter- fere in the geomagnetic detection by this watch. Please keep away from interferential objects or do detection outdoor. It will be difficult to perform the direction detection inside a building made of reinforced concrete.
- Page 26 the same time, please note that the condition needed in each measurement is different to get the best result. When measure air temperature, you’d better take your watch from your wrist to minimize the affection to the measurement result by your body heat.
- Page 27 each easure The work principle of barometer: wrist The air pressure reflects the change of atmosphere. Through your observing the atmosphere change, you can forecast the weather r wear in a rational veracity range. Atmosphere pressure going up y of the indicates fine weather, but atmosphere pressure going down indicates the weather is turning into bad.
-
Page 28: Warranty Information
Water damage is not covered unless the watch is marked 10 ATM water-resistant or more. VESTAL’s warranty is void if the product is disassembled in any manner by any party other than a certified jeweler or watch repairman. - Page 29 fects in e years damage al wear d unless r more. embled jeweler e email item(s) es sent number shipper.
- Page 30 vestalwatch.com | @vestalwatch...
Need help?
Do you have a question about the Guide and is the answer not in the manual?
Questions and answers