
Summary of Contents for FreeHand 1.2
- Page 1 FREEHAND 1.2 USER MANUAL Freehand 2010 Ltd USER MANUAL USER MANUAL VERSION 2.5 Part Number: STDS-X-0116 Date of issue December 2020...
- Page 2 No part of this document may be reproduced or transmitted in any form or by any means, electronic or mechanical, for any purpose without the express permission of Freehand 2010 Ltd. The content of this document is furnished for informational use only, is subject to change without notice and should not be construed as a commitment by Freehand 2010 Ltd.
-
Page 3: Table Of Contents
Explanation of Markings ..........19 1.16 Manufacturer ..............21 Preparing and Setting up FreeHand ........22 Before using FreeHand for the first time ......24 Setting up FreeHand ............24 During Patient Preparation – FreeHand Initial setup . 24 2.2.1 2.2.2... - Page 4 4.4 Indicator Unit Symbols ............53 Troubleshooting ..............57 Technical Specifications............58 FreeHand 1.2 User Manual Version 2.5 Page 3 of 61...
- Page 5 How to Contact Us: The entire team at Freehand 2010 Ltd is dedicated to providing you with the excellent support and service that you deserve. Your local representative will provide the day-to-day contact and support that you require. For customers in the UK & EU...
-
Page 6: Introduction
Training As a new FreeHand customer, we want to ensure that you and your team get up to speed as rapidly as possible. Following receipt of your new system, a representative of Freehand 2010 Ltd, or of one of our certified partner companies, will carry out a comprehensive program of in-service training. -
Page 7: Update Training Programs
This may be due to new surgeons or nurses joining your team, or perhaps you wish to use FreeHand in a new range of endoscopic procedures. Whatever the reason, just contact your local representative and he or she will be pleased to arrange a tailored Update Training Program to meet your needs. -
Page 8: Freehand System Parts
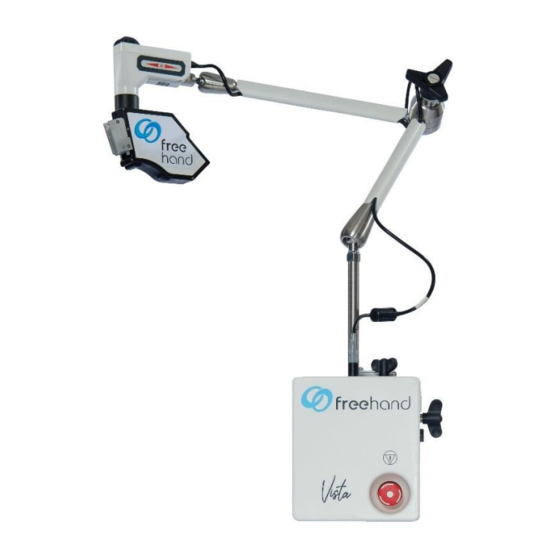
• Removes the need for camera holding assistant. FreeHand System Parts FreeHand consists of the following parts (see Figures): The Control Box containing the main electronics and power supply. There is a clamp on the rear surface of the Control Box which is used to fix the equipment to the operating table. - Page 9 A Sterile Sleeve to cover the Robotic Motion Assembly, Arm and Control Box. A custom-designed mobile cart is also available to help with storage of the FreeHand system between patient cases, and for ease of movement between operating rooms. FreeHand System Parts FreeHand 1.2 User Manual Version 2.5...
- Page 10 FreeHand Control Box FreeHand Robotic Motion Assembly and Sterile Zoom Module FreeHand 1.2 User Manual Version 2.5 Page 9 of 61...
- Page 11 The Sterile Zoom Module will be marked as “used” when it has been attached to the Robotic Motion Assembly. DO NOT DISCONNECT THE ZOOM MODULE, OR TURN OFF THE POWER TO FREEHAND, UNTIL THE COMPLETION OF THE PROCEDURE. FreeHand 1.2 User Manual Version 2.5...
-
Page 12: Sterile Zoom Module - Single-Use Protection
* In this context “laparoscopic” is taken to embrace the use of a rigid endoscope in any part of the body. At all sites on the body where FreeHand might be used, note that FreeHand holds the ‘scope and does not directly contact or interact with tissue. -
Page 13: Contraindications
FreeHand being used several times daily (with a new zoom and new sleeve for each patient). Although FreeHand is attached to a storage cart when not in use, it must be firmly attached to the operating table before each procedure. -
Page 14: Warnings
Warning. Inspect all cables for twisting or strain prior to each use of FreeHand. FreeHand should not be used if cables are twisted or strained. Warning. Inspect all cables for damage prior to each use of FreeHand. - Page 15 Warning. Do not attempt to use the Sterile Zoom Module or Sterile Sleeve if the packaging of these items appears to have been pierced, damaged or torn. Warning. Check that FreeHand is rigidly attached to the operating table and all attachments are secure prior to use.
-
Page 16: Caution
Federal (USA) law restricts this device to sale by or on the order of a medical practitioner licensed by the law of the State in which that person practices to use or order the use of the device. FreeHand 1.2 User Manual Version 2.5 Page 15 of 61... -
Page 17: Conformance To Standards
1.10 Conformance to Standards FreeHand has been certified in accordance with the following standards: ANSI/AAMI ES60601- 1:2005/(R)2012 IEC 60601-1:2005 + A1:2012 Medical electrical equipment - Part 1: General requirements for safety BS EN 60601- 1:2006+A12:2014 CAN/CSA-C22.2 NO. 60601-1:14 IEC 60601-1-2:2014 Medical electrical equipment;... -
Page 18: Declaration Of Conformity
FreeHand requires no routine calibration or adjustments to maintain operation and must only be serviced or repaired by Freehand 2010 Ltd or a Freehand Service and Repair Centre and not by the user or the user’s agent. Circuit diagrams, component listings and servicing instructions are not made available to users. -
Page 19: Defects And Abnormal Stresses
Details of User-replaceable parts and a list of system parts and consumable items are provided at the end of this User Manual. 1.13 Defects and Abnormal Stresses For continued safety FreeHand must not be maltreated or used outside of its specified storage or operational conditions. FreeHand contains... -
Page 20: Explanation Of Markings
For continued safety, FreeHand must not be subjected to any unauthorised modifications and must be used only for the purpose for which it was originally supplied. 1.15 Explanation of Markings Alternating Current CLASS II EQUIPMENT (double insulated) This equipment must not be disposed of... - Page 21 Manufacturer Single Use Only, do not reuse Expiry Date (for sterile parts) Do not use if package is open or damaged In conformity with Council Directive 93/42/EEC concerning medical devices FreeHand 1.2 User Manual Version 2.5 Page 20 of 61...
-
Page 22: Manufacturer
Tel: +44 (0) 1483 408 720 Fax: +44 (0) 1483 452 690 www.freehandsurgeon.com enquire@freehandsurgeon.com Other offices: Mediflex Surgical Products 250 Gibbs Road Islandia NY 11749 Phone: +1 631-582-6424 www.freehandsurgeon.com enquire@freehandsurgeon.com FreeHand 1.2 User Manual Version 2.5 Page 21 of 61... -
Page 23: Preparing And Setting Up Freehand
Ensure that the Headset is in line of sight of the Indicator Unit, and then switch on the Headset. Attach FreeHand to the rail of the operating table, tightening the Table Clamp Knob securely. Connect the Footpedal. Connect the FreeHand power cable to a power outlet/socket. - Page 24 ’scope. Re-confirm that the set up is correct after changing the angle of the operating table. Attach the ’scope to FreeHand by sliding the Scope Clip into the Zoom Module, making sure it clicks securely into place.
-
Page 25: Before Using Freehand For The First Time
‘scope movement direction and Footpedal to activate motion. At the end of the surgical procedure, disconnect the ‘scope from FreeHand by detaching the Scope Clip and moving the Arm away from the operative field. 10. Dispose of the single use items safely, according to your hospital’s infection control policies. - Page 26 “minus” sign coordinates with that on the Headset so that the Headset will function properly. First ensure that the Headset is in line of sight of the Indicator Unit, and then switch on the Headset by sliding the on/off FreeHand 1.2 User Manual Version 2.5 Page 25 of 61...
- Page 27 Warning. Check that the “coin cell” batteries are securely in place in the Headset prior to fitting to the surgeon’s head Attach the FreeHand to the Operating Table after the patient has been positioned Attach the Control Box to the rail of the operating table in the desired position.
- Page 28 1cm above the eyebrows and secure by placing the lanyard around the surgeon’s head and gently tightening. To ensure correct operation, the Headset must be mounted onto the head with the switch and LED FreeHand 1.2 User Manual Version 2.5 Page 27 of 61...
- Page 29 Robotic Motion Assembly. (iii) Switch on the FreeHand system with the switch adjacent to the power connector on the right face of the Control Box. FreeHand will automatically perform a self- test procedure.
-
Page 30: Re-Setting The Control System
Error Codes. 2.2.2 Re-setting the Control System Should the power to the FreeHand system be interrupted or if the Stop Switch on the Control Box has been depressed, the following procedure must be carried out to restart the system. - Page 31 (ii) Place one hand inside the opening cuff indicated by the blue arrow tab on the Sleeve, and grasp the plastic Gasket on its long sides, do not place finger in the central slot. FreeHand 1.2 User Manual Version 2.5 Page 30 of 61...
- Page 32 Sleeve does not become caught on any FreeHand parts that cause damage to the Sleeve. (v) Use the securing tapes to gather and tidy the material without restricting the range of robotic movement. FreeHand 1.2 User Manual Version 2.5 Page 31 of 61...
-
Page 33: Connecting The Zoom Module And The 'Scope
You must use a new Sterile Zoom Module for each surgical procedure. Protection methods prevent a Zoom Module from being re-used. In the event of attempted re-use the Zoom Module will not function. FreeHand 1.2 User Manual Version 2.5 Page 32 of 61... - Page 34 - Zoom Module - Scope Clip - Positioning Template (ii) Hold the Sterile Zoom Module as shown and gently slide it into the slot at the end of the Tilt assembly. FreeHand 1.2 User Manual Version 2.5 Page 33 of 61...
-
Page 35: Positioning Freehand At The Camera Port
‘scopes may occur. 2.2.5 Positioning FreeHand at the camera port Move the FreeHand Arm into position only after the patient has been draped and all of the camera and instrument ports have been inserted. Warning. - Page 36 The base of the Robotic Motion Assembly on the Pan axis should be placed 7cm from the skin surface. A sterile Positioning Template is supplied as part of the Zoom Module pack to assist. FreeHand 1.2 User Manual Version 2.5 Page 35 of 61...
- Page 37 Positioning Knob by rotating it clockwise. Before attaching the ’scope, check the correct operation of FreeHand by using head movements to select the direction of ‘scope movement. Use the Footpedal to activate movement and observe the movement of the Robotic Motion Assembly.
- Page 38 When attaching the ‘scope to the Zoom Module observe the monitor image and take care that the ‘scope does not accidentally come into contact with patient tissue. Adjust the position of the Scope Clip as required. FreeHand 1.2 User Manual Version 2.5 Page 37 of 61...
-
Page 39: Using Freehand
The speed of ‘scope movement is set by using the Speed Control Panel located on the Robotic Motion Assembly. FreeHand offers a choice of 3 speeds. Pressing the Plus (+) button increases the speed; the Minus (-) button decreases the speed. The selected speed is indicated by the yellow LED. -
Page 40: Selecting The Direction Of Movement
LED uppermost. 3.2.1 Selecting the direction of movement FreeHand has two movement modes: Tilt mode and Zoom mode. The current mode is shown on the Indicator Unit by the presence or absence of the Zoom mode indication in the lower right corner of the matrix display. -
Page 41: Selecting Direction Of Movement In Tilt Mode
FreeHand can pan through 180° of continuous movement. Tilting movements are up and down motions. FreeHand can tilt from +70° to -10° relative to the horizontal. FreeHand 1.2 User Manual Version 2.5 Page 40 of 61... -
Page 42: Selecting Direction In Zoom Mode
To change between Tilt mode and Zoom mode, quickly tap once on the Footpedal. Note: The zoom function is mechanical and physically moves the ‘scope using a motorised mechanism. It is not an optical zoom. FreeHand 1.2 User Manual Version 2.5 Page 41 of 61... - Page 43 Head to left (EAR TO LEFT SHOULDER) - left direction selected. Head to right (EAR TO RIGHT SHOULDER) - right direction selected. Tilt head down - zoom in selected. FreeHand 1.2 User Manual Version 2.5 Page 42 of 61...
-
Page 44: Activating Movement
Footpedal it is possible for the user to reverse the direction of movement while the Footpedal is depressed. However, it is not possible to change the axis of movement without first releasing the Footpedal. FreeHand 1.2 User Manual Version 2.5 Page 43 of 61... -
Page 45: Temporarily Disconnecting The 'Scope
3.5 Temporarily disconnecting the ‘scope In the event that it becomes necessary to disconnect the ‘scope from FreeHand temporarily during the procedure, for instance in order to clean the lens, then proceed as follows; FreeHand 1.2 User Manual Version 2.5... -
Page 46: Stop Switch
To operate, firmly press the button, this will stop all powered movement. To reset the FreeHand first ensure it is safe to do so. Switch off the power to the Control Box and release the Emergency Stop by rotating the button in the direction of arrows (clockwise). -
Page 47: Removal Of Freehand From The Operating Table
Disconnect the ‘scope by releasing the Scope Clip from the Zoom Module. While supporting the Arm and Robotic Motion Assembly, loosen the Arm Positioning Knob, move the FreeHand arm to a safe position away from the surgical field and retighten the Arm Positioning Knob. -
Page 48: Using The Freehand Storage Cart
Table Clamp Knob and store safely. 11. Unplug and store the Indicator Unit with its power adapter. 3.8 Using the FreeHand Storage Cart To ensure the safe and convenient storage of the FreeHand system between procedures, use of the FreeHand Storage Cart is highly recommended. - Page 49 Storage Cart. (iv) To protect FreeHand in storage, ensure that the Robotic Motion Assembly is positioned inside handles of the Storage Cart, and that the Arm Positioning Knob is tightened. FreeHand 1.2 User Manual Version 2.5 Page 48 of 61...
-
Page 50: Maintenance
FreeHand System After use, FreeHand should be cleaned and disinfected. All reusable parts of FreeHand (Control Box, Arm and Robotic Motion Assembly, Headset including Lanyard, Indicator Unit, Footpedal and Cables) may be decontaminated using the following procedure: 1. -
Page 51: User Replaceable Parts/Routine Inspection
Take care not to damage the electrical contacts inside the aluminium tilt-zoom connection. Do NOT attempt to sterilise any part of FreeHand; any attempt is likely to damage or destroy the device. Never immerse any part of FreeHand in liquid. -
Page 52: Consumable And Other Parts
FreeHand should be inspected weekly to check for any signs of damage or worn parts. In the event of damage or wear being evident, please contact Freehand 2010 Ltd immediately. 4.3 Consumable and other Parts Stock code Description STDS-X-0110 10-Patient... - Page 53 STDS-X-0038 Fuse for Control Box (pack of 2) Schurter 0001.2507 2A 20mm anti-surge fuse, UL File no: E41599 STDS-X-0018 Power cable, USA STDS-X-0019 Power cable, UK STDS-X-0020 Power cable, EU FreeHand 1.2 User Manual Version 2.5 Page 52 of 61...
- Page 54 In addition to the symbols displayed on the Indicator Unit showing the movement direction selected, a number of other symbols may also appear. If FreeHand detects an error during the self-test at start-up or at any other time, an error code is displayed on the Indicator Unit.
- Page 55 2.2.2 Re-setting the Control System. If the error continues, please contact Freehand 2010 Ltd. The Indicator Unit is faulty Please contact Freehand 2010 Ltd using the details at the front of this manual. FreeHand 1.2 User Manual Version 2.5 Page 54 of 61...
- Page 56 After attaching a Sterile Zoom Module it will be automatically marked as “used”. Do not switch off the power to FreeHand or disconnect the Zoom module for more than 5 minutes or the Zoom Module will need to be replaced.
- Page 57 0 2.2.2 Re-setting the Control System. If the error continues, please contact Freehand 2010 Ltd. There is a communications error between the Control Robotic Motion Assembly. Please contact Freehand 2010 Ltd. FreeHand 1.2 User Manual Version 2.5 Page 56 of 61...
- Page 58 Information codes 5. Troubleshooting In case you encounter problems with FreeHand, most can be corrected simply by the user. Use the flowchart at the end of this User Manual to perform some simple checks to diagnose the problem. If the problem persists once you have performed these checks, please contact your Freehand 2010 Ltd representative, or your local Freehand 2010 Ltd office.
- Page 59 FreeHand is a Class 1 Device and conforms with the Essential Requirements and provisions of Council Directive 93/42/EEC and as amended, concerning medical devices. USA: FreeHand is a Class 2 Device under the relevant FDA regulations (Food and Drug Administration, USA). Physical and Environmental Characteristics Dimensions Control Box Height 19 cm (7.5’’)
- Page 60 UL File no: E41599 Indicator Unit Input: 100-240V~/50-60Hz/250mA power supply Output: 7.5V/1.2A Headset Use only Varta CR2032 3V Lithium batteries Manganese Dioxide cells, UL recognised: MH 13654 (N) only. FreeHand 1.2 User Manual Version 2.5 Page 59 of 61...
- Page 61 The disposable Zoom element is designed to be used for 8 hours maximum cumulative service with the motor-on time not exceeding 20 minutes. The FreeHand system is designed for normal use over a period of 7 years. Disposal After use, dispose of the single-use parts (Sterile Zoom Module, Sterile Sleeve, Scope Clip and Positioning Template) safely, according to your hospital’s infection control policies.
- Page 62 FreeHand complies with the EMC requirements of international standard IEC 60601-1-2: 2014 and USA FCC CFR 47: Part 15: B: 2012 provided that only the parts supplied by Freehand 2010 Ltd are used. Use of alternate cables or power supplies may result in increased RF emissions or decreased RF immunity.
- Page 63 ‘D’ symbol Attach new Zoom module displayed? Refer to User Manual for explanation and Error symbol displayed? resolution of error symbols FreeHand working Contact Freehand 2010 Ltd now? Continue using FreeHand STDS-X-0116 TROUBLESHOOTING FLOW CHART – Vista – V2-4...
Need help?
Do you have a question about the 1.2 and is the answer not in the manual?
Questions and answers