Table of Contents
Advertisement
Quick Links
Advertisement
Table of Contents

Subscribe to Our Youtube Channel
Summary of Contents for Signature PRIMERA
- Page 2 Robotic Feed (SCP-R) ...
- Page 3 l ...
- Page 4 Notices: T he information in this document is subject to change without notice. NO WARRANTY OF ANY KIND IS MADE WITH REGARD TO THIS MATERIAL, INCLUDING, BUT NOT LIMITED TO, THE IMPLIED WARRANTIES OF MERCHANTABILITY AND FITNESS FOR A PARTICULAR ...
-
Page 5: Table Of Contents
Table of Contents Section 1: Getting Started 1 A. Choosing a Good Location 1 B. Unpacking and Inspection 2 C. Identifying the Parts 3 D. Setup (Connecting the Cassette Printer) 5 E. Loading and Installing Hoppers 7 F. Loading Lidless Cassettes 12 ... - Page 6 There are interactive features that allow you to jump to different locations within the document. Each listing in the Table of Contents is interactive. Place the cursor on either the words or the page number. A small hand with a pointing finger icon appears.
-
Page 7: Section 1: Getting Started
To begin using your Robot, please read this manual carefully. This Operator's Manual is a guide to the Robotic Feed only. The Signature Cassette Printer – Manual Feed is required to operate this equipment. H owever, that printer is boxed ... -
Page 8: Unpacking And Inspection
While unpacking your Robot, inspect the carton to ensure that no damage has occurred during shipping. Make sure that all supplied accessories are included with your unit. The following items should be included: • Signature Cassette Printer –Robotic Feed • Power cord • Power converter ... - Page 9 ...
-
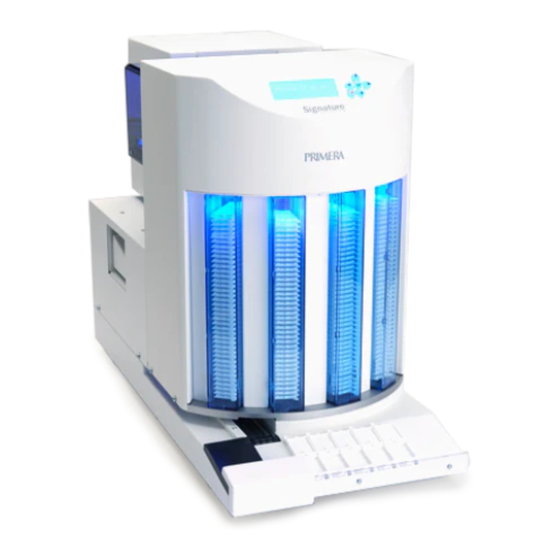
Page 10: Identifying The Parts
The following illustrations show the various parts of the robot. These parts will be referred to throughout this manual so return here if you ever encounter a term that is unfamiliar to you. Signature Cassette Printer – Manual Control Panel... - Page 11 Cassette Conveyor Tray Extension Storage Area Cassette Hoppers Cassette Output Cassette Pusher The C ontrol Panel i s used to display error messages, check remaining cassette levels or assign hopper designations. The C assette Conveyor m oves the printed cassette forward from the cassette chute inside the printer to the Cassette Ouput ...
- Page 12 The S ignature Cassette Printer – Manual i s boxed separately and set in place on the back of the Robot. The C assette Hoppers h old the unprinted cassettes. If hoppers are removed during a print job, the robot will pause its motion until the hopper has been replaced and the ...
- Page 13 Power Switch...
-
Page 14: Setup (Connecting The Cassette Printer)
SETUP (CONNECTING THE CASSETTE PRINTER) Locate the Signature Cassette Printer – Manual Feed. Disconnect any power or USB cables. Open the Robotics Safety cover on the Robot. Lower the Printer onto the back of the Robot. Align the ... - Page 15 Locator Pins...
- Page 16 Lower the Robotics Safety Cover. Connect the 6-pin Mini Din cable to the corresponding port on the back of the printer and robot. ...
-
Page 17: Loading And Installing Hoppers
Connect power to the printer and the robot. Switch on power to the Robot. Note: T he power cables for the Robot and the Printer are interchangeable! Refer to the Printer manual before connecting USB to the printer. - Page 18 Remove the hopper you would like to fill with cassettes. Orient the hopper as shown. Remove the cassettes from the box. Orient the cassettes so that the printable face of the cassette corresponds to the open side of the hopper. ...
- Page 19 Carefully slide the cassettes into the hopper. Make sure that the edge of the tape is accessible through the opening in the slot. ...
- Page 20 The front edges of the cassettes should be pushed all the way past the opening in the hopper. Past Opening Front Edge of Cassette Using your right had to hold the cassettes in place with downward and forward pressure.
- Page 21 Important Note: Check for any leftover tape adhesive remaining on the side walls of the cassettes. Remove the adhesive to prevent cassette sticking issues in the printer. ...
- Page 22 The cassettes will fall into place as you remove the tape and the pressure with your right hand. 10. Gently shake the hopper to level any remaining cassettes. 11. Cassettes should be level on all sides before inserting the hopper into the Robot. ...
-
Page 23: Loading Lidless Cassettes
LOADING LIDLESS CASSETTES Before loading lidless cassettes you must install a divider in the cassette hopper. Slide the divider into the slot inside the hopper with the plastic ribs facing away from the cassette. Once the divider is in place, load the cassettes according to the instructions in the ... -
Page 24: Installing The Extension Tray (Optional)
INSTALLING THE EXTENSION TRAY (OPTIONAL) The 10 cassette extension tray can be added to the Robot simply by setting it in place inline next to the output area so that the locator tab on the tray fits inside the receiving slot under the robot. -
Page 25: Section 2: Printing Cassettes
CASSETTE SPECIFICATIONS The Signature Cassette Printer can print on cassettes with printable face angles between 35 and 45 degrees and cassettes that meet the size specifications shown below. The Signature Cassette Printer uses thermal transfer print technology. This ... - Page 26 botto edges highly recom mend 3.5mm must be clear of lid 41.0mm attachment 40.0mm features 83.0mm MAX Note 1: C assettes may have lids attached in the open position as shown, lids may be removed or lids may be in a closed position as long as they do not project over the printable face.
- Page 27 2. Printable Surface Quality The printable area of the tissue cassette must have a relatively flat and smooth surface. • Roughness. T he recommended surface roughness is approximately 30 microinches. Slightly rougher print surfaces will also work, but there may be incomplete transfer of ink to low spots within the surface texture. ...
-
Page 28: Printing From Ptlab
4. Raised Printable Surface Area The printable area can be a pad that is slightly raised from the rest of the printable face or it can be a perfectly flat face; however, the printable area cannot be recessed within the printable face. -
Page 29: Printing From Other Programs
PRINTING FROM OTHER PROGRAMS Printing to the Cassette Printer from other software can be accomplished by using the included Windows driver installed in the previous section. Four different document sizes are available depending on the type of cassette you have. The image file should correspond to one of the sizes below. ... -
Page 30: Section 3: Control Panel Operation
Section 3: Control Panel Operation OVERVIEW OF OPERATION The control panel can be used to change hopper type descriptions to one of the preprogrammed types, view error messages, view cassette levels in each hopper, view remaining prints on the ribbon, or pause the robot so hoppers can be ... -
Page 31: Programming Hopper Descriptions
If there is an error message the control panel will alternate between the error message and cassette levels. This error indicates that the printer is not plugged in, powered off or not connected via the six pin mini-din cable. ... - Page 32 ...
- Page 33 A blinking cursor will appear on the first letter of the description of the first hopper. Press the side arrow to change to one of the other preprogrammed descriptions. To move to one of the other hopper locations, press the down arrow. ...
- Page 34 descriptions, open PTLab, double-click on the hopper icon on the status bar. You may also click on the settings icon and choose settings – Hopper Settings. ...
- Page 35 To change the currently selected hopper type, click on the drop down menu next to each hopper number. All available descriptions will appear in the drop down. Hopper numbers start with “1” on the left side of the printer. Once the hopper types are selected for each hopper number, click Set.
- Page 36 Cassette/Hopper Type Mismatch The hopper descriptions are stored on the printer (not the robot) and the currently connected computer. The descriptions are stored in both locations so that you do not have reenter them if either the printer or the computer is changed. ...
-
Page 37: Understanding Control Panel Error Messages
UNDERSTANDING CONTROL PANEL ERROR MESSAGES The following is a list of error messages that may occur. For most you can press the check button on the control panel to ... - Page 38 ...
- Page 39 Cover is open The safety cover over the front of the printer is open. Close the cover to continue. Selected cassette type is empty The hopper is out of media. Other types of media may be present in other hoppers. Selected cassette is not in robot ...
- Page 40 hopper. 1:Blue 2:Blue 3:White Biopsy 4:White Biopsy...
-
Page 41: Transporting The Robot
TRANSPORTING THE ROBOT To prevent damage to the robotic arm during shipment, it is important to properly secure it. To prepare for transport remove all hoppers, remove the printer from the back and then do the following. Place the piece of notched foam that originally shipped with the unit in the bottom of the second bay from the left. ... -
Page 42: Technical Support
below. Source Location Primera Knowledge Base http://www.primerahealthcare.com/ knowledgebase.html Email Support http://www.primerahealthcare.com/ contact_tech_support.html Phone Support 763-475-6979 (Mon - Fri 8 a.m. - 5 p.m CST) ... -
Page 43: Section 5: Technical Specifications
Section 5: Technical Specifications Printing technology: Thermal transfer Print speed: Up to 8 cassettes/minute Print resolution: dpi Ink type: Resin thermal transfer Ribbon types: CMYK: 1000 prints Black: 4300 prints Printable colors: 8 solid colors; plus pattern options Cassette types: Prints on standard smooth-faced cassettes ... - Page 44 Printed in the United States of America ...
Need help?
Do you have a question about the PRIMERA and is the answer not in the manual?
Questions and answers