
Related Manuals for walser Walimex Pro RGB TUBE SMALL M10


Summary of Contents for walser Walimex Pro RGB TUBE SMALL M10
- Page 1 WALSER GmbH & Co. KG Senefelderstrasse 23 86368 Gersthofen Germany info@walser.de www.walser.de Made in China...
- Page 2 RGB TUBE SMALL M10 Gebrauchsanleitung Instruction Manual...
-
Page 3: Table Of Contents
Gebrauchsanleitung 1. Hinweise zum Verständnis dieser Gebrauchsanleitung ...... 4 1.1 Kennzeichen und Symbole am Gerät ..............4 1.2 Symbole zu Sicherheitshinweisen in dieser Gebrauchsanleitung ....5 2. Bestimmungsgemäße Verwendung ............5 3. Wichtige Sicherheitshinweise ..............5 3. Gerät auspacken und prüfen ..............7 4. - Page 4 Instruction Manual 1. Notes on understanding these operating instructions ......17 1.1 Markings and symbols on the unit ..............17 1.2 Symbols for safety instructions in these operating instructions .......18 2. Intended use ..................... 18 3. Important safety instructions ..............18 3.
-
Page 5: Hinweise Zum Verständnis Dieser Gebrauchsanleitung
Wir danken Ihnen für Ihr Vertrauen und wünschen Ihnen viel Freude und Erfolg mit Ihrem neu- en Leuchtstab. Die Walimex pro RGB Tube Small M10 ist ein handlicher RGB-Leuchtstab mit Bi-Color- Funktion für Lichteffekte bei Foto- und Video-Sets. Er eignet sich perfekt für die Ausleuchtung sowie Spezialeffekte beim Streamen, bei Food- bzw. -
Page 6: Symbole Zu Sicherheitshinweisen In Dieser Gebrauchsanleitung
Bestimmungsgemäße Verwendung Die Walimex pro RGB Tube Small M10 ist ein leistungsstarker Leuchtstab mit integriertem Akku für die Anwendung bei Foto- und Videoaufnahmen. Sie ist individuell einstellbar und kann mit Adapter per Netzstrom oder über einen PC o. ä. geladen werden. - Page 7 WARNUNG Stromschlaggefahr und Brandgefahr durch Kurzschluss Ein Kurzschluss kann u. a. durch defekte Kabel, Feuchtigkeit oder Nässe verursacht werden. Bei einem Kurzschluss kann die Isolierung oder der Leitungsdraht schmelzen. Dadurch kann es zu einem Brand oder Stromschlag kommen. ■ Verwenden Sie für den Leuchtstab nur die mitgelieferten Originalkabel. ■...
-
Page 8: Gerät Auspacken Und Prüfen
HINWEIS Falls die Lieferung unvollständig ist oder Teile beschädigt sind, wenden Sie sich bitte per E-Mail an info@walser.de. Im Rahmen von Produktverbesserungen behalten wir uns das Recht auf technische und optische Änderungen vor. Abbildungen können geringfügig voneinander abweichen. Richtlinie 2010/30/ EU zur Energieverbrauchskennzeichnung findet hier keine Anwendung. -
Page 9: Übersicht Über Bestandteile Und Bedienelemente
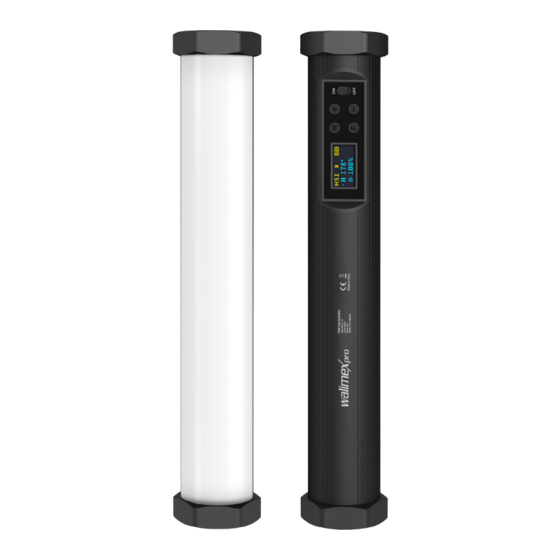
Übersicht über Bestandteile und Bedienelemente... - Page 10 1. Diffusor 2. Gehäuse 3. Bedienbereich 4. Display 5. Funktionsknopf 6. Einstellknöpfe + – 7. Ein/Aus-Schalter 8. Helligkeitsknopf 9. Farb-Modus 10. Ladestand des Akkus 11. Farbe H in ° 12. Helligkeit in % 13. Farbsättigung S 14. Farbtemperatur-Modus 15. Akkuladesymbol 16.
-
Page 11: Kurzanleitung
Kurzanleitung HINWEIS Die detaillierte Anleitung zu den nachfolgenden Tätigkeiten finden Sie in den jeweiligen Ab- schnitten dieser Gebrauchsanleitung. Halten Sie bei der ersten Inbetriebnahme die Reihen- folge der nachfolgenden Tätigkeiten ein, um Schäden am Gerät zu vermeiden. WARNUNG Beachten Sie bei allen Tätigkeiten die Sicherheitshinweise in den jeweiligen Abschnitten. Gerät für den Einsatz vorbereiten 6.1 Leuchtstab auf einem Stativ / dem Ministativ montieren HINWEIS... -
Page 12: Leuchtstab Ein- Bzw. Ausschalten
6.4 Leuchtstab ein- bzw. ausschalten 1. Zum Einschalten bringen Sie den Ein/Aus-Schalter (7) in die Stellung [ON]. HINWEIS Schalten Sie den Leuchtstab nach Gebrauch aus und trennen Sie ihn vom Smartphone o.ä. bzw. Stromnetz, wenn Sie ihn länger nicht verwenden. 2. -
Page 13: Helligkeit ( 1-100%) Am Leuchtstab Einstellen
7.3 Helligkeit ( 1-100%) am Leuchtstab einstellen 1. Schalten Sie den Leuchtstab gemäß Kapitel 6 ein. 2. Drücken Sie die Taste F (8) 1× kurz um die Helligkeitseinstellung auszuwählen. - Das Display zeigt HSI in der oberen Zeile des Displays an. 3. -
Page 14: Reinigen
Entsorgungsstellen. Dieser Service ist für Sie kostenlos. 12. Verweis auf die Konformitätserklärung Hiermit erklärt WALSER GmbH & Co. KG, dass sich die Fernbedienung und die LED-Leuchte mit integriertem Funkempfänger in Übereinstimmung mit den grundlegenden Anforderungen und den übrigen einschlägigen Bestimmungen befinden. -
Page 15: Technische Daten
13. Technische Daten Gerät RGB Tube Small M10 Artikel Nummer 23121 Leuchtstab Material Aluminiumgehäuse Leuchtmittel LED, 190 Stück Max. Leistung 10 W Max. Lichtstrom 620 lm Farbraum 0-360° volles Farbspektrum RGB Farbsättigung 1-100 Lichtintensität 1-100 % Farbtemperatur 3.200 – 7.500 K (bei Weißlicht) Farbwiedergabeindex CRI/ Ra 96+ TLCI... - Page 16 Lithium-Ion-Akku, DC 7,4 V, 2500 mAh Laufzeit ca. 130 min bei 7500 K und 100 % Helligkeit Ladezeit ca. 2,5 Std. Ladetemperatur 0° C bis + 45° C Stromversorgung Akku 5V 1A Walimex pro RGB Tube Small M10, Ministativ, USB-C Ladekabel, Lieferumfang Sicherheitshinweise...
- Page 17 86368 Gersthofen Deutschland Unser Garantieversprechen WALSER ist bekannt für seine hochwertige Verarbeitung, beste Funktionalität und einen kun- dennahen Service. Um unserem außergewöhnlichen Serviceniveau zusätzlichen Ausdruck zu verleihen, geben wir für dieses Walimex pro Produkt eine Garantie von 2 Jahren. Diese Garantie ist nur in Verbindung mit Ihrem Kaufbeleg gültig.
-
Page 18: Instruction Manual
Thank you for placing your trust in us, and we wish you much joy and success with your new glowstick. The Walimex pro RGB Tube Small M10 is a handy RGB glowstick with bi-colour function for lighting effects in photo and video sets. It is perfect for illumination and special effects in streaming, food and product photography, interviews, social media videos, YouTube, Instagram, etc. -
Page 19: Symbols For Safety Instructions In These Operating Instructions
Intended use The Walimex pro RGB Tube Small M10 is a powerful glowstick with integrated rechargeable battery for use in photo and video shoots. It is individually adjustable and can be charged with an adapter via mains power or a PC or similar. - Page 20 WARNING Electric shock hazard and fire hazard, caused by a short circuit Among other things, a short circuit can be caused by defective cables, moisture or wetness. In the event of a short circuit, the insulation or the cable wire may melt. This can lead to a fire or electric shock.
-
Page 21: Unpack And Check The Unit
NOTICE If the delivery is incomplete or parts are damaged, please contact us by e-mail at info@walser.de. Within the scope of product improvements, we reserve the right to make technical and optical changes. Illustrations may differ slightly from each other. Directive 2010/30/EU on energy labelling does not apply here. -
Page 22: Overview Of Components And Controls
Overview of components and controls... - Page 23 1. Diffuser 2. Housing 3. Operating area 4. Display 5. Function button 6. Adjustment knobs + – 7. On/off switch 8. Brightness button 9. Colour mode 10. Battery charge level 11. Colour H in ° 12. Brightness in % 13. Colour saturation S 14.
-
Page 24: Quick Guide
Quick guide NOTICE Detailed instructions for the following activities can be found in the respective sections of these operating instructions. When using the unit for the first time, follow the sequence of the follow- ing steps to avoid damage to the unit. WARNING Please observe the safety instructions in the respective sections for all activities. -
Page 25: Switching The Glowstick On And Off
6.4 Switching the glowstick on and off 1. To switch on the unit, bring the on/off switch to the (7) to the [ON].position. NOTICE NOTE - Switch off the glowstick after use and disconnect it from the smartphone or similar or from the power supply if you are not going to use it for a longer period of time. -
Page 26: Set The Brightness ( 1-100%) On The Glowstick
7.3 Set the brightness ( 1-100%) on the glowstick 1. Switch on the glowstick as described in the chapter 6. 2. Press the F (8) button 1× briefly to select the brightness setting mode - The display shows HSI in the upper line of the display. 3. -
Page 27: Cleaning
This service is free of charge for you. 12. Reference to the declaration of conformity WALSER GmbH & Co. KG hereby declares that the remote control and the LED luminaire with integrated radio receiver are conform with the essential requirements and the other relevant... -
Page 28: Technical Data
13. Technical Data Unit RGB Tube Small M10 Item number 23121 Type Glowstick Material Aluminium housing Lamps LED, 190 pieces Max. Power 10 W Max. Luminous flux 620 lm Colour space 0-360° full colour spectrum RGB Colour saturation 1-100 Light intensity 1-100% Colour temperature 3,200 –... - Page 29 130 min at 7500 K and 100 % brightness Charging time approx. 2.5 hours Charging temperature 0° C to + 45° C Power supply rechargeable 5V 1A battery Walimex pro RGB Tube Small M10, mini tripod, Scope of delivery USB-C charging cable, safety instructions...
- Page 30 This guarantee is only valid in conjunction with your proof of purchase. If you wish to make use of our guarantee, please contact us by e-mail at info@foto-walser.de. You can find our comprehensive guarantee promise and the scope of the guarantee under www.foto-walser.de/garantie...
Need help?
Do you have a question about the Walimex Pro RGB TUBE SMALL M10 and is the answer not in the manual?
Questions and answers