Table of Contents
Advertisement
Quick Links
Advertisement
Table of Contents

Summary of Contents for TAC SYSTEM ONKIO
- Page 1 Install & Operation Manual...
-
Page 2: Table Of Contents
7. BAND LEVEL LOW / MID / HIGH ................18 8. DRY / WET .......................19 9. Insert Mode / Send Mode ..................19 10. Frequency spectrum ....................19 11. Sound Source Position Select ..................20 12. MIC ANGLE ......................21 13. ADJUST MIC ......................22 ONKIO Acoustics Install & Operation Manual Page 2... -
Page 3: Welcome
Welcome Introduction Thank you for purchasing a TAC SYSTEM product, ONKIO Acoustics. This document describes the software license terms, user and support information, installation instructions, iLok Activation, and operations for this product. For the plug-in installer download and the latest information, please refer to the TAC SYSTEM's product website. -
Page 4: Software License Agreement
Software Administrator (hereinafter referred to as the "Software User") on the condition that they agree to all of the following. TAC SYSTEM, INC. software vendors, distributors, or their employees are not authorized to make any modifications, expansions, or additions to the information below. -
Page 5: Authorization
Authorization ONKIO Acoustics uses Pace's iLok system for authorization. Before the authorization process begins, be sure to create an iLok account at iLok.com and download the iLok License Manager. ONKIO Acoustics uses iLok "License Manager" (application) to manage the license. -
Page 6: Ilok License
It does not support iLok1. Machine Authorization ONKIO Acoustics supports Machine Authorization on iLok "License Manager". You can register your machine as a "licensed machine" without using an iLok USB dongle key. License transfer is done on the "License Manager". - Page 7 3. Click "Licenses" > "Redeem Activation Code" in the application menu. On the "Enter Activation Code" screen, enter the "Redeem Code" that was included in your purchase email. ※The code can be copied and pasted. ONKIO Acoustics Install & Operation Manual Page 7...
- Page 8 ※If you check the "Do not show again" checkbox, this confirmation screen will not appear again. 6. When using an iLok, never remove or insert the iLok while the meter on the left side of the screen is moving. ONKIO Acoustics Install & Operation Manual Page 8...
- Page 9 "Successful Activation" dialog box will appear. Click the "OK" button. ※If you check the "Do not show again" checkbox, this confirmation screen will not appear again. 8. Confirm that a license has been deposited at the location. ONKIO Acoustics Install & Operation Manual Page 9...
-
Page 10: Installation On Mac
Installation on Mac Installing ONKIO Acoustics The installer download is available from the Tac System product website. https://www.tacsystem.com/eng/products/onkio-acoustics.html Double-click the installer file (.pkg) to launch it. Click "Continue." Read the lease notes and click "Continue." Read the license agreement and click "Continue." You will be asked if you agree. - Page 11 Check the amount of space required for installation. If all is well, click "Install." Depending on your system, you may need to enter a password. The following window will appear and installation is complete. ONKIO Acoustics Install & Operation Manual Page 11...
-
Page 12: Installation On Windows
Installation on Windows Installing ONKIO Acoustics The installer download is available from the Tac System product website. https://www.tacsystem.com/eng/products/onkio-acoustics.html Double-click the installer file (.exe) to launch it. Click "Yes." *Please allow permission if Windows system protection, etc. is displayed when the installer is started. - Page 13 Read the license agreement. If you are okay with it, select “I accept the agreement" and click “Next." Read the release notes and click "Next." Select the components to be installed and click "Next." ONKIO Acoustics Install & Operation Manual Page 13...
-
Page 14: Contact
※Software support is available via email. Please include your serial number in your email inquiry. Support hours are available only during our business hours.On weekdays, we will respond in order after confirming your e-mail. ONKIO Acoustics Install & Operation Manual Page 14... -
Page 15: Plug-In Overview
Plug-in Overview Part Names/Functions ONKIO Acoustics Install & Operation Manual Page 15... -
Page 16: Plug-In Info
1. Plug-in Info Click on the ONKIO Acoustics logo to display a window with information about the plug-in. To hide the window, click the logo again, or click the window. 2. Foldable Display ① The window can be collapsed by clicking the on the left edge of the plug-in window. -
Page 17: Studio No.1 Reflectors Select
In the Studio No. 2, you can choose from the main floor or booth (inside/outside). ▼Click on "Main Floor" or click on the studio image to open the pull-down menu. Main Inside the Outside the ONKIO Acoustics Install & Operation Manual Page 17... -
Page 18: Input Level / Output Level
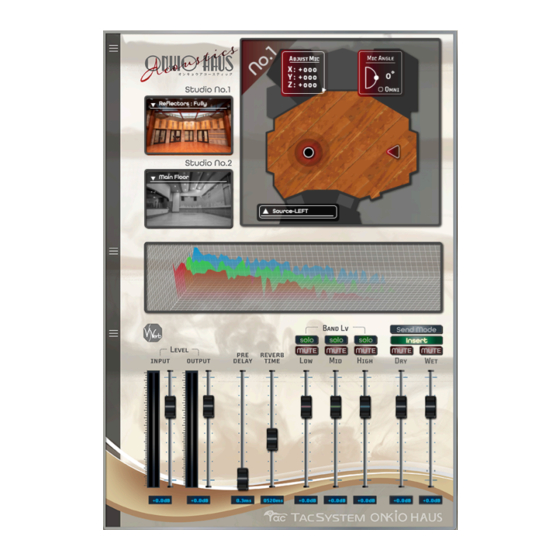
You can also double-click the dB indicator at the bottom and specify the level by number. Solo/mute is available for each LOW, MID, and HIGH. Variable range -90dB〜+12dB -00.0dB -00.0dB 000.0ms 00.00s -00.0dB -00.0dB -00.0dB -000 ONKIO Acoustics Install & Operation Manual Page 18... -
Page 19: Dry / Wet
WET fader is fixed at its default value. 10. Frequency spectrum The chart also changes according to the setting of each parameter. From the front, the order is as follows Red : LOW Green : MID Blue : HIGH ONKIO Acoustics Install & Operation Manual Page 19... -
Page 20: Sound Source Position Select
11. Sound Source Position Select ▲Click on Source-LEFT (default) to display a pull-up and change the position. ←Source ←Microphone Studio No.1 Source-LEFT Source-CENTER Source-RIGHT Studio No.1 Control Room Studio No.1 Main Floor ONKIO Acoustics Install & Operation Manual Page 20... -
Page 21: Mic Angle
●. The microphone is angled vertically up and down to the Source. The microphone type is cardioid by default and can be changed to omni by clicking "OMNI." Variable range -90°〜+90° ONKIO Acoustics Install & Operation Manual Page 21... -
Page 22: Adjust Mic
The triangle vertices of the microphone mark correspond to the X [depth], Y [horizontal], and Z [height] positions. + – Adjust Mic + x: +000 y: - 00 0 z: +000 – Variable range X -999〜+999mm Y -999〜+999mm Z -999〜+999mm ONKIO Acoustics Install & Operation Manual Page 22...
Need help?
Do you have a question about the ONKIO and is the answer not in the manual?
Questions and answers