Table of Contents
Advertisement
Quick Links
Advertisement
Table of Contents

Summary of Contents for Digitsole Pro
- Page 1 User Manual & Technical documentation PS_0001_IFU_000 EN rev 09 of 03-2023...
-
Page 2: Table Of Contents
Precautions to take before use ......................... 5 Intended use ............................. 6 Contraindication ............................6 Adverse effects ............................6 Product description ..........................7 Kit contents ............................... 7 Authorized accessories ..........................8 Recommended Computer/Phone Specifications ..................9 Functioning of the DSPods LEDs ........................ 9 Product Installation .......................... - Page 3 Mobile application ..........................41 Web interface ............................42 PodoSmart migration ..........................43 You have a Podosmart account but don’t have a Digitsole Pro account ..........43 You have a Digitsole Pro account and can migrate your Podosmart data .......... 43 Maintenance ............................ 46 Charging DSPods .............................
- Page 4 Product performance ..........................48 Detailed performance ......................... 49 Gait parameters ..........................49 Running parameters ........................49 Conditions of shipping and storage ......................50 Symbols definitions ..........................51 Regulatory conformity ..........................52 FCC-FCCID: 2AQ4H-DSI ........................52 End of product life ........................... 52 Assistance and help ..........................
-
Page 5: Precautions To Take Before Use
Digitsole® Pro is a device that can be used to examine the walking and running gait of patients aged 7 and older who have a shoe size of ≥ 30 (EU size = 12-12,5 US Kids). The size of the insole should correspond to the patient's foot size. -
Page 6: Intended Use
You can request a paper copy of this notice by emailing us at contact@digitsolepro.com Intended use Digitsole Pro® standard version is a solution for healthcare practitioners that displays objective data based on spatio- temporal and kinematic patient mobility metrics. Mobility reports provide the following information to healthcare practitioners: •... -
Page 7: Product Description
Digitsole Pro® device (gait and run). Digitsole® Pro can be used as part of a standard mobility analysis protocol (walking or running) at a patient's session with their health practitioner, whether or not they have reported mobility issues as a result of various reasons. -
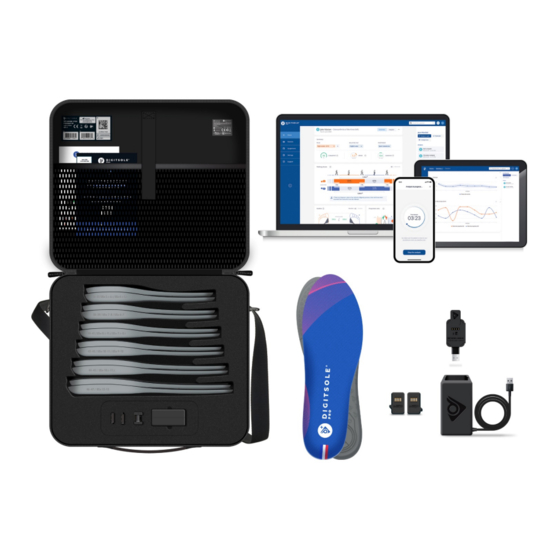
Page 8: Authorized Accessories
Extra Charger DSPS001-KIT00 - DSPods charger socket DSPS001-CAB00 - DSPods charger dock DSPS001-CAB10 Complete Kit of Digitsole Pro Adult Insoles (7 pairs) DSPS001-KIT20 - Digitsole Pro Adult Insole Size 30-32 DSPS001-INS30 (US 12-1,5) - Digitsole Pro Adult Insole Size 33-35... -
Page 9: Recommended Computer/Phone Specifications
Digitsole® Pro Kit DSPS001-KIT60 Recommended Computer/Phone Specifications The Digitsole Pro interface is compatible with both PCs and tablets. The interface: MacOS/IOS - Windows - Android. Web browser: Mozilla Firefox – Google Chrome – Microsoft Edge. The Digitsole Pro application is compatible with mobile phones. -
Page 10: Product Installation
Product Installation Product operation Insert the DSPods into your insoles as follows: • Identify left and right DSPods DSPod left DSPod right • Identify the left insole and the right insole Left insole Right insole • Place the left DSPod in the left insole and the right DSPod in the right insole. Please keep in mind that the DSPods must be inserted in the correct direction for the data capture to work (see image below) The data acquisition can also be done with the use of DSPods positioned on the bottom of the foot if the positioning of... -
Page 11: Account Creation
Account creation If you have not already done so, go to the following page to create a Digitsole® Pro account: https://app.digitsolepro.com/auth/sign-up After reading the data processing contract, enter the email address and password you want to use for your Digitsole®... -
Page 12: Two-Factor Authentication Activation
Two-factor authentication activation To active the two-factor authentication, go to the Your account in the top right corner Then select Enable dual authentication in the menu. Scan the QR Code with your two-factor authentication app (for example, Google authenticator) and enter the code in the area specified for this purpose. -
Page 13: Download The Mobile Application
Download the mobile application The Digitsole® Pro app is free and works with iOS 15.0+ and Android 6.0+ mobile devices. Please check the firmware version on your phone to see which devices are compatible with the apps. Enter Digitsole® Pro in the search bar to locate the application: •... -
Page 14: Use Of The Mobile Application
To log in, enter your account email address and password. If you have forgotten your password, go to the Digitsole® Pro interface and create a new one. DSPods management... - Page 15 • If you already have DSPods, go to the "My DSPods" area and click on "See all," which will redirect you to a list of your DSPods. Select Add DSPods from the menu. To add your DSPods to your account, go to a new page and scan the Datamatrix code from your pair of DSPods. If you have more than one pair of DSPods, repeat the procedure.
-
Page 16: Update Dspods
Update DSPods Click on Check for updates to check the DSPods version and see if they need to be updated. You will have the choice to perform the update now or later. We advise you to do it now but if you choose to do it later, you will have to rescan your Pods by adding them to your account again. -
Page 17: Application Settings
Application settings Units In the "Settings" section, you can choose the system of units you want to use in the application. You can choose between the metric and imperial systems. Languages Our application is available in several languages. The choice of the language is defined according to the language set as the main language in your phone. -
Page 18: Delete A Patient
Edit a patient Click on the patient you want to edit from the list of patients, and the patient file will open. Select Edit from the menu at the upper right of the screen. When the form appears, fill in the fields and then click Submit to save your changes. After that, the patient's file will be updated. -
Page 19: Start And Stop Data Capture
Start and stop data capture 1 – Go to your patient's file once your patient is created and your DSPods have been added to your account. Click on the 2 - Next, choose the type of analysis button New Analysis. 3 -Using the menu above, you can then enter further information about your patient. - Page 20 Note: If you share a workspace with a practitioner, it is not possible to perform an analysis at the same time on the same patient, nor is it possible to perform simultaneous acquisitions on the same Digitsole Pro account. In both cases this could block your account and create errors.
-
Page 21: View The Data
You can select the sort of view you want at the top: General or Details. Clicking the For more details option will automatically link you to the Digitsole Pro web interface, where you may perform a more intensive analysis of the results. -
Page 22: Using The Web Interface
Using the web interface Login to the interface To access the interface, ensure that you have already made your account on the web interface. You can connect to https://app.digitsolepro.com/auth/sign- this application using the same credentials. Log in via the following link: To log in, enter your account’s email address and password. -
Page 23: Web Interface Settings
You then proceed to the login screen, where you enter your email address and your new password to use Digitsole Pro®. Web interface settings Units In the "Settings" section, choose between the metric or imperial systems of units to use on the web interface. -
Page 24: Workspace
In the "Logo" section, you can add, modify or delete the logo. This logo will appear in the exports of your patients' test results. In the section “Members”, click on top right of your screen on "Invite a new member" to add a Digitsole® Pro user to your workspace. -
Page 25: Changes To My Account
Changes to my account Information management for health practitioners To change your practitioner information, go to Your account button at the top right Then, to edit your practitioner information, click the Pen icon. Patient management Add a patient Select the Patients tab, then New patient on the top right. A new window opens, allowing you to enter your patient's details, address, preferred method of contact, purpose for consultation, and any history and pathologies. -
Page 26: Edit A Patient
NB: Note that with imperial units, choose the gender of the patient first to access the men or women’s sizes. Edit a patient To make changes to a patient's file, go to the Patient tab and then choose the patient. Click Edit patient to make changes to the patient's personal information, address, and contact information. -
Page 27: Delete A Patient
Delete a patient To delete a patient, click on the Patient tab, on the right of your screen, on the line corresponding to the patient you want to delete then click on the red logo Delete patient. Please note: This is an irreversible action. Search a patient Type the last name and/or first name of the patient you are looking for in the search for a patient section at the top right of the Home page, and then click on their name to access their patient file. -
Page 28: Patient's File
Patient’s file From the patient file you will have access to different tabs: • Dashboard - You will find the recent analysis of your patient as well as their eventual pathologies and reason for consultation that you can add or modify. •... -
Page 29: Acquisition Management
Acquisition management Rename an analysis From the tab "Practitioner's analysis" on the patient record or directly from the analysis results, you can rename your analysis. To do this, click on the Pen icon, rename the analysis and then click on Save. Your analysis is now renamed. PS_0001_IFU_000 EN rev 09 of 03-2023... -
Page 30: Delete An Analysis
Delete an analysis Select the Patients tab, then the selected patient's line. You are now in the patient file. Click on the analysis you want to delete, then on the top right click ... and select Delete analysis A window appears, asking you to confirm your deletion request. The analysis will be permanently deleted if you click Delete. -
Page 31: View The Analysis
View the analysis Select the Patients tab, then the selected patient's line. You are now in the patient file. Select the analysis you wish to view by clicking on it. The patient analysis is now displayed. On the top right, choose the type of view you want to see - General or Details, then you can choose one of five filters: Neurological, Traumatological, Rehabilitation, a Custom filter or Default view. - Page 32 Gait analyses without this logo, will correspond to analyses performed with the "Raw" version of our algorithms, i.e. with a data calculation performed in the cloud from the raw information recorded by the insoles (Digitsole Pro 2.0). PS_0001_IFU_000 EN rev 09 of 03-2023...
-
Page 33: Generate Report
Generate report Export report Select the Patients tab, then the selected patient's line. You are now in the patient file. Select the analysis you wish to view by clicking on it. Once the analysis is open, click on the three dots in the upper right corner, followed by Export PDF. The export analysis page will appear. - Page 34 For more details about exporting a run analysis, select two points on the details tab chart as below You can then click Export PDF which opens the analysis export page. By checking the details box, you will have access to a more detailed PDF including the comparison of the two points you selected earlier. PS_0001_IFU_000 EN rev 09 of 03-2023...
-
Page 35: Export A Comparative Report
Export a Comparative Report Click on the Patients tab and then on the line of the desired patient. You are now in the patient's file. Click the scan you want to access. Once the scan is open, click on the three dots button at the top right and then click Compare. PS_0001_IFU_000 EN rev 09 of 03-2023... - Page 36 Then select the second analysis for comparison. Then click Export PDF. The analysis export page will open and you can chose how you’d like to export the report. PS_0001_IFU_000 EN rev 09 of 03-2023...
-
Page 37: Change The Information That Appears On The Report
Change the information that appears on the report Following the completion of your analysis export, you can: • Check the "Advanced" box to generate a more advanced report • Choose whether or not to show your information (e-mail, phone number and logo) by checking the corresponding boxes. -
Page 38: Compare Analyses
Compare analyses Select the Patients tab, then the selected patient's line. You are now on the patient file. Select the analysis you wish to compare by clicking on it. Once the analysis is open, click the three dots button in the upper right corner, followed by Compare. Then select the analysis that you want to compare it with. -
Page 39: Add Comments
Add comments Notes added Comments section bottom analysis results. Comments will be saved with the results to be viewed at any time. After report been exported, notes Comments section. The comments you enter here will not be saved on the interface. You can, however, save them by printing the report, emailing it to the patient, and/or saving it as a PDF. -
Page 40: See The Evolution Of The Parameters
See the evolution of the parameters Click on the Patients tab and then on the line of the desired patient. You are now on the patient's file. Click on evolution From the evolution tab, you will find the evolution of your patient's analysis results classified by type of analysis. On the top right you can choose the type of view you want to have: Default, Neurological, Traumatological, Reathletization. -
Page 41: Optional Feature
Optional feature Video Module Recording the patient while they are doing their acquisition is now an optional feature. The video module is a purchasable module compatible with all different types of available analyses. You can then view it in the mobile application or from the web interface. Mobile application To record a patient during the acquisition, start an activity as usual. -
Page 42: Web Interface
Web interface If you use the Mobile application and chose to record the analysis of your patient, the video will be available in the results of the analysis. From the web interface, you cannot add a video to your patients' analysis. By clicking on the button ... -
Page 43: Podosmart Migration
PodoSmart migration If you are a Podosmart user and want to migrate your account, patients and analyses to a Digitsole Pro account follow the guide below. You have a Podosmart account but don’t have a Digitsole Pro account If you don’t have a Digitsole Pro account, please refer to the “Product installation” section of this document and follow the steps to create an account. - Page 44 • When a patient is migrated, it will create a new patient in your DS Pro account that will be tagged as “Migrated from Podosmart”, and the migrated analyses will have the same tag as well PLEASE NOTE: •...
- Page 45 Podosmart once a patient has been migrated to Digitsole Pro • If you are making Digitsole Pro analyses with an imported patient, Podosmart analyses will be tagged as “migrated from Podosmart” and will also appear in the evolution with the new Digitsole Pro analyses done.
-
Page 46: Maintenance
Maintenance Charging DSPods Remove the DSPods from the insoles and position them on either side of the USB charger plug. After connecting the two boxes to the USB plug, place everything in the charger connector provided for this purpose. To power the device, plug the connector into a USB port on your computer or into a power supply that fulfils IEC 60601-1: 2005 (2MOOP) or IEC 62368-1 medical specifications. -
Page 47: Cleaning Instructions For Your Device
Virucide EN14476 on HBV, HCV, Adenovirus, Coronavirus, Norovirus, RSV, H1N1, HSV-1, Polyomavirus* and Rotavirus*. *Unless it is very soiled • We recommend the STERIMED wipes for EU and the SANI-CLOTH product for US, which are available from Digitsole contact@digitsolepro.com and satisfies the requirements. -
Page 48: Radio Module
Radio module Frequency band: 2400-2483.5MHz Maximum power: 10 mW Category: Group 1 Class B (according to CISPR 11) for homecare environment This device conforms with the EMC directive 2014/30/EU and the IEC 60601-1-2:2014 standard for electromagnetic compatibility of medical equipment and/or medical electrical systems. These parameters are intended to offer reasonable interference protection in a residential installation. -
Page 49: Detailed Performance
Detailed performance Gait parameters o Stride length : Distance travelled by the foot in a gait cycle. o Pace: Number of steps taken per minute. o Cycle time: Time between two successive contacts of the same foot. o Stance time: The duration between heel strike and toe lift for each foot during the stride cycle is used to determine gait stance time, which is the length of the period of the gait cycle when the limb is in contact with the ground. -
Page 50: Conditions Of Shipping And Storage
o Swing: The swing is the proportion of time during the running cycle when the limb is not in contact with the ground, measured as the interval between foot lift and initial contact for each foot during the stride cycle. o Double float: For a running cycle, the percentage of time when no foot makes contact with the ground. -
Page 51: Symbols Definitions
Symbols definitions Symbol Description Symbol Description The device meets the requirements of European Directive 93/42/EC, which covers Medical device medical devices. When a device reaches the end of its useful life, it must be disposed separately from household DC power supply 5 V 30mA. waste. -
Page 52: Regulatory Conformity
United States: Federal Communications Commission (FCC) declaration. This device complies with FCC Part 15 FCC Rules. Its operation is subject to the following two conditions: "Changes or modifications not expressly approved by Digitsole may result in the user's right to use the equipment being terminated"... -
Page 53: Assistance And Help
CE marking Date of CE marking: May 2021 DSPS001-FPT00 UDI-DI: 03700565774633 DIGITSOLE S.A.S 13 Rue Héré Place Stanislas 54000 Nancy France PS_0001_IFU_000 EN rev 09 of 03-2023...
Need help?
Do you have a question about the Pro and is the answer not in the manual?
Questions and answers