Advertisement
Quick Links
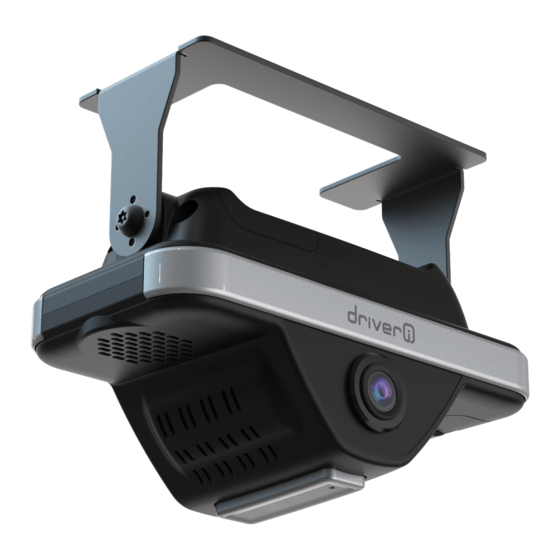
Driveri D-210 (2 Camera) Conventional
Hardwire
Link: https://help.nuvo.solutions/installation-guide/driveri-d-210-conv-hardwire/ Last Updated: December 9th, 2022
The installation kit contains an installation guide (please refer to this online guide as they differ), one Driveri
D-210 device, one mounting bracket, one power cable with antenna, one AD-1/2/3, a 6-pin harness, eight butt
connectors, one ring terminal, one self-tapping screw, one-star washer, eight 8" cable ties and cleaning wipes.
App installation verification and registration is required so please visit the App store on your smartphone and
download the Driveri Installer App.
Additional tools and supplies you will need include dashboard panel removers, a smartphone, a razor blade, a
digital multimeter, a cordless drill, 5/16" in. (8 mm) driver bit, a T9 and T20 security Torx bit, an insulated
crimper, a side cutter, wire strippers, a heat gun, hand roller, electrical tape, a dry/clean/lint-free cloth, dry
erase/wax tip marker and a tamper seal compound.
Installation Steps
The following steps provide an overview of the installation process:
1.
Install Preparation.
2.
6-Pin Harness Installation.
3.
Mounting Preparation.
4.
Device Installation.
5.
Verify and Registration.
6.
Frequently Asked Questions.
Note.
Driveri components MUST remain together; these parts are not replaceable or
interchangeable. The ONLY interchangeable part is the diagnostic bypass cable.
1. Install preparation.
Note.
If applicable, all water/ice/snow should be completely removed. If the outside
temperature is 75 degrees Fahrenheit (24 degrees Celsius) or less, turn on vehicle defrost
until the windshield is warm to the touch. Also, place the mounting bracket in defrost airflow
to warm VHB tape.
Copyright ©2023 Nuvo Solutions
Page 1 of 16
Advertisement

Summary of Contents for Nuvo Driveri D-210
- Page 1 Driveri D-210 (2 Camera) Conventional Hardwire Link: https://help.nuvo.solutions/installation-guide/driveri-d-210-conv-hardwire/ Last Updated: December 9th, 2022 The installation kit contains an installation guide (please refer to this online guide as they differ), one Driveri D-210 device, one mounting bracket, one power cable with antenna, one AD-1/2/3, a 6-pin harness, eight butt connectors, one ring terminal, one self-tapping screw, one-star washer, eight 8”...
- Page 2 Driveri D-210 (2 Camera) Conventional Hardwire Link: https://help.nuvo.solutions/installation-guide/driveri-d-210-conv-hardwire/ Last Updated: December 9th, 2022 Record the 8-digit device serial number (S/N) onto your paperwork. Remove a-pillar plastic and dashboard panels for harness installation. Tape off and cable tie 6-Pin Harness Green and Yellow wires, remove 1 1/2-in (4 cm) of insulation from the end of the Red, White and Black wire, and crimp ring terminal to Black wire.
- Page 3 Driveri D-210 (2 Camera) Conventional Hardwire Link: https://help.nuvo.solutions/installation-guide/driveri-d-210-conv-hardwire/ Last Updated: December 9th, 2022 2. 6-Pin Harness Installation. Note. The device is not rated for more than 17 VDC (+), will shut itself down at 15 VDC (+) and draws ~3Amps when active. Make sure the circuit will support this current draw and does not exceed the max device voltage threshold.
- Page 4 Driveri D-210 (2 Camera) Conventional Hardwire Link: https://help.nuvo.solutions/installation-guide/driveri-d-210-conv-hardwire/ Last Updated: December 9th, 2022 Locate a vehicle wire which provides at least 12 VDC (+) and 14 VDC (+) while the vehicle is On and running and 0 VDC (+) when the key is in the Off and Accessory position; this will be the 6-Pin Harness White wire power source.
- Page 5 Driveri D-210 (2 Camera) Conventional Hardwire Link: https://help.nuvo.solutions/installation-guide/driveri-d-210-conv-hardwire/ Last Updated: December 9th, 2022 3. Mounting Preparation. Mounting location is dependent on windshield type. For other windshield types, please see FAQ section at the end of this guide. Type 1: Rear View Mirror (Standard) Clean bracket mounting area with Alcohol wipe.
- Page 6 Driveri D-210 (2 Camera) Conventional Hardwire Link: https://help.nuvo.solutions/installation-guide/driveri-d-210-conv-hardwire/ Last Updated: December 9th, 2022 Note. Excessive heat may cause delamination of the windshield or cracking. Continuously move heat gun to not apply heat in one area for too long. Near the A-pillar, scrub the dashboard with alcohol wipes and wipe dry with a clean cloth.
- Page 7 Driveri D-210 (2 Camera) Conventional Hardwire Link: https://help.nuvo.solutions/installation-guide/driveri-d-210-conv-hardwire/ Last Updated: December 9th, 2022 4. Device Installation. Bracket Mounting Remove the plastic exposing the VHB adhesive. Apply heat to the tape. If using butane, lightly heat the bracket instead vs. the tape.
- Page 8 Driveri D-210 (2 Camera) Conventional Hardwire Link: https://help.nuvo.solutions/installation-guide/driveri-d-210-conv-hardwire/ Last Updated: December 9th, 2022 Note. Mounting brackets are one time use and should be thrown away after removal. Please contact your account manager for ordering additional mounting brackets. Device Mounting Remove device cover.
- Page 9 Driveri D-210 (2 Camera) Conventional Hardwire Link: https://help.nuvo.solutions/installation-guide/driveri-d-210-conv-hardwire/ Last Updated: December 9th, 2022 Note. The internal-facing camera has a lens cover and an LED on both sides of the camera lens. Cable Routing Route cable along mirror wires and secure with cable ties.
- Page 10 Driveri D-210 (2 Camera) Conventional Hardwire Link: https://help.nuvo.solutions/installation-guide/driveri-d-210-conv-hardwire/ Last Updated: December 9th, 2022 Device Connections Connect device cable to AD-1/2/3 and then connect AD-1/2/3 to 6-Pin Harness. Copyright ©2023 Nuvo Solutions Page 10 of 16...
- Page 11 Driveri D-210 (2 Camera) Conventional Hardwire Link: https://help.nuvo.solutions/installation-guide/driveri-d-210-conv-hardwire/ Last Updated: December 9th, 2022 5. Verification and Registration. Confirm LED lights are facing inwards, put both visors down, in the vertical position, and if applicable pull-out visor extensions. With the vehicle Off, open the ‘Driveri Installer’ app and follow the prompts to connect the Driveri to your smartphone.
- Page 12 Driveri D-210 (2 Camera) Conventional Hardwire Link: https://help.nuvo.solutions/installation-guide/driveri-d-210-conv-hardwire/ Last Updated: December 9th, 2022 Tighten down the two mounting bracket screws and proceed to ‘Pair Driveri with this Vehicle’ and ‘Upload Report.’ Press the Driver Alert button and wait 30 seconds before turning the vehicle off.
- Page 13 Driveri D-210 (2 Camera) Conventional Hardwire Link: https://help.nuvo.solutions/installation-guide/driveri-d-210-conv-hardwire/ Last Updated: December 9th, 2022 Cable tie any loose cables to existing wires, cable tie fuse holders and if available apply tamper seal to all connections. Copyright ©2023 Nuvo Solutions Page 13 of 16...
- Page 14 Driveri D-210 (2 Camera) Conventional Hardwire Link: https://help.nuvo.solutions/installation-guide/driveri-d-210-conv-hardwire/ Last Updated: December 9th, 2022 Note. Unless instructed to leave lens cover on the device, please remove and place it in the vehicle glove box. 6. Frequently Asked Questions. LED Status Description LED1 is flashing RED and LED2 is off.
- Page 15 Driveri D-210 (2 Camera) Conventional Hardwire Link: https://help.nuvo.solutions/installation-guide/driveri-d-210-conv-hardwire/ Last Updated: December 9th, 2022 Type 2: Rear View Mirror (Sensor Housing/Large Trim); Right side of housing/trim with bracket bottom the same level as housing. Type 3: Without Rear View Mirror; Top center, ~4-6”in. down and 6″in. right of center windshield.
- Page 16 Driveri D-210 (2 Camera) Conventional Hardwire Link: https://help.nuvo.solutions/installation-guide/driveri-d-210-conv-hardwire/ Last Updated: December 9th, 2022 Type 4: Angled/Split Windshield; Right windshield, down ~4-6” down from roof and ~1”in right of the center divider. Copyright ©2023 Nuvo Solutions Page 16 of 16...
Need help?
Do you have a question about the Driveri D-210 and is the answer not in the manual?
Questions and answers