Advertisement
Introduction
Smart Box III provides power to your MiVue™ recorder by connecting with the constant power of the fuse terminal of your vehicle. It is very useful when you want to record video footage whilst parking. Smart Box III can prevent the discharge of the vehicle battery by blocking the electric power automatically as it checks the voltage and preset timer.
Precautions and notices
Rated input voltage: DC 12 - 24V, output current: 2A maximum

Do not use other than rated output voltage status. This product can only be used with the vehicles that have DC 12 - 24V voltage.
(Passenger car / RV: 12V; truck / bus: 24V)
- Follow the installation instructions or ask a specialist technician for assistance.
- There may be deviations in vehicle power voltages about vehicle battery status and usage environments.
- Never attempt to disassemble, repair or make any modifications to the product. Disassembling, modifying or any attempt to repair could cause damage to your device, may inflict bodily harm or damage to property and will void any warranty.
- You must use the product as intended. Misuses, neglect, accident or abuse will not cover the warranty, replacement or refund.
- Do not drop the product or subject it to severe shock.
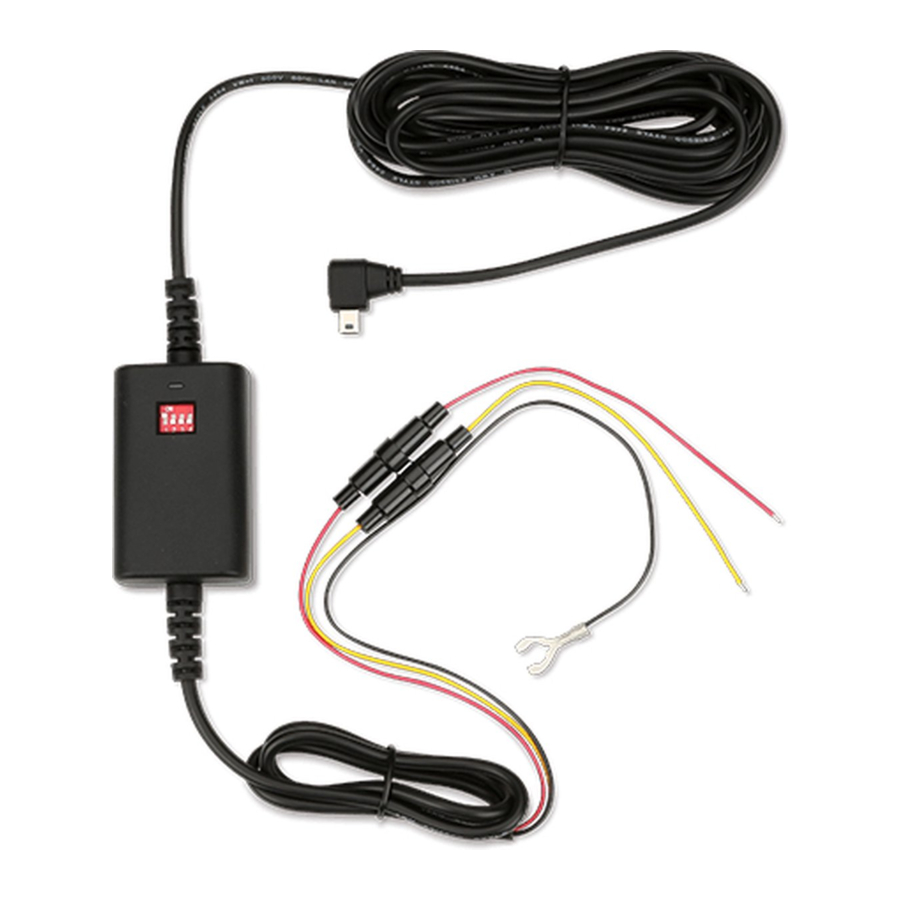
Parts and functions

- Fuse cable
- ACC (red wire)
- B+ (yellow wire)
- GND (black wire)
- Setting switches
Sets up the voltage and timer. - LED indicator
- Micro-USB connector
Connects to the recorder.
Setting switches

Switch 1 and 2: Voltage setting switches
Switch 3 and 4: Timer setting switches
Installation and setup
- Set up the voltage and timer by adjusting the switches.
Setting up the voltage:


The Smart Box III is designed to power the dash cam by drawing power from the car's battery until it reaches a specific voltage limit. Once the car's battery falls lower than this level, the Smart Box III will automatically stop drawing power from the car's battery.
It is recommended to set the Smart Box III to 12.4V (for passenger car and RV) / 24.8V (for truck and bus), and only change it to the other setting options after checking with your car's manufacturer and/or car's battery manufacturer. Please contact your car's manufacturer and/or car's battery manufacturer for more information relating to the minimum battery voltage required for your vehicle.
Setting up the timer:

If the time passes the preset timer (by checking the time after vehicle ignition is turned off), the power to the dash cam will be disconnected automatically.
- Select either 6 / 12 / 24 hours to enable the uninterrupted power function of the Smart Box III and the dash cam will be powered even when the vehicle engine stops.
- If Timer off is selected, the uninterrupted power function of the Smart Box III will be disabled and the dash cam will be powered only when the vehicle engine is started.
- Locate and open the fuse box inside of the vehicle.
Please note that the installation illustrations are for your reference only. The placement of the fuse box may vary depending on the vehicle model. If you encounter any problems during installation, it is recommended that you contact a skilled installer (for example, the service personnel of the vehicle) for assistance.

- Check and confirm the vehicle's voltage by using the electricity tester as battery voltages varies by vehicle. You must confirm your vehicle's voltage.
Use the electricity tester to locate the fuse from which the power is supplied even when the vehicle is turned off, such as the emergency flashing hazard lights, interior and door lights etc. Connect the yellow wire (B+) to the fuse.
Use the electricity tester to locate the fuse from which the power is not supplied when the vehicle is turned off, such as the indicator lights. Connect the red wire (ACC) to the fuse.
The black wire (GND) must be connected to the metal part of the vehicle for grounding. If not grounded, this product may not work properly. You can use a screw to attach the black wire to the vehicle (try to find a screw hole on any metal part).
Connect the Smart Box III to the dash cam and confirm it is working properly by the LED indicator that glows in red. Then you can arrange the cable and complete the installation.
You can route the cable through the top ceiling and the A-pillar so that it does not interfere with driving. Make sure that the cable installation does not interfere with the vehicle airbags or other safety features.


VideosMio MiVue SmartBox III Installation Video
Documents / ResourcesDownload manual
Here you can download full pdf version of manual, it may contain additional safety instructions, warranty information, FCC rules, etc.
Download Mio MiVue Smart Box III Manual with Installation Video
Advertisement
Need help?
Do you have a question about the Smart Box III and is the answer not in the manual?
Questions and answers