
Related Manuals for Gigasense RTM-D

Summary of Contents for Gigasense RTM-D
- Page 1 User Manual, Rope Tension Meter RTM‐D RTM‐D Rope Tension Meter Manual RTM_000_190904_EN.docx © Gigasense AB Page 1 / 16 ...
-
Page 2: Table Of Contents
FUNCTION .............................. 5 RTM‐D MAIN PARTS .......................... 6 FUNCTION .............................. 7 MEASURING PRACTICE .......................... 8 HANDLING ............................... 9 BEFORE USE ............................ 13 MEASURING INSTRUCTIONS ......................... 14 ERROR CODES ............................ 14 MAINTENANCE ............................ 15 TROUBLESHOOTING .......................... 15 IDENTIFICATION AND SPARE PARTS ...................... 15 REPLACEMENT OF PARTS AND DISPOSAL ..................... 16 RECOMMENDED SPARE PARTS ...................... 16 CE‐CERTIFICATION .......................... 16 MANUFACTURER CONTACT ........................ 16 Revision history: Rev 000_2019‐09‐04 First edition Manual RTM_000_190904_EN.docx © Gigasense AB Page 2 / 16 ... -
Page 3: Symbols Used
User Manual, Rope Tension Meter RTM‐D SYMBOLS USED The following symbols are used throughout this documentation, and/or marked on the product: CAUTION. This symbol on the equipment indicates that the manual must be consulted. In this manual it appears before instructions, which if not followed, may result in product damage or improper function. CE‐mark. Indicates that we as a manufacturer declare that this product is in conformity with all relevant CE‐marking Directives. Follow local regulations regarding recycling at disposal of this product. This product must be disposed of separately, and not with normal household waste. See separate section in this manual. IMPORTANT INFORMATION To ensure safe operation, this manual, together with applicable local user industry’s safety rules and regulations must be followed. Gigasense product warranty is not valid if other modifications than those described in this manual are made. Gigasense AB will not be responsible for any other use of this product than the intended use, which is specified in this manual. The buyer of this product is responsible for giving only adequately trained people access to installation, commissioning, maintenance and usage of this product. The users and installation personnel must have read and understood this manual, before using or installing this product. The instructions in this manual must be followed in installation, usage and maintenance procedures. Gigasense AB will not accept any responsibility for failure due to misuse, improper installation or improper maintenance. Apart from the above, there may be local laws, safety regulations and directives from public authorities, relevant for the use of this product. GENERAL – INTENDED USE The Rope Tension Meter RTM‐D is an instrument specially designed for measuring the tension in different kind of ropes. The measurements are made accurate and swiftly somewhere on the tensioned rope, without any extra preparations (off‐loading e.t.c.). The measurements can be done on ropes with different diameters and different designs. The ropes can be made of steel, metal or plastic material, and used as Guy‐wires, suspension wires, support wires for cautionary systems e.t.c.. The RTM‐D is able to contain up to 10 different calibrations, i.e. measurements can be done on 10 ... -
Page 4: Construction
‐ 0 ‐ Rope – List (example) Cal Cap = Max calibrated capacity for each Rope CONSTRUCTION The RTM-D is made of side plates with anodised aluminum. The RTM-D is corrosion and weather resistant. SAFETY INFORMATION AND WARNINGS Supplementary protective measures may be required on the basis of risk assessments for the application. ... -
Page 5: Specifications
Temperature range ambient ‐ 4°F ‐ +140°F / ‐20°C ‐ 60°C Display LCD 0 – 19999 Digit size 0.47” / ~12mm Battery life‐time (hours) 25 (Alkaline 9V battery 6LR61) Degree of protection (IEC 529, NEMA IP 65 Material adonized aluminium Max Cap = RTM-D’s Max. Capacity Cal Cap = Max calibrated capacity for each Rope SAFETY AND ENVIRONMENT Testing instrument for swift, handy and accurate testing of pre tensioned stationary ropes. Can temporarily be overloaded with 100% of its nominal capacity without affecting the accuracy of the instrument. The RTM‐D is delivered in a robust and light weight transport case (760 x 400 x 170 mm) for easy handling and protection of the instrument. FUNCTION The RTM‐D is very simple and handy to use. Simply hold and ”clip” it to the rope to be tested and use ... -
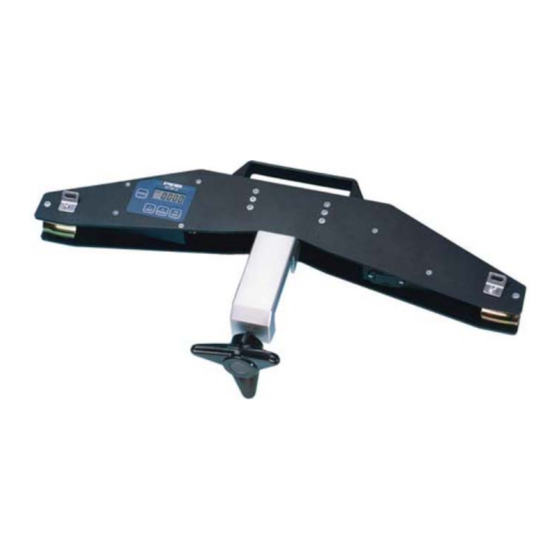
Page 6: Rtm-D Main Parts
User Manual, Rope Tension Meter RTM‐D RTM‐D MAIN PARTS 1. Tightening device 8. Display 2. Clamping jaw 9. Pull rod 3. Tightening screw 10. Leaf spring unit 4. Centre support (flat) 11. Load cell 5. Outer rope support 12. Battery unit 6. Electronic unit 13. Battery unit opening 7. Push buttons Manual RTM_000_190904_EN.docx © Gigasense AB Page 6 / 16 ... -
Page 7: Function
The resultant force affects the pull rod which is firmly connected with the flat center support. The pull rod affects in its turn the load cell, which gives an electrical signal which is proportional to the force. The signal is amplified, converted and indicated on the LCD display of the instrument. The Load Cell The load cell is made of toughened steel. It is constructed with strain gauges (wheatstone brigde). The load cell has supports in the end points and will therefore bend when the pull rod is loaded (figure 4:3). Manual RTM_000_190904_EN.docx © Gigasense AB Page 7 / 16 ... -
Page 8: Measuring Practice
Various types of ropes On the sign at the handle of the RTM‐D, the max rope dimension (diameter) is engraved, decided from the range of the outer rope supports. The limit for usable min rope dimension is more approximate. You can find some guidance under Specifications. For multistrand (flexible) ropes you normally obtain good accuracy, even if the diameter and/or the number of strands differ from the calibration rope. When it comes to measurements on rigid ropes with few strands, the accuracy will be less if the diameter and/or the construction of the rope differ. It is especially obvious for thick stiff ropes. You get the best accuracy when measuring on a rope identical to the calibration rope. Measuring on a tensioned rope (check) The instrument is normally calibrated for measuring on an already tensioned rope according to method 1 above. First you select correct ”RopeNo”, depending on which rope you are going to make measurements on. The RTM‐D then should be mounted/tightened to the tensed rope. The measurement result on the display shows the tension force in the rope. It is often suitable to perform a few more measurements at different spots on the rope. Slack rope to a specified tension Select ”Rope No”. Install the RTM‐D on the slack rope. Load the rope until the RTM‐D shows approx. 90% of the desired end value. Loosen the RTM‐D and then install it again. The RTM‐D will now indicate a higher value, probably rather close to the desired end value. If necessary, make an adjustment of the tension with the RTM‐D installed. Loosen the RTM‐D and check again. The RTM‐D should always be completely loosened between measurements. Manual RTM_000_190904_EN.docx © Gigasense AB Page 8 / 16 ... -
Page 9: Handling
Press the ON/OFF button to start the instrument. The startup is indicated on the display by showing selected ”Rope No” (earlier used rope) for about 2 seconds, e.g. The unit is turned off by pressing and holding the ON/OFF button for about 1 second. The unit will also be automatically turned off, if any of the buttons have not been activated within a programmable time. The time can be set between 1 and 60 minutes and this is described in page 12 . When installed on the completely slack rope, the RTM‐D should indicate zero on the display, otherwise you have to zero the instrument. When you set to zero, hold the RTM‐D with the tightening device hanging vertically or put the RTM‐D in this position on a slack rope. The instrument is zeroed by pressing and holding the ENTER/ZERO for about 2 seconds. The display will Indicate The zero‐setting remains saved even if the RTM‐D is turned off. This zero‐setting should only be done when the rope is untensioned. Manual RTM_000_190904_EN.docx © Gigasense AB Page 9 / 16 ... - Page 10 or: B. Resting on the upper supports – not tightened Then press the ZERO button for approximately 5 seconds If you ZERO‐set the RTM‐D – tightened on a rope under tension you will get an incorrect (low) readout on the display Manual RTM_000_190904_EN.docx © Gigasense AB Page 10 / 16 ...
- Page 11 Press the ENTER/ZERO button too Release the ENTER/ZERO and PEAK buttons The peak value is also resetted if the instrument is set to zero. UNIT – Alternative Unit The UNIT button is used to change between normal unit and alternative unit. The alternative unit mode is indicated by a flashing colon : on the left side of the display. The RTM‐D can e.g. have normal unit in lbs and alternative unit in kN. To get the tension displayed in the alternative unit, the electronics multiply the normal reading by a programmed factor. The factor can only be changed in the calibration mode. If the UNIT is held in for about 2 seconds, the display will first indicate the present ”Rope No” for 2 seconds and then the battery voltage, until the button is released. This is indicated by that the LOBAT indicator is lit and the prefix ”b” is viewed before the voltage, e.g. Low Battery Voltage The battery voltage is continuously measured and the LOBAT indicator will light up when the voltage drops below approx. 7.0V. At that point you will have a maximum of two hours of operation left from a lithium battery (or app. 1 hour from an alkaline battery). If the battery voltage drops to low (app. 5.6V), an error message will be displayed for about 4 seconds and after that the unit is automatically turned off. This ensures correct function during measuring. Change battery. Manual RTM_000_190904_EN.docx © Gigasense AB Page 11 / 16 ...
- Page 12 That is the indication that the stored ”Rope No 3” has been opened. You can cancel the selection and go back to previous rope by pressing ON/OFF. The selected rope will remain in use even if the unit is turned off. Automatic Turn OFF Selection of turn off time. To save the battery, the instrument will automatically be turned off if no button is activated within a programmable time. The time can be set to max 60 minutes and is done when you start up the RTM‐D: UNIT + ON/OFF The display will first indicate: and thereafter . XX is a number between 1 and 60 (minutes). Use the PEAK button to increase or the UNIT button to decrease until the preferred number of minutes is displayed. Accept by pressing the ENTER/ZERO button (for about 2 seconds) until a colon : is lit up on the left side of the display . That is the indication that the time has been stored in the permanent memory. The time will remain in use even if the unit is turned off. You can cancel the selection and go back to previous time by pressing ON/OFF Manual RTM_000_190904_EN.docx © Gigasense AB Page 12 / 16 ...
-
Page 13: Before Use
User Manual, Rope Tension Meter RTM‐D Serial Number and state of revision If the ENTER/ZERO button is held while the RTM‐D is started, serial number e.g. will be displayed for about 1.5 seconds and thereafter the state of revision for about 2 seconds. After that the RTM‐D will go back to normal mode. Overload The instrument will indicate for two kinds of overload. In both cases the displayed value will be flashing. The unit will indicate an overload by flashing the display reading in about 1 Hz. If the overload is due to that the ”Cal Cap” of that ”Rope No” has been exceeded, the reading is flashing slowly. If the overload is due to that the ”Max Cap” (the load cell) of the RTM‐D has been exceeded, the reading is flashing rapidly. It can be difficult to immediately understand what kind of overload that is due, but it is important to reduce the load as soon as the display flashes. BEFORE USE Check that the battery of the instrument is in good condition as per Low Battery Voltage paragraph 6:1:5. Check that the threads of the tightening screw are clean and well lubricated. ROCOL ASP grease or equal molybdenum disulphide grease is suitable. Manual RTM_000_190904_EN.docx © Gigasense AB Page 13 / 16 ... -
Page 14: Measuring Instructions
User Manual, Rope Tension Meter RTM‐D MEASURING INSTRUCTIONS Unscrew the clamping jaw 1 by means of the tightening screw 2 enough to provide space for the rope. Install the RTM‐D on the rope for good contact on the outer rope supports 3. Try not to measure close to rope attachments etc. Screw the clamping jaw 1 by hand to stop. The rope then should be tight to the centre support 4 without being deformed. After Use Dirt in the threads of the tightening screw (2) must be removed. Lubricate if necessary. Clean the instrument and check the battery condition. Keep/carry the instrument in the transportation case provided. ERROR CODES The following error codes can be displayed at startup or while in use. The error codes are useful if the unit must be sent away for service maintenance. Code Explanation Measure Too low battery for reliable measurement Change battery Internal error (EEPROM‐memory) Contact service Internal error (RAM‐memory) Contact service Manual RTM_000_190904_EN.docx © Gigasense AB Page 14 / 16 ... -
Page 15: Maintenance
User Manual, Rope Tension Meter RTM‐D MAINTENANCE To maintain the accuracy of the RTM, we recommend to send it to Gigasense for recalibration on a regular basis. How often it needs to be recalibrated depends on how often it is used. In general, we recommend to send it for recalibration every second year. However, if RTM is used frequently as several times a day, we recommend to send it for recalibration every year. RTM‐D is designed to be maintenance free. In case of cleaning the equipment, this should be done, by gently wiping it off with a dry or damp cloth. TROUBLESHOOTING 1. Error: The display flashes slowly when used Cause: RTM‐D is overloaded at the actual measured wire rope Solution: Reduce the load 2. Error: The display flashes rapidly when used Cause: The RTM‐D load cell is overloaded Solution: Reduce the load 3. Error: The accuracy is bad Cause: The rope is not in correct position Wrong wire rope is selected Solution: See “Measuring instructions” and “Select rope No” for correct installation IDENTIFICATION AND SPARE PARTS ... -
Page 16: Replacement Of Parts And Disposal
User Manual, Rope Tension Meter RTM‐D REPLACEMENT OF PARTS AND DISPOSAL If a failure should occur, it is recommended to send back the unit to the manufacturer for repair. Replaced and disposed parts can be sent to Gigasense AB for destruction. RECOMMENDED SPARE PARTS The RTM‐D does not require any spare parts, except for a 9V battery. CE‐CERTIFICATION Hereby, Gigasense AB, declares that this equipment is in compliance with the essential requirements. MANUFACTURER CONTACT Sales and service Gigasense AB Stationsvägen 16, 184 50 Åkersberga SWEDEN Phone +46 8 540 839 00, fax +46 8 540 213 64 E‐mail info@gigasense.se www.gigasense.se ...
Need help?
Do you have a question about the RTM-D and is the answer not in the manual?
Questions and answers