Table of Contents
Advertisement
Available languages
Available languages
Quick Links
CALIBRATORE DI TEMPERATURA PORTATILE
PORTABLE TEMPERATURE CALIBRATOR
Manuale Operativo ● Operating Manual
Via dei Crederi 411, 24045 Fara Gera d'Adda (Bg). Italy
Tel. +39 0363 399019. Fax +39 0363 398725
E-Mail: info@giussanionline.it. Web:
PYROS 375
PYROS 650
www.giussanionline.it
Rel. 3.1 – 07-2022
From Sn. S287 22
Advertisement
Table of Contents

Summary of Contents for Giussani Techniques PYROS 375
- Page 1 CALIBRATORE DI TEMPERATURA PORTATILE PORTABLE TEMPERATURE CALIBRATOR PYROS 375 PYROS 650 Manuale Operativo ● Operating Manual Via dei Crederi 411, 24045 Fara Gera d’Adda (Bg). Italy Tel. +39 0363 399019. Fax +39 0363 398725 Rel. 3.1 – 07-2022 From Sn. S287 22 E-Mail: info@giussanionline.it.
-
Page 2: Table Of Contents
Italiano: Pagina English: Page Appendices: Page INDICE ● INDEX 1 - CONSISTENZA DELLA FORNITURA ................................. 4 2 - RACCOMANDAZIONI GENERALI ..................................6 3 - ISTRUZIONI PER LA SICUREZZA ..................................7 4 - OPERAZIONI PRELIMINARI ....................................8 4.1 - Installazione ........................................8 4.1.1 - Rimozione dall'imballo .................................... - Page 3 AVVERTENZE Prima di collegare od usare l’apparecchiatura è consigliabile leggere attentamente queste avvertenze: Il calibratore, quando collegato alla rete, è soggetto a tensioni pericolose. Attenersi scrupolosamente alle istruzioni del presente manuale, in particolare modo alle istruzioni sulla sicurezza, per evitare lesioni a persone. Solo personale qualificato può...
-
Page 4: Consistenza Della Fornitura
Questo manuale contiene le istruzioni d'uso e manutenzione validi per la seguente apparecchiatura: Calibratore portatile di temperatura PYROS 375 & 650 completo d’accessori. Per un buon utilizzo del calibratore e per la propria sicurezza, l’operatore è tenuto a rispettare le... - Page 5 2MFR526MJ1393: Valigia stagna di tipo Marino cod. 2TRMBAG-PYROS: Borsa di trasporto in Cordura Codice di ordinazione PYROS 650 o PYROS 375 Certificazione: tutti gli strumenti sono dotati di dichiarazione di collaudo, stabilità e precisione con riferibilità ai campioni nazionali.
-
Page 6: Raccomandazioni Generali
2 - RACCOMANDAZIONI GENERALI IMPORTANTE: Durante il trasporto mettere l’inserto nella sua custodia ATTENZIONE: La configurazione del regolatore di temperatura è salvaguardata da due codici di protezione impostati in fabbrica. Per un eventuale accesso agli stati di configurazione seguire le istruzioni al capitolo 7.2. -
Page 7: Istruzioni Per La Sicurezza
3 - ISTRUZIONI PER LA SICUREZZA ATTENZIONE: Essendo il fornetto un apparecchio portatile da campo, è necessario accertarsi, quando si effettua la connessione elettrica, che la presa sia dotata di regolare messa a terra. Effettuare gli interventi di manutenzione o di riparazione esclusivamente ad apparecchiatura a temperatura ambiente (blocco freddo) e con il cavo elettrico scollegato. -
Page 8: Operazioni Preliminari
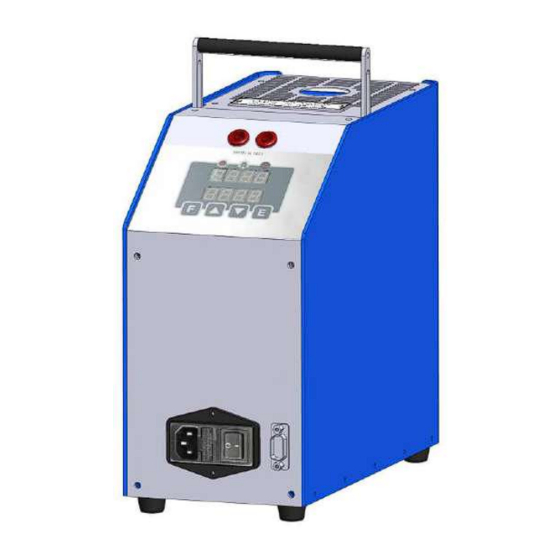
4 - OPERAZIONI PRELIMINARI Rimuovere il calibratore dalla valigia di trasporto o dall’imballo e posizionarlo su un piano. Accertarsi della perfetta messa a terra dell’impianto. Alimentare l'apparecchiatura con una presa di rete a 230V 50Hz o 115 V con un assorbimento massimo di 3,15A (6,3A per 115V). - Page 9 (4.1) (6.2) (6.1) (11) ELENCO COMANDI POS. DESCRIZIONE PRESA DI ALIMENTAZIONE INTERRUTTORE GENERALE FUSIBILI DI PROTEZIONE BOCCOLE DI SWITCH TEST LAMPADA DI SWITCH TEST TERMOREGOLATORE LAMPADA DI COOLING LAMPADA DI HEATING PRESA RS232 pag. 9...
-
Page 10: Procedura D'esercizio
5 - PROCEDURA D’ESERCIZIO 5.1 - Descrizione del funzionamento Il calibratore PYROS è costituito da un blocco metallico con un foro di 26x150 mm in cui vengono inseriti gli inserti pre-forati per la maggior parte dei sensori da tarare. Il blocco viene riscaldato da una resistenza e la temperatura è controllata e regolata da un termoregolatore a microprocessore con uscita di comando per il relè... -
Page 11: Blocco Di Equalizzazione
N.B: Per i calibratori di serie, il termostato è stato tarato in fabbrica per intervenire a 660°C±10°C per il PYROS 650 e 385°C per il PYROS 375. 5.2.8 - Ventilatore di raffreddamento All’interno del calibratore c’è un ventilatore che funziona a due velocità diverse: la velocità minore viene attivata dal regolatore nella fase di salita in temperatura e la velocità... -
Page 12: Istruzioni Operative
5.3 - Istruzioni operative ATTENZIONE: L’uso del calibratore è subordinato alla conoscenza dei fondamenti d’utilizzo dello stesso. Prima di iniziare la calibrazione seguire le istruzioni d’installazione; leggere attentamente le istruzioni dei capitoli 2 e 3. Con questo calibratore è possibile effettuare la taratura per confronto in due differenti modi: con indicatore di temperatura del fornetto (6), o con termometro campione di riferimento esterno. - Page 13 Posizionare le sonde nel blocco: riferimento alle raccomandazioni generali del capitolo 2 (figura 1-2-3). Impostare il valore di temperatura (Set point) a cui si vuole effettuare la taratura procedendo come segue (riferimento al capitolo 7- Termoregolatore): Premere il tasto ▲ o ▼ per impostare il valore di temperatura desiderato ...
-
Page 14: Utilizzo Della Funzione Switch Test
5.4 - Utilizzo della funzione SWITCH TEST È possibile controllare il punto di intervento dei termostati mediante l'utilizzo della funzione 'SWITCH TEST' (riferimento capitolo 7.2). Inserire il bulbo del termostato nel foro più adatto del calibratore (fare riferimento a quanto detto nelle Note del capitolo 2). -
Page 15: Comunicazione Seriale
Premere F per impostare la funzione “run”, con i tasti ▲ o ▼ impostare ON per attivare il processo. Il led lampeggiante indica che il processo è attivo (capitolo 7.2) Alla fine del processo i valori di apertura o chiusura del termostato memorizzati sono visibili premendo la funzione F e leggendo “Son”... -
Page 16: 6- Manutenzione E Guasti
6- MANUTENZIONE E GUASTI 6.1 - Ispezioni rutinarie Spegnere il calibratore prima di qualsiasi manutenzione. Controllare periodicamente che i fori del calibratore siano puliti e non contengano oli o liquidi estranei che potrebbero formare ossidi o sporco nel caso di utilizzo ad alta temperatura causare il blocco dell’inserto nel foro Spegnere il calibratore ed eseguire le operazioni di pulizia solo quando freddo. -
Page 17: Termoregolatore
7 - TERMOREGOLATORE 7.1 – Descrizione delle funzioni LED raffreddamento SWITCH TEST LED SWITCH TEST Quando è acceso il calibratore Boccole di collegamento dei Quando è acceso il contatto sta raffreddando cavi del termostato del termostato è chiuso DISPLAY 1 Visualizza valore della... - Page 18 7.2 – Descrizione del menu Il calibratore ha quattro livelli del menu. Livello 1: Funzioni di uso ordinario. Premere F per scorrere le funzioni del menù. Livello 2: Funzioni specifiche di impostazione della regolazione. Premere F+▲ contemporaneamente per accedere al 2° livello del menù. Premere F per scorrere le funzioni del menù.
- Page 19 Son “Switch on”; visualizza la temperatura di chiusura del contatto di un termostato collegato alle boccole "SWITCH TEST". SOFF “Switch off”; visualizza la temperatura di apertura del contatto di un termostato collegato alle boccole "SWITCH TEST". I valori SON e SOFF vengono cambiati ad ogni ciclo e vengono resettati se si imposta run OFF.
- Page 20 2. Scegliere uno o più punti di calibrazione (Max 10) in funzione del campo di funzionamento del calibratore o del campo che si intende calibrare. Per esempio per il PYROS 375 utilizzare i punti: 50- 120-190-260-340°C, e per il PYROS 650 utilizzare i punti: 100-200-300-400-500-600°C.
-
Page 21: Menu Del Microprocessore
7.3 – Menu del microprocessore NOTE: 1- 1° linea del display: indica il valore della funzione selezionata 2- 2° linea del display: indica il nome la funzione del menù 3- Dopo 20 secondi il valore di set point ritorna a essere indicato sulla riga inferiore del display pag. - Page 22 Operating Manual Power supply PYROS Addendum to the Operating Instruction The instruments PYROS375 and PYROS650 can be supplied with 115 VAC or 230 VAC (50/60 Hz). The fuse must be changed, if the power supply changes from 230 VAC to 115 VAC. Supply with 230 VAC: Fuse 3.15 A (factory delivery)
-
Page 23: Scope Of Supply
This manual contains the use and maintenance instructions valid for the following equipment: Portable Temperature Calibrator models: PYROS 650 & PYROS 375 complete of accessories User must observe all the usual safety rules out in this manual for own security and to avoid... - Page 24 2D3034: Insert with 1 hole ø 17,5 mm code 2MFR526MJ1393: Marine type suitcase, plastic made code 2TRMBAG-PYROS: Soft shoulder bag Ordering Code PYROS 650 or PYROS 375 Certification: all the instruments are supplied with final testing, stability and accuracy certification traceable to national standards. pag. 24...
-
Page 25: General Recommendations
2 - GENERAL RECOMMENDATIONS ATTENTION During transport to put the insert into its case ATTENTION The configuration states of the instrument is protected by two codes factory settings. For any access or modification to the configuration states, follow the instructions on chapter 7. Do not change these parameters to avoid malfunction or breaking of the calibrator with risks of serious personal injury. -
Page 26: Safety Instructions
3 - SAFETY INSTRUCTIONS WARNING: Because the calibrator is a portable instrument to be used in the field, it is very important to ensure that the socket has been earthen correctly when connecting it to the electricity supply. Carry out the maintenance, repair operation only with the equipment at ambient temperature, and disconnected from the electric power. -
Page 27: Preparation Of Operation
4 - PREPARATION OF OPERATION Remove the calibrator from the packaging and place it on a flat surface. Make sure that the instrument has been correctly earthen. Supply the oven with line 230V, 50Hz (3,15A) or 115 V (6,3A) + earth, 3,15A (6.3A for 115V). - Page 28 (4.1) (6.2) (6.1) (11) COMMAND LIST POS. DESCRIZIONE SUPPLY SOCKET MAIN SWITCH PROTECTION FUSES SWITCH TEST CONNECTIONS SWITCH TEST ON/OFF LIGHT THERMOREGULATOR COOLING LIGHT HEATING LIGHT RS232 INPUT pag. 28...
-
Page 29: Operation Procedure
MODELS V230 V110/115 PYROS 375 or 650 3,15A 6,3 A Note: use only fuses F. 5x20mm. All the electrical part is found below the main switch. 5.2.4 - Heating resistance The resistance is stainless steel made;... -
Page 30: Equalising Block
Consulting chapter 6.2 - Typical faults - for any problems. N. B: the thermostat mounted on the calibrator has been set to 660°C±10°C for the PYROS650 and to 385°C±10°C for the PYROS 375. 5.2.8 - Fan A fan is installed in the calibrator. The fan works with two different speed: the control system activates the fan on minimum speed when the temperature increases, and maximum speed when temperature decreases. -
Page 31: Start-Up Instructions
5.3 - Start-up instructions ATTENTION: The calibrator can only be used correctly if the user has a good knowledge of its basics. Before starting with the calibration following the installation procedures, read the instruction on chapter 2, 3 & 4. To calibrate a probe, it is possible to follow two ways: calibration with internal indicator (6), or calibration with external reference. - Page 32 Put the probe to check into the equaliser block: reference to chapter 2. (Fig. 1-2-3). Set required temperature value thermo-regulator (reference THERMOREGULATOR chapter): 1. Press the ▲ or ▼ key to select the required set point value. 2. Press the “E” key to confirm ...
-
Page 33: How To Use The Switch Test Function
5.4 - How to use the Switch Test function With the 'SWITCH TEST' function, it is possible to control the Open and Close temperature of the thermostats (refer to chapter 7.2): Insert the sensor of the thermostat in the most suitable hole of the calibrator (refer to notes in chapter 2). -
Page 34: Serial Communication
Press F to select the function “run” and press the key ▲ ▼ to enter “run” ON to activate the process. The led of the function will flash to indicate that the process is active (chapter 7.2) The thermostat’s release values are recorded in the parameters SOn and SOFF. -
Page 35: Maintenance & Typical Faults
6 - MAINTENANCE & TYPICAL FAULTS 6.1 - Routine inspections Switch off the calibrator before any maintenance operations. Check that the holes and the inserts of the calibrator are cleaned, any liquid or oil inside the well could make oxides or verdigris on the insert during the use at high temperature in this case the insert may become stuck. -
Page 36: Thermoregulator
7 - THERMOREGULATOR 7.1 – Description of the functions SWITCH TEST INPUT COOLING LED SWITCH TEST LED Plugs for the connections of When the led is ON the When the led is ON the the thermostats calibrator is cooling thermostat is closed DISPLAY 1 It shows the value of the internal temperature or the... - Page 37 7.2 – Description of the Menu The calibrator has four menu levels: Level 1: Functions for the continuous usage Press F to scroll through the menu functions. Level 2: Specific functions for the regulation of the calibrator Press F+▲ at the same time to access the 2 level menu Press F to per scroll through the menu functions.
- Page 38 Son “Switch on” displays the temperature at which the thermostat connected to the terminals "SWITCH TEST" has closed. SOFF “Switch off” displays the temperature at which the thermostat connected to the terminals "SWITCH TEST" has open. The values of Son and SOFF will change at each loop or each time you select “run OFF”.
- Page 39 2. Choose one or more calibration points (max 10 points) depending on the appliance range or the field where one wishes to carry out the calibration. For example, for the PYROS 375 use the points: 50- 120-190-260-340°C, and for the PYROS 650 use the points: 100-200-300-400-500-600°C.
-
Page 40: Microprocessor Regulator: Control Description
7.3 - Microprocessor regulator: control description NOTE: 1- 1 display line shows the value of the selected function. 2- 2 display line shows the name of the function 3- After 20 seconds the set point value is displayed on the 2nd display line pag. -
Page 41: 8- Appendici / Addendum
8– APPENDICI / ADDENDUM 8.1 – Communication Protocol Rs232/C Dopo l’accensione del calibratore e dopo aver collegato il After switching on the calibrator and connecting the cavo seriale, attendere la fine della procedura di start-up serial cable wait the end of the start-up procedure e premere il tasto E per attivare la comunicazione serial. - Page 42 LETTURA DI UN DATO: DATA READING: Per la lettura si usa il comando RVAR. For Reading, use the command RVAR. Esempio: lettura del Set Point (variabile 0): Example: reading of the Set Point (0 variable): Il comando risulta così composto: $1RVAR0_<cr> The command string is: $1RVAR0_<cr>...
-
Page 43: Parti Di Ricambio / Spare Parts
8.2 - Parti di ricambio / Spare parts Riferimenti numerici relativi ai disegni allegati Reference number to the enclosed drawing POS. DESCRIZIONE CODE DESCRIPTION PRESA A VASCHETTA 3SCH28366 CUP SOCKET FUSIBILI DI PROTEZIONE 5x20 3,15A for 230V PROTECTION FUSES 5x20 6,3A for 115V VARISTORE 3MRC14D391 VARISTOR... -
Page 44: Dichiarazione Di Conformità E Rapporto Di Prova
8.3 – Dichiarazione di conformità e rapporto di prova Dichiarazione di conformità CE inserita alla fine del manuale Rapporto di taratura allegato con documento separato 8.4 – Disegni schema elettrico Vedi disegni d’assieme e schemi elettrici inseriti alla fine del manuale 8.5 –... - Page 45 GIUSSANI s.r.l. 24045 FARA GERA D'ADDA (Bg) Italy Via dei Crederi,411 C.C.I.A.A. BG 211683 Tel. 0363.399019 - Fax. 0363.398725 C.F. e P.IVA 01496840164 Internet address: www.giussanionline.it Reg. Trib. Bergamo 23221 Vol.22270 Capitale Sociale €10.400 i.v. E-mail: info@giussanionline.it Dichiarazione di conformità Il fabbricante: GIUSSANI S.r.l.
- Page 46 pag. 46...
- Page 47 pag. 47...
- Page 48 www.giussanionline.it www.giussanionline.com pag. 48...
Need help?
Do you have a question about the PYROS 375 and is the answer not in the manual?
Questions and answers