
Summary of Contents for Technotape HPM.400.500.001
- Page 1 TRANSFERPERS HPM.400.500.001 HANDLEIDING TRANSFER PRESS HPM.400.500.001 INSTRUCTION MANUAL...
- Page 2 INHOUD 1. TECHNISCHE TEKENINGEN PAG. 2 2. SPECIFICATIES PAG. 2 3. AAN DE SLAG PAG. 3 Temperatuur instellen Tijd instellen In 5 stappen artikelen bedrukken 4. PROBLEMEN OPLOSSEN EN ONDERHOUD PAG. 5 5. PROBLEMEN MET DE BEDRUKKING OPLOSSEN PAG. 6 6.
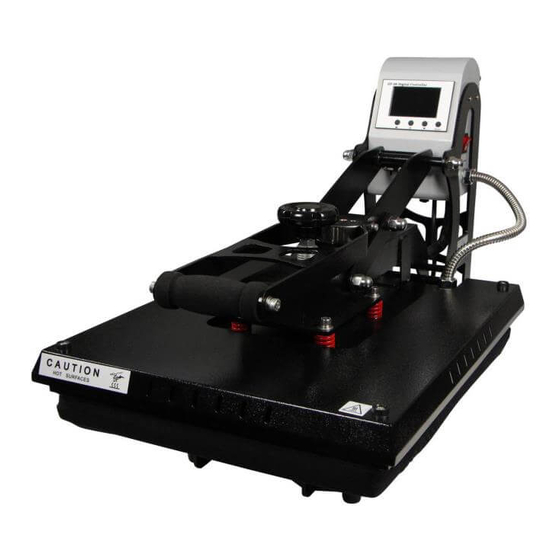
- Page 3 Behuizing GY-06-controller Begrenzer Elektromagnetische persplaat Drukregelaar Noodstop Hoofdschakelaar Resetknop/circuitbreaker 2. SPECIFICATIES Artikelcode: HPM.400.500.001 Dimensies apparaat: 770 x 440 x 445 mm Max. printoppervlak: 400 x 500 x 10 mm Voltage: 220 V/1-fase of 120 V/1-fase Verbruik: 2.0 kWh Aanbevolen instellingen: 30-280 s/180-200 °C...
- Page 4 3. AAN DE SLAG De pers heeft een magnetische sluiting. Nadat de pers de ingestelde tijd heeft afgeteld, laat de elektromagneet los en opent de pers automatisch. DIGITAAL DISPLAY Temperatuur instellen Zet de pers aan, via de rode knop aan de Druk op .
- Page 5 DIGITAAL DISPLAY Tijd instellen Nadat je de temperatuur hebt ingesteld, Druk op om de gekozen tijd op te slaan. knippert een groen cijfer rechtsonder op het Nu staat de pers in de gebruiksmodus. display, dat staat voor de tijd. Druk op de pijlen Zodra je de pers sluit, begint het drukproces.
- Page 6 IN 5 STAPPEN ARTIKELEN BEDRUKKEN Plaats het gekozen product op de bodemplaat en sluit de pers om de druk te controleren. Je stelt de druk bij via de draaiknop bovenop de hitteplaat. Controleer of de voedingskabel goed in het stopcontact zit. Verwijder het product en zet dan de pers aan. De pers warmt nu op naar de ingestelde temperatuur.
- Page 7 Lukt het niet om problemen met de pers zelf op te elektrische onderdelen zo optimaal mogelijk te houden. lossen? Neem dan contact op met jouw contactpersoon bij Technotape International voor technische Stel de pers maximaal in op 210 °C, want dan gaat de ondersteuning.
- Page 8 6. CIRCUITDIAGRAM...
- Page 9 Brandwerende beschermkap Limietschakelaar Frame Adapterplaat van de hitteplaat Electronicabox Gelaste plaat Noodstopknop Behuizing van de achterzijde Elektromagnetische persplaat Davit-arm Zekeringhouder Drukverstelknop Resetknop/circuitbreaker Technotape International 035 541 80 94 Tolweg 7 035 541 18 17 3741 LM Baarn office@technotape.com Nederland www.technotape.com...
-
Page 10: Table Of Contents
CONTENTS 1. TECHNICAL DRAWINGS PAG. 10 2. SPECIFICATIONS PAG. 10 3. GETTING STARTED PAG. 11 Setting temperature Setting time Printing products in 5 steps 4. TROUBLESHOOTING & MAINTENANCE PAG. 13 5. SOLVING PRINTING PROBLEMS PAG. 14 6. CIRCUIT DIAGRAM PAG. 15 7. -
Page 11: Technical Drawings
Electromagnetic press plate Pressure regulator Emergency stop Main switch Reset button/ circuit breaker 2. SPECIFICATIONS Productcode: HPM.400.500.001 Product Dimensions: 770 x 440 x 445 mm Max. print surface: 400 x 500 x 10 mm Voltage: 220 V/1-fase of 120 V/1-fase Power consumption: 2.0 kWh... -
Page 12: Getting Started
3. GETTING STARTED The press has a magnetic closing mechanism. After the set time has expired, the electromagnet will let loose, and the press will open automatically. DIGITAL DISPLAY Setting Temperature Turn on the press with the red button on the Press There is a red symbol on the lower- right side of the press. -
Page 13: Setting Time
DIGITAL DISPLAY Setting Time After you set the time, a green digit on the Press to save your chosen time. Now the lower-right display will blink. It shows you the press is in usermode. The printing process time. Press the arrows to set you preferred starts when the press closes. -
Page 14: Printing Products In 5 Steps
PRINTING PRODUCTS IN 5 STEPS Place your product on the bottom-plate and close the press to check the pressure. You can alter the pressure with the turning-knob on top of the heat plate. Check if the power cord is fully plugged into the power outlet. Remove the product and turn on the press. The press will now heat up to the set temperature. - Page 15 The press’s ventilator turns on automatically when the Are you unable to solve problems with the press press plate is 80 °C. This extends the life expectancy of yourself? Contact your contactperson at Technotape the press’s electrical parts. International for technical support.
-
Page 16: Circuitdiagram
6. CIRCUITDIAGRAM... -
Page 17: Heat Press Explosive View
Welded plate Emergency stop button Backside casing Electromagnetic press plate Davit-arm Fuse holder Pressure adjustment button Reset button/circuit breaker Technotape International +31 (0)35 541 80 94 Tolweg 7 +31 (0)35 541 18 17 3741 LM Baarn office@technotape.com The Netherlands www.technotape.com...
Need help?
Do you have a question about the HPM.400.500.001 and is the answer not in the manual?
Questions and answers