Table of Contents

Subscribe to Our Youtube Channel
Related Manuals for Royal Catering P1KW

Summary of Contents for Royal Catering P1KW
- Page 1 USER MANUAL Bedienungsanleitung Instrukcja obsługi Návod k použití Manuel d´utilisation Istruzioni per l‘uso Manual de instrucciones Használati útmutató Brugsanvisning MICROWAVE P1KW expondo.com...
- Page 2 Produktname: Mikrowelle P 1 kW Product name: Microwave P 1 kW Nazwa produktu: Kuchenka Mikrofalowa P 1 kW Název výrobku Mikrovlnná trouba Nom du produit: Four micro onde Nome del prodotto: Forno a microonde Nombre del producto: Microondas industrial Termék neve Mikrohullámú...
-
Page 3: Technische Daten
Diese Bedienungsanleitung wurde für Sie maschinell übersetzt. Wir arbeiten kontinuierlich daran, eine akkurate Übersetzung zu liefern. Allerdings ist keine maschinelle Übersetzung perfekt. Die offizielle Bedienungsanleitung ist die englische Version. Etwaige Abweichungen oder Unterschiede in der Übersetzung sind weder bindend noch haben sie eine rechtliche Wirkung für die Einhaltung oder Durchsetzung von Vorschriften. - Page 4 Symbolerklärung Das Produkt entspricht den Anforderungen der einschlägigen Sicherheitsnormen. Vor dem Gebrauch die Gebrauchsanweisung sorgfältig lesen. Recycelbares Produkt. VORSICHT! oder ACHTUNG! oder NICHT VERGESSEN! Ein allgemeines Warnzeichen, das eine bestimmte Situation beschreibt. ACHTUNG! Warnung vor elektrischer Spannung! Achtung! Heiße Oberfläche kann Verbrennungen verursachen! Nur für internen Gebrauch.
-
Page 5: Elektrische Sicherheit
2.1. Elektrische Sicherheit Der Netzstecker des Geräts muss für die benutzte Netzsteckdose ausgelegt sein. Nehmen Sie am Stecker keinerlei Modifikationen vor. Originalstecker und passende Steckdosen vermindern das Risiko eines Stromschlags. Der Kontakt zu geerdeten oder masseführenden Elemente, wie Rohre, Heizkörper, Herde und Kühlschränke, muss vermieden werden. Es besteht ein erhöhtes Stromschlagrisiko, wenn Ihr Körper geerdet ist und das Gerät berührt, während es direktem Regen, nasser Fahrbahn oder bei der Arbeit in einer feuchten Umgebung ausgesetzt ist. - Page 6 d) Reparaturen am Gerät dürfen nur vom Kundendienst des Herstellers durchgeführt werden. Keine Reparaturen in Eigenregie durchführen! e) Bei unbeabsichtigter Feuerentzündung oder im Brandfall dürfen nur Trockenpulverlöscher oder Kohlendioxid (CO2)-Feuerlöscher verwendet werden, um das Gerät unter Spannung zu löschen. Bewahren Sie die Gebrauchsanweisung zum späteren Nachschlagen auf. Soll Gerät Dritte weitergegeben...
- Page 7 Betrieb des Geräts beeinträchtigen können). Im Falle einer Beschädigung lassen Sie das Gerät vor der Benutzung reparieren. Die Reparatur und Wartung der Geräte ist von qualifiziertem Personal unter ausschließlicher Verwendung von Originalersatzteilen durchzuführen. Dies gewährleistet eine sichere Verwendung. Um die Funktionstüchtigkeit des Geräts zu gewährleisten, dürfen die werksseitig installierten Abdeckungen nicht entfernt und die Schrauben nicht gelöst werden.
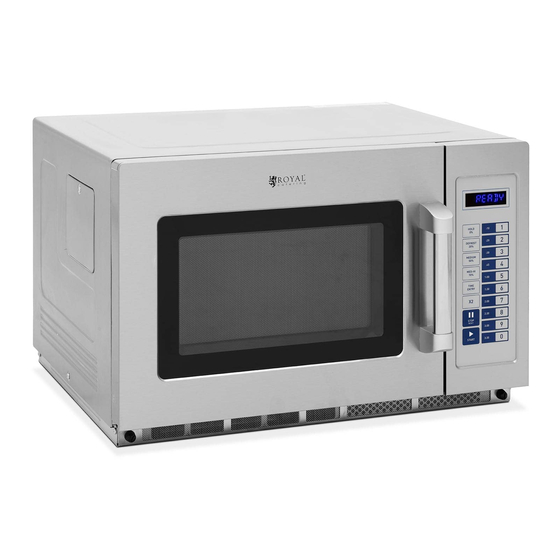
- Page 8 Verletzungsrisiko. Es wird empfohlen, bei der Verwendung Vorsicht und gesunden Menschenverstand walten zu lassen. 3. Gebrauchsanweisung Das Gerät ist zum Erhitzen von Speisen und Getränken bestimmt. Für allerlei Schäden, die durch unsachgemäßen Gebrauch entstehen, haftet der Anwender. 3.1. Produktübersicht 1 – Steuerung 2 - Tür 3 - Sicherheitsverriegelungssystem 4 - Die Platte...
- Page 9 1 - Leistungseinstellungstasten 2 - Zeitschaltflächen 3 - Taste zum Verdoppeln des eingestellten Parameters 4 - Stopp-/Reset-Taste 5 - Starttaste 6 - Zifferntasten 3.2. Arbeitsvorbereitung AUFSTELLUNG DES GERÄTS: Die Umgebungstemperatur darf 40°C und die relative Luftfeuchtigkeit darf 85 % nicht übersteigen. Das Gerät sollte so aufgestellt werden, dass eine gute Luftzirkulation gewährleistet ist.
-
Page 10: Arbeiten Mit Dem Gerät
ebenen, stabilen, sauberen, feuerbeständigen und trockenen Oberfläche sowie außerhalb der Reichweite von Kindern und Personen mit eingeschränkten geistigen, sensorischen oder intellektuellen Fähigkeiten verwendet werden. Das Gerät sollte so aufgestellt werden, dass der Netzstecker jederzeit erreicht werden kann. Vergewissern Sie sich, dass die Stromversorgung des Geräts mit den Angaben auf dem Typenschild übereinstimmt! Entfernen Sie niemals die Gerätefüße. -
Page 11: Standby Modus
Stromversorgung Numerische Taste Anzeigezeit) Kochfaktor des Geräts 0:10 100% 0:20 100% 0:30 100% 0:45 100% 1:00 100% 1:30 100% 2:00 100% 3:00 100% 4:00 100% 5:00 100% 3.3.1. Inbetriebnahme Wenn das Gerät an die Stromversorgung angeschlossen ist, zeigt das Display „_ _ _ _“... - Page 12 Durch das Öffnen und Schließen der Tür werden alle Informationen über das laufende, manuelle oder programmierte Programm gelöscht. 3.3.5. Pause-Modus Während des manuellen Garens oder wenn sich das Gerät programmierten Betrieb befindet und die Tür offen oder geschlossen ist, geht das Gerät in den Pausenmodus, wenn Sie die Taste „Stop/Reset“...
- Page 13 3.3.9. Betriebsart mit voreingestellten Kochprogrammen In diesem Modus können Sie Speisen mit einem Tastendruck zubereiten. Im Standby-Modus führt das Drücken einer der Zifferntasten auf dem Tastenfeld dazu, dass das Gerät das dieser Taste zugeordnete Programm ausführt. Die LED zeigt die verbleibende Garzeit an. Wenn es sich um ein mehrstufiges Garen handelt, zeigt die verbleibende Gesamtgarzeit nicht die angegebene Garzeit der Etappen an.
- Page 14 Schritt 1 : Drücken Sie im Ruhemodus die Zifferntaste „1“ 5 Sekunden • lang; das Display zeigt „ProG“. Schritt 2 : Drücken Sie die Nummerntaste „3“, das Programm wird als • Nummer „3“ gespeichert. • Schritt 3 : Drücken Sie die Zahlentasten „1“, „2“ und „5“, um die Garzeit einzugeben.
- Page 15 Drücken Sie "1", "2", "5", um die Garzeit einzugeben. „1:25“ wird angezeigt. d. „Med.-Hi 70%“ drücken, „PL7“ wird angezeigt. e. Drücken Sie die Tasten "5", "4", "0", "5:40" wird angezeigt. „Mittel 50 %“ drücken, „PL5“ wird angezeigt. Drücken Sie „Start“, um das Programm zu speichern. 3.3.13.
-
Page 16: Reinigung Und Wartung
den Ruhemodus zu wechseln OP: 50 Behinderte Kochen auf die OP: 51 Inbegriffen Schnelle OP: 60 Behinderte Tür zurückgesetzt OP: 61 Inbegriffen Die maximale Kochzeit beträgt 60 OP: 70 Minuten Einstellen der maximalen Zeit OP: 71 Maximale Kochzeit 10 Minuten OP: 80 Behinderte Manuelle... - Page 17 Verwenden Sie keine scharfen und/oder metallischen Gegenstände (z. B. Drahtbürste oder Metallspatel), da diese die Oberfläche des Materials beschädigen können, aus dem das Gerät besteht. Reinigen Sie das Gerät nicht mit säurehaltigen Substanzen, medizinischen Mitteln, Verdünnungen, Kraftstoff, Ölen oder anderen Chemikalien. Das Gerät könnte beschädigt werden.
-
Page 18: Technical Data
This User Manual has been translated for your convenience using machine translation. Reasonable efforts have been made to provide an accurate translation; however, no automated translation is perfect nor is it intended to replace human translators. The official User Manual is the English version. Any discrepancies or differences created in the translation are not binding and have no legal effect for compliance or enforcement purposes. -
Page 19: Safety Of Use
Explanation of symbols The product complies with applicable safety standards. Read the manual before use. Recyclable product. CAUTION! or WARNING! or REMEMBER! A general warning sign that describes a given situation. CAUTION! Warning of electric shock! Caution! Hot surface can cause burns! For indoor use only. -
Page 20: Electrical Safety
2.1. Electrical safety The plug of this device must fit into the outlet. Do not modify the plug in any way. Original plugs and matching outlets reduce the risk of electric shock. Avoid touching grounded parts, such as pipes, heaters, ovens, and refrigerators. -
Page 21: Personal Safety
Remember! Keep children and other bystanders safe while operating the appliance. 2.3. Personal safety Do not operate this device if you are tired, ill or under the influence of alcohol, drugs or medication that could impair your ability to operate the device. The device is not intended to be used by persons (including children) with reduced mental, sensory or intellectual functions or persons who lack experience and/or knowledge unless they are supervised or have been... - Page 22 Do not open the casing under any circumstances. The unit is a free-standing appliance and is not suitable for permanent furniture installation. This appliance is only intended for heating food. Harmful fumes and fumes are emitted when heating adhesives, plastics, non-food liquids or flammables. Do not use this unit to dry, heat or dehumidify objects.
-
Page 23: Product Overview
3.1. Product overview 1- Control panel 2 - Door 3 - Safety lock system 4 - The plate Control panel:... -
Page 24: Preparation For Operation
1 - Power setting buttons 2 - Time buttons 3 - Button to double the set parameter 4 - Stop/reset button 5 - Start button 6 - Numeric buttons 3.2. Preparation for operation POSITIONING OF THE UNIT The ambient temperature must not exceed 40°C and ambient humidity should not exceed 85%. -
Page 25: Working With The Device
and persons of impaired mental, sensory and intellectual functions. Place the unit in such a way that the mains plug can be reached at any time. Ensure that the power supply to the unit corresponds to that specified on the identification plate! Never remove the feet of the appliance. -
Page 26: Idle Mode
0:30 100% 0:45 100% 1:00 100% 1:30 100% 2:00 100% 3:00 100% 4:00 100% 5:00 100% 3.3.1. Starting When the unit is connected to the power supply, the display will show "_ _ _ _". If the "Stop/reset" button is pressed, the unit will go into idle mode. Note: No button can be pressed in idle mode. - Page 27 During the pause, the display will show the remaining cooking time. The fan and the lamp are working. The pause mode will go back to the idle mode in exactly the same way as the standby mode, depending on user option # 4. In addition, if the "stop/reset" button is pressed, the unit will immediately go into standby mode.
- Page 28 3.3.10. Programming mode This mode allows the user to assign cooking times and power levels to individual number buttons. a) Open the door and press "1" for 5 seconds. The buzzer will sound once and the unit will go into programming mode. b) The display will show "ProG".
- Page 29 2. If the program needs to be reset, just repeat the above steps. 3. If the "stop/reset" button is pressed in the last step, the unit will return to standby mode. The settings will not be saved. 3.3.11. Cooking double the amount In standby mode, press the "X2"...
- Page 30 If the "Start" button is not pressed in the last step, the program will not be saved and the unit will remain in the previous mode. Usage options (items placed in cells with gray fill are set as default) Option Setting Description of the OP: 10...
-
Page 31: Cleaning And Maintenance
3.4. Cleaning and maintenance Pull the mains plug and let the unit cool down completely before cleaning, adjusting or replacing accessories and when the unit is not in use. Use only non-corrosive cleaning agents for cleaning the surfaces. Only mild detergents designed for cleaning food contact surfaces may be used to clean the unit. -
Page 32: Dane Techniczne
Niniejsza instrukcja obsługi została przetłumaczona dla wygody użytkownika przy użyciu tłumaczenia maszynowego. Podjęto rozsądne wysiłki, zapewnić dokładne tłumaczenie; jednak żadne automatyczne tłumaczenie nie jest doskonałe, ani nie ma na celu zastąpienia ludzkich tłumaczy. Oficjalną instrukcją obsługi jest wersja angielska. Wszelkie rozbieżności lub różnice powstałe w tłumaczeniu nie są... -
Page 33: Bezpieczeństwo Użytkowania
Objaśnienie symboli Produkt spełnia wymagania odpowiednich norm bezpieczeństwa. Przed użyciem należy zapoznać się z instrukcją. Produkt podlegający recyklingowi. UWAGA! lub OSTRZEŻENIE! lub PAMIĘTAJ! Ogólny znak ostrzegawczy opisujący daną sytuację. UWAGA! Ostrzeżenie przed porażeniem prądem elektrycznym! Uwaga! Gorąca powierzchnia może spowodować oparzenia! Do użytku tylko wewnątrz pomieszczeń. -
Page 34: Bezpieczeństwo Elektryczne
2.1. Bezpieczeństwo elektryczne Wtyczka urządzenia musi pasować do gniazda. Nie modyfikować wtyczki w jakikolwiek sposób. Oryginalne wtyczki i pasujące gniazda zmniejszają ryzyko porażenia prądem. Unikać dotykania uziemionych elementów, takich jak rury, grzejniki, piece i lodówki. Istnieje zwiększone ryzyko porażenia prądem, jeśli ciało jest uziemione i dotyka urządzenia narażonego na bezpośrednie działanie deszczu, mokrej nawierzchni i pracy w wilgotnym otoczeniu. -
Page 35: Bezpieczeństwo Osobiste
Zachować instrukcję użytkowania w celu jej późniejszego użycia. W razie, gdyby urządzenie miało zostać przekazane osobom trzecim, to wraz z nim należy przekazać również instrukcję użytkowania. g) Urządzenie trzymać z dala od dzieci i zwierząt. Pamiętać! Należy chronić dzieci i inne osoby postronne podczas pracy urządzeniem. -
Page 36: Zasady Użytkowania
Aby zapewnić zaprojektowaną integralność operacyjną urządzenia, nie należy usuwać zainstalowanych fabrycznie osłon lub odkręcać śrub. Zabrania się przesuwania, przestawiania i obracania urządzenia będącego w trakcie pracy. Należy regularnie czyścić urządzenie, aby nie dopuścić do trwałego osadzenia się zanieczyszczeń. Urządzenie nie jest zabawką. Czyszczenie i konserwacja nie mogą być wykonywane przez dzieci bez nadzoru osoby dorosłej. -
Page 37: Opis Urządzenia
Odpowiedzialność za wszelkie szkody powstałe w wyniku użytkowania niezgodnego z przeznaczeniem ponosi użytkownik. 3.1. Opis urządzenia 1 – Panel sterowania 2 – Drzwi 3 – System z blokadą bezpieczeństwa 4 – Płyta... -
Page 38: Przygotowanie Do Pracy
Panel sterowania: 1 – Przyciski ustawiania mocy 2 – Przyciski wprowadzania czasu 3 – Przycisk podwojenia ustawianego parametru 4 – Przycisk Stop/Reset 5 – Przycisk Start 6 – Przyciski numeryczne 3.2. Przygotowanie do pracy UMIEJSCOWIENIE URZĄDZENIA Temperatura otoczenia nie może przekraczać 40°C, a wilgotność względna nie powinna przekraczać... -
Page 39: Praca Z Urządzeniem
z dala od wszelkich gorących powierzchni. Urządzenie należy zawsze użytkować na równej, stabilnej, czystej, ognioodpornej i suchej powierzchni i poza zasięgiem dzieci oraz osób o ograniczonych funkcjach psychicznych, sensorycznych i umysłowych. Urządzenie należy umiejscowić w taki sposób, by w dowolnej chwili można się było dostać... -
Page 40: Tryb Gotowości
Domyślne czasy gotowania - urządzenie jest dostarczane z następującymi zaprogramowanymi czasami gotowania, chyba że w specyfikacji produktu podano inaczej: Przycisk Wyświetlacz Czynnik numeryczny (czas) gotowania 0:10 100% 0:20 100% 0:30 100% 0:45 100% 1:00 100% 1:30 100% 2:00 100% 3:00 100% 4:00 100%... - Page 41 We wszystkich innych przypadkach, urządzenie powróci do trybu gotowości z opcją użytkownika OP:61. Otwarcie i zamknięcie drzwi spowodują usunięcie wszelkich informacji o uruchomionym programie ręcznym lub zaprogramowanym. 3.3.5. Tryb pauzy Podczas trybu gotowania ręcznego lub gdy urządzenie jest w trybie pracy zaprogramowanej, jeśli drzwi są...
- Page 42 Jeśli wybrano opcję użytkownika OP:11 lub OP:12, urządzenie będzie emitowało dźwięk do momentu, aż użytkownik potwierdzi to poprzez otwarcie i zamknięcie drzwi lub naciśnięcie przycisku „X”. Jeśli wybrano opcję użytkownika OP:10, po 3- sekundowym sygnale dźwiękowym urządzenie przechodzi w tryb gotowości. 3.3.9.
- Page 43 Jeśli istnieje program zapisany w pamięci, nacisnąć odpowiedni przycisk numeryczny, zapisany program rozpocznie się. Jeśli nie ma zapisanego programu, brzęczyk będzie alarmował po naciśnięciu przycisku numerycznego i nie będzie działał. Na przykład: ustawić program jako gotowanie w pamięci. Poziom mocy PL7, a czas gotowania wynosi 1 minutę...
- Page 44 Przykład: Aby ustawić trzy etapy jako tryb pamięci. Pierwszy etap to PL7 i czas 1 minuta 25 sekund. Drugi etap to PL5 i czas 5 minut i 40 sekund. Kroki są następujące. Stan gotowości, nacisnąć „1” przez 5 sekund, LED wyświetla "ProG".
-
Page 45: Czyszczenie I Konserwacja
Dźwięk brzęczyka Sygnał dźwiękowy przycisków włączony / OP:31 włączony wyłączony OP:40 15 sekund Czas przejścia do OP:41 30 sekund trybu bezczynności OP:42 60 sekund między kolejnymi naciśnięciami OP:43 120 sekund przycisków OP:50 Wyłączone Gotowanie na OP:51 Włączone bieżąco OP:60 Wyłączone Reset drzwi OP:61 Włączone... - Page 46 Urządzenie należy przechowywać w suchym i chłodnym miejscu chronionym przed wilgocią i bezpośrednim promieniowaniem słonecznym. Zabrania się spryskiwania urządzenia strumieniem wody lub zanurzania urządzenia w wodzie. Należy pamiętać, aby przez otwory wentylacyjne znajdujące się w obudowie nie dostała się woda. Otwory wentylacyjne należy czyścić...
-
Page 47: Technické Údaje
Tento návod k použití byl přeložen strojově. Vždy se snažíme o poskytnutí přesného překladu. Žádný strojový překlad však není dokonalý. Rovněž neslouží k nahrazení překladu lidskou osobou. Oficiální návod k použití je dostupný v anglické verzi. Případné nesrovnalosti nebo rozdíly v překladu nejsou závazné a nemají žádný právní účinek pro účely dodržování... -
Page 48: Elektrická Bezpečnost
Výrobek splňuje požadavky příslušných bezpečnostních norem. Před použitím se seznamte s pokyny. Recyklovatelný výrobek. POZOR! nebo VAROVÁNÍ! nebo PAMATUJ! Obecný varovný signál, který popisuje danou situaci. UPOZORNĚNÍ! Varování před zásahem elektrickým proudem! Upozornění! Horký povrch může způsobit popáleniny! K použití pouze uvnitř místností. UPOZORNĚNÍ! Ilustrace použité... -
Page 49: Bezpečnost Na Pracovišti
Nedotýkejte se uzemněných částí, jako jsou trubky, ohřívače, kamna a chladničky. Pokud je vaše tělo uzemněno a dotýkáte se zařízení při přímém dešti, mokrém chodníku nebo při práci ve vlhkém prostředí, hrozí zvýšené riziko úrazu elektrickým proudem. Vniknutí vody do zařízení zvyšuje riziko jeho poškození... -
Page 50: Osobní Bezpečnost
Zapamatujte Během práce se zařízením chraňte děti a jiné, okolní osoby. 2.3. Osobní bezpečnost Nepoužívejte toto zařízení, pokud jste unavení, nemocní nebo pod vlivem alkoholu, drog nebo léků, které by mohly zhoršit vaši schopnost ovládat zařízení. Zařízení není určeno pro použití osobami (včetně dětí) se sníženými mentálními, smyslovými nebo intelektuálními funkcemi nebo osobami, které... -
Page 51: Návod K Použití
Za žádných okolností nesmí být kryt otevřen. Toto zařízení je volně stojící a nehodí se k trvalé vestavbě do nábytku. Tento spotřebič je určen pouze k ohřevu potravin. Při zahřívání lepidel, plastů, nepotravinářských kapalin nebo hořlavin se uvolňují škodlivé výpary a výpary. Toto zařízení... - Page 52 3.1. Přehled produktů 1 – Ovládací panel 2 - Dveře 3 - Bezpečnostní zámek 4 - Talíř Ovládací panel:...
- Page 53 1 - Tlačítka nastavení výkonu 2 - Časová tlačítka 3 - Tlačítko pro zdvojnásobení nastaveného parametru 4 - Tlačítko Stop/reset 5 - Tlačítko Start 6 - Číselná tlačítka 3.2. Příprava k práci UMÍSTĚNÍ ZAŘÍZENÍ Teplota prostředí nesmí překračovat 40 °C a relativní vlhkost by neměla překračovat 85 %.
- Page 54 povrchu mimo dosah dětí a osob se sníženými psychickými, smyslovými a duševními funkcemi. Zařízení umístěte tak, aby byl vždy zajištěn přístup k síťové zástrčce. Nezapomeňte, že napájení zařízení musí odpovídat údajům uvedeným na typovém štítku! Nikdy neodstraňujte nožičky spotřebiče. Nikdy neblokujte otvory pro vstup a výstup vzduchu - zablokování...
- Page 55 0:30 100% 0:45 100% 1:00 100% 1:30 100% 2:00 100% 3:00 100% 4:00 100% 5:00 100% 3.3.1. Uvedení do provozu Když je jednotka připojena ke zdroji napájení, na displeji se zobrazí „_ _ _ _“. Pokud stisknete tlačítko "Stop/reset", jednotka přejde do klidového režimu. Poznámka: V klidovém režimu nelze stisknout žádné...
- Page 56 Během pauzy se na displeji zobrazí zbývající doba vaření. Ventilátor a lampa fungují. Režim pauzy se vrátí zpět do klidového režimu přesně stejným způsobem jako pohotovostní režim, v závislosti na uživatelské možnosti #4. Pokud navíc stisknete tlačítko „stop/reset“, jednotka okamžitě přejde do pohotovostního režimu. NEBO, pokud je stisknuto tlačítko "start", jednotka přejde do provozního režimu.
- Page 57 3.3.10. Režim programování Tento režim umožňuje uživateli přiřadit časy vaření a úrovně výkonu jednotlivým číselným tlačítkům. a) Otevřete dvířka a stiskněte „1“ na 5 sekund. Jednou zazní bzučák a jednotka přejde do programovacího režimu. b) Na displeji se zobrazí „ProG“. Stiskněte libovolné...
- Page 58 3.3.11. Vaření dvojnásobné množství V pohotovostním režimu stiskněte tlačítko "X2" (na displeji se zobrazí "double"). Poté během 5 sekund stiskněte číselná tlačítka 0-9 a spotřebič začne vařit s nastavenou dobou vaření. Na konci programu přejde spotřebič do režimu ukončení cyklu vaření. 3.3.12.
- Page 59 Pokud v posledním kroku nestisknete tlačítko "Start", program se neuloží a jednotka zůstane v předchozím režimu. Možnosti použití (položky umístěné v buňkách s šedou výplní jsou nastaveny jako výchozí) Volba Nastavení Popis OP: 10 3sekundový zvuk Zvuk konce procesu OP: 11 Nepřetržitý...
-
Page 60: Čistění A Údržba
3.4. ČISTĚNÍ A ÚDRŽBA Před každým čištěním, seřízením, výměnou vybavení a rovněž není-li zařízení používáno, vytáhněte síťovou zástrčku a zařízení nechejte zcela vychladnout. Na čistění ploch zařízení používejte výhradně přípravky neobsahující leptavé látky. Na čistění zařízení používejte pouze jemné čisticí přípravky na čistění ploch určených pro styk s potravinami. - Page 61 Informace o příslušném sběrném dvoře pro likvidaci vyřazených zařízení Vám poskytne orgán místní samosprávy.
-
Page 62: Caractéristiques Techniques
Ce manuel d’utilisation a été traduit à l’aide d’une traduction automatique pour votre confort. Des efforts raisonnables ont été faits pour vous fournir une traduction précise ; cependant, aucune traduction automatique n’est parfaite et ne pourra jamais remplacer les traducteurs humains. La version anglaise est la version officielle de nos manuels d’utilisation. - Page 63 Explication des symboles Le produit répond aux exigences des normes de sécurité applicables. Veuillez lire attentivement le mode d’emploi ci-dessous avant d’utiliser le produit. Produit recyclable. AVERTIR! ATTENTION SOUVENEZ-VOUS ! signe d'avertissement général qui décrit une situation donnée. ATTENTION ! Risque d’électrisation ! Attention ! La surface chaude peut provoquer des brûlures ! Uniquement pour une utilisation à...
-
Page 64: Sécurité Électrique
2.1. Sécurité électrique La fiche de l’appareil doit être compatible avec la prise de courant. Ne pas modifier la fiche de quelque manière que ce soit. Les fiches d’origine et les prises correspondantes réduisent le risque d'électrocution. Évitez tout contact avec des pièces mises à la terre telles que des tuyaux, des radiateurs, des cuisinières et des réfrigérateurs. -
Page 65: Sécurité Personnelle
d) Le produit ne peut être réparé que par le service après-vente du fabricant. Ne pas réparer l’appareil par ses propres soins ! e) En cas d’incendie ou de départ de feu, utiliser uniquement les extincteurs à poudre ou à neige (CO2) pour éteindre l’appareil sous tension. Conserver le mode d’emploi pour référence future. - Page 66 Les travaux de réparation ou d’entretien ne doivent être effectués que par un personnel qualifié avec des pièces de rechange originales. Cela garantira la sécurité d’utilisation. Pour assurer l’intégrité opérationnelle de l’appareil, ne retirez pas les protections installées en usine ni ne desserrez les vis. Ne déplacez pas, ne déplacez pas et ne tournez pas l'appareil pendant son fonctionnement.
-
Page 67: Présentation Du Produit
L'appareil est destiné à chauffer des aliments et des boissons. L’utilisateur est responsable de tout dommage résultant d’une utilisation non conforme du produit. 3.1. Présentation du produit 1 – Panneau de commande 2 - Porte 3 - Système de verrouillage de sécurité 4 - L'assiette Panneau de commande :... - Page 68 1 - Boutons de réglage de puissance 2 - Boutons de temps 3 - Bouton pour doubler le paramètre réglé 4 - Bouton d'arrêt/réinitialisation 5 - Bouton de démarrage 6 - Touches numériques 3.2. Préparation au fonctionnement PLACEMENT DE L'APPAREIL : La température ambiante ne doit pas dépasser 40 °C et l’humidité...
-
Page 69: Utilisation De L'appareil
toujours l’appareil hors de portée des enfants et des personnes aux capacités mentales, sensorielles ou intellectuelles réduites. Placez l’appareil de manière à ce que la prise de courant soit accessible à tout moment. Assurez-vous que l’alimentation électrique de l’appareil correspond aux informations indiquées sur la plaque signalétique ! Ne retirez jamais les pieds de l'appareil. -
Page 70: Mode Veille
Touche Temps Alimentation de Facteur de numérique d'affichage) l’appareil cuisson 0:10 100% 0:20 100% 0:30 100% 0:45 100% 1:00 100% 1:30 100% 2:00 100% 3:00 100% 4:00 100% 5:00 100% 3.3.1. Départ Lorsque l'appareil est connecté à l'alimentation électrique, l'écran affiche "_ _ _ _". Si le bouton «... - Page 71 L'ouverture et la fermeture de la porte effaceront toutes les informations sur le programme en cours, manuel ou programmé. 3.3.5. Mode pause Pendant la cuisson manuelle ou lorsque l'appareil est fonctionnement programmé, si la porte est ouverte ou fermée, l'appareil se mettra en mode pause lorsque vous appuyez sur le bouton "stop/reset".
- Page 72 3.3.9. Mode de fonctionnement avec programmes de cuisson prédéfinis Ce mode vous permet de cuire des aliments avec une seule touche. En mode veille, l'appui sur l'une des touches numériques du clavier entraînera l'exécution par la machine du programme associé à cette touche. La LED affiche le temps de cuisson restant.
- Page 73 Par exemple : réglez le programme sur la cuisson mémoire. Le niveau de puissance est PL7, le temps de cuisson est de 1 minute et 25 secondes. Étape 1 : En mode veille, appuyez sur la touche numérique "1" pendant •...
- Page 74 b. Appuyez sur la touche numérique "3" pour enregistrer le programme sur "3". Appuyez sur "1", "2", "5" pour entrer le temps de cuisson. "1:25" s'affiche. d. Appuyez sur "Med.-Hi 70%", "PL7" s'affiche. e. Appuyez sur les touches "5", "4", "0", "5:40" s'affiche. Appuyez sur "Moyen 50%", "PL5"...
-
Page 75: Nettoyage Et Entretien
pressions sur les boutons OP : 50 Désactivé Cuisiner à la volée PO : 51 Inclus OP : 60 Désactivé Réinitialisation de la PO : 61 Inclus porte Le temps de cuisson maximum est de OP : 70 60 minutes Réglage du temps Temps de cuisson maximum 10 maximum... - Page 76 Nettoyez avec un chiffon doux et légèrement humide. N'utilisez pas d'objets pointus et/ou métalliques (par exemple une brosse métallique ou des spatules métalliques) car ils pourraient endommager la surface du matériau à partir duquel l'appareil est fabriqué. Ne nettoyez pas l'appareil avec des substances acides, des agents médicaux, des diluants, du carburant, des huiles ou d'autres produits chimiques.
-
Page 77: Dati Tecnici
Questo manuale di istruzioni è stato tradotto con la traduzione automatica. Ci sforziamo costantemente di fornire una traduzione accurata. Tuttavia, nessuna traduzione automatica è perfetta, né intende sostituire la traduzione umana. Il manuale di istruzioni ufficiale è nella versione inglese. Eventuali discrepanze o differenze create dalla traduzione non sono vincolanti e non hanno alcun effetto legale ai fini della conformità... - Page 78 Spiegazione dei simboli Il prodotto soddisfa i requisiti degli standard di sicurezza pertinenti. Prima dell’uso bisogna prendere visione del manuale. Prodotto riciclabile. ATTENZIONE! o ATTENZIONE! o RICORDA! Un segnale di avvertimento generale che descrive una determinata situazione. ATTENZIONE! Avvertenza contro la folgorazione! Attenzione! La superficie calda può...
-
Page 79: Sicurezza Elettrica
2.1. Sicurezza elettrica La spina del dispositivo deve essere adattata alla presa. Non modificare la spina in alcun modo. Le spine originali e le prese corrispondenti riducono il rischio di scosse elettriche. Evitare di toccare i componenti con messa a terra come tubi, radiatori, fornelli e frigoriferi. -
Page 80: Sicurezza Personale
d) Le riparazioni devono essere eseguite solo dall’assistenza tecnica del produttore. Riparare il dispositivo in autonomia è severamente vietato! e) In caso di accensione di fuoco o incendio, per estinguere il dispositivo sotto tensione, occorre utilizzare estintori a polvere o ad anidride carbonica (CO2). Conservare il manuale d’istruzioni per il futuro utilizzo. -
Page 81: Istruzioni Per L'uso
La riparazione e la manutenzione delle apparecchiature dovrebbero essere effettuate dal personale qualificato utilizzando esclusivamente parti di ricambio originali. Ciò garantirà un utilizzo sicuro. Per assicurare l'integrità operativa progettata dell'apparecchio, non rimuovere le coperture installate in fabbrica o allentare le viti. Non spostare, spostare o ruotare il dispositivo mentre è... -
Page 82: Panoramica Del Prodotto
L'utente è responsabile di qualsiasi danno derivante da un uso improprio. 3.1. Panoramica del Prodotto 1 – Pannello di controllo 2 - Porta 3 - Sistema di chiusura di sicurezza 4 - Il piatto Pannello di controllo:... -
Page 83: Preparazione Al Lavoro
1 - Pulsanti di impostazione della potenza 2 - Pulsanti orari 3 - Pulsante per raddoppiare il parametro impostato 4 - Pulsante stop/reset 5 - Pulsante di avvio 6 - Tasti numerici 3.2. Preparazione al lavoro POSIZIONAMENTO DELL’APPARECCHIO La temperatura ambiente non deve superare i 40°C e l'umidità relativa non deve superare l'85%. -
Page 84: Utilizzo Del Dispositivo
superficie piana, stabile, pulita, resistente al fuoco e tenere fuori dalla portata dei bambini e delle persone con funzioni mentali, sensoriali o intellettuali ridotte. L'apparecchio deve essere collocato in modo tale che la spina di alimentazione possa essere raggiunta in qualsiasi momento. Assicurarsi che l'alimentazione elettrica dell'apparecchio corrisponda ai dati riportati sulla targhetta! Non rimuovere mai i piedini dell'apparecchio. -
Page 85: Modalità Stand-By
Pulsante Visualizzazione Alimentazione del Fattore di cottura numerico (ora) dispositivo 0:10 100% 0:20 100% 0:30 100% 0:45 100% 1:00 100% 1:30 100% 2:00 100% 3:00 100% 4:00 100% 5:00 100% 3.3.1. Avviamento Quando l'unità è collegata all'alimentazione, il display visualizzerà "_ _ _ _". Se viene premuto il pulsante "Stop/reset", l'unità... - Page 86 3.3.5. Modalità pausa Durante la cottura manuale o quando l'apparecchio è funzionamento programmato, se la porta è aperta o chiusa, l'apparecchio andrà in modalità pausa quando si preme il tasto "stop/reset". Durante la pausa il display visualizzerà il tempo di cottura rimanente. Il ventilatore e la lampada funzionano.
- Page 87 3.3.9. Modalità di funzionamento con programmi di cottura preimpostati Questa modalità ti consente di cucinare il cibo con un solo tocco. In modalità standby, premendo uno dei tasti numerici sulla tastiera, la macchina eseguirà il programma associato a quel tasto. Il LED visualizza il tempo di cottura rimanente.
- Page 88 Ad esempio: impostare il programma come cottura in memoria. Il livello di potenza è PL7, il tempo di cottura è di 1 minuto e 25 secondi. Passaggio 1 : in modalità inattiva, premere il pulsante numerico "1" • per 5 secondi; il display visualizzerà "ProG". Passaggio 2 : premere il pulsante numerico "3", il programma verrà...
- Page 89 Premere "1", "2", "5" per inserire il tempo di cottura. Viene visualizzato "1:25". d. Premere "Med.-Hi 70%", viene visualizzato "PL7". e. Premere i pulsanti "5", "4", "0", "5:40" viene visualizzato. Premere "Medio 50%", viene visualizzato "PL5". Premere "Start" per salvare il programma. 3.3.13.
-
Page 90: Pulizia E Manutenzione
OP: 50 Disabilitato Cucinare al volo OP: 51 Incluso OP: 60 Disabilitato Ripristino della porta OP: 61 Incluso Il tempo massimo di cottura è di OP: 70 60 minuti Impostazione del tempo Tempo massimo di cottura 10 massimo OP: 71 minuti OP: 80 Disabilitato... - Page 91 Non pulire l'unità con sostanze acide, agenti medici, diluenti, carburante, oli o altri prodotti chimici. Potrebbe causare danni al dispositivo. Per prestazioni ottimali e per mantenere un elevato grado di sicurezza, il pannello interno della porta e la parte anteriore dell'apparecchio devono essere privi di depositi di cibo o grasso.
-
Page 92: Características Técnicas
Este manual de instrucciones ha sido traducido automáticamente. Nos esforzamos constantemente por ofrecer una traducción precisa. Sin embargo, ninguna traducción automática es perfecta. Tampoco pretende sustituir a la traducción realizada por un ser humano. El manual de instrucciones oficial es la versión inglesa. Cualquier discrepancia o diferencia en la traducción no es vinculante ni tiene ningún efecto legal a efectos de cumplimiento o ejecución. -
Page 93: Seguridad De Uso
Explicación de los símbolos El producto cumple con los requisitos de las correspondientes normas de seguridad. Antes de utilizar, leer atentamente el manual. Producto reciclable. ¡PRECAUCIÓN! o ¡ ADVERTENCIA! o ¡ RECUERDA! Una señal de advertencia general que describe una situación dada. ¡ADVERTENCIA! ¡Peligro de choque eléctrico! ¡advertencia! ¡Tocar la superficie caliente puede provocar quemaduras! Solo para uso en interiores. -
Page 94: Seguridad Eléctrica
2.1. Seguridad eléctrica La clavija de la herramienta eléctrica debe coincidir con el enchufe. Nunca modificar el enchufe de ninguna manera. Usar la clavija no modificada y el enchufe de alimentación correspondiente reducirá el riesgo de choque eléctrico. Evite tocar las partes conectadas a tierra como tubos, radiadores, calderas y frigoríficos. -
Page 95: Seguridad Personal
e) En caso de fuego o incendio, solo deben utilizarse extintores de polvo o de nieve (CO2) para extinguir el aparato bajo tensión. Guardar este manual para futuras consultas. En caso de transmitir el equipo a otra persona, deberá entregarse también el manual de uso. g) Mantener el equipo fuera del alcance de los niños y los animales. -
Page 96: Instrucciones De Uso
Cualquier operación de reparación y mantenimiento debe ser realizada por el personal cualificado y utilizando repuestos originales. Así la seguridad de uso será garantizada. Para garantizar la integridad operativa diseñada del equipo, no retirar las cubiertas instaladas en fábrica ni desatornillar los pernos. No mueva, mueva ni gire el dispositivo mientras está... -
Page 97: Descripción Del Producto
La responsabilidad de todos los daños resultantes de un uso distinto al indicado recae sobre el usuario. 3.1. Descripción del producto 1.– Panel de mando 2 - Puerta 3 - Sistema de bloqueo de seguridad 4 - El plato Panel de mando:... -
Page 98: Preparación Para El Trabajo
1 - Botones de ajuste de potencia 2 - Botones de tiempo 3 - Botón para duplicar el parámetro configurado 4 - Botón de parada/reinicio 5 - Botón de inicio 6 - Botones numéricos 3.2. Preparación para el trabajo LUGAR DE USO La temperatura de ambiente no debe exceder los 40°C y la humedad relativa no debe exceder el 85%. - Page 99 sobre una superficie plana, estable, limpia, resistente al fuego y seca, fuera del alcance de los niños y las personas con reducida capacidad psíquica, sensorial y mental. El dispositivo debe estar situado en un lugar con acceso libre al enchufe de alimentación.
- Page 100 Tiempo de Alimentación del Botón numérico factor de cocción visualización) equipo 0:10 100% 0:20 100% 0:30 100% 0:45 100% 1:00 100% 1:30 100% 2:00 100% 3:00 100% 4:00 100% 5:00 100% 3.3.1. Puesta en marcha Cuando la unidad esté conectada a la fuente de alimentación, la pantalla mostrará "_ _ _ _".
- Page 101 Al abrir y cerrar la puerta se borrará toda la información sobre el programa en ejecución, manual o programado. 3.3.5. modo de pausa Durante la cocción manual o cuando el aparato está funcionamiento programado, si la puerta está abierta o cerrada, el aparato entrará en modo de pausa cuando pulse el botón "stop/reset".
- Page 102 3.3.9. Modo de funcionamiento con programas de cocción preestablecidos Este modo le permite cocinar alimentos con un solo toque. En el modo de espera, al presionar una de las teclas numéricas del teclado, la máquina ejecutará el programa asociado con esa tecla. El LED muestra el tiempo de cocción restante.
- Page 103 Paso 1 : en modo inactivo, presione el botón numérico "1" durante 5 • segundos; la pantalla mostrará "ProG". • Paso 2 : presione el botón numérico "3", el programa se guardará como el número "3". Paso 3 : Presione los botones numéricos "1", "2" y "5" para ingresar el •...
- Page 104 e. Presione los botones "5", "4", "0", "5:40" se muestra. Presione "Medio 50%", se muestra "PL5". Pulse "Inicio" para guardar el programa. 3.3.13. Modo de opciones de uso Abra la puerta del aparato y presione "2" durante 5 segundos. El zumbador sonará una vez y la unidad entrará...
-
Page 105: Limpieza Y Mantenimiento
OP: 60 Desactivado Reinicio de puerta OP: 61 Incluido El tiempo máximo de cocción es de 60 OP: 70 minutos. Configuración del Tiempo máximo de cocción 10 tiempo máximo PO: 71 minutos PO: 80 Desactivado Programación OP: 81 Incluido manual Modo de un solo dígito - 10 OP: 90 programas... - Page 106 No limpie la unidad con sustancias ácidas, agentes médicos, diluyentes, combustible, aceites u otros productos químicos. Puede causar daños al dispositivo. Para obtener el mejor rendimiento y mantener un alto grado de seguridad, el panel interno de la puerta y el frente del electrodoméstico deben estar libres de restos de comida o grasa.
-
Page 107: Műszaki Adatok
Kérjük, vegye figyelembe, hogy ez a használati útmutató gépi fordítással készült. Arra törekszünk, hogy a fordítások a lehető legpontosabbak legyenek, azonban egyetlen gépi fordítás sem tökéletes, és nem is célja, hogy helyettesítse az emberi fordítást. A hivatalos használati útmutató az angol nyelvű változat. A fordításban keletkezett eltérések vagy különbségek nem kötelező... - Page 108 Jelmagyarázat A termék megfelel a vonatkozó biztonsági előírásoknak. Használat előtt ismerkedjen meg az utasítással! Újrahasznosítható termék. VIGYÁZAT! vagy FIGYELMEZTETÉS! vagy EMLÉKEZTETÉS! Egy adott helyzetet leíró általános figyelmeztető jel. VIGYÁZAT! Vigyázat, áramütés veszélye áll fent! Vigyázat! A forró felület égési sérülést okozhat! Csak beltéri használatra.
- Page 109 2.1. Elektromosságra vonatkozó biztonsági szabályok A készülék villásdugójának illenie kell a konnektorba. A villásdugót semmilyen módon ne módosítsa. Az eredeti villásdugók és a megfelelő aljzatok csökkentik az áramütés kockázatát. Kerülje a földelt elemekkel, például csövekkel, radiátorokkal, tűzhelyekkel és hűtőszekrényekkel való érintkezést. Fokozottan fennáll az áramütés veszélye, ha a teste földelve van, és megérinti a készüléket, miközben közvetlen esőnek, nedves járdának van kitéve, vagy nedves környezetben dolgozik.
- Page 110 e) Láng vagy tűz fellépése esetén a feszültség alatt lévő berendezést kizárólag porral vagy szénsavhóval (CO2) oltó készülékkel szabad oltani. Őrizze meg a használati útmutatót, mivel később is szüksége lehet rá. Ha a készüléket átadja egy következő tulajdonosnak, a használati útmutatót is át kell adni a termékkel együtt.
-
Page 111: Használati Utasítás
A készülék működési integritásának biztosítása érdekében tilos eltávolítani a gyári burkolatot vagy a csavarokat. Működés közben ne mozgassa, tolja vagy forgassa a készüléket. Rendszeresen tisztítsa meg a készüléket, hogy megakadályozza a szennyeződések felhalmozódást. A készülék nem játék. Gyermekek nem végezhetik felnőtt felügyelete nélkül a tisztítási vagy karbantartási munkálatokat. - Page 112 3.1. Termék áttekintés 1 – kezelőpanel 2 - Ajtó 3 - Biztonsági zárrendszer 4 - A tányér Kezelőpanel:...
- Page 113 1 - Teljesítménybeállító gombok 2 - Idő gombok 3 - A beállított paraméter megduplázására szolgáló gomb 4 - Stop/visszaállítás gomb 5 - Start gomb 6 - Numerikus gombok 3.2. Beüzemelés előtt BERENDEZÉS ELHELYEZÉSE: A készülék környezetének hőmérséklete nem haladhatja meg a 40°C-ot, és páratartalma nem haladhatja meg a 85%-ot.
- Page 114 használni, gyermekek és csökkent szellemi, érzékszervi vagy mentális funkciókkal rendelkező személyek számára elérhetetlen helyen. A készüléket úgy kell elhelyezni, hogy a tápkábel villásdugója bármikor elérhető legyen. Ellenőrizni kell, hogy a készülék tápellátása megfelel-e az adattáblán megadott adatoknak! Soha ne távolítsa el a készülék lábát. Soha ne zárja el a levegő be- és kimeneti nyílásokat - ezek elzárása károsíthatja a készüléket! A készüléket rádió- és TV-vevőkészülékektől távol helyezze el.
- Page 115 0:10 100% 0:20 100% 0:30 100% 0:45 100% 1:00 100% 1:30 100% 2:00 100% 3:00 100% 4:00 100% 5:00 100% 3.3.1. Beüzemelés Amikor a készüléket a tápegységhez csatlakoztatják, a kijelzőn a "_ _ _ _ _" felirat jelenik meg. A "Stop/reset" gomb megnyomásakor a készülék üresjárati üzemmódba kerül.
- Page 116 3.3.5. Szünet üzemmód Kézi főzés közben, vagy amikor a készülék programozott üzemmódban van, ha az ajtó nyitva vagy zárva van, a készülék a "stop/reset" gomb megnyomásakor szünet üzemmódba lép. A szünet alatt a kijelzőn megjelenik a hátralévő főzési idő. A ventilátor és a lámpa működik. A szünet üzemmód a 4.
- Page 117 3.3.9. Működési mód előre beállított főzési programokkal Ez az üzemmód lehetővé teszi, hogy egyetlen érintéssel főzzön ételt. Készenléti üzemmódban a billentyűzeten lévő numerikus billentyűk egyikének megnyomásával a gép az adott billentyűhöz tartozó programot indítja el. A LED kijelzőn megjelenik a hátralévő főzési idő. Ha többlépcsős főzésről van szó, a hátralévő...
- Page 118 2. lépés: Nyomja meg a "3" számgombot, a program "3" számként lesz • elmentve. • 3. lépés: Nyomja meg az "1", "2" és "5" számgombokat a főzési idő megadásához. 4. lépés: Nyomja meg a "Med.-Hi 70%" gombot, és a kijelzőn •...
- Page 119 e. Nyomja meg az "5", "4", "0" gombokat, megjelenik az "5:40". Nyomja meg a "Medium 50%" gombot, a "PL5" megjelenik. Nyomja meg a "Start" gombot a program mentéséhez. 3.3.13. Használati opciók mód Nyissa ki a készülék ajtaját, és 5 másodpercig nyomja meg a "2" gombot. A hangjelzés egyszer megszólal, és a készülék belép ebbe az üzemmódba.
-
Page 120: Tisztítás És Karbantartás
OP: 60 Mozgáskorlátozottak Ajtó visszaállítása OP: 61 Tartalmazza a OP: 70 A maximális főzési idő 60 perc A maximális idő OP: 71 Maximális főzési idő 10 perc beállítása OP: 80 Mozgáskorlátozottak Kézi programozás OP: 81 Tartalmazza a OP: 90 Egyszámjegyű üzemmód - 10 program Megduplázott Kétszámjegyű... - Page 121 A legjobb teljesítmény és a magas fokú biztonság érdekében a készülék belső ajtópanelének és elülső részének mentesnek kell lennie az élelmiszer- és zsírlerakódásoktól. Ne használjon mosószert vagy lúgos spray-t a kezelőpanelen és a műanyag alkatrészeken, mert ezek az alkatrészek károsodhatnak. Használjon száraz (nem átitatott) ruhát ezen alkatrészek tisztításához.
-
Page 122: Tekniske Data
Bemærk at denne brugervejledning er maskinoversat. Skønt der er blevet gjort en stor arbejdsindsats for at få oversættelserne så præcise som muligt, er ingen maskineoversættelser perfekte, og er heller ikke ment som erstatning for en menneskelig oversættelse. Den officielle brugervejledning er den engelske version. Vi hæfter ikke juridisk for misforståelser som følge af maskinelle fejloversættelser Såfremt der opstår tvivl om meningen, henviser vi til den engelske brugsanvisning da dette er den officielle version. -
Page 123: Elektrisk Sikkerhed
Produktet opfylder kravene, angivet i de relevante sikkerhedsstandarder. Læs betjeningsvejledningen inden brug. Produktet er genanvendeligt. FORSIGTIG! eller ADVARSEL! eller HUSK! Et generelt advarselstegn, der beskriver en given situation. OBS! Advarsel mod elektrisk stød! Obs! Varm overflade kan forårsage forbrændinger! Udelukkende til indendørs brug. OBS! Illustrationerne i denne betjeningsvejledning er kun til reference og kan i nogle detaljer afvige fra det faktiske produkt. -
Page 124: Sikkerhed På Arbejdspladsen
Undgå kropskontakt med jordede dele såsom rør, radiatorer, ovne og køleskabe. Der er en øget risiko for elektrisk stød, hvis din krop er jordet og rører ved enheden, mens du er udsat for direkte regn, vådt fortov eller arbejder i et fugtigt miljø. Vand, der kommer ind i apparatet, øger risikoen for skader og elektrisk stød. -
Page 125: Personlig Sikkerhed
OBS! Under brug af udstyret skal børn og andre tilstedeværende personer beskyttes. 2.3. Personlig sikkerhed Du må ikke betjene dette apparat, hvis du er træt, syg eller påvirket af alkohol, stoffer eller medicin, der kan forringe din evne til at betjene apparatet. Apparatet er ikke beregnet til at blive brugt af personer (herunder børn) med nedsatte mentale, sensoriske eller intellektuelle funktioner eller personer, der mangler erfaring og/eller viden, medmindre de er under opsyn eller er blevet... - Page 126 Hold apparatet væk fra varmekilder og ild. Maskinen skal være placeret på et stabilt underlag. m) Apparatets ventilationsåbninger må ikke blokeres! Huset må under ingen omstændigheder åbnes. Enheden er et fritstående apparat og er ikke egnet til permanente møbler. Dette apparat er kun beregnet til opvarmning af mad. Der udsendes skadelige støv og dampe ved opvarmning af klæbemidler, plast, væsker og brændbare materialer.
- Page 127 3.1. Produktoversigt 1 – Betjeningspanel 2 - Dør 3 - Sikkerhedslåsesystem 4 - Pladen Betjeningspanel:...
- Page 128 1 - Knapper til strømindstilling 2 - Tidsknapper 3 - Knap til at fordoble den indstillede parameter 4 - Stop/reset-knap 5 - Start-knappen 6 - Numeriske knapper 3.2. Klargøring til drift APPARATETS PLACERING Omgivelsestemperaturen må ikke overstige 40°C, og luftfugtigheden må ikke overstige 85%.
- Page 129 rækkevidde af børn og mennesker med nedsatte mentale, sensoriske og mentale funktioner. Apparatet skal placeres på en sådan måde, at netstikket når som helst kan nås. Sørg for, at strømforsyningen til apparatet svarer til de data, der er angivet på typeskiltet! Fjern aldrig apparatets fødder.
- Page 130 0:20 100% 0:30 100% 0:45 100% 1:00 100% 1:30 100% 2:00 100% 3:00 100% 4:00 100% 5:00 100% 3.3.1. Start Når enheden er tilsluttet strømforsyningen, vises "_ _ _ _ _ _ _" på displayet. Hvis der trykkes på knappen "Stop/reset", går apparatet i tomgang. Bemærk: Der kan ikke trykkes på...
- Page 131 3.3.5. Pause-tilstand Under manuel madlavning eller når apparatet er programmeret drift, går apparatet i pausetilstand, hvis døren er åben eller lukket, når du trykker på knappen "stop/reset". Under pausen vises den resterende tilberedningstid på displayet. Ventilatoren og lampen fungerer. Pausetilstanden går tilbage til tomgangstilstand på nøjagtig samme måde som standbytilstanden, afhængigt af brugerindstilling nr.
- Page 132 3.3.9. Driftstilstand forudindstillede madlavningsprogrammer Denne tilstand giver dig mulighed for at tilberede mad med et enkelt tryk. I standby- tilstand vil et tryk på en af de numeriske taster på tastaturet få maskinen til at køre det program, der er knyttet til den pågældende tast. LED'en viser resterende...
- Page 133 Trin 1: Tryk på talknappen "1" i 5 sekunder i tomgang; på displayet • vises "ProG". • Trin 2: Tryk på nummerknappen "3", programmet gemmes som nummer "3". Trin 3: Tryk på talknapperne "1", "2" og "5" for at indtaste •...
- Page 134 Tryk på "Medium 50%", "PL5" vises. Tryk på "Start" for at gemme programmet. 3.3.13. Brugsindstillinger mode Åbn apparatets dør, og tryk på "2" i 5 sekunder. Summeren lyder en gang, og enheden går i denne tilstand. LED'en viser "OP: - - -". Tryk på...
-
Page 135: Rengøring Og Vedligeholdelse
Den maksimale tilberedningstid er OP: 70 60 minutter Indstilling af den Maksimal tilberedningstid 10 maksimale tid OP: 71 minutter OP: 80 Handicappede Manuel OP: 81 Inkluderet programmering Enkeltcifret tilstand - 10 OP: 90 programmer Dobbelte cifre Dobbeltcifret tilstand - 100 OP: 91 programmer 3.3.14. - Page 136 Brug ikke rengøringsmiddel eller alkalisk spray på kontrolpanelet og plastikdelene, da dette kan beskadige disse dele. Brug en tør klud (ikke gennemblødt) til at rengøre disse dele. Efter brug skal du fjerne spildte væsker, spildt olie og madrester så hurtigt som muligt.
- Page 137 UMWELT – UND ENTSORGUNGSHINWEISE Hersteller an Verbraucher Sehr geehrte Damen und Herren, gebrauchte Elektro – und Elektronikgeräte dürfen gemäß europäischer Vorgaben [1] nicht zum unsortierten Siedlungsabfall gegeben werden, sondern müssen getrennt erfasst werden. Das Symbol der Abfalltonne auf Rädern weist auf die Notwendigkeit der getrennten Sammlung hin.
Need help?
Do you have a question about the P1KW and is the answer not in the manual?
Questions and answers