Advertisement
- 1 VACUUM PACKAGING AND FOOD SAFETY
- 2 THE VACUUM SEALER FEATURES
- 3 TECHNICAL DATA
- 4 SAFETY
- 5 MAINTENANCE
- 6 GETTING STARTED WITH VACUUM PACKAGING
- 7 PACKAGING WITH VACUUM POUCHES
- 8 PREPARATIONS
- 9 HOW TO VACUUM AND SEAL WITH BAGS
- 10 HOW TO VACUUM MARINATE WITH BAG OR CANISTER
- 11 FOOD STORAGE AND SAFETY INFORMATION
- 12 VACUUM PACKAGING TIPS
- 13 TROUBLE SHOOTING
- 14 ERROR CODES AND REPAIRING
- 15 Documents / Resources
VACUUM PACKAGING AND FOOD SAFETY
Vacuum packaging extends the life of foods by removing most of the air from sealed containers and prevents fresh air escaping into the sealed containers, thereby reducing oxidation. Vacuum packaging helps preserve flavor and overall quality. It also helps inhibit the growth of aerobic microorganisms, which can lead to the problems noted below under certain conditions:
Mold – Mold cannot grow in a low oxygen environment; therefore vacuum packaging can virtually eliminate it.
Yeast – Results in fermentation, which can be identified by smell and taste. Yeast needs water, sugar and a moderate temperature to grow. It can also survive with or without air. Slowing the growth of yeast requires refrigeration, while freezing stops it completely.
Bacteria – Results in an unpleasant odor, discoloration and/or soft or slimy texture. Under the right conditions, clostridium botulinum (the organism that causes Botulism) can grow without air and cannot be detected by smell or taste. Although it is extremely rare, it can be very dangerous.
As with any other storage container, it is important to inspect food for spoilage prior to consuming.
To preserve foods safely, it is important to maintain low temperatures. You can significantly reduce the growth of microorganisms at temperatures of 39.2˚F (4˚ C) or below. Freezing at 1.4ºF (-17) does not kill microorganisms, but stops them from growing. For long-term storage, always freeze perishable foods that have been vacuum packaged.
It is important to note that vacuum packaging cannot reverse the deterioration of foods. It can only slow down changes in quality. It is difficult to predict how long foods will retain their top-quality flavor, appearance or texture because it depends on the age and the condition of the food on the day it was vacuumed packaged.
Note: vacuum packaging is not a substitute for refrigeration or freezing. Any perishable foods that require refrigeration must still be refrigerated or frozen after vacuum packaging.
Preparation Guidelines
Vegetables need to be blanched before vacuum packaging. This process stops the enzyme action, which leads to loss of flavor, color and/or texture. To blanch vegetables, place them in boiling water or in the microwave until they are cooked, but still crisp. Then, immerse the vegetables in cold water to stop the cooking process. Finally, dry the vegetables with a towel before vacuum packaging. Cruciferous vegetables (broccoli, sprouts, cabbage, cauliflower, kale, turnips) naturally emit gases during storage. Therefore, after blanching, they must be stored in the freezer only.
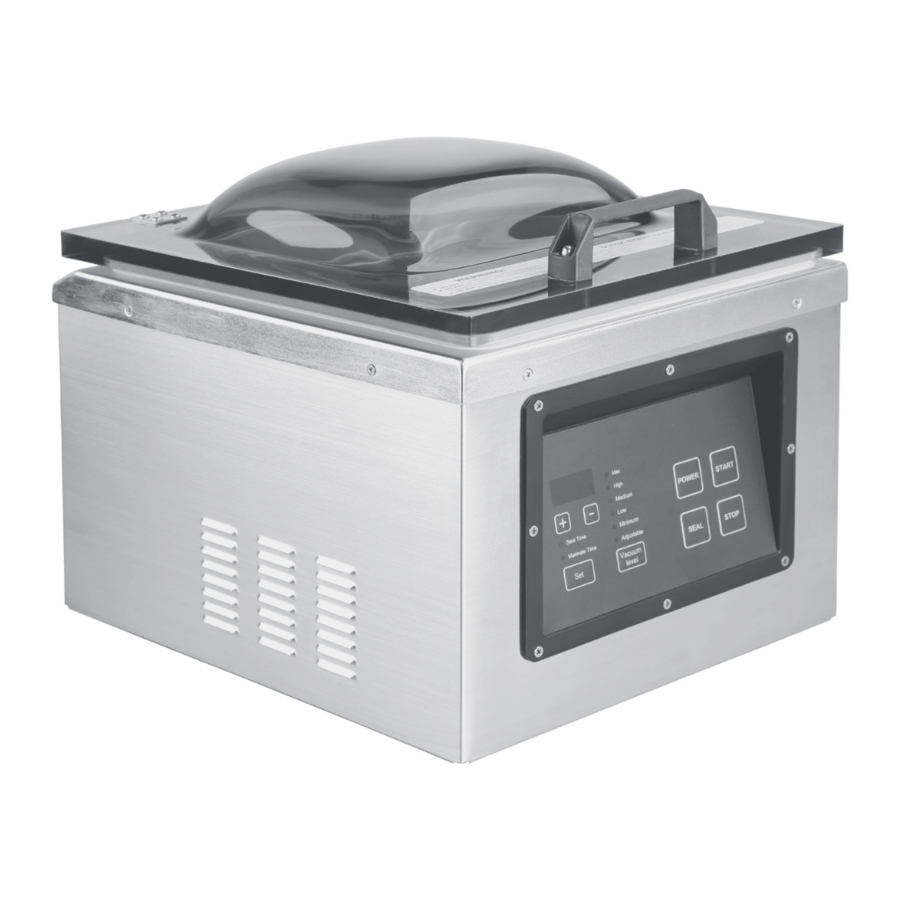
THE VACUUM SEALER FEATURES


- POWER BUTTON (POWER)
- START BUTTON (START)
- SEAL BUTTON
- STOP BUTTON
- SET BUTTON
- VACUUM LEVEL BUTTON
- LED DISPLAY
- ADJUST BUTTON
- INDICATOR LIGHTS
FEATURES
Power Button (Power)
When the machine is connected to power, LED (G) will show OFF, press Power button, LED (G) will show the preset sealing time (or marinate time) and then the preset vacuum degree. The machine is now ready to work. Press Power button, the machine will be back to standby mode. LED (G) will show OFF.
Start Button (Start)
When the machine is ready to work, press the Start button, the machine will enter into vacuum-sealing mode or vacuum-marinate mode (according to the setting mode).
Seal Button
(Seal) During the vacuum mode, press the Seal button, stop the vacuum process and enter into sealing mode.
Stop Button (Stop)
Press the Stop button, the machine will stop any process which is underway.
Set Button (Set)
Press the Set button, choose vacuum-seal mode or vacuum-marinate mode (indicator light will be on accordingly). Press the " + " " - " button to adjust the seal time or marinate time (the time will show on the LED).
Vacuum Level Button (Vacuum Level)
Press the Vacuum Level button, choose the vacuum Degree needed (indicator light will be on accordingly, with a unit of inHg). When choosing ADJUSTABLE, press " + " " - " button to set any vacuum degree needed (the vacuum degree will show on the LED).
LED Display
- Show the vacuum degree in real time.
- Show the seal time or marinate time.
Adjust button (" + " " - ")
- Adjust seal time
- Adjust marinate time
- Adjust vacuum degree
Indicator lights
- Indicate working process
- Indicate vacuum degree
TECHNICAL DATA
Voltage: 100-120V~60HZ
Pressure: -29.7"Hg / -1006mbar (±5‰) directly in pump
-29.5"Hg/-999mbar (±5‰) in vacuum chamber
Max bag width: 11.8" (300mm)
Weight: 53.7 lbs (24.4Kg)
Power: 630W
Seal wire width: 3.5mm
16.8" x 14.1" x 13.5"
429 x 359 x 345mm (L x W x H)
SAFETY
For your safety, follow these precautions when using your Vacuum Sealer:
- Read Owner's Manual carefully before using the machine for the first time.
- Do not use the Vacuum Sealer on wet or hot surfaces, or near a heat source.
- Do not immerse machine or power cord in water or any other liquid.
- Plug Vacuum Sealer into grounded power sources only, do not use extension cord.
- To disconnect, unplug directly from power source. Do not disconnect by pulling on cord.
- Do not operate appliance with damaged power cord.
- Only use the Vacuum Sealer for its intended use.
- Only use Vacuum bags, accessories and attachments.
- This appliance is not intended for use by persons (including children) with reduced physical, sensory or mental capabilities, or lack of experience and knowledge, unless they have been given supervision or instruction concerning use of the appliance by a person responsible for their safety.
- Children should be supervised to ensure that they do not play with the appliance.
- If the supply cord is damaged, it must be replaced by the manufacturer, its service agent or similarly qualified persons in order to avoid a hazard.
MAINTENANCE
- Unplug before cleaning.
- Clean appliance regularly with damp cloth and mild soap to remove crumbs, dust, debris.
GETTING STARTED WITH VACUUM PACKAGING
- If you are part of the food processing or food service industry, there is a good chance that you already know the advantages of vacuum packaging. It has been used with success for many years as a safe and cost effective method for extending shelf life and maintaining the quality of food products. If vacuum packaging is new to your home or business, you will soon wonder how you lived without it!
- Whether you are a beginner or expert, there are certain basic guidelines that should always be followed in order to package foods safe to eat. Neglecting these basic guidelines can result in food spoilage, and in some cases, illness or death.
- Once you familiarize yourself with the YJS822 procedures, you will feel at ease using the Chamber Machine and enjoy a higher quality of stored foods.
- Package only fresh foods. Do not package old or rancid foods. An already bad product does not improve with vacuum packaging.
- Fresh foods (Meats, vegetables, cheeses, etc.) should be refrigerated at 34˚F or below or frozen after vacuum packaging.
- Vacuum packaging removes a high percentage of air. This slows the growth of most living microorganisms, which degrade food, such as aerobic bacteria and molds. However, some forms of bacteria such as clostridium botulinum (responsible for botulism) are anaerobic and grow in the absence of oxygen.
- The foods susceptible to botulinum should be refrigerated for a short term and frozen for long-term storage. Consume immediately after heating.
- Vegetables such as cauliflower, broccoli and cabbage will emit gases when vacuum sealed. To prepare these foods for vacuum packaging, you must blanch them first.
- All perishable foods must be refrigerated or frozen to prevent spoilage.
- Vacuum packaging is not a substitute for canning.
PACKAGING WITH VACUUM POUCHES
You can easily package a wide variety of sizes and shapes. You can also prep and store smaller individual serving portions as well as bulk items.
- Keeps food fresh 3-5 times longer than conventional storage bags.
- Several sizes available to meet your packaging needs.
- Terrific for hundreds of applications in and out of the kitchen.
- Safe for freezer, refrigerator and microwave use. Pouches can also be boiled.
- Pouch thickness available in standard 3mil or heavy duty 4mil.
- Pouches are economically priced, giving you a better value.
- Vegetables must be blanched before being packaged. Place in boiling water or microwave until heated through but still crunchy. Vacuum package as normal.
PREPARATIONS
- Read the user manual carefully before use.
- Plug in grounded power socket.
- Open the lid, press "Power button", the machine is ready to work, LED will show the working mode last time. Now use the machine for vacuum packing.
HOW TO VACUUM AND SEAL WITH BAGS
- Select "Vacuum Bag"
Select the proper size vacuum pouch. Allow a minimum of 1" to 2" of extra headspace at the top of the pouch to ensure quality, air-tight seal. - Select Seal mode and set seal time
Press Set button, when the indicator light of seal time in on, the "Seal" mode is selected. Press " + " " - " button to increase or decrease seal time, time range is 0~6 seconds. - Select Vacuum Degree
Press Vacuum Level, select the vacuum degree needed. There are 6 options: Max (29.3inHg), High (29.0inHg), Medium (27.5inHg), Low (26.0inHg), Minimum (23.5inHg) and Adjustable. Indicator light will be on according to the selected vacuum degree. When select the Adjustable option, press " + " " - " button to set any degree between 23.5~29.3inHg - Put the vacuum bag with items into the vacuum chamber.
- Ensure the height of packing bag with liquid or moist food should be less than the height of the sealing bar.
- Lay down the packing bag, ensure the bag mouth should be across the sealing bar.
- Open the clip in the front of the chamber, clip the underside of the bag mouth and press down the clip to lock the bag.
Note: the whole bag including the bag mouth should be within the vacuum chamber.
- Working Process (Vacuum-Seal)
- Close the lid, press Start button, ready for Vacuum-Seal.
- Pump starts to work. The indicator light of the preset vacuum degree starts to blink (when the vacuum degree reaches at the preset degree, the indicator light will be constant on). The number on the LED will count up from 0 to preset vacuum degree (when it is up to 5 and 19, the machine will beep).
- When the vacuum is finished, the machine will enter into Seal mode automatically. LED shows the preset seal time, and starts to count down to 0. When Sealing is finished, the machine starts to release air.
- When the machine beeps three times, the whole process is finished. The machine will be back to ready-to-work mode. The LED and indicator lights will show accordingly.
Note: during the above b process, press Seal button, it will enter into Seal mode in advance.
HOW TO VACUUM MARINATE WITH BAG OR CANISTER
- Select the packing bag or container.
Packing bag: choose packing bag with suitable size. Allow a minimum of 1" to 2" of extra headspace at the top of the pouch to ensure quality, air-tight seal. Container: choose the container with correct size which can be put into the vacuum chamber. - Select marinate mode and set the marinate time
Press Set button, when Marinate time indicator light is on, the Marinate mode is selected. Press " + " " - " button to increase or decrease the marinate time. The time range is 9~99 minutes. - Set vacuum degree
Press Vacuum Level, select the vacuum degree needed. There are 6 options: Max (29.3"Hg), High (29.0"Hg), Medium (27.5"Hg), Low (26.0"Hg), Minimum (23.5"Hg) and Adjustable. Indicator light will be on according to the selected vacuum degree. When select the Adjustable option, press " + " " - " button to set any degree between 23.5~29.3"Hg - Put the packing bag or container into the vacuum chamber
Packing Bag:- Ensure the height of packing bag with liquid or moist food should be less than the height of the sealing bar.
- Lay down the packing bag, ensure the bag mouth should be across the sealing bar.
- Open the clip in the front of the chamber, clip the underside of the bag mouth and press down the clip to lock the bag.
Note: the whole bag including the bag mouth should be within the vacuum chamber.
Container: put the container with items inside into the vacuum chamber. If the container is with a lid, take away the lid to ensure the container is connected with the vacuum chamber.
- Working process (Vacuum-Marinate)
- Close the vacuum lid, machine starts to run and enter into the Vacuum-Marinate mode. One cycle is for 9 minutes; maximum is 11 cycles (99 minutes). The process is: vacuum— keep vacuum-release. Vacuum and release time is about 1 minute. Keep-vacuum time is about 8 minutes.
- Pump starts to work. The indicator light of the preset vacuum degree starts to blink (when the preset vacuum degree is reached, the indicator light will be constant on). The number on LED will count up from 0 to the preset vacuum degree (the machine will beep when the degree is up to 5 and 19).
- When vacuum process is finished, machine enters into Marinate mode (keep vacuum). The marinate time showing in the LED display will count down by 1 minute each. When the number is counted down to a multiple of 9, the vacuum chamber starts to release air. After the release finished, repeat the Vacuum-Marinate mode, till the number counts down to 0. The whole process is finished.
- When machine beeps three times, the whole working process is finished. Machine will be back to ready-to-work mode. Display and indicator lights will show accordingly.
Note: during the above b or c process, press Seal button, machine enters into seal mode.
FOOD STORAGE AND SAFETY INFORMATION
The Vacuum Sealer will revolutionize the way you buy and store food. Because vacuum packaging works to eliminate freezer burn and slow food spoilage, you are now able to take advantage of buying food in bulk without the threat of wasting food.
Vacuum packaging with the Vacuum Sealer removes up to 90% of the air from the package. This will help keep food fresher up to 5 times longer than under normal circumstances. Dry foods like pasta, cereals and flour will stay fresh from start to finish. Plus vacuum packaging prevents weevils and other insects from infesting dry goods. Package only the freshest foods possible.
However, please keep in mind that not all foods benefit from vacuum packaging. Never vacuum package garlic or fungi like mushrooms. A dangerous chemical reaction takes place when air is removed, causing these foods to be dangerous if ingested. Vegetables should be blanched before packaging to kill any enzymes that may cause the release of gases (out-gassing) when vacuumed.
| FOODS | Vacuum Freezer Storage | Vacuum Fridge Storage | Typical Storage |
| Fresh Beef & Veal | 1-3 years | 1 month | 1-2 weeks |
| Ground Meat | 1 year | 1 month | 1-2 weeks |
| Fresh Pork | 2-3 years | 1-4 weeks | 1 weeks |
| Fresh Fish | 2 years | 2 weeks | 3-4 days |
| Fresh Poultry | 2-3 years | 2-4 weeks | 1 week |
| Smoked Meats | 3 years | 6-12 weeks | 2-4 weeks |
| Fresh Produce, Blanched | 2-3 years | 2-4 weeks | 1-2 weeks |
| Fresh Fruits | 2-3 years | 2 weeks | 3-4 days |
| Hard Cheeses | 6 months | 6-12 weeks | 2-4 days |
| Sliced Deli Meats | Not recommended | 6-12 weeks | 1-2 weeks |
| Hard Cheeses | 6 months | 2-3 weeks | 1 week |
VACUUM PACKAGING TIPS
Vacuum packaging greatly extends the shelf life of foods, but your Vacuum Sealer can also be used in many other areas of the house besides the kitchen.
VACUUM PACKAGING IS GREAT FOR CAMPING AND OUTDOOR ACTIVITIES!
- For a quick & reusable ice pack, fill a vacuum bag about half full with water and a few tablespoons of rubbing alcohol. Seal the bag - don't vacuum it - and place in the freezer. The alcohol keeps the water from freezing completely, resulting in a flexible ice pack to wrap around sore joints and minor injuries.
- Vacuum package pre-made meals in advance for camping outings for quick and easy dinners in the great outdoors.
- Vacuum package meats and other items for scent-free storage.
- Create your own dry packs by vacuum packaging essentials like matches, dry socks and a map for emergencies.
AROUND THE HOUSE
- Organize 'junk' drawers and keep easy to lose items like nails and screws safe by vacuum packaging them in a vacuum bag. That way, items are clearly visible and organized within the bag.
- Don't worry about polishing silver ever again! Simply vacuum package rarely used silverware in vacuum bags to prevent the oxidation that causes tarnishing.
** Hint: place a folded paper towel in between sharp edges of the silverware and the vacuum bag to prevent puncturing.
TROUBLE SHOOTING
Under the proper circumstances, your Vacuum Sealer will give you many top-notch vacuum performances. In some instances, problems may arise. Please review this trouble shooting page prior calling customer support.
Note: In order to maintain a longer product life, we strongly recommend to stop at least 20 seconds between each seal.
THE VACUUM SEALER WON'T TURN ON
- Ensure that the machine is properly plugged into a grounded outlet.
- Check the power cord for tears and frays. Do not use machine if power cord is damaged.
THE VACUUM SEALER DOESN'T PULL A COMPLETE VACUUM WITH BAGS
- To vacuum and seal properly, edge of bag must be across the seal bar. Make sure bag is inside the chamber seal gasket and that there are no wrinkles in the bag along the seal bar.
- If packaging from a roll bag, make sure first seal is complete and that there are no gaps in either seal.
- The Vacuum Sealer and vacuum bag need to be clean, dry and free of debris for the vacuum process to be successful. Wipe surface of seal bar and inside of bag and try again.
VACUUM BAG LOSES VACUUM AFTER BEING SEALED
- Sharp items can puncture small holes in bags. To prevent this, cover sharp edges with paper towel and vacuum in a new bag.
- Some fruits and vegetables can release gases (out-gassing) if not properly blanched or frozen before packaging. Open bag. If you think food spoilage has begun, discard food. If food spoilage has not yet begun, consume immediately. If in doubt, discard food.
THE VACUUM SEALER IS NOT VACUUMING CANISTERS PROPERLY
- The accessory hose may not be properly attached. Ensure the hose is completely inserted into the lid of the canister and the accessory port and try again.
- Make sure the canister lid is turned to the "Vacuum" setting.
- Leave adequate head space at the top of the canister.
- Make sure there isn't any damage to the canister and lid. Sometimes hairline cracks can develop in canisters. When this happens the canister is no longer air tight and should be discarded.
- Twist knob on lid of canister to make sure it is attached securely.
In seldom cases some of the programs may cause an error and lead to the machine not work well.
- Unplug from electric outlet and then re-connect it.
ERROR CODES AND REPAIRING
| Error code | Alert reason | Repairing |
| E01 | When the machine vacuum for some time, the two pressure switches do not close |
|
| E02 | When the machine enters into Seal mode, the microswitch does not close. |
|

Documents / Resources
References

Download manual
Here you can download full pdf version of manual, it may contain additional safety instructions, warranty information, FCC rules, etc.
Download Excalibur EPCV Professional Chamber Vacuum Sealer Manual
Advertisement


Need help?
Do you have a question about the EPCV and is the answer not in the manual?
Questions and answers