Advertisement
IMPORTANT SAFEGUARDS
When using electrical appliances, basic safety precautions should always be followed, including the following:
- Read all instructions carefully.
- Do not touch hot surfaces. Always lift the lid by handle.
- The Gourmet Egg Cooker is equipped with a 3 prong grounded cord plug. For your safety, always make certain that the wall power outlet is a three (3) prong grounded receptical. Do not use a three to two way power cord adapter.
![burn hazard]()
![shock hazard]()
To protect against fire, electrical shock and injury to persons, do not immerse cord, plug or Egg Cooker base in water or other liquid. Do not hold under running water.- Close supervision is necessary when any appliance is used by children, handicapped or infirm persons.
![shock hazard]() Always unplug the Egg Cooker when not in use in order to avoid accidental electrical shock. Allow it to cool before cleaning.
Always unplug the Egg Cooker when not in use in order to avoid accidental electrical shock. Allow it to cool before cleaning.- Do not operate the Egg Cooker with a damaged cord or plug or after the Egg Cooker malfunctions or has been damaged in any manner. Return Egg Cooker to the EdgeCraft Corporation, Service Department for examination, repair or adjustment.
![burn hazard]()
![shock hazard]()
The use of attachments not recommended by the EdgeCraft Corporation may result in fire, electric shock or injury to persons.- Do not use the Egg Cooker outdoors.
- Do not let the cord hang over edge of table or counter or touch hot surfaces.
- Always make sure the unit is turned "OFF" before plugging in the Egg Cooker. After use, turn power switch to "OFF" position.
- Do not use the Egg Cooker for other than intended use.
- Do not place the Egg Cooker on or near hot gas or electric burner or in a heated oven.
- Do not operate the Egg Cooker unless lid is fully closed.
- Do not turn power "ON" unless there is water in the water pan.
![burn hazard]()
![]()
![burn hazard]()
Avoid the risk of being scalded. Hot or boiling water and steam can cause serious burns. Extreme caution must be used when moving an appliance containing hot water or other hot liquids. Do not fill the Egg Cooker above the "LEVEL" fill marks shown on the water pan. Always pour slowly and carefully when filling the pan.- Operate the Egg Cooker only on a dry, flat and level, non-slip surface.
- For household use only.


SAVE THESE INSTRUCTIONS
Introduction
The Chef'sChoice® Gourment Egg Cooker 810 is designed to cook your eggs "just right", whether you choose them poached, soft boiled, medium or hard boiled. Put in the eggs, set the slide control knob to your choice and leave the rest to the Chef'sChoice 810! You can poach three eggs at once or cook seven as soft, medium or hard boiled. If your family or guests don't like their eggs cooked the same way, the Vari-Cook™ feature, with its precision timer, makes it easy, in a single rack of 7 eggs, to prepare some soft, some medium and the balance hard. Unlike conventional egg cookers, the Vari-Cook™ design avoids the cumbersome process of measuring and loading an exact quantity of water for different cook times and number of eggs cooked. Just fill the water pan as instructed, select how you like your eggs and enjoy.
Understanding the Device
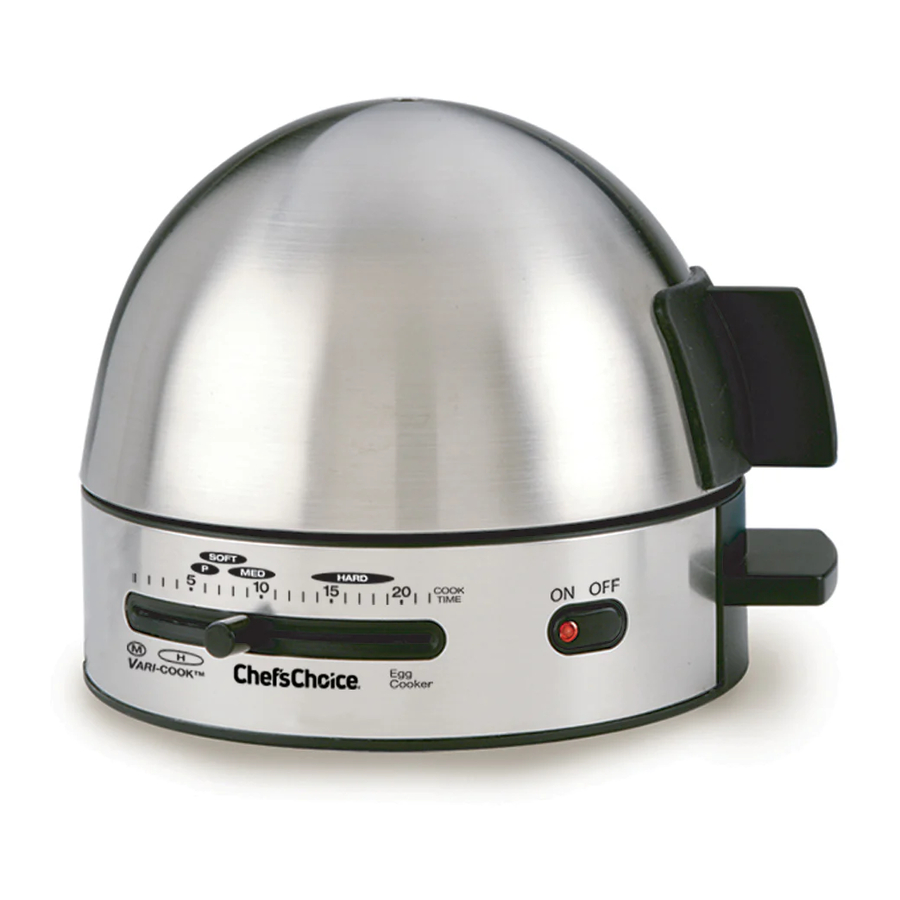
The Chef'sChoice® Egg Cooker consists of four main components; the base, lid, black egg rack and white egg poaching tray (see fig 1, below).
The egg cooker can cook in one batch up to seven eggs to your taste; soft, medium or hard boiled. A poaching tray with elliptical-shaped cavities, in the tradition of Julia Child, quickly and conveniently poaches up to 3 eggs at a time. In addition, the cooker's novel Vari-Cook™ feature allows you to segment the cooking so you can soft, medium and hard boil all in the same batch.

Figure 1. Chef'sChoice ® Gourmet Egg Cooker.
Using the Egg Cooker
To cook soft, medium or hard boiled
Place the Egg Cooker on a flat, level surface and remove the stainless lid and the egg rack from the base unit. Pour about ¾ cup of water into the gray non-stick coated water pan to the "LEVEL" fill marks at top of the base (see fig. 1 and fig. 2). Do not add water above the fill marks. This amount of water is more than enough for cooking 7 eggs to your choice. Wash or rinse the eggs and load them onto the black egg rack. Place the rack of eggs on the base (see Fig. 3).
(Make certain there is water in the water pan), replace the stainless lid and set the black slide control arm to  ,
,  or
or  according to your choice. Press "ON" the power switch on base unit and wait as the water boils and the eggs cook. A beeper will alert you when the eggs are done. At the sound of the beeper, turn the switch "OFF," which stops the beeper and stops the cooking. Remove the stainless lid, lift the tray of eggs and enjoy!
As you remove the lid, use caution, the lid is hot and steam will rise from under the lid. Be careful to avoid the steam, which can scald you. Hold the lid, as shown in Figure 4, by the handle. Tilt the other end up as shown and remove it in such a way that you avoid coming into contact with the rising steam. Carefully take out the egg rack by its handle. Dip or rinse the eggs in cold water to stop the cooking, cool the shell and make them easier to handle.

Figure 2. Fill the water pan no higher than the "LEVEL" fill Marks" with water. Do not overfill.

Figure 3. Insert the egg rack and cover with the lid. the lid.

Figure 4. Remove the hot lid carefully by its handle. Tilt it as shown so that steam can escape from under the lid.
Poaching Eggs
If you wish to prepare poached eggs, remove the black egg rack and prepare to use the white poaching tray (see fig. 5). Add ¾ cup of water to water pan (to the fill marks). Use a little non-stick spray or butter on the tray cavities to avoid sticking. Crack and drop the shelled raw eggs into the three (3) poaching cavities. Place the tray on the base, replace the lid and set the black slide control arm to the letter  for poach. Press the power switch to "ON". When the beeper sounds turn the power "OFF" lift the lid and remove the poaching tray.

Figure 5. The white poaching tray in place. the control arm is set to "p".
Using Vari-Cook Feature
As an example, to cook soft, medium and hard boiled eggs in the same batch, place up to seven (7) eggs in the black egg rack. Make certain there is water in the water pan to the "fill line". Place the loaded egg rack onto the base and cover with stainless lid. Then position the slide control arm at  on the UPPER scale. Turn the power "ON". When the beeper sounds, stop the beeper by flipping the switch to "OFF", remove the lid and the desired number of soft boiled eggs and replace the lid. Move the black slide control arm to
  (for Medium) on the lower Vari-Cook™ scale (see fig. 6) and turn the power switch to "ON". When the beeper next sounds, turn "OFF" the beeper and power and remove the desired number of medium eggs. Then move the slide control arm promptly to
  (for hard) on the lower Vari-Cook™ scale (see fig. 7), replace lid and turn the power "ON" and wait for the remaining eggs to cook to hard. When the beeper sounds, turn "OFF" the power and remove the hard boiled eggs.
If you want to sequentially cook medium boiled and then hard boiled eggs in the same batch, check the water level, load the eggs in the egg rack and cover with the stainless lid. Then position the slide control arm at  on the UPPER time scale. Turn the power "ON". Wait as the eggs cook. When beeper sounds, stop the beeper by turning the power switch to "OFF"; remove the lid and the medium cooked eggs. Then replace the lid, move the slide control arm promptly to on the lower Vari-Cook™ scale, turn "ON" the power and wait until the beeper sounds. Then turn "OFF" the power switch and beeper. Remove the hard boiled eggs. In these sequences it is necessary to turn the power switch "OFF" and "ON" as instructed to ensure accurate timing.

Figure 6. The control arm set to "M" (for Medium) on the lower, vari-Cook™ scale.

Figure 7. The control arm set to "h" (for hard) on the lower, vari-Cook™ scale.
To sequentially cook soft boiled and then hard boiled eggs in the same batch make certain the water pan is filled to the fill line, load eggs onto the black rack and place rack on the base. Replace the lid, move the slide control arm to SOFT in the UPPER time scale. Turn "ON" power switch and wait until the beeper sounds. When beeper sounds, turn "OFF" the power, remove lid and remove the soft boiled eggs. Then promptly replace lid, set the slide control arm to M on lower Vari-Cook™ scale, and press the power switch to "ON". Wait as eggs cook to medium. When beeper sounds turn the power switch "OFF" but do not remove the lid or eggs. Move the slide control arm to H on the lower Vari-Cook™ scale and turn the power switch "ON". Wait while eggs cook to hard boil. When beeper sounds, turn "OFF" the power switch, lift the lid and remove the hard boiled eggs.
Tip: When using the Vari-Cook™ sequential cooking method, always minimize the time between the cooking steps. Promptly remove eggs when the beeper sounds and restart the next heating step because the remaining eggs will continue to cook during the pause. If eggs are left too long between cooking steps they may be overcooked at the end of the following step or steps.
Cleaning
Note: Before cleaning or removing any part of the egg cooker for maintenance, always turn the unit "OFF" and unplug the cord from the outlet. Never immerse the base in water or other liquid. Never put the base in the dishwasher.
The egg rack and poaching tray can be cleaned either by hand or in the dishwasher upper rack. When cleaning them by hand, use a mild detergent solution and a scouring brush. Do not use steel wool or harsh abrasives. Add vinegar to the cleaning water if any egg remains stick to the tray or rack. If cleaning in dishwasher, always place the egg rack and poaching tray on top rack – never place these on the lower shelf close to a heating coil.
To clean the water pan use a solution of vinegar in water and a sponge. Avoid using any harsh abrasives or steel wool on the water pan. Use of such materials will damage the non-stick coating.
Wipe the outside of stainless surface of lid and base with a damp sponge or cloth. Never put the base under running water or immerse the base in any liquid.
Tips and Cautions
If the eggs are medium size, set the slide control in the center of the indicated marks for soft, medium or hard. If eggs are small set the control to left end of the mark. If large, set the slider to the right end of the mark. The number of eggs and their temperature can likewise change the optimum cooking time. We recommend that you keep eggs refrigerated until you are ready to cook them. With experience you will find the optimum setting to match your taste. The egg rack and poaching tray are designed to comfortably hold small through extra large eggs. The use of jumbo or larger eggs is not recommended.
Add water each time before you use the Cooker but do not add water in the middle of a cooking cycle. When the water level seems low, add just enough to bring the level to the "LEVEL" fill marks embossed onto wall of water pan at ¾ cup level.) Never fill the water pan above the fill marks. When you finish cooking, let the water cool, then pour out the remaining water and dry the water pan with a towel.
 Always remember you are cooking with boiling water and steam. They can cause serious burns. While cooking, the egg compartment fills with steam and some constantly escapes from the vent hole on the top of the lid. Keep your hands and face away from the vent and your hands off the lid. When cooking with a full water pan (water level at "Fill Marks"), you will notice heavy condensation on the rim of the base. This is normal.
Before removing the lid when cooking, always turn "OFF" the power first and remember to use the handle to lift and remove the lid. By tilting the lid as shown in Figure 4, the lid deflects the steam from your fingers. Avoid all contact with the steam.
Remember to never operate the Egg Cooker without water in the water pan. Load one or more eggs in the Cooker before turning the power "ON".
The timing scale is calibrated in minutes. The printed symbols for soft, medium, hard, P (for poaching) and the Vari-Cook™ and are located at times considered best for the average tastes. Electronic sensors detect the water temperature and do not start timing until the eggs are heated to that temperature where they first start cooking.
Generally it takes two to three minutes for the water to reach the true cooking temperature where cooking begins. The timer does not start until that temperature is reached.
Cord Safety
A short power supply cord is provided with this appliance to reduce the risk of someone becoming entangled in or tripping over a longer cord and causing the Gourmet Egg Cooker to overturn, spilling its hot contents. While EdgeCraft does not recommend it, appropriately rated extension cords are available and may be used if care is exercised in their use. If an extension cord is used, it must have an integral ground wire, a three prong plug and, for your safety, we recommend that the marked electrical rating of the extension cord should be not less than 20 amperes. The longer cord should be arranged so that it will not hang over the counter top or tabletop where it can be pulled on by children or pets or tripped over.
Service
This appliance is for household use only. No user-serviceable parts are inside. In the event service is needed, return your Egg Cooker to EdgeCraft Corp., where the cost of repair can be estimated before the repair is undertaken. Please include your return address and a brief description of the problem or damage to the Model 810 on a separate sheet inside the box. PLEASE CAREFULLY PACKAGE THE EGG COOKER TO AVOID SHIPPING DAMAGE.
Send your Egg Cooker insured and postage prepaid to:
EdgeCraft Corporation
825 Southwood Road, Avondale, PA 19311 U.S.A.
Telephone 800-342-3255 or 610-268-0500
www.chefschoice.com
Retain evidence of shipping for your protection.
Conforms to: UL 1026 Certified to CAN/CSA: C22.2#64
120 volts/60Hertz, 2.9 Amps, 350 watts
© EdgeCraft Corporation 2015
Limited Warranty
Used with normal care, this EdgeCraft product is guaranteed against defective material and workmanship for a period of one (1) year from the date of original purchase ("Warranty Period"). We will repair or replace, at our option, any product or part that is defective in material or workmanship without charge if the product is returned to us postage prepaid with dated proof of purchase within the Warranty Period. This warranty does not apply to commercial use or any product abuse. ALL IMPLIED WARRANTIES, INCLUDING IMPLIED WARRANTIES OF MERCHANTABILITY AND FITNESS FOR A PARTICULAR PURPOSE, ARE LIMITED TO THE WARRANTY PERIOD. EDGECRAFT CORPORATION SHALL NOT BE LIABLE FOR ANY INCIDENTAL OR CONSEQUENTIAL DAMAGES.

Documents / Resources
References

Download manual
Here you can download full pdf version of manual, it may contain additional safety instructions, warranty information, FCC rules, etc.
Advertisement

Need help?
Do you have a question about the 810 and is the answer not in the manual?
Questions and answers