
Related Manuals for GearMo GM-HU32ES

Summary of Contents for GearMo GM-HU32ES
- Page 1 User Manual 2-Port USB 3.2 Gen 1 Industrial Surface & DIN-Rail Mount Hub w/ Gigabit Ethernet & DB9 FTDI Serial Model No. GM-HU32ES gearmo.com...
-
Page 2: Table Of Contents
Contents - Introduction ........................- System Requirements ..................- Package Contents ....................- Hub Layout ........................- Installation ........................- DIN Rail Mounting ...................... - Surface / Wall Mounting ..................- Specifi cations ......................- Windows Installation ....................gearmo.com/support... -
Page 3: Introduction
Introduction Thank you for purchasing Gearmo’s 2-Port USB 3.2 Gen 1 Industrial Surface & DIN- Rail Mount Hub w/ Gigabit Ethernet & DB9 Serial FTDI Chipset! Please read the manual in detail fi rst before you begin using this hub. The specifi cations are subject to change without notice. -
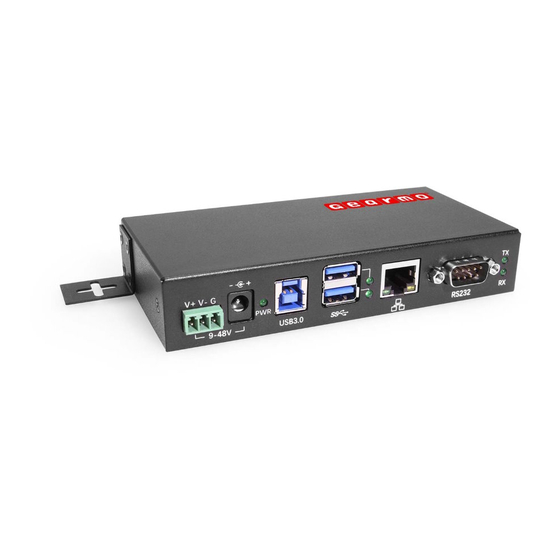
Page 4: Hub Layout
- Power up the USB Hub through either the Included DC Power Jack Adapter or 3-Pin Terminal Block. 2. 3-Pin Terminal Block - Plug the included terminal block to the hub’s terminal block connector. 3. Hardware - Mount your hub on the Wall, Surface or Din Rail, if needed. gearmo.com/support gearmo.com/support... -
Page 5: Din Rail Mounting
Use the included screws to install the DIN Rail Clip to the hub. Insert the top of the DIN Rail Clip onto the DIN Rail Track, then gently push the bottom of the hub to secure it to the DIN Rail Track. gearmo.com/support... -
Page 6: Surface / Wall Mounting
Surface / Wall Mounting Use the included screws to affi x the surface mounting fl anges to the hub. Use surface mounting screws attach hub to the wall or smooth surface (surface mounting screws not included). gearmo.com/support gearmo.com/support... -
Page 7: Specifi Cations
Support all USB 1.1 to 3.2 Gen 1 compatible peripheral device data transfer upto 5Gbps Support Ethernet 10/100/1000 Mbps Single RS232 9-48V DC input Support LED indicator Supported OS Systems Windows 11/10/8/7 and Mac OS Support USB 3.0 plug and play 15KV ESD surge protection Operating temperature 0-50C gearmo.com/support... -
Page 8: Windows Installation
2. Open the path: “CD ROM-driver\realtek drivers\Setup.exe”, afterwards click next. 3. Click fi nish to complete the installation 4. Open device manager to make sure that the driver was installed successfully. 5. You can now start to use the device. gearmo.com/support...