Table of Contents
Advertisement
Advertisement
Table of Contents

Related Manuals for Smartro SC31B


Summary of Contents for Smartro SC31B
- Page 1 Instruction Manual Time & Temperature Projection Alarm Clock Model: SC31B...
-
Page 3: Table Of Contents
Content 1. Preface..................1 2. Attention..................1 3. Package Content................2 4. Product Specification..............3 5. Know Your Device................4 5.1. Buttons..................4 5.2 Wireless Remote Sensor............5 6. Preparation..................6 7. Manual Setting................7 8. Alarm Function Setting..............9 8.1 Activate/Deactivate the Alarm Function........9 8.2 Manual Setting of the Alarm............9 8.3 Turn off the Alarm Tone............10 8.4 Snooze Function..............10 9. -
Page 4: Preface
1. Preface Thanks for choosing this device from SMARTRO. Before Use ● Make sure to read the instruction manual carefully. This information will help you to familiarize yourself with your new device, to learn all of its functions and get advice in the event of problems. -
Page 5: Package Content
sunlight and high temperatures such as a radiator, electric heater, stove, etc. ● Keep the product away from strong electromagnetic waves, strong static electricity, or moisture and condensation. ● Children below 10 years of age should be supervised by an adult when using this product. -
Page 6: Product Specification
4. Product Specification ● Time and temperature projection ● Two alarms with snooze function ● Calendar (up to the year of 2099) ● 12/24 hour format alternative ● Multiple colors for backlit ● Temperature measuring range: Indoor temperature: -9.9°C ~ 50°C (14°F ~ 122°F) Outdoor temperature: -40°C ~ 70°C (-40°F ~158°F) Temperature displays in °C or °F ●... -
Page 7: Know Your Device
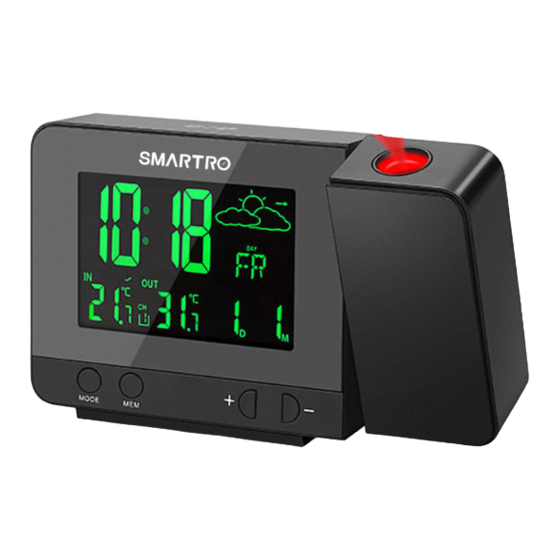
5. Know Your Device 5.1. Buttons " " snooze touch button Outdoor temperature Projection display Month and date Weather forecast "MODE" button Time "MEM" button Day of the week "+" button Indoor temperature "-" button... -
Page 8: Wireless Remote Sensor
Alarm 1 ON/OFF switch "LOOP" button Alarm 2 ON/OFF switch "RAINBOW" button USB charging port Battery compartment Projection ON/OFF switch DC power interface 5.2 Wireless Remote Sensor C1: Channel number C5: "TX" button C2: Temperature C6: Channel switch knob C3: Transmission signal light C7: Battery compartment C4: "°C/°F"... -
Page 9: Preparation
6. Preparation ● Open the clock battery compartment cover, insert 2 x AAA batteries, ensure correct battery polarities [ "+" and "–" ] and connect the DC adapter to power the clock. ● The screen will light up, and the device will make a beeping sound. -
Page 10: Manual Setting
7. Manual Setting ● Long press "MODE" button, the Year display will be flashing. Press "+" or "-" button to set the year and press "MODE" button to confirm. ● The Month display will be flashing. Press "+" or "-" button to set the month and press "MODE"... - Page 11 the hour and press "MODE" to confirm. ● The Minute display will be flashing. Press "+" or "-" button to adjust minute and press "MODE" button to confirm the setting. ● The temperature unit °C or °F will be flashing. Press "+" or "-" button to choose the °C or °F and press "MODE"...
-
Page 12: Alarm Function Setting
8. Alarm Function Setting 8.1 Activate/Deactivate the Alarm Function ● When the switch of alarm 1 or alarm 2 is moved to the "ON" position, the symbol of " " or " " appears on the LCD display. The alarm function will be activated. ●... -
Page 13: Turn Off The Alarm Tone
8.3 Turn off the Alarm Tone ● Alarm tone will automatically turn off after 2 minutes or you can press any button except the " " to turn off the alarm tone. The alarm will repeat automatically at the same time on the next day. 8.4 Snooze Function ●... -
Page 14: Projection Setting
9. Projection Setting Note: Switch on the projection button for further operation. 9.1 Temporary Time & Temp Projection ● When the clock is only powered by batteries (not included), touching " " will light up the projection for a few seconds, then the projection will turn out automatically. -
Page 15: Backlit
10. Backlit 10.1 Backlit Dimmer ● When the clock is only powered by batteries, touching " " will light up the backlit for a few seconds. ● When the clock is powered by DC power adapter, the battery will automatically disconnect with the power supply, and the backlit will always be on. -
Page 16: Wireless Remote Sensor Pairing
● When the backlit is on, press "RAINBOW" button to change the color. There are 8 colors available: white, red, orange, yellow, green, cyan, blue, and purple. 11. Wireless Remote Sensor Pairing Step 1: — Connect the clock with the adapter. —... -
Page 17: Temperature
12. Temperature 12.1 Temperature Display and Temperature Trend ● The current indoor temperature and the temperature trend (indoor) are shown on the LCD display. ● When connected with the wireless remote sensor successfully, the outdoor temperature and the temperature trend (outdoor) will appear on the LCD display. -
Page 18: Outdoor Temperature Frost Alarm
that the maximum and minimum temperature records were reset successfully. Please take note of the following: ● If the temperature reading is below the lowest measuring range, LL.L will be displayed. ● If the temperature reading is above the highest measuring range, HH.H will be displayed. -
Page 19: The Symbols Of Weather Forecast
13.2 The Symbols of Weather Forecast sunny slightly cloudy cloudy rainy heavy rainy snowy 13.3 Barometric Pressure Trend The weather station can display the barometric pressure trend. You may see the following symbols: The barometric pressure will rise. The barometric pressure will remain constant. The barometric pressure will fall. -
Page 20: Troubleshooting
Remote Sensor Pairing ). 3. Long press "+" button to receive the signals manually. Fuzzy projection / Missing pixels projection Contact after-sales service. image / USB charger Email: support@smartro.co does not work/ Have Phone Number: 323-287-5798 trouble with manual setting. -
Page 21: After-Sales Support
For more products, please visit our website: https://www.smartro.co/ For further support and discount information, join our Facebook group or follow us on Instagram. -
Page 22: Waste Disposal
18. Waste Disposal ● This product is manufactured with high-grade materials and components which can be recycled and reused. ● As a consumer, you are legally required to take them to your retail store or an appropriate collection site depending on national or local regulations in order to protect the environment. - Page 24 : +1(323)287-5798 : support@smartro.co : http://bit.ly/smartro_01 : smartro_01 Website: https://www.smartro.co...
Need help?
Do you have a question about the SC31B and is the answer not in the manual?
Questions and answers
I do not have mode button, need to set the time, how do I do that?
The Smartro SC31B requires the "MODE" button to set the time. Without the "MODE" button, setting the time is not possible using the documented procedure.
This answer is automatically generated
no connection to outdoor remote
The outdoor temperature does not display consistently. It will display correctly and then miss two interior displays.