Table of Contents
Advertisement
Quick Links
Advertisement
Table of Contents

Related Manuals for Aeris F10

Summary of Contents for Aeris F10
-
Page 3: Table Of Contents
CONTENTS WARRANTY, NOTICES ............................6 NOTICE - STORAGE AND INITIAL ACTIVATION ....................7 FULL LCD ................................8 INTRODUCTION AND GENERAL FEATURES AND DISPLAYS ................9 INTERACTIVE CONTROL CONSOLE ......................10 OPERATING MODE STRUCTURE ........................ 11 OPERATION AS A DIVING GAUGE ....................... 12 PC INTERFACE ............................. - Page 4 CONTENTS (continued) SURFACE MODE ............................36 SURF MAIN ..............................37 SURF ALT 1 (CDT STATUS) .......................... 38 SET FREE CDT .............................. 39 SURF ALT 2 ..............................41 LOG ................................41 HISTORY ................................ 44 SURFACE SET MODES ............................46 SET A GROUP (ALARMS) ..........................46 Set Audible Alarm .............................
- Page 5 GLOSSARY ..............................79 INSPECTION / SERVICE RECORD ....................... 82 WARNING: If you do not fully understand how to use the F10 Digital Gauge after reading this manual, or if you have any questions, you should seek instruction in its use from your...
-
Page 6: Warranty, Notices
San Leandro, CA USA 94577 TRADEMARK, TRADE NAME, AND SERVICE MARK NOTICE AERIS, the AERIS logotype, F10, the F10 logo, Diver Replaceable Battery, Graphic Diver Interface, Set Point, Control Console, and ACI (AERIS Computer Interface) are all registered and unregistered trademarks, trade names, and service marks of AERIS. All rights are reserved. -
Page 7: Notice - Storage And Initial Activation
NOTICE STORAGE and INITIAL ACTIVATION AERIS Watch type dive gauges are placed in a Deep Sleep mode prior to being shipped from the factory. The intent is to extend storage life of the Battery for up to 7 years, before the unit is initially placed in service. -
Page 8: Full Lcd
Components: a. Mode (M) Button b. Select (S) Button c. Light (L) Button d. Advance (A) Button e. LED Warning Light f. Icon - Low Battery g. Icon - Time Am/Pm h. Icon - Log Mode i. Icon - Surface Interval Time j. -
Page 9: Introduction And General Features And Displays
INTRODUCTION GENERAL FEATURES AND DISPLAYS... -
Page 10: Interactive Control Console
Welcome to AERIS and thank you for choosing the F10 ! It is extremely important that you read this Operating Manual in sequence and understand it completely before attempting to use the F10 as a dive gauge. Remember that technology is no substitute for common sense, and a dive gauge only provides the person using it with data, not the knowledge to use it. -
Page 11: Operating Mode Structure
OPERATING MODE STRUCTURE Main Sequence Unless it is operating in Free Dive mode, the F10 will be On in (while at home) the default Watch Main Time (home time) mode (Fig. 1), like a Main Time standard Watch, until the mode is changed. -
Page 12: Operation As A Diving Gauge
Prior to attempting to Download data from your F10 or Upload Settings to it, review the HELP section of the ACI program which serves as its User Manual. Recommended is to print those sections of HELP that you consider appropriate for your Interface activities. -
Page 13: Alpha Numeric Messages
ALPHA NUMERIC MESSAGES The upper line of digits on the LCD screen is used to convey alpha numeric graphic Messages such as Day of the Week, Mode of Operation, items being Set, Altitude level, and Alarm identification. At times, the lower line is also used to display graphics such as On/Off, Set, and Seconds. -
Page 14: Backlight
BACKLIGHT To turn the Backlight On, press and release the L button (lower/right) button momentarily (< 2 seconds). The Backlight will remain On for the Duration time set (a Set U selection) unless you turn it Off during that time. •... -
Page 15: Power Supply
POWER SUPPLY The F10 utilizes (1) 3 volt CR2430 Lithium Battery. The F10 checks Battery voltage every 2 minutes during opera- tion while on the surface. • If voltage decreases to the Warning level (2.75 volts), the Battery icon will appear on Surface display screens (Fig. - Page 16 This page intentionally left blank.
-
Page 17: Watch Features And Displays
WATCH FEATURES AND DISPLAYS... -
Page 18: Local Default Time
LOCAL DEFAULT TIME Watch Main Time (Fig. 4) is the current Time at your home location and is normally selected as the Local Default Time. The normal Watch screen sequence accessed with momentary presses (less than 2 seconds each) of the M button is - Fig. -
Page 19: Main Time
MAIN TIME (home), information includes: > Battery icon, if a Low Battery Condition exists > AM (or PM) icon, when set for 12 Hour Format > Day of the Week graphic MON (or TUE, WED, THU, FRI, SAT, SUN) > Time of Day (hr:min:sec) (Fig. 6a) >... - Page 20 • Depressing and holding the M button at any time for 2 seconds or if no button is pressed during a period of 2 minutes, the unit will revert to the Watch Time screen. While the Watch Default Time screen (Main/home or Alt/ travel location) is being displayed, depressing the A and S buttons simultaneously for 2 seconds will access the Set Date Format screen displaying the graphic dAtE and the Set Point...
- Page 21 Set Time The AM (or PM) icon is displayed when Hour Format is set for 12 Hour. • Pressing and releasing the S button momentarily (< 2 seconds) while the Hour Set Point is flashing (Fig. 9A) will step upward through the Hour Set Points in 1 Hour increments from 12: AM to 11: PM (or 0: to 23: if set for 24 Hour Format).
- Page 22 • Pressing and releasing the A button momentarily (< 2 seconds) will save the Minute Set Point and/or advance to the Set Date screen with the Year Set Point flashing. • Pressing and releasing the S button momentarily (< 2 seconds) while the Year Set Point is flashing (Fig.
-
Page 23: Alt (Alternate) Time
• Pressing and releasing the M button momentarily (< 2 seconds) will step back through the Set Points in 1 Month decrements. • Pressing and releasing the S button momentarily (< 2 seconds) while the Day Set Point is flashing (Fig. 12) will step upward through the Set Points in 1 Day increments from 1 to 31. - Page 24 ALT Time information includes (Fig. 13): > Battery icon, if a Low Battery Condition exists > AM (or PM) icon, when set for 12 Hour Format > Lazy 8 symbol (Fig. 13a) indicating Time is ALT Time > Day of the Week graphic MON (or TUE, WED, THU, FRI, SAT, SUN) >...
-
Page 25: Set Time Differential
SET TIME DIFFERENTIAL • Time Differential can be set OFF, or to an Hour based numeric time ranging from + 1 through + 23 through - 23 through - 1 (hours). • Once the Differential is selected and saved, ALT Time/ Date values will be based upon the Watch Main Time Set Points plus/minus the Differential set. -
Page 26: Watch Cdt (Countdown Timer)
• Pressing and releasing the S button momentarily (< 2 seconds) while the Set Point is flashing will step upward through the Set Points in 1 Hour increments. • Depressing and holding the S button while the Set Point is flashing will scroll upward through the Set Points at a rate of 8 per second. - Page 27 • Pressing the L button will operate the Backlight. • Depressing and holding the M button for 2 seconds will revert to the Watch Default Time screen (MAIN or ALT). • Depressing both the A and S buttons simultaneously for 2 seconds will access the Set Watch CDT screen indicated by the graphics TIMR and SEt, TIME icon, and Hour Set Point flashing (Fig.
-
Page 28: Chronograph
• Pressing and releasing the A button momentarily (< 2 seconds) will save the Set Point and/or advance to the CDT Status screen indicated by the graphic OFF (flashing) in place of the graphic SEt. • Pressing and releasing the S button momentarily (< 2 seconds) will toggle from OFF to ON and Start the Timer (Fig. - Page 29 > During the first 4 seconds, the .01 (1/100th) second values will be displayed, then 2 dashes ( . - - ) will be displayed. The 1/100th values will be recorded and displayed when Lap times are recalled. • Subsequent pressing/releasing of the S button (< 2 seconds each) will save addition Lap Times and start the next one (Fig.
-
Page 30: Watch Daily Alarm
WATCH DAILY ALARM When set ON, the Watch Daily Alarm will sound the Audible Alarm and flash the red LED every day at the Time set. • Pressing the M button momentarily 4 times (< 2 seconds each time) while the Watch Default Time screen is displayed will access the Daily Alarm Status screen. -
Page 31: Set Daily Alarm
SET DAILY ALARM, information includes (Fig. 21): > AM (or PM) icon, if set for 12 Hour Format > Graphics ALRM and SEt > Alarm Time (hr:min) with the HOUR Set Point flashing > Alarm icon • Pressing and releasing the S button momentarily (< 2 seconds) while the Hour Set Point is flashing will step Fig. - Page 32 NOTES: Each display represents unique pieces of information. It is imperative that you understand the formats, ranges, and values of the information represented to avoid any possible misunderstanding that could result in error. Understand which Time displays are represented as Minutes: Seconds and which are Hours:Minutes.
-
Page 33: Features, Displays, And Free Surface Mode
FEATURES, DISPLAYS, AND FREE SURFACE MODE... -
Page 34: Alpha Numeric Displays
ALPHA NUMERIC DISPLAYS Time and Date Displays Times, identified by the Time (clock) icons, appear in the middle and lower rows of the display (Fig. 22a/b). Times are shown in hour:minute format or minute:second format. Fig. 22 - TIMES The colon that separates hours and minutes, or minutes and seconds, blinks once per second when the display is indicating real time (e.g., Surface Interval, Elapsed Dive Time), and is solid (not blinking) when times are calculated projections (e.g.,... -
Page 35: Depth Displays
Depth Displays During dives, Current Depth is displayed (Fig. 24a) from 0 to 330 FT (100 M) in increments of 1 FT (0.1 M). During the first hour while on the surface after dives, the Max Depth of the Last dive conducted will be displayed on the Post Dive Surface screen (Fig. -
Page 36: Surface Mode
Descent to 4 FT (1.2 M) for 1 second will activate Dive Mode, which will run in the background if the Chrono is on display. The F10 will enter Post Dive Surface Mode following a dive upon ascent to 2 FT (0.6 M) for 1 second. The SURF icon will flash during the first 1 minute after a dive. -
Page 37: Surf Main
SURF MAIN, information includes (Fig. 30): > Battery icon (shell with inner bar) if a Low Battery Warning Condition exists, flashing (shell with no inner bar) if a Low Battery Alarm Condition exists > Graphic FREE > Surface Interval Time (min:sec, hr:min if > 59:59 min:sec) with SURF and TIME icons >... -
Page 38: Surf Alt 1 (Cdt Status)
SURF ALT 1 (CDT STATUS), information includes (Fig. 31): The FREE Mode CDT (Count Down Timer) counts down time values in minutes:seconds and is separate from the Watch CDT that counts down time in hours:minutes. > Graphic TIMR > Remaining Countdown time (min:sec) with the colon flashing and the TIME icon, if ON and a CD is in CDT STATUS - SET READY TO START... -
Page 39: Set Free Cdt
• Depressing the M button for 2 seconds, or if no button is pressed during a period of 2 minutes, operation will revert to the SURF MAIN screen. NOTES: Once the CDT has been Set and Started (by selecting ON), it will continue to run in the background while on the surface until turned OFF (stopped) or the Time reaches Fig. - Page 40 • Pressing and releasing the S button momentarily (< 2 seconds) while the Minute Set Point is flashing will step upward through the Set Points from 0: to 59: in 1 Minute (1:) increments. • Depressing the S button while the Minute Set Point is flashing will scroll upward through the Set Points at a rate of 8 per second.
-
Page 41: Surf Alt 2
• Pressing and releasing the S button momentarily (< 2 seconds) will toggle to ON and Start the CDT. • Pressing and releasing the A button momentarily (< 2 seconds), or depressing the M button for 2 seconds, or if no button is pressed during a period of 2 minutes, operation will revert to the SURF MAIN screen. - Page 42 Regardless of the BDSI (Between Dive Surface Interval) time set, access to Log Mode can be gained by depressing the A button for 2 seconds while viewing the Free Surface Main or Watch Default Time screen. Upon entering Log Mode, the most recent dive’s Log 1 screen will be displayed. •...
- Page 43 LOG 2, information includes (Fig. 37): > AM (or PM) icon, if set for 12 Hour Format > Graphic No with the dive number (1 to 99) for that day > Log (book) icon > Time of Day (hr:min:sec) the dive began with TIME icon, and graphic A to the left if Alternate Time was selected as the Watch Default Time when the dive was conducted.
-
Page 44: History
• Pressing and releasing the S button momentarily and repeatedly (< 2 seconds each time) will increase EDT 1 second at a time. • Pressing and releasing the M button momentarily and repeatedly (< 2 seconds each time) will decrease EDT 1 second at a time. - Page 45 HISTORY 1, information includes (Fig. 39A/B, page 44): > Graphic HIST > Total Dive Time up to 999:59:59 (hr:min:sec) maximum, then 1000 - Hr, then start over at 0:01 (min:sec). > Total number of Dives conducted (up to 9999) with DIVE icon HISTORY 2, information includes (Fig.
-
Page 46: Surface Set Modes
SURFACE SET MODES Set Mode Sequence: SURF MAIN >> SET A >> SET U >> SN (serial number) Access and step through of the sequence is gained by repeated simultaneous 2 second presses of the A and S buttons. SET A (Alarms) and SET U (Utilities) Set Points can also be changed using the PC Settings Upload portion of the ACI PC Interface program. -
Page 47: Set Audible Alarm
The SRT (Surface Recovery Time) Alarm provides an alert when a set 'recovery time' has elapsed after surfacing from a dive. The EDT (Elapsed Dive Time) Alarm repeats each time the Time Interval set is reached during operation in Dive Mode. The RDI (Repeating Depth Interval) Alarm repeats each time the Depth Interval set is reached, except when the DD Alarms strike. -
Page 48: Set Srt (Surface Recovery Time) Alarm
SET SRT ALARM, information includes (Fig. 45) - > Graphic SRT (meaning Surface Recovery Time) > Time Set Point (min:sec), flashing if ON is selected, with SURF and TIME icons > Set Point ON or OFF, flashing • Pressing/releasing the S button momentarily (< 2 seconds) will toggle between ON and OFF. -
Page 49: Set Edt (Elapsed Dive Time) Alarm
SET EDT ALARM, information includes (Fig. 46) - > Graphic EDT (meaning Elapsed Dive Time) > Time Set Point value (:sec), flashing if ON is selected, with TIME icon > Set Point ON or OFF, flashing • Pressing/releasing the S button momentarily (< 2 seconds) will toggle between ON and OFF. -
Page 50: Set Rdi (Repeating Depth Interval)) Alarm
SET RDI ALARM, information includes (Fig. 47) - > Graphic RDI (meaning Repeating Depth Interval) > Depth Interval Set Point value, flashing if ON is selected, with FT (or M) icon > Set Point ON or OFF, flashing • Pressing/releasing the S button momentarily (< 2 seconds) will toggle between ON and OFF. -
Page 51: Set Dd (Descending Depth) Alarms 1, 2, 3
DD (DESCENDING DEPTH) ALARMS > If Alarm 1 is set OFF, then Alarms 2 and 3 will be disabled. > If Alarm 2 is set OFF, Alarm 3 will be disabled. > When each of the Depths are reached while descending during a dive, the Audible will sound and the message DD1 (DD2, DD3) will flash. - Page 52 • Pressing and releasing the M button momentarily and repeatedly (< 2 seconds each time) will step back through the Set Points one at a time. • Pressing and releasing the A button momentarily (< 2 seconds) will accept the Set Point and access Set DD 2. •...
- Page 53 • Pressing and releasing the M button momentarily (< 2 seconds each time) will step back through the Set Points one at a time. • Pressing and releasing the A button momentarily (< 2 seconds) will accept the Set Point and access Set DD 3. •...
-
Page 54: Set U Group (Utilities)
• Pressing and releasing the M button momentarily (< 2 seconds each time) will step back through the Set Points in decrements of 10 FT (1 M). • Pressing and releasing the A button momentarily (< 2 seconds) will accept the Set Point and revert to the Set A screen. -
Page 55: Set Wet Activation
SET WET ACTIVATION, information includes (Fig. 52): > Graphics WET and ACt > Set Point graphic ON (or OFF) flashing • Pressing and releasing the S button momentarily (< 2 seconds) will toggle between ON and OFF. • Pressing and releasing the A button momentarily (< 2 seconds) will save the setting and access SET Units. -
Page 56: Set Backlight Duration
SET BACKLIGHT DURATION, information includes (Fig. 54): > Graphics GLO and durA (meaning Backlight Duration) > Set Point (min:sec) flashing with TIME icon • Pressing and releasing the S button momentarily and repeatedly (< 2 seconds each time) will step upward through the Set Points of 0:00, 0:05, 0:10, 0:30, 1:00 Fig. -
Page 57: Serial Number
SURF MAIN screen will access the SN screen displaying (Fig. 56): > Graphic SN > Factory programmed Serial Number of the F10 > Firmware revision number (e.g., graphic r1A) • Depressing the A and S buttons simultaneously for 2 seconds will revert to the SURF MAIN screen. - Page 58 This page intentionally left blank.
-
Page 59: Dive Mode
NOTE: If a descent is made while the Chrono is on the display, it will remain on the display even after a dive is started), until the M button is pressed/released to display the Dive Main. DIVE MODE... -
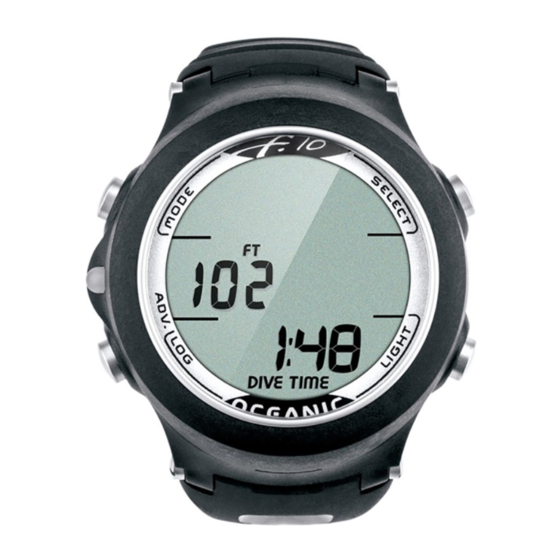
Page 60: Dive Main
DIVE MAIN, information includes (Fig. 57) - > Current Depth with FT (or M) icon > EDT (Elapsed Dive Time, min:sec) with DIVE and TIME icons • Press and release the A button momentarily (< 2 seconds) to access ALT 1. •... -
Page 61: Dive Alt 2
• If the A button is not pressed during a period of 10 seconds, operation will revert to the MAIN. • Pressing the L button will operate the Backlight. DIVE ALT 2, information includes (Fig. 59): > Time of Day (hr:min:sec) with TIME and AM (or PM) icons >... - Page 62 CDT (Count Down Timer) Alarm The Free CDT Alarm will operate during a dive or while on the surface, when it is set ON. When the Free Mode CDT decreases to 0:00 (min:sec), 3 sets of (3) 1 second beeps will sound during which the message TIMR will flash on the display (Fig.
- Page 63 DD (Descending Depth) Alarms When the DD 1 Alarm is set ON, 3 sets of (3) .125 second beeps will sound, the red LED will flash, and the message DD1 will flash on the display (Fig. 63) upon descent to the Alarm Depth set, then clear.
- Page 64 Never spray aerosols of any kind on, or near, an AERIS instru- ment. The propellants may chemically attack the plastic. When a Low Battery condition is displayed prior to a dive, DO...
-
Page 65: Reference
REFERENCE... -
Page 66: Uploading Settings And Downloading Data
UPLOADING SETTINGS AND DOWNLOADING DATA The F10 is configured with a Data Port located on the back of the left side that enables it to be connected to a PC through a USB port using the ACI (AERIS Computer Interface) Cable, when viewing the Watch Main Time screen or Free Surface Main screen. -
Page 67: Pc Compatibility Requirements
0) if no PC action was taken. Prior to attempting to Download data from your F10 or Upload Settings to it, review the HELP section of the ACI program which serves as its User Manual. Recommended is to print those sections of HELP that you consider appropriate for your Interface activities. -
Page 68: Care And Cleaning
Instrument Lens Protector. Small scratches will naturally disappear underwater. • Soak and rinse the F10 in fresh water at the end of each day of diving, and check to ensure that the areas around the Low Pressure (Depth) Sensor (Fig. 66a), PC Interface Data Port (Fig. -
Page 69: Battery Replacement
Warranty Registration Card. • Send freight prepaid and insured using a traceable method to AERIS. • If shipping to AERIS, obtain an RA (Return Authorization) number by contacting AERIS Customer Service at 510/546-0010 or send an email to info2@diveaeris.com. - Page 70 HATCH REMOVAL cracked or damaged. If there is any sign of moisture in the (using tool) F10, DO NOT attempt to use it for diving until it receives proper service by the AERIS factory. Hot Swap If the new Battery can be inserted within 8 seconds after the old one is removed (referred to as a Hot Swap), settings will be retained.
- Page 71 • Inspect the Buttons, Lens, and Housing to ensure they are not cracked or damaged. WARNING: If damage or corrosion is found, return your F10 to an Authorized AERIS Dealer, and DO NOT attempt to use it until it has received factory prescribed service.
- Page 72 • Closely examine the inside of the Battery Compartment for any signs of corrosion indicating entrance of moisture into the unit. • If corrosion is found, return the F10 to an Authorized AERIS Dealer, and DO NOT attempt to use it until it has Fig. 70 - BATTERY received factory service.
- Page 73 • If any portions of the display are missing or appear dim, or if a Low Battery Condition is indicated, return your F10 to an Authorized AERIS Dealer for a complete evaluation before attempting to use it.
-
Page 74: Altitude Sensing And Adjustment
No adjustments are made during any time that the Wet Contacts are bridged. At an elevation of 3,001 feet (916 meters), Depth Calibration automatically changes from feet of seawater to feet of fresh water. The F10 will not function as a Dive Gauge above 14,000 feet (4,270 meters). -
Page 75: Specifications
SPECIFICATIONS CAN BE USED AS SET MODES • Set A Group (Alarms): Factory Settings: • Watch • Digital Gauge for Free Dive activity Audible (OFF/ON) SRT (OFF/ON, 1 to 30 min) EDT (OFF/ON, 5 to 30 sec) WATCH MODES • Main Time (home) RDI (OFF/ON, 10 to 100 FT, 3 to 33 M) >... - Page 76 SPECIFICATIONS (CONTINUED) NUMERIC DISPLAYS: Range: Resolution: • Dive Number 0 to 99 • Current Depth 0 to 330 FT (100 M) 1 FT (0.10 M ) • Maximum Depth 330 FT (100 M) 1 FT (0.10 M) • Elapsed Dive Time 0:00 to 59:59 min:sec 1 second •...
- Page 77 SPECIFICATIONS (CONTINUED) Altitude: • Operational from Sea Level (= 0 to 3,000 feet/915 meters) to 14,000 feet (4,270 meters) elevation • Measures ambient pressure every 30 minutes in Watch Mode and every 15 minutes while in FREE Mode. • Does not measure ambient pressure when Wet. •...
- Page 78 Diving trainer. It is imperative that the physiological affects be understood and the diver is physically prepared. • If your F10 stops working for any reason while operating in Free Dive Mode, it is important that you have anticipated this possibility and are prepared for it.
-
Page 79: Glossary
Elapsed Dive Time - The total time spent underwater during a dive between 4 FT (1.2 M) on initial descent to 2 FT (0.6 M) on final ascent. Graphic Diver Interface - Feature of AERIS digital gauges that indicate the diver's status ™ (bar graphics, icons, graphic displays). - Page 80 NOTES...
- Page 81 NOTES...
-
Page 82: Inspection / Service Record
INSPECTION / SERVICE RECORD Serial Number: _________________________________ Firmware Revision: _________________________________ Date of Purchase: ____________ Purchased from : __________________________ Below to be filled in by an Authorized AERIS Dealer:...
Need help?
Do you have a question about the F10 and is the answer not in the manual?
Questions and answers