Table of Contents
Advertisement
Quick Links
Advertisement
Table of Contents

Subscribe to Our Youtube Channel
Summary of Contents for PRECIOUS PLASTIC Extruder Pro
- Page 1 Extruder Pro Machine Manual Extruder Pro – Version 1.2 Feb 2022...
-
Page 3: Table Of Contents
Contents 1.0 Introduction 1.1 The Extruder Pro 1.2 Components 1.3 Specifications 2.0 Operation & 2.1 How the Extruder works 2.2 Operating the machine Maintenance 2.3 Maintenance 3.0 Safety 3.1 - 3.10 Safety Instructions 4.0 Setup and 4.1 Setup Decommisioning 4.2 Decommisioning 5.0 More... -
Page 4: Introduction
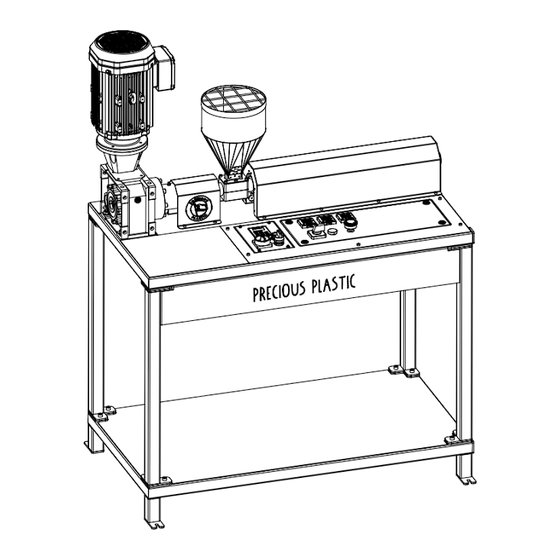
1.0 Introduction 1.1 The Extruder Pro The Extruder pro uses a screw to melt and pump plastic. It can be used to make bricks, beams and profiles. It has an troughput of 10 – 15 kg/hr depending on the type of plastic and the design of the mold/die. - Page 5 1.3 Specifications Weight 110 kg Dimensions (l x w x h) 1105x670x1460mm Voltage 400 V, 3 phase Total power consumption 4,8 kW Motor Power 3,0 kW Heating power 1,8 kW Required amperage 16 A Screw speed @ 50hz 227 rpm Pressure Rated up to 200 bar Input...
-
Page 6: Operation & Maintenance
Note! Before operating the machine, make sure to read and understand chapter 3.0 safety section in this manual! The extruder pro uses heat combined with friction to melt plastic granules or flakes at a high rate and pressure. The friction and thereby heat is generated by means of a plasticizing screw. - Page 7 2.2 Operating the machine Make sure to use properly designed molds and dies while operating the extruder. Make sure to clean the sealing surfaces and thread of the nozzle before installing the molds. Always use high temperature ceramic or copper grease on the threads to prevent seizing of the threaded connection.
- Page 8 2.2 Operating the machine During operation Make sure to fill or dose the hopper with plastic during extrusion. • Make sure not to leave the motor running without plastic to • prevent excessive wear. Adjust the throughput op plastic by adjusting the motor speed. •...
- Page 9 2.3 Maintenance Motor reductor maintenance Change the gearbox oil after the first run in period. This should • take place after 300 running hours or 3 months After the first oil change, check the following after 3000 running • hours or 6 months: The oil quality The oil level Leakages of oil from the seals...
- Page 10 Yearly Check the electronics box and inspect for signs of dust, liquids • or burn marks. Also ensure all wires are securely in place. If any repair is required, seek a licenced electrician. Remove the barrel and inspect the extruder screw. Replace the •...
-
Page 11: Safety
3.0 Safety 3.1 - General instructions The Extruder pro is designed to process thermoplastics ● only. Processing other materials could introduce additional hazards. It is recommended that the source and grade of the plastic ● material is also known and does not contain any contaminants (for example water or oil) that could introduce additional risk. - Page 12 ○ Extruder screw ○ Covers ○ The Extruder pro must not be modified in any way. Doing so ● may introduce additional hazards. Always make sure to run the machine in a well ventilated ● room (More info section 3.2) Always use the correct personal protection equipment as ●...
- Page 13 A ventilation system with an activated carbon filter or ● other filter suitable for VOC filtration must be used in conjunction with the Extruder pro at all times. It is recommended that an electrician wires the ventilation ● unit such that it automatically initiates once the power to the extruder pro is initiated.
- Page 14 Heat proof gloves such as MIG welding gloves should be ● used at all times while using the Extruder pro. These gloves should extend to provide protection to the forearms as well. A work suit or coverall that covers arms and legs must be ●...
- Page 15 ● extruder pro and are capable of handling high pressures. 3.7 Ancillary equipment The Extruder pro is not designed to be used in conjunction ● with any other equipment than what is provided. Ancillary equipment shall not be mounted to the existing ●...
- Page 16 3.9 Information for emergency situations The Extruder pro can reach temperatures of up to 350ºC ● and so as such, poses a serious risk of fire if there are no steps taken to reduce this risk. It is recommended that an individual risk assessment is ●...
- Page 17 3.10 Safety Labels 9-11 Safety stickers on the Extruder frame Hand Crush: Indicates an area of hazard due to crushing Burn Hazard: Indicates a hazardous hot surface Lifting Point: Indicates lifting points for handling Wear Eye Protection: Indicates that eye protection is required when using this particular machine Wear Respirator: Indicated that a respirator is required when using this particular machine...
-
Page 18: Setup And Decommisioning
Complete assembly of the machine is out the scope of this ● manual. The Extruder Pro machine frame van be fitted with either ● adjustable machine feet or castor wheels to level the machine and optionally make it mobile. The feet of the machine frame is designed wit a slot suitable for M8 Thread to fit these parts. -
Page 19: Decommisioning
The Extruder Pro 3kW version requires a power input of ● 380-400 Vac with a 16A supply. The machine comes with a 5P male plug. Only run the machine in well ventilated rooms, use suction ● devices with filtration to remove fumes while extruding. -
Page 20: Online Resources
The Academy is where you'll find video tutorials, tips, drawings and much more on topics like plastic, machines, product design, business and so on. community.preciousplastic.com/academy There is a custom map to connect the Precious Plastic Universe. Find recycling spaces near you to push local plastic recycling in your area. community.preciousplastic.com/map... - Page 21 Events Find and share Precious Plastic events and meet people in real life. Meetups, presentations, conferences and more to start collaborating locally. community.preciousplastic.com/events How-to’s How-to’s are a tool for people to share step-by-step guides on how they tackle plastic waste. Learn how people around the world hack machines, make products, collect plastic and more.
-
Page 22: Community Power
.2 Community power Precious Plastic comes with a worldwide community of collectors, machine builders, recyclers, designers, activists and more people sharing the mission to tackle plastic pollution. It's fun to be part of a global community of like minded people, you... -
Page 23: Be Part Of It
Buy and sell on the Bazar If you’re looking for materials, machines or product around plastic recycling, or want to sell your own, do it on the Precious Plastic Bazar. Why? It can be a lot easier for you to find what you need and enables other people to find you as a seller in the plastic recycling area. - Page 24 Featuring: We are always stalking the community to find inspiring creations to feature and collaborate. But we can only do that on our social media or videos, if we actually FIND you and see that you are connected to Precious Plastic.
-
Page 25: Feedback & Support
Finding errors and typos in the Academy? Have an idea to improve the machines? Or other feedback for our solutions and platforms? Let us know! This is how we can improve Precious Plastic for you and for all the other people working on this. -
Page 26: Take It To The Next Level
5.5 Take it to the next level Precious Plastic provides you with the basic framework to run a recycling workspace effectively. It is up to you (and your team) to bring it to the next level. Create new products, new moulds, hack... -
Page 27: List Of Recommended Spares
6.0 Technical Documents 6.1 List of recommended spares Item Details/Part no Band Heaters Wema DH500, d=40mm, b= 190 mm, Cable length = 800 mm, 600W Thermocouples Bayonette type Rokoma, Fe-CuNi J-type thermocouple, Tip 6mm, tip angle 118 degrees PID controller REX C100 - 240vac 40A SSRs Fotek SSR-40DA... -
Page 28: Electrical Control Box
6.2 Electrical control box Below is a graphical representation of the control box wiring. Any work conducted inside the box shall be carried out by a licensed professional.
Need help?
Do you have a question about the Extruder Pro and is the answer not in the manual?
Questions and answers