Table of Contents
Advertisement
Advertisement
Table of Contents

Related Manuals for Kzyee KM50

Summary of Contents for Kzyee KM50
-
Page 2: Table Of Contents
Vehicle Super Probe Table of Contents 1. IMPORTANT SAFETY INFORMATION............2 2. PRODUCT INTRODUCTION ..............3 3. PRODUCT SPECIFICATIONS ..............4 4. PRODUCT APPEARANCE ….................5 5. FUNCTION INTRODUCTION ..............6 5.1 DC VOLTAGE ..................7 5.2 AC VOLTAGE....................8 5.3 FREQUENCY...................9 5.4 DUTY CYCLE................10 5.5 FUEL INJECT....................11 5.6 RESISTANCE. -
Page 3: Important Safety Information
Warning! KM50 is ONLY for 12-24V vehicle battery electrical systems, and should NOT be used to test 110/220V household electric appliances; otherwise, it will be damaged. The LED and LCD pull no more than 100 milliamp of current, therefore when using this device as a test light or multimeter, it is safe for computer and airbag. -
Page 4: Product Introduction
1. Diagnose 12 ~24V automotive electrical systems swiftly and accurately. 2. Show battery voltage reading and help user determine circuit polarity immediately after connecting the KM50 clips to the vehicle battery. 3. Test DC Voltage, AC Voltage, Frequency, Duty Cycle, Fuel Injection Circuit, Resistance, and Diode. -
Page 5: Product Specifications
Vehicle Super Probe 3. Product Specifications (1) Tool Specifications Display TFT color display (160x128 dpi ) Operating Temperature 0 to 60℃ ( 32 to 140℉) Storage Temperature -5 to 70℃ (-40 to 185℉ ) Dimensions (L*W*H) 200mm*52mm*39mm Net Weight 0.48Kg (2) Electrical Specifications Supply Voltage 8V DC ~ 30V DC... -
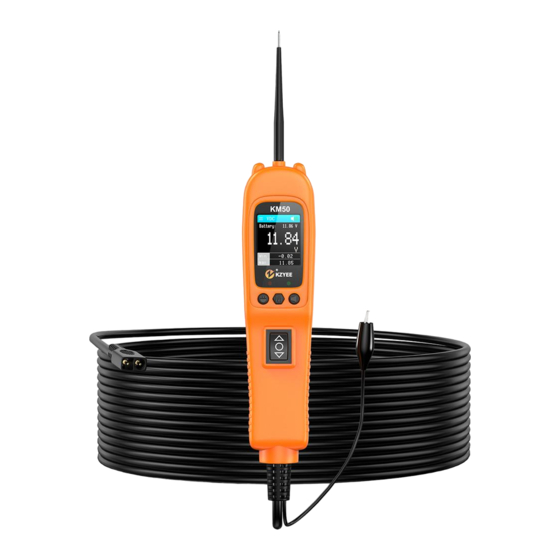
Page 6: Product Appearance
Vehicle Super Probe 4. Product Appearance Figure 1 1) Probe Tip - Contacts the circuit or Button - short press is the up button, component to be tested. long press is to turn the light on/off; 2) LED Lights - Illuminates dark work ode Button - for selecting test areas or work areas at night. -
Page 7: Function Introduction
Vehicle Super Probe 5. Function Introduction KM50 has 7 test modes: DC Voltage, AC Voltage, Frequency, Duty Cycle, Fuel Injection Circuit Detection, Resistance, and Diode. Especially, in AC Voltage, Frequency, Duty Cycle and Fuel Inject Modes, user can long press the mode button to switch between Waveform Display Mode and Digital Display Mode. -
Page 8: Dc Voltage
Vehicle Super Probe IMPORTANT: When powering-up components, you can increase the life of rocker switch in the tool if you first press the switch, and then contact the tip to the component. The arcing will take place at the tip instead of the metal contacts of the rocker switch. -
Page 9: Ac Voltage
Vehicle Super Probe 5.2 AC Voltage Figure 4 Clip the red alligator clip to the battery positive pole; clip the black alligator clip to the battery negative pole. 2) Once the device is powered on, it will enter DC voltage test mode as default. Short press the mode button to enter the menu, short press the down button to place the cursor in the AC voltage mode, and short press the mode button to enter the AC voltage waveform display mode. -
Page 10: Frequency
Vehicle Super Probe 5.3 Frequency Figure 5 Clip the red alligator clip to the battery positive pole; Clip the black alligator clip to the battery negative pole. 2) Once the device is powered on, it will enter DC voltage test mode as default. Short press the mode button to enter the menu, short press the down button to place the cursor in the frequency mode, and short press the mode button to enter the frequency waveform display mode. -
Page 11: Duty Cycle
Vehicle Super Probe 5.4 Duty Cycle Figure 6 Clip the red alligator clip to the battery positive pole; Clip the black alligator clip to the battery negative pole. 2) Once the device is powered on, it will enter DC voltage test mode as default. Short press the mode button to enter the menu, short press the down button to place the cursor in the Duty Cycle mode, and short press the mode button to enter the Duty Cycle waveform display mode. -
Page 12: Fuel Inject
Vehicle Super Probe 5.5 Fuel Inject Figure 7 Clip the red alligator clip to the battery positive pole; Clip the black alligator clip to the battery negative pole. 2) Once the device is powered on, it will enter DC voltage test mode as default. Short press the mode button to enter the menu, short press the down button to place the cursor in the Fuel Inject mode, and short press the mode button to enter the Fuel Inject waveform display mode. -
Page 13: Resistance
Vehicle Super Probe a) Fuel Injection Time, displayed in the main area; b) Fuel Injector Power Supply Voltage (INJ Voltage), displayed at the top; c) Maximum Reverse Induced Voltage Value of Fuel Injector Control Coil, shown as Max (If it exceeds 35V, the red LED light will flash); and d) Minimum Ground Voltage Value When Fuel Injection Is ON, shown as Min. -
Page 14: Diode
Vehicle Super Probe place the cursor in the Resistance mode, and short press the mode button to enter the Resistance mode. 3) The probe contacts one end of the measured resistance, and the auxiliary ground lead is connected to the other end of the measured resistance. The LCD display will read the resistance between the tip and auxiliary ground lead. -
Page 15: Voltage & Polarity Testing
Vehicle Super Probe 3) Contact the probe tip to diode positive terminal, connect the auxiliary ground lead to diode negative terminal, the screen will display the forward voltage drop, which indicates forward bias. If swapping the probe tip with auxiliary ground lead, the screen will not display voltage, which indicates reverse bias. -
Page 16: Continuity Testing
Vehicle Super Probe 5.9 Continuity Testing Figure 12 Clip the red alligator clip to the battery positive pole; Clip the black alligator clip to the battery negative pole. 2) Once the device is powered on, it will enter DC voltage test mode as default. Short press the mode button to enter the menu, short press the down button to place the cursor in the Resistance mode, and short press the mode button to enter the Resistance mode. -
Page 17: Signal Circuit Testing
Vehicle Super Probe 5.10 Signal Circuit Testing Figure 13 Once you extract a DTC from the vehicle and realize that troubleshooting begins with some kind of sensor circuit, there is a quick test you can perform to verify the code. Testing your sensor is easy while using the tool. -
Page 18: Activating Components In Your Hand
Vehicle Super Probe 5.11 Activating Components in Your Hand Figure 14 1) While the tool is in DC voltage mode, by using the probe tip in connection with the auxiliary ground lead, components can be activated right in your hand, thereby testing their functions. -
Page 19: Activating Components In The Vehicle
Vehicle Super Probe 5.12 Activating Components in the Vehicle Figure 15 1) While the tool in DC Voltage mode, contact the probe tip to the positive terminal of the component, the green LED should light, indicating continuity to ground. 2) Observe the green LED, quickly depress and release the rocker switch forward. If the green LED went out and the red LED came on, you may proceed with further activation. -
Page 20: Testing Trailer Lights And Connections
Vehicle Super Probe 5.13 Testing Trailer Lights and Connections Figure 16 1) While the tool in DC Voltage mode, clip the auxiliary ground lead to the trailer ground, probe the contacts at the jack and then apply voltage to the probe tip. This may check the function and orientation of the connector and trailer lights. -
Page 21: Activating Components W/Ground
Vehicle Super Probe 5.14 Activating Components W/Ground Figure 17 1) While the tool in DC Voltage mode, contact the probe tip to the negative terminal of the component, the red LED should light. While observing the red LED, quickly depress and release the rocker switch rearward. If the red LED went out and the green LED came on, you may proceed with further activation. -
Page 22: Following & Locating Short Circuits
Vehicle Super Probe 5.15 Following & Locating Short Circuits In most cases a short circuit will appear by a fuse or a fusible link blowing or an electrical protection device tripping (i.e., a circuit breaker). This is the best place to begin the search. -
Page 23: Product Warranty
Limited 90 Day Warranty KZYEE makes every effort to assure that its products meet high quality and durability standards, and warrants to the original purchaser that this product is free from defects in materials and workmanship for the period of 90 days from the date of purchase.
Need help?
Do you have a question about the KM50 and is the answer not in the manual?
Questions and answers