Advertisement
Quick Links
Advertisement

Related Manuals for eZLO VistaCam 1203

Summary of Contents for eZLO VistaCam 1203
- Page 1 VistaCam 1203 Quick Start Guide Video Doorbell...
- Page 3 Congratulations on choosing the VistaCam 1203 You’ve taken the next step toward mak- ing your home safer and your life easier. It’s easy to set up your camera. Here’s what you need to do.
- Page 4 If you haven’t already set up your Vera or Ezlo controller, please do that first. There are instructions on how to do so accompany- ing the controller.
- Page 5 App Store or on Google Play. If you already have the Vera app, just log in. Open the Ezlo’s Vera app and please sign up for a Vera account, or sign in if you have one already.
-
Page 6: What's In The Box
What’s in the Box 2 x Wire Nuts 1 x Silicone Plug Quick Start Guide 1 x Video 2 x Wire Doorbell Extenders 1 x Dual-purpose screwdriver 1 x Thick 1 x Mounting 1 x 5° Vertical 1 x 15° Horizontal 1 x Drill Hole mounting bracket... -
Page 7: Physical Description
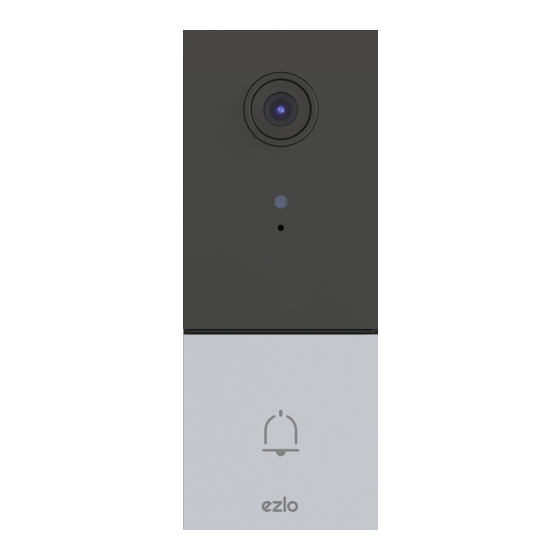
Physical Description Front Panel Rear Panel Micro SD Card Slot Mounting slots Type-C Port Camera Reset Light sensor Type-C Port Microphone Power Input Port Doorbell button Bottom Panel Speaker Security screw hole... - Page 8 Before doing anything else, shut off the breaker that controls the doorbell’s circuit. If you have a mechanical chime installed in your home, install the power kit and doorbell. If you have an electronic chime installed in your home, refer to its own manual to install the power kit, and install the doorbell.
- Page 9 Install the power kit 1 Insert one end of the wire har- ness into the power kit 2 Remove the cover from your mechanical chime. 3 Remove the existing chime wires in the terminals named TRANS and FRONT.
- Page 10 Install the power kit 4 Connect the wire harness to the chime’s terminals named TRANS and FRONT. 5 Insert the existing chime wire and the other end of the wire Wire Connector harness into the wire connector and twist it tightly. Repeat this step with the other chime wire.
- Page 11 Install the power kit 6 Mount the power kit to the side of the chime. 7 Put back the chime cover.
-
Page 12: Install The Doorbell
Install the doorbell 1 Ensure the electricity at the breaker that controls the door- bell’s circuit is still off. 2 Place the mounting bracket where you want to mount the doorbell. A good location is at least 59 inches (1.5m) high from the ground. - Page 13 Install the doorbell 4 Fix the mounting plate to the wall. Option A Option B Option C Mounting Screws Mounting Screws Mounting Screws 22mm (0.87’’) 35mm (1.38’’) 35mm (1.38’’) Option D Option E Mounting Screws Mounting Screws 45mm(1.77’’) 22mm(0.87’’)
- Page 14 Install the doorbell 5 Connect the doorbell with your existing doorbell wires. Type-C Port Please note that it is forbidden to connect the doorbell to AC and Type-C power supply at the same time.
- Page 15 Install the doorbell 6 Hook the doorbell on top of the Type-C Port mounting bracket and then snap the doorbell bottom to the bracket. You may hear a “click” sound. 7 Use the included screwdriver to tighten the anti-theft screw. 8 Restore the electricity at the breaker.
- Page 16 9 In the Vera app, navigate to the Devices screen and tap + in the top right corner. Select doorbells and look for the VistaCam 1203. Follow the prompts to finalize the setup. If you want to change your doorbell’s Wi-Fi, press and hold the reset button for 5s and repeat the device adding process.
- Page 17 Camera model VistaCam 1203 is designed for indoor use. FCC Information This device complies with Part 15 of the FCC Rules. Operation is subject to the following two conditions: (1) This device may not cause harmful interference, and (2) This device must accept any interference received, including interference that may cause undesired operation.
- Page 18 Your doorbell is now set up! You can now talk to people at your door through the Vera app and ensure greater security for your home.
- Page 20 You’re now ready to enjoy smarter home control. © Ezlo Innovation 2021...
Need help?
Do you have a question about the VistaCam 1203 and is the answer not in the manual?
Questions and answers