Table of Contents
Advertisement
Advertisement
Table of Contents

Summary of Contents for Massimo MGC
- Page 1 E-Trike Owners Manual...
-
Page 2: Preface
Massimo Electric continually seeks advancements in products and quality. Therefore, while this manual contains the most current product information available at the time of printing, there may be minor discrepancies between your vehicle and this manual. -
Page 3: Table Of Contents
Table of Contents Preface ................1 1-1Company Introuction ............4 2-1 Vehicle Overview ............6 2-1-1 Cargo E-Tricycle Body Structure ......... 6 2-1-3 Leisure Passenger E-Tricycle Body Structure ..... 8 2-2 Speedometer & Handle Bar Instruction ......11 2-2-1 Speedometer ............. 12 2-2-2 Left &... - Page 4 2-7-1 Charging Plug ............21 2-7-2 Charger ..............22 2-8 Rearview Mirror ............22 2-9 Vehicle Nameplate & VIN ..........23 2-9-1 Vehicle Nameplate............. 23 2-9-2 VIN ................24 2-10 Battery Installation ............26 3-1 Precautions before driving ..........27 3-1-1 Precautions Before Driving ........
- Page 5 4-1-4Battery’s Usage Maintenance ........ 36 4-1-5 Charger’s Usage Maintenance ....... 38 4-1-6 Inspection and adjustment of brake ......39 4-2 Troubleshooting ............40 4-2-1 Maintenance Periodic Table ........40 4-2-2 Common Breakdowns ..........42 4-3 Circuit Diagram ............43...
-
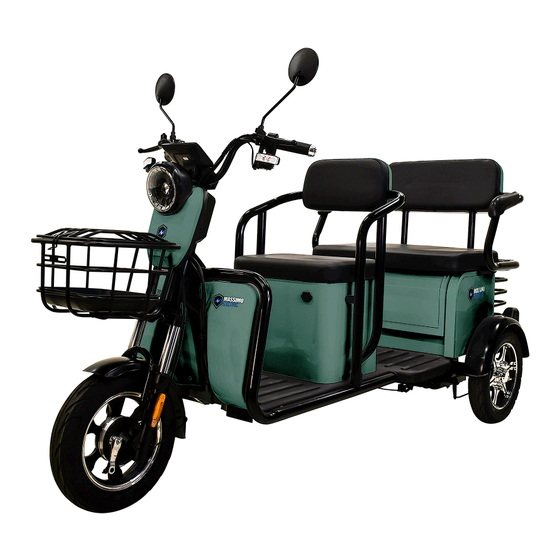
Page 6: Leisure Passenger E-Tricycle Body Structure
2-1-3 Leisure Passenger E-Tricycle Body Structure Figure2-3 1. Front fork 2.Front wheel 3.Horn 4.Headlight 5.Turning light 6.Speedometer 7.Throttle 8.Rearview mirror 9.Reflector 10. Front seat mat 11. Front backrest 12.Rear seat 13.Armrest 14.Backrest cask 15.Rear light 16.Rear bumper 17.Rear wheel 18.Leaf spring 19.Motor 20.Rear axle 21.Charging plug... -
Page 7: Speedometer & Handle Bar Instruction
2-2 Speedometer & Handle Bar Instruction Console Introduction of Cabin tricycles Figure 2-6 Console 1 Throttle 2 Speaker 3 Reverse camera 4 Speedometer 5 Hand bar 6 Video 7 Dashboard Note: Before first driving, please familiarize yourself with the various operating switches and equipment in the cab. If anything is different from this manual, subject to the actual tricycles. -
Page 8: Speedometer
2-2-1Speedometer km/h 电 瓶 能 量 指 示 Figure 2-7 Speedometer 1 1 【Speed signal】 :shows driving speed; 2 【Left turning signal】 :The light flashes when you turn on left signal; 3 【Right turning signal】: The light flashes when you turn on right signal; 4 【Headlight signal】... - Page 9 Figure 2-8 Meter 2 1 【Left turning signal】 :The light flashes when you turn on left signal. 2 【High beam signal】 :The light flashes when you turn on high beam signal。 3 【Right turning signal】: The light flashes when you turn on right signal 4 【Power signal】...
-
Page 10: Left & Right Handle Bar
7 【MF/MP3】 : shows the current status of MP3 and radio. 8 【USB】 :display audio from USB。 9 Radio/MP3 switch】: play radio and MP3. Refer to section 2-3-2 of this manual for details of radio and MP3 operation. 10【Speaker】: play radio and MP3. 2-2-2 Left &... - Page 11 Figure 2-10 Throttle & Function keys 2 1 【Throttle】:Throttle is used to control the speed. When you want to accelerate, 2 【Forward &Reserve】 : This switch is used to control the direction of travel of the vehicle. When it is in the "forward" gear, turn to turn the vehicle forward;...
-
Page 12: Key & Electric Lock
7 【Left function key】 :Used to control the direction, please do not leave the grip with both hands at the same time Notice: When stopped, please set the switch to "Neutral", and remove the key to avoid misoperation by children or others, resulting in injury When driving, please do not toggle the switch gear at will, and wait for the vehicle to stop completely before switching gears。... -
Page 13: Power Off Switch
2-4 Power- off switch The power off switch is located in the inner side of the bucket bin, which is the on-off control switch of the whole vehicle power supply When the vehicle is over-current or short-circuited, this switch will be automatically disconnected.When carrying out vehicle maintenance or suspension, manually disconnect the switch. -
Page 14: Brake System
2-5 Brake System 2-5-1 Brake pedal The brake pedal is located on the right front side of the pedal in the driving area, and the brake pedal is stepped down, and the vehicle brake system works. Figure 2-13 Brake pedal 1... -
Page 15: Parking Brake
Figure 2-14 Brake pedal 2 and parking brake 2-5-2 Parking brakes When you stop, you can avoid slipping by manipulating parking brakes,Turn off the power at the same time.Remove the parking brake before the vehicle starts. With the parking brake shown in Figure 2-15,use as follows:【Parking】Pull up the parking brake as shown. 【release】①Press the lock release button,②Put down the parking brake. - Page 16 【Parking】1,Press the brake pedal2,Press handle 1 down to lock with pedal,release the pedal. 【Release】Press brake pedal 2 to handle 1 to bounce naturally,at this time the parking brake is lifted. Figure 2-15 Parking brakes 2-6 Gearshift Lever Some models are equipped with high and low speed gearboxes.High speed or low speed gear can be reasonably selected according to vehicle condition and road condition.
-
Page 17: Charging Plug & Charger
2 【Low speed】 :The shift handle is in the solid line position in Figure 2-16,the vehicle is in the low speed gear, the vehicle speed is slower, the power increases,suitable for loading or driving on ramp pavement. Figure 2-16 Variable speed handle 2-7 Charging Plug &... -
Page 18: Charger
Danger:It is forbidden to use conductive foreign body or finger to insert charging hole, It is strictly forbidden to use water battery charger to charge the dry battery. It is strictly forbidden to connect the charger for charging for a long time. 2-7-2 Charger When charging with a charger,at one end of the plug ,220 V AC power supply is connected, and the other end is connected to the vehicle charging socket, and the connection of each joint is ensured to be well connected.When charging,... -
Page 19: Vehicle Nameplate & Vin
Axxxxxx Figure 2-17 rear-vision mirror 2-9 Vehicle Nameplate & VIN 2-9-1 Vehicle nameplate The nameplate is located on the right side of the seat, as shown in Figure 2-18.Product nameplate identifies the manufacturer of the vehicle, VIN code, product model, product name, date of production and the main parameters of the vehicle, which are non-detachable.The nameplate position may be adjusted due to different models. -
Page 20: Vin
金彭牌电动正三轮摩托车 车辆型号 整备质量 电动机型号 额定工作定压 载质量(客) 电机额定功率 出厂日期 年 中国·江苏金彭集团有限公司制造 Figure 2-18 Location Map 2-9-2 VIN Vehicle VIN code is the identification number of the vehicle, It contains information such as the manufacturer, year, model, body type and code of the vehicle. It has a unique identification of the vehicle. Figure2-19... -
Page 21: Battery Installation
The location of the VIN code for different models is as follow: a) The VIN code of Sankai freight and leisure models is printed at A or B in Figure 2-19; b) The VIN code of the semi-closed freight model is printed at C or D in Figure 2-20; c) The VIN code of the fully enclosed model is printed at E in Figure 2-21;... - Page 22 1 Wiring scheme A: suitable for battery installation of 48V models. 2 Wiring scheme B: Suitable for battery installation of 60V models. Depending on the model, the car can be equipped with a variety of battery specifications. For the battery model and size, refer to the following table but not limited to the table below (size is for reference only) Model Voltage/V...
-
Page 23: Precautions Before Driving
Warning: 1 When connecting the battery, make sure that the power switch is off; 2 The battery connection must be strictly in accordance with the diagram cross wiring is strictly prohibited; 3 It is strictly forbidden to run the battery cable from under the pressure plate; 4 After the water battery wiring is completed, please apply butter protection to the battery pole;... -
Page 24: Start Vehicle
4 Instrument and control system: confirm whether the instrument and controller are normal, first turn on the power switch to confirm that the headlights, brake lights, driving lights, turn signals, reverse lights and other lighting are all working. 5 Confirm whether the brake pedal has enough free clearance. 6 Make sure that the battery connection cable is not loose, damaged, or otherwise in poor contact. - Page 25 person with a C4 or above license drive the vehicle. 2 Vehicles should go to the designated place to register and obtain a driving license according to the requirements of the country or province and city. Unlicensed vehicles are not allowed to drive on the road. The driving license must be carried along with the vehicle during driving.
-
Page 26: Protection Device
high-speed driving is not allowed. 3-2-2 Protection Device 1 In order to ensure personal safety, you should not wear slippers when driving; when necessary, you should wear gloves, goggles, helmets and other protective equipment. 2 Loose clothes are not conducive to safe driving, and it is easy to hook the auxiliary equipment such as joystick, start lever and rearview mirror;... -
Page 27: Attachment
● 3-2-4 Attachment Adjust the tire pressure according to the weight of the load and the road conditions (the calibration pressure cannot be exceeded). ● Do not hang objects on the direction (disk), front fork, and rearview mirror to avoid unstable driving or slow steering. ●... - Page 28 In order to ensure the normal operation of the vehicle, in addition to the requirements of special working conditions, the operation of fully opening the electric door for a long time should be avoided. Do regular inspections and motor maintenance. The interval of regular maintenance can be determined according to the form of the motor and the use environment.
-
Page 29: Controller's Usage & Maintenance
changed every 1500km afterwards; after maintenance, the oil must be changed. When the amount of oil is insufficient, it should be refilled in time. 6. Oil change method ① Remove the vent plug at the top; ② Remove the oil drain plug at the bottom, drain the oil and reinstall the screw plug; ③Inject special gear oil from the vent plug port, the amount of refueling will vary depending on the model, please refer to the amount of refueling marked on the rear axle;... -
Page 30: Wheel & Tire's Maintenance
1. Regularly clean the external dust of the controller, which is conducive to heat dissipation; 2. Regularly check the controller plug to prevent the controller from being invalid due to virtual connection; 3. After the controller is sprayed with water, clean the controller lead connector with clean water or alcohol in time to avoid oxidation and corrosion. -
Page 31: 4-1-4Battery's Usage Maintenance
! warning 1. Improper inflation of tires can cause abnormal tire damage, leading to safety accidents. Too low tire pressure will cause the tire to slip or fall off the rim, causing the tire to run flat and make the vehicle runaway. When the tread in the middle of the tire reaches the following limit value, please replace the tire (see Table 4-1) 2. - Page 32 To charge the battery, you must use the special charger that comes with the car. Charge in a well-ventilated environment. Fireworks should be strictly prohibited in the charging place. ! warning 1、If you want to store the electric vehicle for a long time, you should remove the battery from the vehicle and fully charge it, then put it in a cool and dry place, and then recharge it every other month.
- Page 33 ● The replacement fuse must comply with the regulations, and other conductive materials must not be used to replace the fuse, otherwise it will cause the electric vehicle to catch fire and the consequences will be at your own risk. ●...
- Page 34 carry it with the car. If you really want to carry it, you should pack the charger with shock-absorbing materials and place it in the tool box on the car. 4-1-6 Inspection and adjustment of the brake Good braking performance is an important guarantee for your driving safety. The new vehicle brake system is all adjusted.
-
Page 35: Troubleshooting
1Turn the brake adjusting nut clockwise or counterclockwise to adjust the free stroke to the requirements. (The dotted line in Pic 4-1) 2 After adjusting the free travel, lift the rear wheel on one side or push the vehicle. There should be no resistance to the wheel turning. - Page 36 Note: The meanings of various symbols in the table are as follows: I:Inspect, clean, adjust, lubricate or replace. C:Cleaning。 R:Replacement。 *:It should be serviced by professional when repaired △:It is carried out by professional maintenance personnel, if the user has the maintenance ability, he can also maintain it by himself.
-
Page 37: Common Breakdowns
4-2-2 Common Breakdowns Fault fault cause elimination methods (1)low battery voltage; (1)Charge the battery fully; Throttle disable or (2)loosen of the wire in throttle; (2)reweld; tope speed is low (3)spring stuck in throttle may failed. (3)clean or replace the throttle。 (1)the controller is protected due to the low voltage;... -
Page 38: Circuit Diagram
4-3 Circuit Diagram Motor Remarks:This circuit diagram is a connection diagram,but not as a basis for maintenance. Please go to the designated after-sales service point if you need repair.
Need help?
Do you have a question about the MGC and is the answer not in the manual?
Questions and answers
my Massimo MGC e trike only moves a few inches and stops batteries fully charged verified battery condition l checked voltage all read 13.1 13.4 volts series voltage 52.4V also load tested all the batteries 130 cca @ 10 volts what should I do nest to check for inop Massimo MGC e trike the schematic for the Massimo MGC are very poor & no color codes for wiring
If the Massimo MGC e-trike only moves a few inches and stops despite fully charged batteries, follow these troubleshooting steps:
1. Check for low battery voltage – Charge the battery fully even if it seems charged.
2. Inspect throttle wiring – Look for loose wires in the throttle and reweld if necessary.
3. Examine the throttle spring – If the spring is stuck or failed, clean or replace the throttle.
These steps address common causes of limited movement in the e-trike.
This answer is automatically generated