
Summary of Contents for Meraki Solar
- Page 1 Meraki Solar Setup Guide 4Gon www.4Gon.co.uk info@4gon.co.uk Tel: +44 (0)1245 808195 Fax: +44 (0)1245 808299...
- Page 2 4Gon www.4Gon.co.uk info@4gon.co.uk Tel: +44 (0)1245 808195 Fax: +44 (0)1245 808299...
-
Page 3: Table Of Contents
Contents · System Overview · Understanding the Solar Repeater · Pre-Site Preparation · Configuration on Dashboard · Solar Panel Orientation & Elevation Angle · On-Site Instructions · Install Solar Panel · Pole Mount · Wall Mount · Roof Mount · Mount Solar Repeater ·... -
Page 4: System Overview
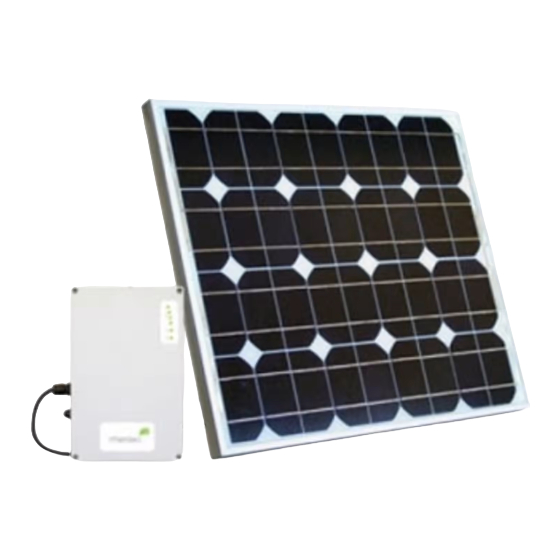
Solar Repeater The solar repeater is the core of your Meraki Solar system. It contains an 802.11 b/g radio, battery, and charge controller, all integrated into a weatherproof enclosure. This solar repeater package contains the following items:... - Page 5 20W Solar Panel 40W Solar Panel Note: If you are providing your own solar panel, you will need to purchase the Meraki Solar Power Ac- cessory Cable (model number SOL-PWR-CBL) to connect your panel to the solar repeater. You will also need to follow your 3rd-party solar panel manufacturer’s mounting instructions.
-
Page 6: Understanding The Solar Repeater
Solar Panel Connector Mounting Backplate Understanding the LED Indicators Your solar repeater is equipped with a series of LED lights on the front of the unit to convey information about system functionality and performance: Solar Panel Status LED On: Solar panel is powering radio, battery is fully charged Off: Nighttime or solar panel is disconnected;... -
Page 7: Pre-Site Preparation
Configure your Solar Repeater on Dashboard Your solar repeater will act as a repeater, but not as a gateway. Therefore, you will need to have an ex- isting Meraki network that is connected to the Internet. We recommend that you add your solar repeater to a network on Dashboard before mounting it in the field. -
Page 8: Solar Panel Orientation & Elevation Angle
(directly at the geographical north pole). If you are in the Northern hemisphere, point your solar panel to true south. If you use a magnetic compass to measure your orien- tation, keep in mind that depending on your location, magnetic north often varies from true north due to variation in the earth’s magnetic field around the globe. - Page 9 Elevation Angle 105° 105° 95° 95° 85° 85° 75° 75° 65° 65° 55° 55° 45° 45° 35° 35° 25° 25° 15° 15° 25° 25° 35° 35° 45° 45° 55° 55° 65° 65° 75° 75° 85° 85° 95° 95° 105° 105° The elevation angle should point the panel directly at the sun at noon during the winter.
-
Page 10: On-Site Instructions
2. The solar repeater should have line of sight to at least 2, preferably 3 or 4, Meraki repeaters. 3. The solar repeater power cord is 15' (4.5 m) long, so the panel can be up to 15' from the repeater. -
Page 11: Install Solar Panel
Install Solar Panel There are several mounting options for your solar panel. You should have purchased either a pole or a roof/wall mount kit. Follow the appropriate set of instructions below for your mount type. Solar Panel Pole Mount Kit... -
Page 12: Pole Mount
1. Attach the Mount Arm to the Solar Panel Lay the solar panel face-down on a protected flat surface such as a towel or carpet. Center the arm on the back of the panel and attach it to the panel as shown using 1/4"... - Page 13 Pole Mount Top of pole Tip: Check the fit of the hose clamp to your pole before installing. Trim off any excess length of hose clamp with the tin snips to save install time, leaving about 2" (5.1 cm) of excess length when installed.
- Page 14 Next, insert the other three bolts and hand tighten. 4. Set Proper Elevation Angle of Panel Using the included inclinometer, set your solar panel to the angle that you calculat- ed in the “Elevation” section on page 7. Tighten the 5/16" (8 mm) nuts to 12 ft-lbs.
- Page 15 Solar Panel Roof or Wall Mount Kit Foot Rail 5/16" (8 mm) 1/4" (6.4 mm) Spare hardware kit Nut & Washer Nut & Washer 5/16" (8 mm) in actual scale 1/4" (6.4 mm) in actual scale 4Gon www.4Gon.co.uk info@4gon.co.uk Tel: +44 (0)1245 808195 Fax: +44 (0)1245 808299...
-
Page 16: Wall Mount
Lay the solar panel face-down on a protected flat surface such as a towel or carpet. Attach the rails to the frame of the solar panel using 1/4" (6.4 mm) bolts. Put the bolts through the holes in the frame and long slots on the rails. Tighten the nuts to 7 ft-lbs. - Page 17 5. Set Proper Elevation Angle of Panel Using the included inclinometer, set your solar panel to the angle that you calculated in the “Elevation” section on page 7. See diagram for how to properly use the inclinometer to set the angle of the panel.
-
Page 18: Roof Mount
Lay the solar panel face-down on a protected flat surface such as a towel or carpet. Attach the rails to the frame of the solar panel using 1/4" (6.4 mm) bolts. Put the bolts through the holes in the frame and long slots on the rails. Tighten the nuts to 7 ft-lbs. - Page 19 5. Set Proper Elevation Angle of Panel Using the included inclinometer, set your solar panel to the angle that you calculated in the “Elevation” section on page 7. Note where lower feet should be attached to the roof to fix the panel at the proper angle.
-
Page 20: Mount Solar Repeater
Mount the Solar Repeater Your solar repeater can be mounted to a pole or wall. Remember, your solar repeater can be up to 15' (4.5 m) away from your solar panel if using a Meraki solar panel. Pole Mount Your solar repeater includes 2.5" (6 cm) u-bolts for mounting to a 2.5" (6 cm) pole. If you are mounting to a larger or smaller pole, you will need to use your own hardware. - Page 21 Wall Mount Your solar repeater may also be mounted to a wall. Keep in mind that most walls will block the solar repeater’s wifi signal. If you are mounting to a wall, consider mounting at the top of the wall so the antenna is unobstructed or using a directional antenna to amplify the repeater signal to the front of the unit.
-
Page 22: Troubleshooting
Either your battery is completely discharged or there is a malfunction with the unit. Try charging the unit via the solar panel for 2-3 hours in direct sunlight (or 7-8 if it is a cloudy day). Check the power light again. If the power light is now on, your unit should now function properly;... - Page 23 · Consult the dealer or an experienced radio/TV technician for help. Any changes or modifications not expressly approved by Meraki, Inc. could void the user’s authority to operate this equipment. EU – EN 55 022 Declaration of Conformance This equipment is shielded against the generation of radio interference in ac- cordance with the application of Council Directive 89/336/EEC, Article 4a.
- Page 24 © Meraki, Inc. 2008 600-08010 4Gon www.4Gon.co.uk info@4gon.co.uk Tel: +44 (0)1245 808195 Fax: +44 (0)1245 808299...
Need help?
Do you have a question about the Solar and is the answer not in the manual?
Questions and answers