Advertisement
J2 PET Felt Horizontal Acoustic Cloud
PRODUCT ASSEMBLY AND INSTALLATION GUIDE
PANEL ASSEMBLY
1.
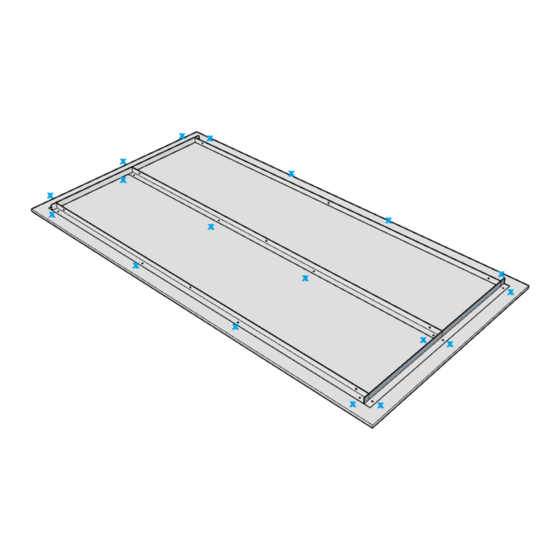
Place the panel face down on a clean, dry, flat surface (an "X" can be found in the corner
of the panel on the back.) Place L brackets according to diagram A on panel (2" from
edge of panel.) Ensure that the leg of the bracket with the most pre-drilled holes attaches
to the back of the panel (the leg with fewer holes will be used to suspend the panel.) Use
the screws (x18) to fasten L brackets to the back of the panel as shown in diagram A.
Do not over-tighten screws.
2.
Determine mounting location on ceiling. Attach cable to hardware mounted to substrate
(not included) using the looped end.
Diagram A
www.j2systems.net
PAGE 1
sales@j2systems.net
(801) 701-7979
Advertisement
Table of Contents

Summary of Contents for J2 PET Felt
- Page 1 J2 PET Felt Horizontal Acoustic Cloud PRODUCT ASSEMBLY AND INSTALLATION GUIDE PAGE 1 PANEL ASSEMBLY Place the panel face down on a clean, dry, flat surface (an “X” can be found in the corner of the panel on the back.) Place L brackets according to diagram A on panel (2” from edge of panel.) Ensure that the leg of the bracket with the most pre-drilled holes attaches...
- Page 2 J2 PET Felt Horizontal Acoustic Cloud PRODUCT ASSEMBLY AND INSTALLATION GUIDE PAGE 2 Using the supplied cable adjuster kit (x5), insert the bare end of the cable (without loop) through adjuster (following arrow indicator on adjuster.) Insert wire through pre-drilled suspension point holes on L bracket (Diagram B), then back through cable adjuster.
Need help?
Do you have a question about the PET Felt and is the answer not in the manual?
Questions and answers