Table of Contents
Advertisement
Quick Links
Advertisement
Table of Contents

Summary of Contents for Smarter Home Platform Storage Rack 4' x 8'
- Page 1 Platform Storage Rack 4’ x 8’ 4’ x 8’ INSTALLATION MANUAL...
-
Page 2: Table Of Contents
Table of Contents Safety Overview ................................MyLifter Safety . -
Page 3: Safety Overview
Safety Overview This is a DO IT YOURSELF project. Read and follow the installation instructions carefully. Failure to follow instructions could result in property damage, serious injury or death. If you have any questions or concerns about the quality of your ceiling structure discontinue installation and consult a structural engineer. -
Page 4: Mylifter Safety
MyLifter Safety When using the the MyLifter and related storage accessories: • Do NOT use the MyLifter to lift people or animals. Do NOT climb or hang on the storage rack. • • Do NOT lift items while hands or other body parts are near the MyLifter device, lifting cables, storage accessories, etc. -
Page 5: What's In The Box
What’s in the Box (Drawings below are not shown to scale) Riveted Side Rails Riveted End Rails M6 x 15mm Bolt M6 Washer Center Supports Ceiling bracket (non-motorized install only) Vertical Upright (3-Hole) M6 Flange Nut Plastic Plug Required Tools (not included) •... -
Page 6: Platform Installation
Platform Installation | Assemble Platform Overhead Storage Rack Step 1: Assemble Platform Overhead Storage Rack 1. Align the holes on two of the riveted side rails. NOTE: All four side rails are the same so no need to worry about using the wrong ones. 2. - Page 7 Platform Installation | Assemble Platform Overhead Storage Rack Step 1: Assemble Platform Overhead Storage Rack (cont.) 4. Join a side rail with an end rail using a vertical upright post. We suggest using a rubber mallet and screwdriver (fig 1.2) to ensure the rivets are properly seated.
- Page 8 Platform Installation | Assemble Platform Overhead Storage Rack Step 1: Assemble Platform Overhead Storage Rack (cont.) 7. Fasten the center support to the side rails as shown using the remaining bolts, nuts and washers. (fig 1.4) 8. Attach the remaining center supports to the side rails by fig 1.4 fig 1.5...
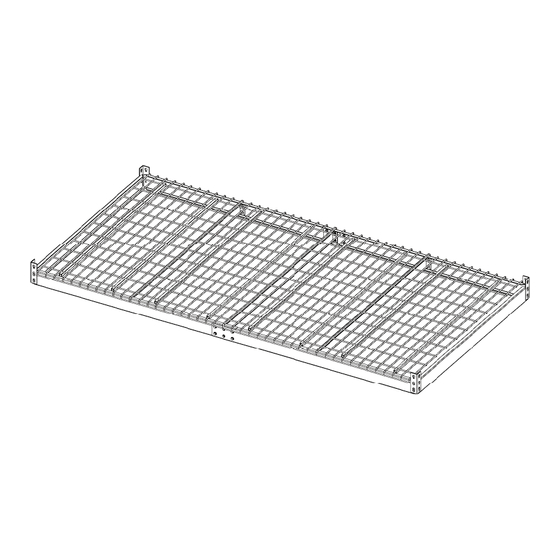
- Page 9 Platform Installation | Assemble Platform Overhead Storage Rack Step 1: Assemble Platform Overhead Storage Rack (cont.) 9. The frame of the platform is now fully assembled (fig 1.6) and ready to add the wire decking. 10. Place the wire decking on the platform frame. The edge of each section of the wire decking (except the outer edges) should rest on a center support.
-
Page 10: Step 2: Install Smart Track
Platform Installation | Smart Track Installation Overview Step 2: Install Smart Track • Lag bolts used to secure Smart Track must be centered in ceiling joists. • If you are not confident locating and anchoring items to ceiling joists do not STOP: attempt this installation. - Page 11 Platform Installation | Install Smart Track JOIST DIRECTION Step 2: Install Smart Track (cont.) 1. Determine where to install your platform overhead storage rack. Be sure to take into consideration garage doors, overhead lights etc. when choosing your install location. Keep in mind you’ll also need access to at least one power outlet for the MyLifters.
- Page 12 Platform Installation | Install Smart Track Step 2: Install Smart Track (cont.) 7. Place the Smart Track over the center mark you made for the ceiling joist and use a pencil to mark where the lag screws will be installed so you can drill the pilot holes.
- Page 13 Platform Installation | Install Smart Track Step 2: Install Smart Track (cont.) 11. Repeat steps 4-6 to find the center of the joist where you will secure the other end of the Smart Track. 12. Tighten both lag screws so the Smart Track is flush and secure against the ceiling.
-
Page 14: Step 3: Install Mylifter Hoists
Platform Installation | Install MyLifter Hoists Step 3: Install MyLifter Hoists 1. Before installing the MyLifters onto Smart Track pair to each MyLifter. This is important to ensure you can troubleshoot any potential issues before installing them. 2. Download the MyLifter app from the App Store or Google Play (fig 3.1). fig 3.1 3. - Page 15 Platform Installation | Install MyLifter Hoists Step 3: Install MyLifter Hoists (cont.) 8. On the home page, click “Create Group” in the bottom left corner. Choose “Locked Group”. 9. On the “Select Devices” screen, select the MyLifters you just paired to. 9.
- Page 16 Platform Installation | Install MyLifter Hoists Step 3: Install MyLifter Hoists (cont.) 13. Now that you’ve paired to each MyLifter and created a group, they can be installed on the Smart Track. 14. Each MyLifter must be placed on Smart Track between two lag screws to ensure proper support.
-
Page 17: Step 4: Install Power Adapters And Cable Management Clips
Platform Installation | Install Power Adapters and Cable Management Clips Step 4: Install Power Adapters and Cable Management Clips 1. For each MyLifter you’ve installed on the Smart Track, determine where the Power Adapter should be installed. The preferred location, if possible, is adjacent to the MyLifter. - Page 18 Platform Installation | Install Power Adapters and Cable Management Clips Step 4: Install Power Adapters and Cable Management Clips (cont.) 5. To secure and organize the cables, determine where to place the cable management clips. fig 4.3 fig 4.4 6. Peel the adhesive backing off the first cable management clip and place it and created a group.
- Page 19 Platform Installation | Install Power Adapters and Cable Management Clips Step 4: Install Power Adapters and Cable Management Clips (cont.) 10. Once all Power Adapters have been installed, connect them to the closest outlet (this may be a wall outlet or the power pass through on another Power Adapter).
-
Page 20: Step 5: Attach Platform To Mylifters
Platform Installation | Attach Platform to MyLifters Step 5: Attach Platform To MyLifters A. SET HIGH AND LOW POINTS 1. On the “Device Control” screen, press and hold the Manual Lower arrow Program Smart High and Smart Low points for safety and convenience. to let out enough cable to run through the pulley block and back up to B. - Page 21 Platform Installation | Attach Platform to MyLifters Step 5: Attach Platform To MyLifters (cont.) A. SET HIGH AND LOW POINTS 4. Make sure that the cables are as vertical as possible. Angled cables will Program Smart High and Smart Low points for safety and convenience.
Need help?
Do you have a question about the Home Platform Storage Rack 4' x 8' and is the answer not in the manual?
Questions and answers