Advertisement
Getting to Know Your Device
Note:
This guide briefly describes the appearance of the LTE E8372 and the steps for using the LTE E8372. For details about how to set the device and Wi-Fi management parameters, see help information on the device management web page at http://huawei.setup or http://192.168.8.1.
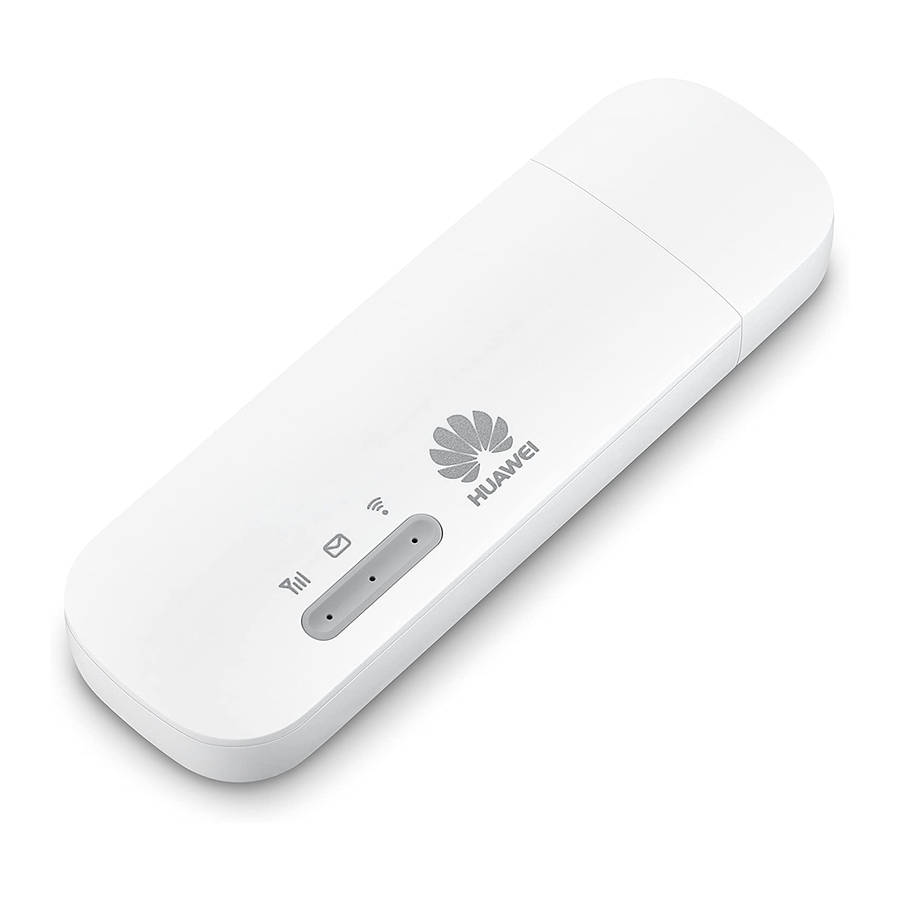
The following figure shows the LTE E8372. The actual product may look different.

- USB connector
Allows the LTE E8372 to connect to a computer or power adapter (not included). - Wi-Fi indicator
Indicates the status of a Wi-Fi network.
- Steady green: The Wi-Fi function is turned on.
- Off: The Wi-Fi function is turned off or the LTE E8372 has been removed.
- SMS indicator
Indicates the status of the SMS inbox. To view SMS messages and manage the inbox go to http://huawei.setup or http://192.168.8.1.
- Steady green: There are unread messages in your inbox.
- Blinking green once every 2 sec: The message storage is full.
- Off: The LTE E8372 is powered off, there are no unread messages.
- 2G/3G/LTE indicator
Indicates the connection status to the Mobile network (connection to the internet).
- Blinking green twice every 2 sec: The LTE E8372 is powered on.
- Blinking green once every 0.2 sec: The software of the LTE E8372 is being upgraded.
- Blinking green once every 2 sec: The LTE E8372 is registered with a 2G network.
- Steady green: The LTE E8372 is connected to a 2G network.
- Blinking blue once every 2 sec: The LTE E8372 is registered with a 3G network.
- Steady blue: The LTE E8372 is connected to a 3G network.
- Blinking cyan once every 2 sec: The LTE E8372 is registered with a LTE network.
- Steady cyan: The LTE E8372 is connected to a 4G/LTE network.
- Off: The LTE E8372 has been removed.
- microSD card slot
microSD card holder for the LTE E8372. - SIM card slot
Subscriber Identity Module (SIM) card holder for the LTE E8372.
Getting Started
- Remove the cover from the LTE E8372 by sliding it off.
Note:
Make note of the SSID and Wi-Fi network key which are printed on the LTE E8372, as shown in the following diagram.

- Insert the SIM card and the microSD card (not included in package) into the corresponding card slot, as shown in the following figure.
- Replace the cover and slide it into place.


Note:
- Ensure that the bevelled edge of the SIM card is properly aligned with that of the SIM card slot.
- Do not remove the SIM card when the device is in use as it may get damaged and result in the data stored on the card becoming corrupted.
- Please only use compatible SIM cards to avoid damage to your LTE E8372 and SIM card.
- The microSD card is an optional accessory and is not included in the package.
- Ensure that microSD card is inserted according to the direction (as labelled on the microSD card slot).
- Do not remove the microSD when the device is in use as it may get damaged and result in the data stored on the card becoming corrupted.
Connection Scenarios
One-device Internet access

Multi-device Internet access using Wi-Fi (connected to a computer)

Multi-device Internet access using Wi-Fi (connected to the power adapter)

Using Your Device with a computer as a USB modem
The procedure for installing the device management software may vary depending on your computer's operating system. The following instructions are specific to Windows 7 OS.
Connecting to a Network
- Connect the LTE E8372 to one of your computer's USB ports.


The drivers are installed automatically in the background.
- When the installation is complete, the LTE E8372's device management web page (http://huawei.setup or http://192.168.8.1) is displayed and the LTE E8372 connects to the LTE network automatically.
Note:
- If the driver installation does not run automatically, find the AutoRun.exe file in the driver path, and double-click the file to run it.
- The default user name and password of the device management web page are admin. It is recommended for security purposes that you change the default password.
- If your SIM card's personal identification number (PIN) verification function is enabled, log in to the device management web page at http://huawei.setup or http://192.168.8.1, enter and save the PIN.
- If you do not wish to use the default access point name (APN), log in to the device management web page at http://huawei.setup or http://192.168.8.1, to configure and save the APN settings.
- If you are not connected to the network, access http://huawei.setup or http://192.168.8.1 to check the device status.
- If you cannot access http://huawei.setup or http://192.168.8.1, disconnect other network connections, such as an Ethernet or Wi-Fi connection, remove and then re-insert the LTE E8372, or restart the computer.
Disconnecting from a Network
Before you remove the LTE E8372, make sure that the data connection has been disconnected
Unplug the LTE E8372 from your computer or disconnect the LTE E8372's data connection through the device management web page at http://huawei.setup or http://192.168.8.1 or the Mobile Wi-Fi application.
Note:
- By default, the LTE E8372 automatically disconnects from the network if no data is transferred within 10 minutes.
- The connection is automatically re-established by accessing the internet.
Using the Device as a Wi-Fi hotspot connected to your computer
To manage your LTE E8372's Wi-Fi functions, login to the device management web page at http://huawei.setup or http://192.168.8.1 to configure the Wi-Fi functions.
Setting Up a Wi-Fi Connection
- Insert LTE E8372 into computer (or power adapter)..
- Ensure that the LTE E8372's Wi-Fi function is on. The Wi-Fi indicator light should be on.
- Search for Wi-Fi from your Wi-Fi device or computer to find the LTE8372's Wi-Fi SSID, as detailed in the "Getting Started" section.
- Select the wireless network connection with the LTE E8372's SSID and click Connect.
- Enter the Wi-Fi Network key as detailed in the "Getting Started" section.
Note:
Before establishing a Wi-Fi connection, ensure that the computer is equipped with a wireless network adapter. If the computer indicates a wireless network connection, the wireless network adapter can be used. Otherwise, verify that your wireless network adapter is working properly. - Wait until a wireless network connection icon is displayed in the lower right corner of the computer screen. A wireless network connection is set up.
Accessing the Internet
You can access the Internet after a connection between your LTE E8372 and Wi-Fi device is set up.
Note:
By default, the LTE E8372 automatically disconnects from the Internet when you are roaming.
Using the Device with a Power Adapter
Connect the LTE E8372 to the power adapter's USB port, and connect the power adapter to a power outlet.

Note:
- The power adapter is not included in the product package. Only use a USB power adapter rated 5V with a minimum output current of 750mA as marked on the power adapter.
- Use of a power adapter not matching the recommended specifications may cause the LTE E8372 to malfunction, fail, or could even cause a fire. Such use voids all warranties, on the product, whether expressed or implied. Please refer to the enclosed warranty card for additional information on your warranty.
Connecting a Game Console through Wi-Fi
Example: PSP
- On the PSP, turn on the WLAN.
- Choose Settings > Network Settings.

- Select Infrastructure Mode.
- Select New Connection, and enter the connection name.

- Select Scan to search for wireless networks. A list of access points will be displayed on the screen.

- Select the access point with the LTE E8372's SSID, and press the
![]() button on the PSP. Confirm the SSID, and enter the correct wireless network encryption key.
button on the PSP. Confirm the SSID, and enter the correct wireless network encryption key.

- Press the
![]() button to proceed to the next step, and then press the X button to save settings.
button to proceed to the next step, and then press the X button to save settings. - Select Test Connection to test whether the network connection is successful.
- You can now open the browser and access the network.


 button on the PSP. Confirm the SSID, and enter the correct wireless network encryption key.
Connecting a Tablet Computer through Wi-Fi
Example: iPad
- Touch Settings > WLAN to turn on WLAN.
- The tablet computer automatically searches for wireless connections and displays a list of access points.
- Select the access point with the LTE E8372's SSID.
- If required, enter the correct wireless network encryption key, and tap Join.
(The lock icon indicates that the encryption key is required to connect to this wireless network.)


Note:
Any Wi-Fi enabled device can access the Internet through the LTE E8372. For specific operations, refer to the Wi-Fi device's user manual.
Viewing Service Information
Visit at http://huawei.setup or http://192.168.8.1 to view your wireless network service information.
Restoring Factory Defaults
If you wish to restore factory settings on your device, you can do so by connecting the LTE E8372 to a computer or a power outlet, and press and hold the RESET button for 2 seconds.
See diagram below:

Note:
Restoring factory defaults deletes all the device's user-defined settings and restores all the settings on the web management page to their defaults.
LTE is a trademark of ETSI.
Documents / ResourcesDownload manual
Here you can download full pdf version of manual, it may contain additional safety instructions, warranty information, FCC rules, etc.
Advertisement


Need help?
Do you have a question about the E8372 and is the answer not in the manual?
Questions and answers