Advertisement
Introduction
STATEMENT
The projector is product grade A,in living Environment, the projector may cause wireless disturbance, maybe users should do something effective to avoid the disturbance.


High brightness lamp!
Avoid staring or directly looking at the light, especially for children.
Tips

- Please wash the anti-dust mesh once a month in order to protect your projector!
- Before using this machine, please remove the protective membrane from the top & bottom cover.
This <GUIDE>offer basic operation, please read the details in<Electronic-directions>from projector software application;
Please read this<GUIDE>carefully before use;
The company reserves the right of final interpretation;
Appearance of the product and the UI please please prevail;
If product technology or software will upgrade, without prior notice.
NOTICE
How to use the projector correctly:
- Do not face to lens by eyes, it will hurt your eyes from hard light of the projector when it's working.
- Do not block the air outlet, to avoid damage from internal electronic device by projector can not cooling.
- Do not use chemicals, cleaner or water to clean, and also avoid rain, moisture and leucocratic liquid to corrode circuit board.
- Please put the projector and accessories on the place that children can not reach.
- Please make sure the projector working environment is dry and windy.
- Do not place projector in too warm or too cold room, the high temperature or low temperature will shorten lifespan of the device. The working environment would be 5℃~35℃ better.
- Do not put the projector in heating equipment(drying machine, microwave oven)to make it dry.
- Do not press hard or put something heavy on the projector, it will damage projector.
- Do not throw, beat, shake projector, it will damage circuit board in it.
- Do not dismounting projector. Please contact after-sales service if you have any problem.
- Do not fix by yourself. If projector can not working normaly, please consult with after-sales service or depot repair.
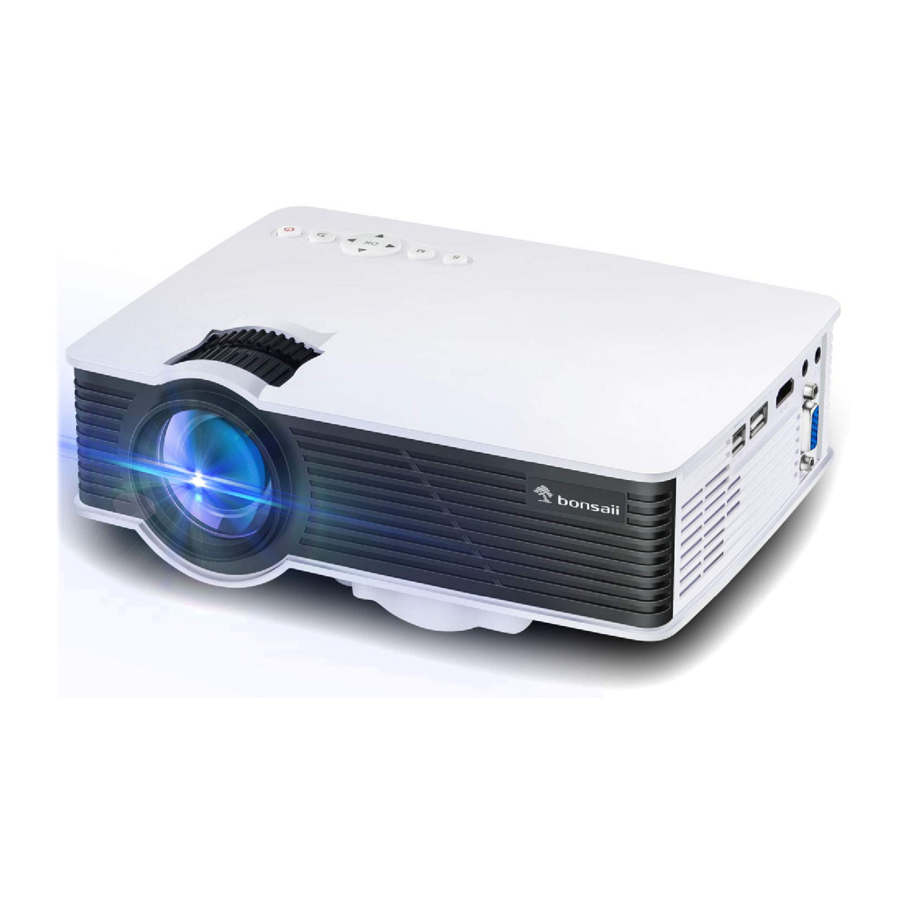
The projector and remote control

Note: please refer to the product appearance, this figure is for reference only.
- Power
- Arrow Keys
- Confirm
- Menu Button
- Signal Source
- Back
- Lens Focussing
- Keystone Correction
- Media Card
- Video HD Input
- Audio, Video Input
- Earphone/3.5mm AUDIO OUT
- 5V Output
- Media Input/Multi-screen interface.
- VGA Input
- Lens 17.Power Input(110-240V)

Projector Operation
- Getting Started
- Projector connect to power by the power line together with the projector.
- According to the front of the projector or the remote control power supply button, start the projector, indicator light becomes green, The projector is working
- Power on/Power off
Press the "power "button on the top of the projector, or the button on the remote control, to turn on or off the projector. - Startup interface
After power on, the boot screen appear, like the picture.

- Keystone Correction
- Vertical keystone correction
- The vertical keystone correction is required when
![]() and
and ![]() below appear during the first installation and use.
below appear during the first installation and use.

- Dial the keystone button left and right to adjust the picture to the quadrangle as shown in
![]() to finish the vertical keystone correction.
to finish the vertical keystone correction.

Note: Please refer to the product appearance, this figure is for reference only.
- The vertical keystone correction is required when
- Horizontal keystone correction

- If the picture is big in the left and small in the right, slightly swing the project to theright to correct the picture.
- Please refer to the picture. It is normal if the project is slightly oblique.
- If the picture is big in the right and small in the left, slightly swing the project to the left to correct the picture.
- Vertical keystone correction
- Image focus
Let projector be perpendicular to wall, with the Focusing button to make the picture clear. When focusing, you can broadcasting programs to help you finsh focus.
![]()
Note: Please refer to the product appearance, this figure is for reference only. - Connecting


 and
and  below appear during the first installation and use.


- Network Multimedia Connect
- Insert the removable storage, Media cards in thecorresponding interface.
- According to the broadcast programs to choose:" photos" "music" "movie".
- Choose the file you want to play, press the key"play pause"to play or pause the file.
- signal source selection
- You can select the signal from the homepage.
- Press the projector front or the remote controlsignal source key "S", enter the signal sourcemenu interface. Use the direction key and theconfirmation key to select the signal source.
- AV video equipment connecting
- Use the 3in 1video tieline comes with projector to connect with AV.
- Choose the media signal channel:"AV".
- HDMI device connection
- HDMI interface can be connected to the HDMI output interface equipment.
- Select the corresponding signal channel: "HDMI".
- 3.5mm audio equipment connecting
Support 3.5mm earphones and other cable soundequipment. - other connections
Could charge the mobile phone and ipad by 5V power.
Multi-screen for Android phone
- System requirements
| Phone | Android 4.2 model with 1GB RAM |
| Resolution | WVGA~1080P |
| Storage | At least 40MB free space needed |
- Device connection
- Select "Miracast" and press "OK" to ente miracast interface.

- Find Multi-screen/Miracast setting/software on the phone, select and connect to the Projector name shown on the projector interface. Then your phone content will be mirrored to big screen by the projector. (Note: Miracast setting and display name will differ for different phones, such as Multi-screen and Wireless Display. Pls refer to your phone for details.)

- Select "Miracast" and press "OK" to ente miracast interface.


Multi-screen for iPhone
- System requirements
| ios | ios 7 and above |
| Device | All iPhone model after iPhone 4 |
| All iPad model after iPad2 | |
| All iPod touch after iPod touch 4th generation | |
| Resolution Supported | iPhone: 480*320~1136*640 |
| iPad: 1024*768~2048*1536 | |
| Storage | At least 40MB free space needed |
- Airplay for iPhone
- Open setting menu of the phone, turn on WiFi, and connect to a certain WiFi SSID.
- Connect the projector to the same WiFi SSID which is connected by the phone. Enter "setting", select "Network Setup", Search for the same WiFi SSID and connect it.
- Select "Airplay" and press "OK" to enter IOS wireless connection interface.

- Slide from the bottom of iPhone, click on Air-Play Mirroring, and select the SSID to connect for multi-screen sharing.


Wirecast
- Select " Wirecast" and press "OK" to enter Wirecast interface.

- Connect the phone to the projector with a data cable.
IPhone: Click "Allow"or "OK" to start multi-screen sharing.

Android Mobile: When using the mobile phone for the first time, the following interface will be called up to install "byteflymirror" according to the prompts. Interact with the screen.


Maintenance and Simple Troubleshooting of Projector
Smart projector is a high-tech product integrating precision optics, electronics and machinery. The improper maintenance of the projector during the daily use will affect its service life and effects.
For the maintenance, important attention shall be paid to:
- Dust prevention: Excessive dust will affect the heat dissipation of the projector due to environmental impact. It is suggested to clean its dust filter for one and half months according to the actual environment.
- Ventilation: As the projector integrates the sound & photo-electricity, the optical source will produce heat during its operation. Therefore, during the installation and use, it shall be ensured that no objects around will block the air inlet and outlet of the projector as the heat dissipation depends on cold air convection to improve it working stability and service life.
- Lens maintenance: Lens, as the core component of the projector, is directly related to the picture definition and effect. The excessive dust thereon will affect image quality. The dirty lens shall be wiped with soft cotton cloth for the glass lens surface. Hard cloth or abrasives shall not be used.
- Cleaning: Excessive dust on the projector surface shall be cleaned in a timely manner, as it will affect the heat dissipation.
- Moisture protection: The projector is vulnerable to the damp air. Its operating humidity is about 45%-60%. The too damp air will affect its working stability.
- Vibration prevention: The projector shall be strictly protected from strong impact, extrusion and vibration. Try not to move and knock the projector during its normal operation, which will cause the internal circuit faults.
- The projector shall not be installed on the unstable, shaking and uneven desk.
- The container with liquid shall not be placed on the projector.
- The power shall be switched off or the power cord shall be unplugged when not in use.
Please visit www.bonsaiishop.com to register for your warranty.
Simple Troubleshooting
| Faults | Troubleshooting |
| Power failure | Check whether the power cord is plugged in place and the switch is on |
| The Indicator light is on but can not open projector | Check whether the power cord is plugged in place and switch is on |
| No signal | If the signal source channel is selected correctly, please refer to the signal input port of the projector |
| Screen interaction not work |
|
| Can not play online | Check the mobile and wifi connection |
Warm Tips: When connected to projector via Android phone, no matter with or without USB Cable, there will be no sound from projector, sound will be only from Android phone. Please refer to Point 5 - 5.EZMirror( Screen Mirroring Interactive for Android mobile phone) in user manual if you want the sound directly from the projector. Thank you!
VideosBonsaii PJ8003 Review Video
Documents / Resources
References
Download manual
Here you can download full pdf version of manual, it may contain additional safety instructions, warranty information, FCC rules, etc.
Advertisement
Need help?
Do you have a question about the PJ8003 and is the answer not in the manual?
Questions and answers