
Related Manuals for Butterfly M21


Summary of Contents for Butterfly M21
- Page 1 Instruksi Manual Mesin Jahit Multifungsi Rumah Tangga M21 IMPORTIR : PT BAHTERA TUNAS FAJAR JL. GANG TENGAH NO. 76 SEMARANG No. Pendaftaran Manual dan Kartu Garansi IMKG.1266.06.2022 HD2021116...
-
Page 2: Table Of Contents
Halaman Overview/Safety Instructions/ Ikhtisar/Petunjuk Keselamatan ............3 Device part/ Bagian perangkat.......................7 Power switch/plug/machine specifications/ Sakelar daya/steker/ spesifikasi mesin…............................8 Foot control/ Kontrol kaki ....................... 10 Needle guard and mobile phone holder/ Pelindung jarum dan dudukan ponsel…..........................12 Sewing pattern selection/ Pemilihan pola jahit................14 speed adjustment switch/ sakelar penyesuaian kecepatan. -
Page 3: Overview/Safety Instructions/ Ikhtisar/Petunjuk Keselamatan
Overview/ Ringkasan RRRRRingkasan Thank you for buying the Butterfly household multipurpose sewing machine;before using the machine, please read the manual carefully to operate various functions correctly; after reading this manual, please keep it properly for future reference! Terima kasih telah membeli mesin jahit serbaguna rumah tangga Butterfly, sebelum menggunakan mesin, harap baca manual dengan seksama untuk mengoperasikan berbagai fungsi dengan benar;... - Page 4 3 Electrical Hazard: • The unit should be connected to an AC power source within the range indicated on the nameplate. Do not connect to DC power or frequency converter. If you are unsure of your power source type, please contact a professional electrical technician. 3 Bahaya Listrik:...
- Page 5 6 Special attention should be paid when sewing: • Be sure to pay attention to the needle. Do not use bent or damaged needles • Do not touch any moving parts with your fingers. Be especially careful near the needle. •...
- Page 6 The contents of this manual and the specifications of this product are subject to change without notice. For more detailed product information or upgrades, please visit our website https://butterfly-indonesia.com Gunakan unit ini hanya untuk tujuan yang ditentukan dalam manual ini. Gunakan hanya aksesori yang direkomendasikan oleh pabrikan dalam manual ini.
-
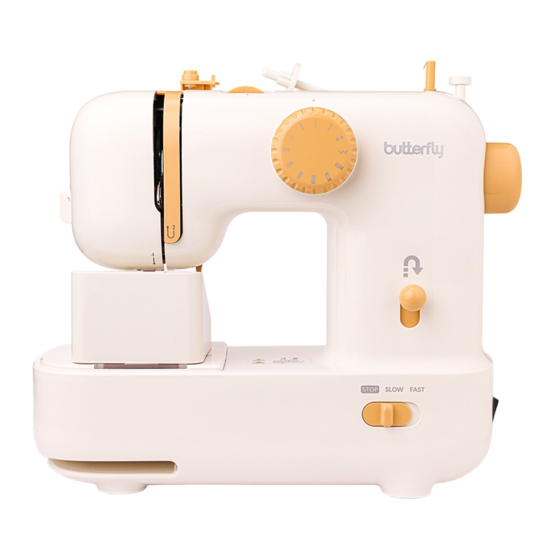
Page 7: Device Part/ Bagian Perangkat
1. Main parts and accessories name/Bagian utama dan nama aksesori 1. 1 . 主要部件及附件名称 主 要 部件及附件名称 Upper line Upper thread bracket Small wire tension dial clamp Winder Winding wheel Thread guide Pattern Adjustment Dial Handwheel Thread cutter Reverse Presser foot lever lifter Needle plate... -
Page 8: Power Switch/Plug/Machine Specifications/ Sakelar Daya/Steker/ Spesifikasi Mesin
2. Power switch/plug/machine specifications/ Sakelar daya/steker/spesifikasi SakelaSakdaya/steker/spesifikasi mesidaya/steker/spesifikasi mesin mesin 2.1 Power switch/plug Sakelar/colokan listrik Warn! If the AC adapter power cable is ruptured, replace it with a new one. Otherwise, it will cause electric leakage or machine fire. Memperingatkan! Jika kabel daya adaptor AC putus, ganti dengan yang baru. - Page 9 2.1 Insert the AC adapter plug into power jack. 2.2 Insert the plug of the AC adapter into the 220V power socket to ensure that the AC adapter is powered on. 2.3 Then turn ON the power switch (ON) to "1". 2.1 Masukkan steker adaptor AC ke colokan listrik.
-
Page 10: Foot Control/ Kontrol Kaki
3.Foot control / Kontrol kaki Warn! If the AC adapter power cable is ruptured, replace it with a new one. Otherwise, it will cause electric leakage or machine fire. Memperingatkan! Jika kabel daya adaptor AC putus, ganti dengan yang baru. Jika tidak, akan menyebabkan kebocoran listrik atau kebakaran mesin. - Page 11 2.1 Press the "power switch" on the "0" side, the power is turned off. 2.2 Insert the "foot control plug" into the corresponding jack in the picture above; insert the "AC adapter plug" into the corresponding jack in the picture above. 2.3 Insert the "AC adapter"...
-
Page 12: Dudukan Ponsel
4.Needle guard/mobile phone bracket/Pelindung jarum /dudukan ponsel 4.1 When the machine is not in use, you can put the needle guard in front of the needle to prevent children from touching the needle and accidentally hurting their hands. The specific installation method is as follows: 4.1 Saat mesin tidak digunakan, Anda dapat meletakkan pelindung jarum di depan jarum untuk mencegah anak-anak menyentuh jarum dan melukai tangan mereka secara tidak sengaja. - Page 13 4.2 When the machine is not in use or is being used, the needle guard can be used as a mobile phone holder, which is convenient for placing mobile phones. As shown below 4.2 Saat mesin tidak digunakan atau sedang digunakan, pelindung jarum dapat digunakan sebagai dudukan ponsel, yang nyaman untuk meletakkan ponsel.
-
Page 14: Sewing Pattern Selection/ Pemilihan Pola Jahit
5. Selection of sewing patterns/Pemilihan pola menjahit 1. Please pay attention to the needle to avoid bumping your hands. Attention! 2. When the machine is sewing, do not switch patterns.。 Perhatian! 1. Harap perhatikan jarum untuk menghindari menabrak tangan Anda. 2. -
Page 15: Speed Adjustment Switch/ Sakelar Penyesuaian Kecepatan
6. Use of the speed adjustment switch/Penggunaan sakelar penyesuaian kecepatan Turn the speed adjustment switch to the "SLOW" or SLOW FAST "FAST" position;The machine will run and start sewing. Putar sakelar penyetel kecepatan ke posisi "SLOW" atau "FAST"; Mesin akan bekerja dan mulai menjahit. -
Page 16: Sepatu Penindas
7. Presser foot function and loading and unloading/Fungsi Presser foot dan bongkar muat 7. 1 Using the presser foot function Menggunakan fungsi kaki penindas Attention! perhatian! When operating, please pay attention to the needle to avoid bruising your hands. Saat mengoperasikan, harap perhatikan jarum untuk menghindari memar pada tangan Anda. - Page 17 Putar handwheel berlawanan arah jarum jam terlebih dahulu sehingga jarum berada pada posisi tertinggi. Tarik "tuas kaki tekan" untuk menaikkan kelompok kaki tekan. Tekan "tombol hitam" di bagian belakang dudukan kaki, dan "penahan kaki penindas" akan terpisah dari "kelompok kaki penindas" 7.
- Page 18 Attention ! 7.4 Presser Foot Holder Removal and Installation Perhatian ! 1.To do this, you need to set the power switch to 4 Pelepasan dan Pemasangan "off" first。 2.When operating, please pay attention to the Dudukan Kaki Presser needle to avoid bruising your hands 1.Untuk melakukan ini, Anda perlu mengatur sakelar daya ke "mati"...
- Page 19 Attention ! Perhatian ! 7.5 Removing and installing the bobbin 1. To do this, you need to set the power switch to "off" first。 Melepas dan memasang bobbin 2.When operating, please pay attention to the needle to avoid Lift the needle 1.
-
Page 20: Use Of The Winder/ Penggunaan Penggulung
8. Use of the winder/ Penggunaan penggulung Attention ! Perhatian ! 1.To do this, you need to set the power switch to "off" first。 2.When operating, please pay attention to the needle to avoid bruising your hands 1. Untuk melakukan ini, Anda perlu mengatur sakelar daya ke "mati"... - Page 21 Setelah memutar beberapa kali, putar sakelar Tekan sakelar penyesuaian kecepatan kontrol kecepatan ke "STOP" untuk memotong "STOP", potong benang dengan gunting, kelebihan benang di ujung atas, dan kemudian dorong bobbin ke kiri untuk buat penggulung putar sakelar kecepatan ke "CEPAT (cepat) untuk meninggalkan sumbat, lalu keluarkan kumparan melanjutkan berliku sampai 80% penuh, sekitar ke atas.
-
Page 22: Bobbin Thread Installation/ Pemasangan Benang Bobbin
9. Installation of the lower thread bobbin/ Pemasangan bobbin ulir bawah Attention ! Perhatian ! 1.To do this, you need to set the power switch to "off" first。 2.When operating, please pay attention to the needle to avoid bruising your hands 1.Untuk melakukan ini, Anda perlu mengatur sakelar daya ke "mati"... -
Page 23: Threading The Machine/Mengulir Mesin
10. Threading the machine/Mengulir mesin Attention !/ Perhatian ! 1. To do this, you need to set the power switch to "off" first。 2.When operating, please pay attention to the needle to avoid bruising your hands 1. Untuk melakukan ini, Anda perlu mengatur sakelar daya ke "mati"... -
Page 24: Draw Up Bottom Thread/ Buat Garis Bawah
front front 7.Insert from the back of the pinhole with a threading device; The threading device will draw the thread from the front side of the pinhole (the front side of the sewing machine) to the back side of the pinhole (the back side of the sewing machine). 7. - Page 25 3. Tarik gulungan dengan jari Anda untuk menemukan garis bawah; Masukkan garis atas melalui celah di depan sepatu penindas, dan tarik keluar garis atas dan garis bawah masing-masing 10 cm. Digambarkan di atas; Kemudian angkat tuas penekan, dan persiapkan untuk langkah menjahit selanjutnya.
-
Page 26: Sewing/ Menjahit
12. Sewing/ Jahit Attention !/ Perhatian ! 1. When operating the machine, please pay attention to the position of the needle and do not touch it with your hands。 Any moving parts, such as needles and handwheels, that could otherwise cause injury. 2.When sewing, do not pull the cloth too hard, otherwise it will lead to bending or broken needle. -
Page 27: Reverse Sewing/ Jahit Terbalik
4. Gerakkan tuas sepatu penindas bawah dan turunkan sepatu penindas, Anda dapat menjahit beberapa jahitan dengan tangan terlebih dahulu untuk memeriksa apakah ada kesalahan seperti threading. Ketika tidak kesalahan, mesin jahit dapat dihidupkan. 5.Tekan sakelar daya ke sisi "1" (aktif) untuk menghidupkan mesin, dan atur sakelar penyetelan kecepatan ke "SLOW"... -
Page 28: Upper Thread Tension Adjustment/ Penyesuaian Tegangan Ulir Atas
14. Upper thread tension adjustment/ Penyesuaian tegangan ulir atas The knob here is the tension adjustment For the correct tension, the intersection knob.The basic upper thread tension of the of the top and bottom threads is in the machine is set to 4,and the user can adjust it middle of the cloth. -
Page 29: Selection Of Thread And Needle/ Pemilihan Benang Dan Jarum
When sewing serrated patterns, the upper thread tension is usually lower than the tension of straight sewing, and the sewing effect is better. Saat menjahit pola bergerigi, tegangan benang atas biasanya lebih rendah daripada tegangan jahitan lurus, dan efek menjahitnya lebih baik 15. -
Page 30: Sewing Method Of Thick Material/ Metode Menjahit Bahan Tebal
Jika jahitan mencapai sudut kain, harap HENTIKAN mesin jahit, putar sakelar pengatur kecepatan ke "STOP", pertahankan jarum pada posisi jarum berikutnya (jarum di dalam kain). Angkat tuas sepatu penindas, lalu putar kain (putar kain dengan jarum sebagai poros tengah) ke posisi yang tepat sesuai kebutuhan. -
Page 31: Blind Seam Sewing Method/ Metode Menjahit Jahitan Buta
18. Blind needle sewing method/ Metode menjahit jarum buta Suitable for frills such as curtains, pants, skirts...etc. Cocok untuk embel-embel seperti gorden, celana, rok...dll. Blind seam hem before the preparation work, install the presser foot; Choose good patterns. Ujung jahitan buta sebelum pekerjaan persiapan, pasang sepatu penindas; Pilih pola yang bagus. The sewing method is as follows: Cara menjahitnya adalah sebagai berikut: Fold the fabric so the back is facing up as shown. - Page 32 Place the fabric at the foot of the press and turn the handwheel in your direction until he needle drops to its lowest point and the left toe of the stitch must be sewn right into the folded fabri. Tempatkan kain di kaki mesin pres dan putar roda tangan ke arah Anda sampai jarum turun ke titik terendah dan ujung kiri jahitan harus dijahit tepat ke kain yang terlipat.
-
Page 33: Buttonhole Sewing Method/ Metode Menjahit Lubang Kancing
19.Buttonhole sewing/ Jahit lubang kancing Attention ! Perhatian ! To do this, you need to set the power switch to "off" first。 When operating, please pay attention to the needle to avoid bruising your hands 1. Untuk melakukan ini, Anda perlu mengatur sakelar daya ke "mati" terlebih dahulu。 2. - Page 34 To start sewing, follow these steps: 4.1 Turn the pattern adjustment plate, select "button hole pattern 1", pinch the top thread, start the sewing machine to start sewing, from the beginning to the end of sewing, stop the sewing machine, cut the top thread. 4.2 Turn the pattern adjustment dial, select "Buttonhole pattern 2", start the sewing machine to sew 5~6 stitches, end the sewing, and turn off the sewing machine.
-
Page 35: Sewing Of Cuffs And Pant Legs/ Jahit Manset Dan Kaki Celana
Attention ! Positioning the needle seam ripper Perhatian ! When operating, please pay attention to the seam ripper to avoid bumping your hands. Saat mengoperasikan, harap perhatikan ripper jahitan agar tangan Anda tidak terbentur. 6. Insert a positioning needle along a fixed stitch at the end of the buttonhole stitch to prevent the stitches from being cut;... -
Page 36: Replace The Needle/ Ganti Jarum
Attention ! perhatian ! 1.Remove the AC adapter from the outlet. 2.When operating, please pay attention to the needle to avoid bruising your hands 1. Lepaskan adaptor AC dari stopkontak. 2. Saat beroperasi, harap perhatikan jarum untuk menghindari memar di tangan Anda 1.Turn the handwheel counterclockwise first 2. -
Page 37: Daily Maintenance/ Perawatan Harian
Attention ! 2.When operating, please pay attention to the needle to avoid Perhatian ! 22. perawatan harian 1.Untuk melakukan ini, Anda perlu mengatur sakelar daya ke perawatan harian "mati" terlebih dahulu Saat beroperasi, harap perhatikan jarum untuk menghindari memar tangan Anda. bobbin holder Before the Bobbin... -
Page 38: Faults And Solutions/ Kesalahan Dan Solusi
If the sewing machine is not functioning properly, please check the following possible problems before requesting service; most problems can be solved by yourself. If the problem is still not resolved, please contact an authorized Butterfly brand home sewing machine dealer or technical service center. - Page 39 The upper line and the bottom line shall The upper and lower threads used be of the same quality are very different from the fabric Benang atas dan bawah digunakan sangat berbeda dari kain Garis atas dan garis bawah harus memiliki kualitas yang sama Confirm the machine threading steps, and re-thread the The path of the upprt line is incorrect machine...
Need help?
Do you have a question about the M21 and is the answer not in the manual?
Questions and answers