Table of Contents
Advertisement
Quick Links
Advertisement
Table of Contents
Troubleshooting

Related Manuals for AutoFarm Viper Pro

Summary of Contents for AutoFarm Viper Pro
- Page 1 Installation & Operation Manual AutoFarm Viper Pro™...
-
Page 3: Table Of Contents
Viper Pro Console ........................1 Viper Pro Features ......................2 Optional Features ........................ 3 Roof Module ..........................3 The Viper Pro User Interface ..................... 4 Front Panel ..........................5 File Transfer ........................5 Rear Panel ..........................6 Required System Setup ...................... - Page 4 Resetting the Tally Registers ..................... 48 Setting or Resetting Distance and Individual Nodes ............49 Alarms ............................. 50 Chapter 4 Navigating the Viper Pro Interface ........53 Main Screen Features ......................53 Profile ..........................54 Current Heading ........................ 55 Speed ..........................
- Page 5 Console Comm Port Setup ....................91 Auxiliary Comm Port Setup ....................92 Weather Module Setup ...................... 92 NEMA Output ........................92 Configuring Viper Pro for Lightbar Guidance ................92 Boom and Implement Setup ....................95 Implement Setup ....................... 95 Multi-Section Implement or Boom Setup ................
- Page 6 Create Map From Field Boundary Method ..............130 Changing Spray/No-Spray Default Colors ............... 130 AccuBoom™ Spray/No-Spray Maps ................130 How to Create a Spray/No-Spray Map ................131 Chapter 8 Using AutoBoom™............. 133 AutoBoom™ Status Display ....................134 ® AutoFarm Viper Pro™ Operation Manual...
- Page 7 Table of Contents Chapter 9 Viper Pro Guidance ............135 Guidance Views ........................135 Swathing Patterns ......................... 136 Setting the Straight A-B Line Pattern ................136 Set B by Heading ......................137 Setting the Fixed Contour Pattern ................... 138 Setting the Last Pass Pattern ..................
- Page 8 To Edit an Rbin Report ....................172 Reset History ........................174 To Reset the Edit History ....................174 Chapter 12 Troubleshooting the Viper Pro ......... 177 Viper Pro Troubleshooting Information .................. 177 General Issues ........................ 177 Setup Issues ........................178 Job Issues ........................
- Page 9 Appendix F Calculating Calibrations for Liquid and Granular Applications ................ 199 Appendix G Testing Extension Cables ..........203 Appendix H Updating CAN Nodes on the Viper Pro Console....207 Appendix I Using the Front Panel Program with the Viper Pro System ..............211 Appendix J Controlling Spinner RPM ...........
- Page 10 Table of Contents ® viii AutoFarm Viper Pro™ Operation Manual...
-
Page 11: Introduction
The navigation feature has several different swathing patterns, including Straight A-B, Fixed Contour, Last Pass, and Pivot. The Viper Pro can also control an external Raven lightbar. Refer to Chapter 9, Viper Pro Guidance, for more detailed operation information. -
Page 12: Viper Pro Features
A real-time, as-applied map is displayed on-screen while application and scouting information is logged and saved by the Viper Pro. This “Job” information can then be transferred to a USB flash drive, copied to a home or office PC, and used to create printed reports and coverage maps. -
Page 13: Optional Features
Please see Chapter 7, Using AccuBoom™, or Chapter 8, Using AutoBoom™, for more information on using these features with the Viper Pro console. The Viper Pro is also capable of integrating into many Raven CANbus control systems or with Raven standard serial interface control consoles. -
Page 14: The Viper Pro User Interface
Chapter 1 The Viper Pro User Interface The following sections offer an overview of the user interface features of the Viper Pro console. Active Matrix Transflective Touch Screen The Active Matrix Transflective touch screen allows screen visibility through a wide range of lighting conditions and even in direct sunlight while the touch screen functionality places menus, options, and features literally at the operator’s finger tips. -
Page 15: Front Panel
Make sure to properly close any open jobs before shutting down the console. A USB Port is conveniently located on the front of the Viper Pro console. Insert a USB flash drive into this port to transfer compatible Viper Pro files. Note: The USB flash drive must be formatted with the Viper Pro file structure. -
Page 16: Rear Panel
Rear Panel The following is a brief introduction to the ports and connectors available on the back of the Viper Pro console. The rear panel offers additional USB Ports as well as an ethernet port for connecting to the AutoFarm Paradyme™... -
Page 17: Required System Setup
Tuning may be required, depending on vehicle type. Product Control Setup Steps Setup the Viper Pro control system for your specific application and vehicle. Refer to Chapter 3, CAN (Controller Area Network) Setup, to verify the following settings prior to starting an actual application:... -
Page 18: Viper Pro Care And Use
Apply the cleaner to the cloth and then wipe the screen gently. • Do not use any type of pointed or sharp instrument on the Viper Pro touch screen. Only your fingertip or approved stylus should be used when interfacing with the console. -
Page 19: Installation, Start Up & Registration
C h a p t e r 2 & Registration Overview of the Installation Process The following sections are intended as an overview of the Viper Pro installation process. These instructions cover basic installation of the Viper Pro console and supplied components and cabling. Note: For instructions on installing additional hardware with your Viper Pro, refer to instructions provided with the additional or optional component(s). -
Page 20: Mounting And Installation
CAN Node, Single Product 063-0172-373 Note: If the Viper Pro will be providing product control through a CANbus system, a boom sense/speed node (P/N 063-0172-272) and at least one single product node (P/N 063-0172-373) must be connected to the CANbus. -
Page 21: Start Up
Once installation of the Viper Pro precision application management system has been completed and verified, the console may be powered up. To start up the Viper Pro: Press the power button on the Viper Pro console. The console will take approximately 2 minutes to power Manual No. 016-0171-365... - Page 22 This prompt is displayed for approximately five seconds and may be ignored to display the Program Selection Menu as normal. The Program Selection Menu will display if the Viper Pro was powered off at this screen the last time the console was on.
-
Page 23: Touch Screen Calibration Wizard
Select the Sprayer/Spreader option to launch the Viper Pro precision application management system. If the Viper Pro is set as the CAN Controller, the Viper Pro will attempt to establish communication with the CANbus system. The CAN Initialization Results screen displays the results of CANbus detection. -
Page 24: Registering Your Viper Pro System
Registering Your Viper Pro System The Viper Pro must be registered if an optional feature activation key such as the Multi-Product VRA (P/N 077- 0171-152) or Weather Station (P/N 077-0180-030) will be activated. Activation keys are specific to each Viper Pro console. -
Page 25: To Register Your Viper Pro
On the main screen, touch the Menu button. Select Setup then Reg. Keys to display the Validation Data screen. Write down the Machine ID and Validation Code from your Viper Pro console on the Registration Code sheet; an example is shown below. - Page 26 Press the Next button. The Key 1 screen displays. This is the screen on which the Activation Key Code will be entered. Do not navigate away from this screen. On your home or office computer, go to the Raven Precision web site at www.ravenprecision.com/us/Support/productRegistration.jsp and click the link to register Viper products. Viper Pro™ ParaDyme™ Operation Manual...
- Page 27 Installation, Start Up & Registration Fill in the requested information and then click Submit. The Registration Code screen displays. Fill in the Machine ID, Validation Code, and Registration Code from the Registration Code sheet. click the Submit button. Manual No. 016-0171-365...
- Page 28 Note: Print this page and save it for your records. Back on the ‘Key 1’ screen on the Viper Pro console, use the on-screen keyboard to enter the Activation Key received from the Raven Precision web site (see step 8).
-
Page 29: Can (Controller Area Network) Setup
CAN systems allow products to be added to a control system at any time. Five product control nodes can be connected to the Viper Pro control system for any combination of liquid, granular, chemical injection, or spinner control applications. -
Page 30: Best Installation Practices
Wiring Power to a CANbus System Wiring power to the Viper Pro console and the CAN nodes is especially important for proper operation of the system. Many issues in CAN systems can be traced to improper wiring of power and ground. Review the following items and refer to Figure 1, “CAN Node Wiring Diagram,”... - Page 31 CAN (Controller Area Network) Setup CAN Node Wiring Diagram FIGURE 1. Manual No. 016-0171-365...
-
Page 32: Can Node Off-Line Errors
Adding Nodes to the CAN System You can add up to five products to the Viper Pro CAN system plus AccuBoom, and/or AutoBoom. The minimum nodes Viper Pro requires for CAN product control are the boom/speed node, or combo node, and one product node. -
Page 33: Detecting Canbus Nodes
CAN (Controller Area Network) Setup Detecting CANbus Nodes The Viper Pro console must be able to communicate with the CANbus system to make sure product is being applied correctly. Viper Pro should automatically establish communication with the boom/speed node and all product nodes connected to the CANbus. -
Page 34: Re-Addressing Product Nodes
When the CAN Initialization Results screen appears and if all of your CAN nodes are ‘Found’, press Start Viper. If the product nodes are still not found, touch the Retry CAN Init. button to allow Viper Pro to retry the CANbus detection. If nodes are still not found, the product nodes must be re-addressed. See the following procedure for Re-Addressing Product Nodes. -
Page 35: Programming Nodes On The Canbus System
Note: If the Viper Pro is set up as the CAN controller, the boom sense/speed node, and at least one product control node must be programmed to allow the Viper Pro to control application of a product during a field application. -
Page 36: Boom Cals
Touch inside the Boom Cals area on the CAN Controller Status Screen to display the Boom Select screen. The Boom Select screen is used to assign enabled products to the configured boom or implement sections. Place a check mark in the corresponding product column to assign that product to a boom section. Viper Pro™ ParaDyme™ Operation Manual... -
Page 37: Miscellaneous Settings Area
CAN (Controller Area Network) Setup Miscellaneous Settings Area The following readings and settings are displayed in the Miscellaneous area: • Speed Sensor • Speed Cal • Self Test • Fan/Pump RPM (Display only) • Speed (Display only) • Units The Miscellaneous area on the CAN Controller Status screen displays an overview of the selections and settings accessible by touching within the Miscellaneous area. -
Page 38: Miscellaneous Settings Screen
Set the speed sensor selection for the type of speed sensor connected to the Viper Pro.Use the Wheel option if a magnetic type, such as a wheel magnet or drive shaft magnet, system is used with the Viper Pro. Set the speed sensor setting to the Radar option if a radar or GPS unit is sending speed information to the Viper Pro. - Page 39 CAN (Controller Area Network) Setup Using the Calibration Assistance: Touch within the Product Control area on the main screen. Touch within the Miscellaneous Settings area on the CAN Controller Status screen. The Miscellaneous Settings screen will display. Press the Calibration Assistance button on the Miscellaneous Settings screen.The Speed Calibration screen will appear.
- Page 40 Press No to discard the calculated speed cal and continue using the existing value. To verify the calculated value: Press OK on the Miscellaneous Settings screen to return to the CAN Controller Status screen. Touch the Tally Registers button at the bottom of the screen. Viper Pro™ ParaDyme™ Operation Manual...
-
Page 41: Node Version Information
If no AccuBoom node is installed, ensure “Combo” is selected. Audible Alarms Viper Pro can sound a five second alarm tone whenever a CAN alert condition is encountered (i.e. low tank or bin, zero speed, etc. Audible Alarms are enabled by default. -
Page 42: Data Box 1
The selected product control node appears with a check mark in the corresponding radio button. To switch the selected node, touch the radio button for the desired product node. Touch within Data Box 1 to view the first Settings screen for the selected node. Viper Pro™ ParaDyme™ Operation Manual... -
Page 43: Node Settings Screen
Use the Off Rate % to set the allowable difference between the actual and target application rates. If a non- zero value is entered for this setting and the Off Rate % is exceeded for longer than five seconds, the Viper Pro will display an off rate alarm. -
Page 44: Node Settings Screen
The Vacuum/Bin Alarm must be disabled during non-injection liquid applications. The Vacuum Alarm option may be used when an injection pump is connected to the Viper Pro via a CAN Product Control node capable of controlling an injection product. Enable the Vacuum Alarm to allow Viper Pro to display an alert if the injection pump cannot draw product from the nurse tank. - Page 45 With the Display Smoothing feature enabled, the target rate displays as the R (actual rate applied) on the Viper Pro main screen as long as the target rate is within 10% of the actual application rate. The actual rate displays if the vehicle does not reach the deadband within 10 seconds.
-
Page 46: Data Box 2
2. To access settings for the other values displayed in Data Box 2, touch within this area. Area/Hour Displays the area per hour of product application. This is a display only. Vol/Min Displays the volume per minute of product application. This is a display only. Viper Pro™ ParaDyme™ Operation Manual... -
Page 47: Node Settings Screen
Box 2. See the Application Area section on page 46 for information about setting the type of product application. For liquid product application, the meter cal must be entered to calibrate the Viper Pro to the specific flow meter used to measure product application. The meter cal value is typically found on the flow meter. - Page 48 Press OK to continue the Spreader Calibration wizard. Note: The Viper Pro uses the currently entered product density and spreader constant when performing the Calibration Assistance wizard. Raven recommends setting any known values prior to beginning the Calibration Assistance wizard to ensure accuracy of the Viper Pro system.
- Page 49 If you are going to weigh the amount of product dumped, enter zero in the start weight. Press the Dump Product button. The Viper Pro will display the Product Dump Warning prompt. WARNING Product will be expelled when the OK button is selected.
- Page 50 Press Yes to accept the new spreader constant or No to discard the calculated spreader constant. Note: Raven recommends performing the Spreader Constant Calibration Assistance wizard again to verify the spreader constant. Viper Pro™ ParaDyme™ Operation Manual...
-
Page 51: Node Settings Screen
CAN (Controller Area Network) Setup Node Settings Screen (Page 2) Touch within Data Box 2 and then select the Next button on the first Node Settings screen to access the following settings. Valve Cal Enter the appropriate valve cal value for the valve used to turn product application on or off. Raven recommends using the following initial values for the valve cal. - Page 52 For liquid systems, use the up or down arrows to adjust the valve until either pressure is observed or the minimum desired pressure is achieved. For granular systems, use the up or down arrows to adjust the belt speed until either the belt just begins to move or just stops. Viper Pro™ ParaDyme™ Operation Manual...
- Page 53 CAN (Controller Area Network) Setup Note: You can increase or decrease the step sizes for the up arrow and down arrow buttons by either selecting 1 or 10 for the step size. If an electronic pressure transducer is not installed, a manual gauge must be used to calibrate the Min and Max PW.
-
Page 54: Node Settings Screen
A Value of zero must be entered if a Fast Close or PWM Close valve is used as the control valve or when the Valve Type is programmed as a standard valve with an injection system. Viper Pro™ ParaDyme™ Operation Manual... -
Page 55: Pressure Area
The Viper Pro is capable of monitoring pressure from two separate pressure transducers. Dual Pressure Pressures monitored by the Viper Pro, via electronic pressure transducers, are displayed as P1 (Pressure Transducer 1) and P2 (Pressure Transducer 2) on the Viper Pro. -
Page 56: Application Area
Application Area The Application Area displays the current settings for the application and valve type. The application and valve type may be different for each product node in the Viper Pro CAN Control system. To modify settings for the selected node: Touch within the Application Area on the CAN Controller Status screen. -
Page 57: Valve Type
CAN (Controller Area Network) Setup Valve Type The following valves are commonly used: Valve Type Description Select this type when using a standard valve. This is a butterfly-type valve used in liquid applications. The valve stays at the current setting Standard when the control signal is removed. -
Page 58: Tally Registers
Tally Registers The Viper Pro may be used to keep track of various totals over the course of a field application, or over the course of a year. To view or reset these totals, touch the Tally Registers button at the bottom of the CAN Controller Status screen. -
Page 59: Setting Or Resetting Distance And Individual Nodes
Using the on-screen keyboard, enter the desired values for Miles and Feet in the appropriate fields. Press Set. To reset the Odometer, press the Reset button. The Viper Pro odometer is reset to zero. Press Next. The Node 1 screen displays. -
Page 60: Alarms
Chapter 3 Alarms The Viper Pro displays various alarms depending upon the conditions programmed into the console. Specific warning boxes display when the conditions for the alarm are met. In addition to the warning boxes, the Product Control area of the main screen displays a ‘Warning’ symbol instead of the ‘Thumbs Up’ symbol. - Page 61 CAN (Controller Area Network) Setup The following table discusses the alarms and the conditions that will set off the alarm. Alarm Condition This alarm activates when the actual application rate differs from the specified percentage rate for more than five seconds, This alarm Off Rate activates only when the system is in Auto mode.
- Page 62 Chapter 3 Viper Pro™ ParaDyme™ Operation Manual...
-
Page 63: Navigating The Viper Pro Interface
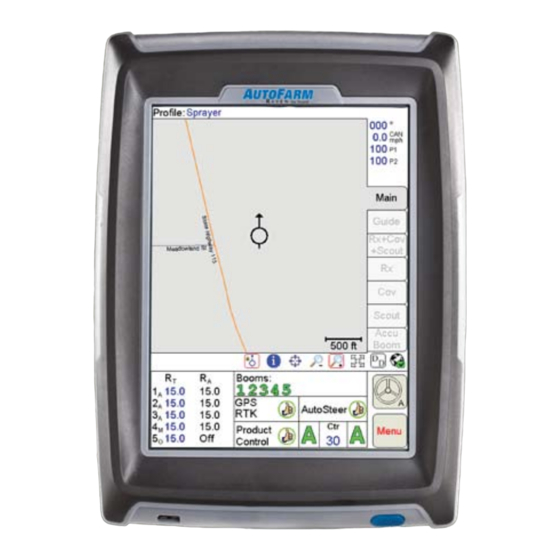
C h a p t e r 4 Viper Pro Interface The purpose of this chapter is to familiarize the operator with the Viper Pro interface and display features. The Viper Pro interface allows the operator to quickly view or modify settings and options, retrieve job information, or access job features, all while navigating through the field. -
Page 64: Profile
Profile Changes If any of the settings saved within a profile are changed via the Viper Pro user interface, the Viper Pro will request the operator to save the current profile settings before the console is powered down. -
Page 65: Current Heading
The current speed of the vehicle displays in the upper right-hand corner of the screen. If this section also displays the word “CAN”, then the Viper Pro is connected to a Raven CANbus control system. CAN speed is the speed reported by the CAN control system for product application. -
Page 66: Map Area
The Map area also displays information regarding the applied products. If more than one product is enabled for the job, the Viper Pro will display application information for the product selected in the top right corner of the screen. This area also displays street, prescription, and coverage map information, as well as guidance and scouting information. - Page 67 Select the ZOOM OUT tool. Viper outlines the icon in red. Touch an area on the map to zoom out from. The Viper Pro adjusts the view. Repeated zooming allows you to continue to scale down a selected area.
-
Page 68: Tabs
Tabs displayed in gray are currently unavailable for use and the Main tab is the only tab available when no jobs are in progress on the Viper Pro console. Touching available tabs during a job will display and access information for the current field application. The AccuBoom tab is only available if the required hardware has been installed on your machine and the feature has been enabled for the current job. -
Page 69: Booms
If a prescription map will be used with the Viper Pro console, touch the Default Rate button to display the Rx Map Default Value screen. Set the default value of the target rate for areas without prescription information. -
Page 70: System Status Icons
Errors must be corrected before proceeding with application. GPS Status Indicator The status of DGPS messages being received by the Viper Pro console is displayed in the GPS area on the main screen. Note: This is not necessarily the status of the GPS Receiver or the availability of DGPS reception. - Page 71 Any problems with the DGPS signal or receiver are displayed in the Solution area. Touch the GPS Setup button to launch the AutoFarm ParaDyme application and view the GPS Configuration screens. Refer to the AutoFarm ParaDyme User Manual for more information.
-
Page 72: Autosteer Status
The status of the AutoSteer system displays in this area. This section displays a red “X” if the Viper Pro console is not receiving signal from the SA Module. A yellow “caution” displays when system “cautionary conditions” are met. For normal operation, a green “thumbs-up”... -
Page 73: Product Control Status
The Status Indicator displays a red ‘X’ if communication with the Raven control console or CANbus system is not available. A yellow ‘caution’ symbol is displayed if the Viper Pro detects a problem with the CANbus system such as an alarm condition. The Status Indicator will display a green ‘thumbs-up’ during normal operation. -
Page 74: Display Data
See Appendix L, Weather Station, for more information on the optional weather station available for use with the Viper Pro console. Cellular/WiFi Communication Status The status of wireless communications is displayed on the Viper Pro main screen in the tool bar below the map. Wireless... -
Page 75: Wifi/Cellular Status
The following icons may be displayed in the wireless status area: No Device Connected - No supported wireless device is connected to the ethernet port on the Viper Pro. This icon is also displayed if wireless communication is unavailable or has been lost. -
Page 76: Tabs
The Main tab displays the following information: • If a street map for the vehicles current location has been loaded on the Viper Pro console, the Main tab displays the GPS position of the vehicle relative to the displayed map. -
Page 77: Guide Tab
Cancel -Exits the boundary preview screen Guide Tab Swath guidance is a standard feature with the Viper Pro console. During a job, the Guide tab displays guidance information such as the guidance path and swath number for certain guidance paths. The Guide tab is only available if the operator selects the Swath Guidance option during the Start Job procedure. -
Page 78: Rx+Cov+Scout Tab
Chapter 4 Chapter 9, Viper Pro Guidance for more details on using the Viper Pro Guidance features and available swath patterns. Rx+Cov+Scout Tab The Rx+Cov+Scout tab displays scouting and coverage map information on the same screen. Scouting information such as weed or insect infestations and field boundaries or water ways may be pre-recorded and recalled for following jobs. -
Page 79: Rx Tab
Press the Rx tab. The Rx screen displays. Press the Prescription icon located below the map screen. Touch an area or zone on the map. The Viper Pro displays prescription rate information for the selected map area. For more information on Rx maps, see thePrescription (Rx) Maps section on page 84. -
Page 80: Cov Tab
Press the Cov tab. The Cov tab screen displays. Press the Prescription icon located below the map screen. Touch a field area or zone on the map. Viper Pro displays product coverage information for the selected area. See the Coverage Maps section on page 82 for more information about using coverage maps. -
Page 81: Scout Tab
Trees • AccuBoom Spray/No-Spray zones The Scout tab must be active to allow the Viper Pro to record scouting features. The Scout tab must be Scouting features must be recorded or imported. Marking a Field Boundary Each job may only contain a single field boundary. Additional zones or features within a field must be setup with new names. - Page 82 Refer to Chapter 7, Using AccuBoom™, for detailed AccuBoom setup and operation and for detailed information on creating AccuBoom Spray/No-Spray zones. Drive the perimeter of the field while keeping the selected reference point along the path of the field boundary. Viper Pro™ ParaDyme™ Operation Manual...
-
Page 83: Importing A Field Boundary
Navigating the Viper Pro Interface To close the field boundary, select one of the following options: • To manually close the field boundary, touch the Finish button in the Map area. • Press the Field Boundary button, typically labeled ‘Field Zone Auto.’ Viper automatically connects the boundary line from the current position to the boundary starting point. -
Page 84: Accuboom™ Tab
Several selections and configuration screens are available through the Menu button located in the lower-right corner of the Viper Pro main screen. The Menu is used to start and manage job files, configure several system preferences and features and to shut down the Viper Pro console. -
Page 85: Exit Button
Cancel to resume the Viper Pro program. Note: If a Job is in progress when the exit button is selected, the Viper Pro will display a warning alerting the operator. Exit the Viper Pro application without closing the job, touch Yes. Raven recommends closing any open jobs before exiting the Viper Pro application to avoid losing job information. -
Page 86: Display Mode And Brightness
50 and 100. In Night mode, the brightness value may be set between 0 and 100. • OK - Touch the OK button to accept the current mode and brightness value and return to the Viper Pro main screen. Note: The Viper Pro will always default back to the day mode when powered up or restarted. -
Page 87: Web Button
File Maintenance The File Maintenance feature allows the operator to transfer files from the Viper Pro to a USB flash drive. In addition, archived files may be transferred back to the Viper Pro console to recall field information or resume previous job applications. -
Page 88: Start Job
Chapter 4 Start Job Select the Start Job button to setup and begin a job on the Viper Pro. See Chapter 5, Using the Viper Pro System, for detailed information about using the Viper Pro during field applications. Setup Menu AutoFarm Button Pressing the AutoFarm menu key accesses the AutoFarm ParaDyme application. -
Page 89: Maps
• Prescription (Rx) Maps Street Maps If a county map is loaded on the Viper Pro, the Map area displays the vehicle course direction indicator in relation to the selected street map on the Main tab. Note: The Main tab is only accessible when a job is not in progress. - Page 90 On the Advanced File Maintenance screen, select: Street Map, then Copy or Move. To move files from the USB drive to the Viper Pro, select the External --> Viper option., and Copy All or Copy Selected. Viper will upload streetmaps files to the internal memory.
-
Page 91: Scout Maps
Features within a field may be pre-recorded, or scouted, using the Viper Pro console. These features can be saved on the Viper Pro console and recalled at a later date for other field applications. The Viper Pro offers up to 16 different field feature types with four Viper presets and 12 user selectable features. -
Page 92: Coverage Maps
Coverage Maps The Coverage Map feature of the Viper Pro creates an as-applied map for the job in progress. After the job is completed, the map may be transferred from the Viper Pro console to a home or office PC for viewing and printing application reports for each job. - Page 93 During product application in rough field areas, excess “bouncing” may cause the encoder to send out false pulses, which the Viper Pro records as an over application of the area. If these pulses are recorded in a zero rate zone, the Viper Pro Coverage Map report will display an over application in this area.The Zero Rate Tolerance feature allows the operator to set a threshold for encoder pulses which can help eliminate “chatter”...
-
Page 94: Prescription (Rx) Maps
Prescription Map Display Colors Multi-Product VRA The Viper Pro is capable of controlling up to five products in reference to individual maps for each product or a single map containing the rate information for each product in the .dbf file. - Page 95 Rx Look-Ahead The Rx Look-Ahead setting is the number of seconds (determined by vehicle speed) the Viper Pro is allowed to scan in front of the vehicle’s current position to find rate changes on a prescription map. This feature may help to compensate for the time it takes a valve to fully adjust to a different rate.
- Page 96 The colors displayed for different rate zones on a prescription map may be modified for the operator’s preferences. If no color template is selected by the operator, the Viper Pro will use the default colors. Adding a Rx Color Template Select Menu, then Setup, Maps, Rx Maps, and Rx Colors.
- Page 97 Navigating the Viper Pro Interface Press Next. The Rate Range and Color selection screen displays. Using the screen keyboard, enter a value for the upper limit in the first Rate Range field. Press Select. The Rx Map Colors screen displays.
-
Page 98: Local Settings
Press Yes. Press OK. Viper deletes the template from the system. Local Settings The Local settings allow the operator to set up preferences for: • Language • Profile Configuration • Units Configuration • Time Zone Configuration Viper Pro™ ParaDyme™ Operation Manual... -
Page 99: Language
A confirmation screen displays. Press OK. Profile Configuration Profiles allow the operator to save various machine setup and configuration information. If the Viper Pro console will be used with multiple machines, the profile for that vehicle can be re-applied to quickly configure the Viper Pro for the machine. -
Page 100: Display Units Configuration
Press OK. Viper saves the setting. Time Zone Configuration To configure the Viper Pro for the time zone in which the console will be operating. Select the Time Zone button in the Viper Pro Menu. Using the correct time zone ensures that the correct date and time display on the Viper Pro console. The standard default setting is for Central Time Zone and automatically adjusts for Daylight Savings. -
Page 101: Serial Communication Port Setup
Menu, Setup, Comm Ports. The following screen will be displayed. GPS Comm Port Setup With the ParaDyme system, the GPS Comm Port settings are already configured in the Viper Pro. You will not need to change these settings. -
Page 102: Auxiliary Comm Port Setup
Next to advance to the next Comm Port Setup screen. Weather Module Setup If the optional Weather Module activation key has been entered on the Viper Pro, the Weather Module Setup screen will be displayed. Refer to Appendix L, Weather Station, for more information. - Page 103 Navigating the Viper Pro Interface On-Screen Lightbar If you are not using the AutoFarm RTK GPS, then the DGPS receiver must output messages at a minimum of 5hz to use this function. Configuring the On-Screen Lightbar Press Menu, then Setup, and Lightbar. The Lightbar Setup screen displays.
- Page 104 Press the Next button. The External Lightbar Setup will appear. Select the desired comm port. Send Guidance Message The Viper Pro guidance system is capable of working with the SmarTrax automated steering system. In order for the Viper Pro to send guidance messages to the SmarTrax system, The Send Guidance Message option must be selected.
-
Page 105: Boom And Implement Setup
Boom and Implement Setup In order to provide accurate guidance and product control, the Viper Pro must be configured to the equipment being used for a Profile or Job. To begin configuring a boom or implement, touch the Menu button on the main screen and then select Setup, Boom/Impl. -
Page 106: Multi-Section Implement Or Boom Setup
Profile using your new configuration. Multi-Section Implement or Boom Setup If Multi-Section Implement Setup is selected, the first setup screen will require a name for the implement being pulled. See the Implement Setup section above for an example screen. Viper Pro™ ParaDyme™ Operation Manual... - Page 107 Navigating the Viper Pro Interface If Boom Setup is selected, a Boom Setup screen similar to the screen shown below appears. Note: The Implement Name will also be the name of the Profile created at the end of the Implement Setup process.
- Page 108 Press OK to accept the current setup Map Booms to change the display characters on the boom or implement. Press on a Section or Summary Entry to enter Advanced Settings for the selected boom section. Viper Pro™ ParaDyme™ Operation Manual...
-
Page 109: Using The Viper Pro System
Jobs A job is a collection of information about the area of a field in which you are using Viper Pro to apply a product. This information includes: •... -
Page 110: New Jobs
Once you have opened a job, you can access the tabs displayed on the main screen. Your access to the tabs depend upon the features you purchased with the Viper Pro system. When you start a new job, Viper uses the current date and time as the job name. -
Page 111: Swath Guidance
If the field exceeds the size of the original AccuBoom file, Viper will automatically increase the file size to cover the entire field area. See Chapter 7, Using AccuBoom™, for more information on using the AccuBoom feature with the Viper Pro console. -
Page 112: Product Chaining
If Advance on Bin Level Sensor Alarm is to be used, all products in the chain must be equipped with a bin level sensor. Starting a New Job Select Menu, then Start Job. Select New Job. Viper Pro™ ParaDyme™ Operation Manual... - Page 113 Standard AccuBoom - This method requires no action or additional setup by the operator. The operator simply begins to apply product to the field and the Viper Pro Console monitors the application and turns boom sections off if they enter into a previously applied area.
- Page 114 Using the screen keyboard, enter a product name in the Product Name field. Press Booms. The Select Booms for this Product screen displays. Select the booms you want to use to apply the product and press OK. Viper Pro™ ParaDyme™ Operation Manual...
- Page 115 Using the Viper Pro System To apply a prescription map to the job, check VRC. Press Browse to display a list of prescription maps. Select the appropriate prescription map from the list and press OK. Select the appropriate rate information file for rate conversion and press Next. The Rate Conversion screen displays.
-
Page 116: Pausing A Job
When you add to an existing job, the original data is used. Make sure that if you are adding to an existing job, the files used by and created in the existing job are still present on Viper Pro internal memory. -
Page 117: Tiered Booms
A specialized relay box and cabling is required for operating a tiered boom system. The Tiered Boom feature of Viper Pro allows the machine to operate over a wider range of application rates than a normal single boom operation. A tiered boom system has two tiers of boom sections stacked on top of each other. -
Page 118: Enabling Tiered Booms
Press Next until the Node 1 Settings screen displays Tier 1 Max, Tier 2 Max, and % Tier Disable. Enter your Tier 1 Max, Tier 2 Max, and % Tier Disable values. Press OK. Viper saves your settings and returns you to the CAN Controller Status screen. Viper Pro™ ParaDyme™ Operation Manual... -
Page 119: Application Reports
Reports may be created for viewing and archiving or as a visual report for a customer. Information for the application report may be entered either on the Viper Pro console during the Job or using the Rbin Viewer on a home or office PC. -
Page 120: Field Information
Once you have added the field condition information, you do not have to add the information again if you do another job for the same customer. You can select the field condition information from a list for each field on the screen and it is automatically associated with the new job. Viper Pro™ ParaDyme™ Operation Manual... -
Page 121: Weather Information
The Weather Information screen allows you to enter wind speed, wind direction, temperature, and humidity levels. The Watchdog Weather Station is also available for use with the Viper Pro system. See Appendix L, Weather Station, for more information and ordering. -
Page 122: Vehicle Information
If you are applying anhydrous, you can enter the tank number in this screen. The tank number will be displayed on the Rbin report. You can also select the option of printing the report in a single color instead of the default 3 colors. Viper Pro™ ParaDyme™ Operation Manual... -
Page 123: Ingredient Information
Using the Viper Pro System Ingredient Information If you have checked Product Mix in the Product Information screen, the ingredient information screen will display. The ingredient information screen allows you to enter the ingredients of a mixed product, which includes the manufacturer, EPA number, target pests, and mixture rate. -
Page 124: Creating An Application Report
Note: If the Watch Dog Weather Station is connected to the Viper Pro system, weather information is automatically recorded by touching the Record button on the Weather Information screen of the Display Data window. -
Page 125: Product Chaining
P roduct Chaining CHAPTER C h a p t e r 6 The product chaining feature allows you to chain together product tanks or bins when applying product to a field. When one tank or bin runs out, Viper automatically switches to another tank and keeps applying product. This reduces trips made by the operator to refill product. - Page 126 You will then be able to finish the rest of the job setup like you would any other job. For more information on product setup and the rest of the job setup, refer to the Starting a New Job section on page 102. Viper Pro™ ParaDyme™ Operation Manual...
-
Page 127: Using Product Chaining
If there are more than 3 lines of data, the ‘Application Rates’ heading in the Application Rates area will be removed in order to allow the data to display on the Viper Pro screen. The number radio buttons at the top of the screen do not equal the number of products entered for the job. All chained products are represented by the button labeled ‘C.’... -
Page 128: Display Data
For more information on the Display Data area, see the Display Data section on page 64. Miscellaneous Messages While using the product chaining feature, you will get messages for the alarms or conditions you have set. Below are examples of some of these messages. Viper Pro™ ParaDyme™ Operation Manual... - Page 129 Product Chaining The message shown below will display if the Vac/Bin alarm condition is received and the ‘Enable Auto Advance’ and ‘Advance on Vac/Bin’ alarm options are selected. The message shown below will display when the last product in the chain has been emptied and all of the conditions shown in the image above are met.
- Page 130 Chapter 6 Viper Pro™ ParaDyme™ Operation Manual...
-
Page 131: Chapter 7 Using Accuboom
AccuBoom turns the boom section back on. The following sections will guide you through setting up and using the AccuBoom feature with the Viper Pro console. Contact your local Raven dealer for more information and available kits for your machine. - Page 132 Chapter 7 AutoFarm Viper Pro CAN AccuBoom Installation FIGURE 1. Viper Pro™ ParaDyme™ Operation Manual...
- Page 133 Using AccuBoom™ AutoFarm Viper Pro CAN AccuBoom with Serial Console Installation FIGURE 2. Manual No. 016-0171-365...
-
Page 134: Accuboom™ Control Setup
To help compensate for the valve’s response time and lag due to product lines building or relieving pressure, the Look-Ahead values allow the Viper Pro to begin adjusting control valves for spray/no-spray zones and previously applied areas. -
Page 135: Configuring Accuboom™ Control
Using AccuBoom™ Turn-Off % Coverage This value controls the percentage of the boom that must be inside a previously applied area in order for the boom to turn off. The default value is 80%. This would require that 80% of a boom section be in a previously applied area before AccuBoom would turn off that boom section. -
Page 136: Accuboom™ Aggressiveness Factor
The aggressiveness factor uses the user defined look- ahead values to adjust AccuBoom response for these driving styles and/or field areas requiring aggressive maneuvering when crossing spray zones. Viper Pro™ ParaDyme™ Operation Manual... -
Page 137: Enabling Accuboom™ Override
Using AccuBoom™ The AccuBoom aggressiveness factor adds a percentage of the current turn-on or turn-off look-ahead setting to the time which AccuBoom overrides subsequent zone boundaries. To set the AccuBoom aggressiveness: Press the Boom Area on the main screen. From the AccuBoom Control Setup screen, press Next until the AccuBoom Aggressiveness Factor screen is displayed. -
Page 138: Accuboom™ Spray/No-Spray Mapping
When this method is selected, a new screen prompts you to give the map a name. You also have the option to create a boundary no-spray zone. Viper Pro™ ParaDyme™ Operation Manual... -
Page 139: Load Accuboom™ No-Spray Map Method
Using AccuBoom™ Selecting the Create No-Spray Boundary option causes the Viper to automatically create a no-spray zone for three boom widths outside the extents of all the spray zones created. Once the job has been started, AccuBoom will function the same as in the standard AccuBoom mode until all the zones have been defined and the spray/no-spray map is created. -
Page 140: Create Map From Field Boundary Method
The first step in creating an AccuBoom spray/no-spray map is to define the spray and no-spray zones within a field. These zones are created in the same method as boundary fields. Note: The spray and no-spray selections will only be available while creating a map. Viper Pro™ ParaDyme™ Operation Manual... -
Page 141: How To Create A Spray/No-Spray Map
Using AccuBoom™ How to Create a Spray/No-Spray Map Start a new job. Press the Scout tab. Select Record, then Zone. The Record Field Feature screen displays. Select Spray or No-Spray. Note: Only one zone type can be created at a time. Select an offset shift for the boundary that is in relationship to one-half the boom width. - Page 142 Note: The Create Map button will only appear when at least one zone has been defined and when there are no zones in the process of being defined. Viper Pro™ ParaDyme™ Operation Manual...
-
Page 143: Using Autoboom
CHAPTER C h a p t e r 8 The AutoBoom feature, used in conjunction with Viper Pro, adjusts the height of your booms automatically. Using your boom’s hydraulics, AutoBoom’s parallel hydraulic system always keeps the hydraulic valves open, gently balancing the hydraulic cylinders and allowing the booms to descend or elevate effortlessly. -
Page 144: Autoboom™ Status Display
If a center ultrasonic sensor is installed, Ctr Ht is displayed in the AutoBoom area in place of the set height. Refer to the CAN AutoBoom Calibration & Operation Manual (P/N 016-0130-062) for detailed instructions on calibrating and operating either the UltraGlide or PowerGlide Plus AutoBoom systems with your Viper Pro console. Viper Pro™ ParaDyme™ Operation Manual... -
Page 145: Chapter 9 Viper Pro Guidance
C h a p t e r 9 Guidance Views The Viper Pro provides two viewing options for guidance control, the ‘Down Field View’ and the ‘Bird’s Eye View’. The ‘Down Field View’ shows a three dimensional display of the field much like the view you would see as viewed from the window of the vehicle. -
Page 146: Swathing Patterns
Once you have started a job, the guidance screen will display. If you have selected the Straight A-B guidance pattern, you will need to perform the following steps. When you are ready to set Point A, touch the ‘Set A’ button on the screen. Viper Pro™ ParaDyme™ Operation Manual... -
Page 147: Set B By Heading
Once the B point is set, Viper will create a straight guidance line displayed in blue. Note: While using the Straight A-B Line pattern, the Viper Pro will display the next guidance paths to the right and left of the current swath guidance line. -
Page 148: Setting The Fixed Contour Pattern
The Fixed Contour pattern allows the operator to set an irregular A-B Line pattern. To set the Fixed Contour Pattern: Touch the ‘Set A’ button when you are ready to begin an irregular A-B Line. Viper Pro will begin plotting the vehicle’s position as the machine moves along the desired path. -
Page 149: Setting The Last Pass Pattern
When you get to the end of your pass and turn your vehicle, Viper Pro will detect the nearest area that you have covered and use this to determine your guidance for the next swath line. -
Page 150: Using The Guide Tab
Using the Guide Tab Once you have opened a job and selected the Guidance pattern, Viper Pro displays the Guide tab. The map area displays a Course Direction Indicator in the form of an arrow with the arrow pointing in the direction of travel of the vehicle. - Page 151 Press the LB Bright button to increase the brightness of the external lightbar. The more times you push the button, the brighter the screen will get. Each time you push the LB Bright button, Viper Pro displays the percentage of brightness on the screen to indicate the current intensity level.
- Page 152 The Reset A-B button displays if Straight A-B guidance is selected and the menu button is pressed. The Reset A-B button allows you to clear the current A-B guidance points and set new points without closing the current job. Viper Pro™ ParaDyme™ Operation Manual...
-
Page 153: Screen Icons
Viper Pro Guidance Screen Icons The following screen icons appear on the Guidance screen. Icon Name Description Guide Menu Icon: Shows the current menu options for the job when you touch the icon. Straight A-B Pattern: Allows you to switch to the Straight A-B pattern from the pattern you are presently running by touching the icon. -
Page 154: Saving An A-B Line
Note: You should name each A-B line so that it can be easily recognized at a later date. Avoid using dates and times as this will make selecting a previously stored A-B line more difficult. Viper Pro™ ParaDyme™ Operation Manual... -
Page 155: Loading An A-B Line
Available A-B Lines Filtering Options If several A-B lines are saved on the Viper Pro, the following filtering options may be used to help locate a specific guidance path: Show all guidance files. This option shows all currently saved paths of the same type selected when the job was created. -
Page 156: Nudge Feature
The in-Job nudge settings will only be accessible with an A-B type guidance path (i.e. Straight Line, Fixed Contour, Pivot). To configure the nudge settings in a Job: Touch the Guide Menu icon on the Guidance screen. Guide Menu Icon Viper Pro™ ParaDyme™ Operation Manual... -
Page 157: Using The Nudge Feature
Show Nudge Ctrls. The user will then be able to nudge the swath as desired from the “Guide” tab on the Viper PRO’s main screen as shown above. Two nudge values can be applied by selecting either “N1” or “N2” and then touching the nudge left or right button. - Page 158 Chapter 9 Viper Pro™ ParaDyme™ Operation Manual...
-
Page 159: File Maintenance
File Maintenance All Viper Pro job files are stored in memory located inside the Viper Pro. The storage location for these files is of a fixed size and will hold a large, but limited, number of files. File maintenance should be conducted on a regular basis to ensure sufficient storage space is available for your future jobs. - Page 160 Press OK. The necessary file folders will be loaded onto the thumb drive. Press OK to return to the File Maintenance main menu. Your USB thumb drive will now be populated with the necessary file folders needed by the Viper Pro. Viper Pro™ ParaDyme™ Operation Manual...
-
Page 161: Misc Folder Sub-Folders
Field Boundaries created using the Viper Pro are saved as a part of the Job file. Clone: The clone sub-folder will only appear on the USB drive if a clone of the Viper Pro has been created. Clones may be used as “restore points” to quickly and easily reset the Viper Pro console to a previous set up. -
Page 162: Performing File Maintenance
Rbin Sub-folder: The rbin sub-folder allows you to download specific job rbins without downloading the complete job information. RxMaps Sub-folder: The ‘rxMaps’ sub-folder is used to transfer prescription maps to the Viper Pro. These prescription maps must be in the proper shapefile format used by the Viper Pro. -
Page 163: Uploading Prescription Maps From A Usb Thumb Drive
Select USB RxMap Upload from the list of file maintenance options. The following warning screen will display. Press OK to upload the prescription maps from the USB thumb drive to the Viper Pro internal storage or Cancel to abort the upload process. -
Page 164: Usb File Transfer And Advanced File Maintenance
Delete - Deletes the selected files from the source storage location. • Move - Move the file from the source storage location to the destination storage location. The selected file on the source storage location is deleted. Viper Pro™ ParaDyme™ Operation Manual... - Page 165 Selecting Associated File Actions Some file types may be associated with a job file on the Viper Pro. If job files will be deleted, the operator must choose what action to perform on files associated with the job file being deleted.
-
Page 166: Initialize External Usb Drive
Cancel button to return to the Advanced File Maintenance screen. Initialize External USB Drive Select the Initialize External USB Drive and follow the on-screen instructions to setup the required file structure on a connected USB thumb drive. Viper Pro™ ParaDyme™ Operation Manual... -
Page 167: Automatic File Maintenance
Clone or Restore Settings The Clone or Restore Settings feature can be used to save all settings and files from the Viper Pro console to external memory. These clones can then be reloaded to restore settings to the same Viper Pro or transferred to another Viper Pro console. -
Page 168: Select External Drive
Select External Drive If you have more than one flash drive connected to the Viper Pro at one time, the Select External Drive button will be displayed on the File Maintenance screen. Touch this button to select an external drive. -
Page 169: Rbin Viewer
The Rbin Viewer is used on your personal computer to view and print application reports that have been previously created using Viper Pro. You can also use the Rbin to export the application data as a shapefile for use in other software packages. - Page 170 Chapter 11 Locate the available Viper/Viper Pro software updates. Select the latest Viper Pro Rbin Viewer version. Click on Download Now. A window similar to the following will appear. Click on Save. A screen similar to the following will display.
-
Page 171: Installing The Rbin Viewer
Rbin Viewer Installing the Rbin Viewer The downloaded Rbin file is in zipped form. You will need to unzip the file before you can install it on your computer. Some operating systems can unzip the file directly. Other systems may require you to download a program to unzip the file. - Page 172 On the screen that appears, select the option corresponding to the Viper console from which you will be importing information into the Rbin Viewer. If you have both a Viper and Viper Pro console, select the Viper Pro option.
-
Page 173: Viewing Rbin Files
Rbin Viewer Continue clicking Next to install all of the software components as prompted. When the following screen appears, click Install. The Rbin Viewer software will be installed on your computer. Once installation has been completed, the following screen will display. Click Finish to complete the software installation. - Page 174 Browse list. Click Open. The report opens in the Rbin Viewer. When you are finished viewing the file, you can close the file by selecting File from the drop down menu, then Close. Viper Pro™ ParaDyme™ Operation Manual...
-
Page 175: Exporting Shapefiles
Rbin Viewer Exporting Shapefiles The Rbin report is a simple comprehensive report of the application job. If more detailed information is needed on the application job, Rbin allows you to export more detailed data in the form of a polygon shapefile. The shapefile contains information such as: •... -
Page 176: Toolbar Options
In the multi-color mode, any field area that has had product applied to it will be colored in with one of three colors. These colors define the field application as High, OK, or Low. To change coverage map colors: Open the desired Rbin file. Select the Color Palette icon from the Rbin toolbar. Viper Pro™ ParaDyme™ Operation Manual... -
Page 177: Rbin Options
Rbin Viewer Select the desired coverage range (High, OK, or Low). Select the desired color and click on OK to change the color of the selected application range. Press the OK button on the coverage map colors window to finish color selection. Rbin Options The Rbin Viewer has several options to allow you to customize the report output. -
Page 178: To Change The Units Of Measure
Select English or Metric and press OK. The units of measure on the Rbin report will now be in the selected units. To Change the Layout Open Rbin Viewer. Select Options from the drop down menu selection. Select Layout from the drop down menu. Viper Pro™ ParaDyme™ Operation Manual... -
Page 179: To Change The Language
Rbin Viewer Click on the Browse button. Select the desired layout, then click the Open button. Select the OK button and the layout will change to the selected layout. To Change the Language: Open Rbin Viewer. Select Options from the drop down menu selection. Select Language from the drop down menu. -
Page 180: Enabling Manual Console Display
When ‘Filter Overlap’ is unchecked, areas may show overlap due to sharp turns and the acreage may be calculated slightly greater than the actual field acreage. With ‘Filter Viper Pro™ ParaDyme™ Operation Manual... -
Page 181: To Change The Export Settings
Rbin Viewer Overlap’ checked, areas covered twice due to sharp turns will be filtered out and the acreage calculated will be closer to the actual acreage of the field. To Change The Export Settings: Open the Rbin Viewer. Select a file to be viewed. Select Options from the Rbin drop down menu. -
Page 182: To Edit An Rbin Report
The data you enter into the editing boxes is saved in a history file on your computer. You can pull up this data when you open a new Rbin. The data is automatically sorted in alphabetical order for ease of use. Viper Pro™ ParaDyme™ Operation Manual... - Page 183 Rbin Viewer Press Next. The following screen displays. Edit the data in the fields using the keyboard on your computer. If you are using a product mix, check the Product Mix box in the desired product information box. When you check the product mix box, the Done button on the Edit Products screen will change to a Next button.
-
Page 184: Reset History
You can clean out the history file and start a new history file by using the reset history option. To Reset the Edit History Open Rbin viewer. Select a file to be edited. Select Options from the drop down menu. Viper Pro™ ParaDyme™ Operation Manual... - Page 185 Rbin Viewer Select Reset History. The following screen displays. Select Yes to delete ALL editing history items. Press No to save the current editing history items. Manual No. 016-0171-365...
- Page 186 Chapter 11 Viper Pro™ ParaDyme™ Operation Manual...
-
Page 187: Troubleshooting The Viper Pro
C h a p t e r 1 2 Viper Pro This chapter contains information on troubleshooting the Viper Pro system. Please read through all sections in this chapter before contacting technical support, as many common questions are answered here. -
Page 188: Setup Issues
• Streetmaps are not in the • Save the streetmap files in the shapefile format. correct format • Too many streetmaps • Limit the number of county streetmap files in the Streetmap files in the Streetmaps folder. folder Viper Pro™ ParaDyme™ Operation Manual... -
Page 189: Job Issues
Troubleshooting the Viper Pro Job Issues Issue Possible Cause Solution • Boom switches are • Turn boom and master switch on. turned off Boom numbers are • AccuBoom enabled but gray • Move the machine out of the applied zone. -
Page 190: Rx Map Issues
Slow down the vehicle or configure the vehicle to supply a higher vehicle amount of product. Cannot achieve • Calibration numbers • Check and adjust meter calibration, density, and other calibration target rate incorrect numbers. • Speed calibration • Check and adjust speed calibration setting. incorrect Viper Pro™ ParaDyme™ Operation Manual... -
Page 191: Error Messages
Troubleshooting the Viper Pro Error Messages The following table provides issues and solutions about error messages displayed on the Viper system. General Error Messages Issue Possible Cause Solution The Activation key • Incorrect Activation key • Re-enter the Activation key. If this still does not work,... -
Page 192: Job Error Messages
• VRC was not selected • Select VRC in the Product Setup screen. during the product setup enter prescription information • There are no more No VRC Products • Press OK to start the job. selections to make Viper Pro™ ParaDyme™ Operation Manual... -
Page 193: Gps Error Messages
• Ensure the ParaDyme roof array is sending the correct No Differential been detected by Viper messages to the Viper Pro. • Ensure ParaDyme roof array is receiving GPS signal. • Verify that the AutoSteer option is selected on the GPS •... -
Page 194: Can Troubleshooting
• Make sure that each node has a separate power and ground ground connection. and ground connections • Make sure that both ends of the CANbus system are CANbus ends not • Terminate CANbus ends properly terminated. See Chapter 2 for more terminated information. Viper Pro™ ParaDyme™ Operation Manual... -
Page 195: Appendix A System Diagrams
A p p e n d i x A The following diagrams may be helpful for installing or troubleshooting the Viper Pro console or Product Control system. The following diagrams may show optional features or components not required for operation and will not apply to your system if the required hardware has not been installed. - Page 196 Appendix A Serial Control Console to Viper Pro Connection Example FIGURE 1. Note: Use only a Raven RS-232 communication cable between the Viper system and the SCS console. This cable is available as listed below. Contact your Raven distributor for purchasing and more information.
- Page 197 Viper Pro Single Product (Liquid) CAN Control System FIGURE 2. Manual No. 016-0171-365...
- Page 198 Appendix A Viper Pro Dual Product (Liquid/Granular) CAN Control System FIGURE 3. Viper Pro™ ParaDyme™ Operation Manual...
-
Page 199: Appendix B Understanding Viper Pro Files
When you first start using your Viper Pro console, the internal Viper operating system automatically creates certain files and folders on the internal memory. These files and folders will be where the Viper Pro system later stores data files, such as navigation files, map files, and job files. Below is a list of the files and folders that Viper automatically creates on the internal memory: •... - Page 200 The clone sub-folder will only appear on the USB drive if a clone of the Viper Pro has been created. Clones may be used as “restore points” to quickly and easily reset the Viper Pro console to a previous set up. A clone will contain the following files contained within the Viper Pro file structure: •...
- Page 201 The RxMaps folder contains the prescription maps used for future jobs. You must save the .shp, .shx, and .dbf files associated with the prescription map to this folder. Viper Pro uses these files to generate a file with a .mem extension that is used by the Viper Pro OS.
- Page 202 These files are used by the Viper Pro OS and are not viewable. Zulu.ini File The zulu.ini file contains the configuration and user settings for the Viper Pro console. This file is specific to the Viper Pro with which it is being used.
-
Page 203: Applications
C alculating the Boom APPENDIX A p p e n d i x C Width (Calibration) for Liquid Applications You can calculate boom calibration for two different types of spray applications, Broadcast spraying and Band spraying. Broadcast Spraying You can calculate the boom section width with the formula: ... - Page 204 Adjusted Rate for band spraying. For Example: If your Broadcast Rate is 20 GPA, the band width is 14 inches, and the tip spacing is 40 inches: ----------------- - Therefore, the adjusted rate is 7 GPA. Viper Pro™ ParaDyme™ Operation Manual...
-
Page 205: Appendix D Calculating And Verification Of Spreader Constant
C alculating and APPENDIX A p p e n d i x D Verification of Spreader Constant Calculation of Spreader Constant Standard RATE display For RATE displayed in 1 lb. increments, the formula to calculate the Spreader Constant is: 311 040 --------------------------------- - ... - Page 206 -------------------------- - 1950 The new Spreader Constant is 234. A Corrected Spreader Constant in Metric units: 4400 -------------------------- - 4290 Repeat this procedure until the weight of the metered materials equals the total volume value. Viper Pro™ ParaDyme™ Operation Manual...
-
Page 207: Appendix E Calculating Speed Calibration
5280 ----------------------------- - Where OSC = the Old Speed Cal value, D = the Viper Pro odometer reading, and CSC = the Corrected Speed Cal. Manual No. 016-0171-365... - Page 208 Appendix E For Example: in English Units: Using the default Speed Cal of 598, and a Viper Pro odometer reading of 5000: 5280 -------------------------- - 5000 the Corrected Speed Cal is 631. in Metric units: 1000 -------------------------- - Therefore, the Corrected Speed Cal equals 155.
-
Page 209: Applications
C alculating APPENDIX A p p e n d i x F Calibrations for Liquid and Granular Applications Calculating Valve Calibration To ensure that you are applying the proper amount of product to the field, you must calibrate the valves used to deliver the product. - Page 210 Using the above information, you can calculate the gallons per minute (GPM), per nozzle using the following equation: inches ---------------------------------------------------- - 5940 For Example: GPA = 20, MPH = 5.2, Inches = 20 and assuming a target pressure of 30 PSI: ------------------------------- - 0.35 5940 Viper Pro™ ParaDyme™ Operation Manual...
- Page 211 Therefore, you would need to select a tip that outputs a pressure of 30 PSI and 0.35 GPM. The chart below shows examples of different spray tips and configurations: Liquid Capacity Capacity Tip No. Pressure Nozzle Nozzle in Gallons Per Acre- 20” Spacing Color in PSI in GPM...
- Page 212 RFM 400 25 to 400 GPM Calculating Meter Calibrations The flow meter calibration value is stamped on the tag that is attached to each flow meter. Use this number when programming Viper for the calibration. Viper Pro™ ParaDyme™ Operation Manual...
-
Page 213: Appendix G Testing Extension Cables
T esting Extension APPENDIX A p p e n d i x G Cables Speed Sensor Extension Cable Verify that the system is in the Wheel Speed Sensor mode while testing the cable. Disconnect the extension cable from the Speed Sensor Assembly cable. Hold the extension cable connector so that the keyway is pointing in the 12 o’clock position as shown below. - Page 214 If no pulses are registered, perform the above voltage checks. If all of the cables test ‘good’, replace the Speed Sensor. Note: After testing is complete, re-enter the correct Speed Cal and Speed Sensor type before starting application. Viper Pro™ ParaDyme™ Operation Manual...
- Page 215 Flow Meter Extension Cables Before starting this test, disconnect the flow meter cable from the flow meter. Hold the flow meter cable so that the keyway is pointing in the 12 o’clock position as shown below. Keyway 2 o’clock 10 o’clock 6 o’clock Pin Designations and Voltage Readings The following tables show the following pin designations and voltage readings.
- Page 216 Replace the defective cable as required. Verify the pin connection and voltage from the previous chart. If all of the cables test ‘good, replace the Flow Meter. Note: After testing is complete, re-enter the correct Meter Cal before starting application. Viper Pro™ ParaDyme™ Operation Manual...
-
Page 217: Appendix H Updating Can Nodes On The Viper Pro Console
A p p e n d i x H on the Viper Pro Console Viper Pro consoles with version 3.0 or higher software are capable of programming nodes on the CANbus directly through the Viper Pro console using a USB flash drive with the CAN Update program. Note: Before trying to update a CAN Node, make sure the node is communicating properly over the CANbus. - Page 218 The Update CAN Nodes screen displays a list of available node updates.This screen also displays the firmware version to which each node will be updated if the update is applied. Available Node Updates Firmware Version Viper Pro™ ParaDyme™ Operation Manual...
- Page 219 Pro will begin the update by erasing the node’s memory. Note: The Viper Pro may take several minutes to prepare and apply the software update to the node. When the update is completed, Viper Pro will display a Programming Complete prompt. Touch the OK button to continue.
- Page 220 Appendix H Viper Pro™ ParaDyme™ Operation Manual...
-
Page 221: Using The Front Panel Program With The Viper Pro System
APPENDIX A p p e n d i x I Program with the Viper Pro System The Front Panel Program can be used to configure the Raven DGPS receivers, (110, 115, 210, and Phoenix 200, 310) only. Initializing the Front Panel Program Press Front Panel from the Program Selection Menu. - Page 222 After communication with receiver is established, you may navigate through the receiver by utilizing the buttons provided on the Viper touch screen, as well as using the Invicta Quick Start Guide (on the following page) as a reference. Viper Pro™ ParaDyme™ Operation Manual...
- Page 223 Invicta 210/310 Menu Structure FIGURE 1. Manual No. 016-0171-365...
- Page 224 Appendix I Viper Pro™ ParaDyme™ Operation Manual...
-
Page 225: Appendix J Controlling Spinner Rpm
C ontrolling Spinner APPENDIX A p p e n d i x J For spinner box machines, you can use a CAN control node capable of controlling spinner speed. Valve Type Select the Valve Type for the machine you are using. Application Select Spinner, for the application type. - Page 226 Appendix J Viper Pro™ ParaDyme™ Operation Manual...
-
Page 227: Appendix K External Serial Rate Control
Shapefile from the Rbin data. The Viper Pro can be configured either as a CANbus system or the Viper Pro can be connected to a Raven serial console. Set up the Viper product control for either configuration the same as you would without external serial rate control. - Page 228 Select the Serial Rate radio button. Press OK to return to the main Viper screen. Connecting the GreenSeeker® RT200 to the Viper Pro Connect the GreenSeeker® Interface Module to PDA Cable to the GreenSeeker® RT200. Connect the DB9 connector on the GreenSeeker® Interface Module to the Auxiliary Comm Port connector on the Viper harness.
-
Page 229: Appendix L Weather Station
• Wind Gust The Viper Pro can only read information from one specific model of weather station. This unit is the WatchDog Sprayer Station Model 3349SS manufactured by Spectrum Technologies, Inc. This system can be ordered through your Raven distributor (P/N 117-0171-138). - Page 230 Appendix L Connecting the Weather Station If the Viper Pro is connected to a CAN control system, the weather station must be connected to the CONSOLE connector on the Viper Pro Main Interface Cable (P/N 115-0171-746). If the Viper Pro is connected to an external Raven serial controller, the weather station must be connected to COM 3 on the Viper Pro Auxiliary Interface cable (P/N 115-0171-745).
- Page 231 To view weather information, press the Display Data button on the lower right hand side of the Viper, and then touch in the data area to toggle to the weather information. Note: If the Wind Direction heading displayed in the Weather Information does not appear as expected, re-initialize the Weather Station as described in the Comm Port Configuration section on page 220.
- Page 232 Appendix L Viper Pro™ ParaDyme™ Operation Manual...
- Page 233 Audible Alarms AutoBoom™ Status Indicator 63 Data Box 1 Using 133 Data Box 2 AutoFarm Button Decimal Shift AutoFarm Viper PRO CAN AccuBoom with Deleting Street Maps Serial Console Installation Display Data 64, 118 Automatic File Maintenance Display Smoothing AutoSteer Status...
- Page 234 Multi-Product VRA General Issues Multi-Section Implement or Boom Setup Comm Port Setup 91 Error Messages 183 Status Indicator 60 Navigating the Viper Pro Interface Guidance Node Guide Menu Icon 142 CAN Node Wiring Diagram 21 Guide Tab 67 Off-line Errors 22...
- Page 235 Ratio Rate System Diagrams Rbin Viewer CAN Node Wiring 21 Change Language 169 Viper Pro Dual Product (Liquid/Granular) CAN Control Change Units of Measure 168 System 188 Downloading 159 Viper Pro Single Product (Liquid) CAN Control Editing an Rbin Report 171...
- Page 236 Navigating the Interface 53 Serial Console Connection 185 Troubleshooting Information 177 Understanding Files 189 Using 99 Using Front Panel 211 Viper PRO CAN AccuBoom with Serial Console Installation Viper Pro Care and Use Vol/Min Weather Station Wiring Power to a CANbus System...
- Page 238 (P/N 016-0171-365 Rev A 11/09) (P/N 602-0245-01-A) For technical support, call your local dealer first. If any additional technical support is required, AutoFarm support may be reached at (U.S./Canada): Phone: 1-877-947-7327 Web: www.gpsfarm.com Outside U.S./Canada, call your local dealer for country-specific requirements.
Need help?
Do you have a question about the Viper Pro and is the answer not in the manual?
Questions and answers