Geemarc Amplidect Combi 295 - Telephone Quick Start
- Quick user manual (2 pages)
Advertisement
Safety Information

Use only the battery provided. There may be a risk of explosion if a wrong type of battery is used for the parent unit. The battery cannot be subjected to high or low extreme temperature and low air pressure at high altitude during use, storage or transportation. Disposal of battery into fire or a hot oven, or mechanically crushing or cutting or the battery can result in an explosion. Leaving the battery in an extremely high temperature surrounding environment can result in an explosion or the leakage of flammable liquid of gas. Battery subjected to extremely low air pressure may result in an explosion or the leakage of flammable liquid or gas. Dispose of used battery according to the instructions.
Normal operating temperature for the product (e.g.0
Use only the adapters and battery listed below.
 Power adapter information: output: 6V DC 0.45A,2.7W. Vtech Telecommunications Limited.
Model: VT05EEU06045 (EU), VT05EUK06045 (UK)
Rechargeable Battery Pack: Model: NI-MH AAA500x2. 2.4V, 500mAh. Corun.
Wall Mounting

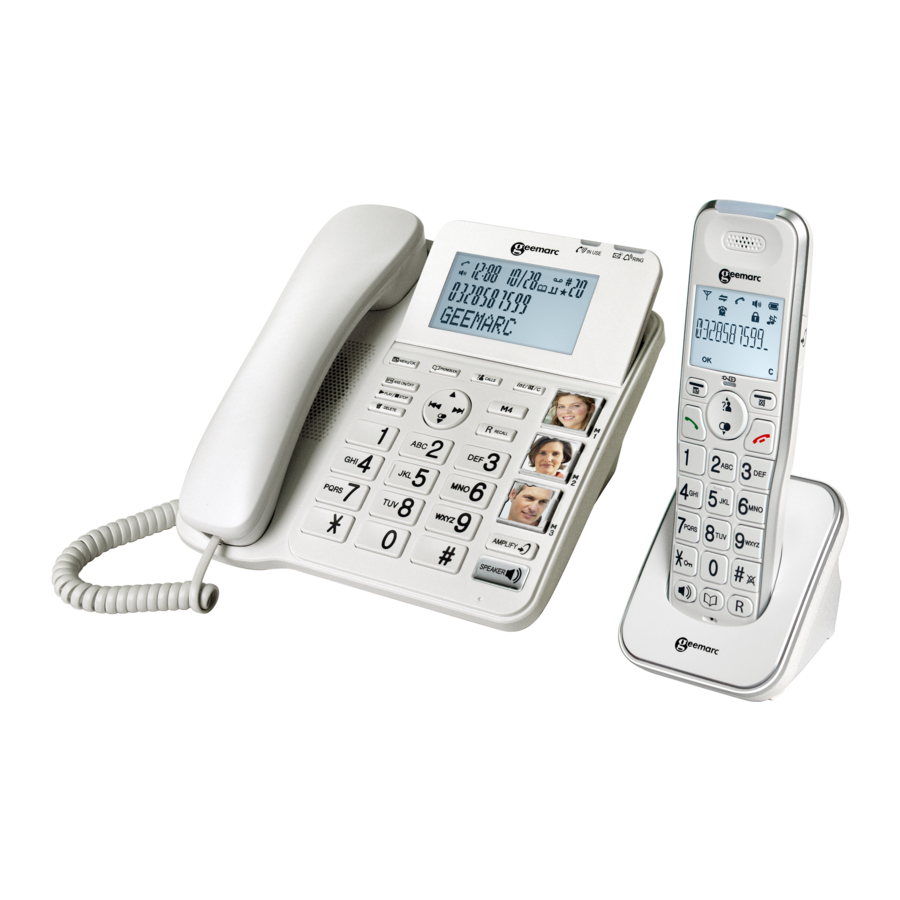
PACKAGE CONTENTS
1 Telephone base, 1 Corded handset, 1 cordless Handset, 2 power adapter, 1 Charger, 1 Telephone line cord, 1 NiMh battery pack, 1 Quick user guide.
INSTALLATION
Connecting the telephone

Connect the telephone cable to the telephone line socket (A) and to the telephone wall socket (B).
Connect the handset curly cord to the base.
Connect the power adapter jack to base and charger (C) then connect the power adapter plug in mains power (D).
Note: Use only the power adapters supplied with the phone.
Connecting the battery
Plug the battery connector securely into the socket inside the handset battery compartment. Insert the supplied battery as indicated. Align the cover flat against the battery compartment, and then slide it upwards until it clicks into place.

Charging the batteries
Charge the batteries for at least 16 hours when charging for the first time.
OVERVIEW
Base

- LCD DISPLAY
- IN USE (
![]() ) : On during a call.
) : On during a call. - RING light (
![]() )
)
Flashes when there is an incoming call. Steadily on when the answering machine is turned on. Flashes when there are new memos or messages in the answering machine. - MENU/OK (
![]() )
)
In idle mode: Press to access the main menu. In sub-menu mode: Press to confirm the selection. In Redial list/Call list: Press to store the number into Phonebook. - PHONEBOOK (
![]() )
)
In Idle: Press to access the phonebook. - CALLS (CALL LIST) (
![]() )
)
In Idle mode: Press to access the call list. - INT/MUTE/CLEAR (
![]() )
)
In main menu mode: Press to go back to idle screen.
In sub-menu mode: Press to go back to previous level.
In sub-menu mode: Press and hold to go back to idle screen.
In editing / predialing mode: Press to clear a character / digit.
In editing / predialing mode: Press and hold to delete all the character /digits During a call: Press to mute / unmute the microphone.
In ringing: Press to silence the base ringer.
In idle mode: Press to intercom another system handset. - MEMORY KEYS (3 PHOTO SPEED DIAL KEYS; 1 MEMORY KEY - M4)
In idle mode: Dial your phone number and Press and hold the memory key until to hear a beep.
To use: Press to dial out to the number stored in the memory key. - VOLUME BOOST (
![]() )
)
During a call: Press to activate/deactivate the VOLUME BOOST function. - SPEAKER (
![]() )
)
In Idle mode or Phonebook/ Call list/ Redial list view mode: Press to make a call with speakerphone. - ALPHANUMERIC KEYPAD, STAR (
![]() ), HASH (
), HASH ( ![]() )
)
In predial or editing mode: Press to insert a digit. 0 key in predial or editing mode: Press and hold to insert a pause. - NAVIGATION KEYS
UP (![]() )
)
In menu mode: Press to scroll up the menu items.
In Phonebook list / Redial list / Call list: Press to scroll up the list.
In editing mode: Press to move the cursor one character to the left.
During a call or TAM message playback: Press to increase the volume.
REPEAT/OGM (![]() )
)
In Idle mode: Press and hold to record OGM.
Press to playback OGM.
In TAM message playback mode: Press to go back to previous message.
MEMO/SKIP FORWARD (![]() )
)
In Idle mode: Press and hold to record a memo.
In TAM message playback mode: Press to skip to next message.
DOWN/REDIAL LIST (![]() )
)
In idle mode: Press to access the redial list.
In menu mode: Press to scroll down the menu items.
In Phonebook list / Redial list / Call list view mode: Press to scroll down the list.
In editing mode: Press to move the cursor one character to the right.
During a call or TAM message playback: Press to decrease the volume. - ANS ON/OFF (
![]() )
)
In Idle: Press to switch the answering machine ON or OFF. - PLAY/STOP (
![]() )
)
In idle mode: Press to playback messages.
During TAM message playback: Press to stop playing messages. - DELETE (
![]() )
)
In TAM message playback mode: Press to delete the current
TAM message playback.
In idle mode: Press and hold to delete all old messages. - RECALL (
![]() )
)
During a call: Press to activate Recall for use with Telephone Network Services such as Call Waiting during a call.
During message playback: Press to call back the caller if the caller's number is available


 )
) )
) )
)Handset

- EARPIECE
- LCD DISPLAY
- CHARGE LIGHT (
![]() )
)
Steadily on when the handset is charging in the charger. - MENU/OK (
![]() )
)
In idle mode: Press to access the main menu.
In sub-menu mode: Press to confirm the selection.
During a call: Press to access Intercom / Phonebook / Redial list / Call list. - UP/CALL LIST (
![]() )
)
In idle mode: Press to access the call list. In menu mode: Press to scroll up the menu items. In phonebook list/redial list/call list: Press to scroll up the list.
In editing mode: Press to move the cursor one character to the left.
During a call: Press to increase the listening volume.
During ringing: Press to increase the ringer volume. - TALK ON (
![]() )
)
In idle/pre-dial mode: Press to make a call in earpiece mode.
In phonebook/redial list/call list: Press to make a call to the selected entry in the list in earpiece mode. During ringing: Press to answer a call in earpiece mode. - DOWN/REDIAL LIST (
![]() )
)
In idle mode: Press to access the redial list.
In menu mode: Press to scroll down the menu items.
In phonebook list/redial list/call list: Press to scroll down the list.
In editing mode: Press to move the cursor one character to the right.
During a call: Press to decrease the listening volume.
During ringing: Press to decrease the ringer volume. - SPEAKERPHONE (
![]() )
)
In idle/pre-dial mode: Press to make a call in speakerphone mode. Press again to switch to earpiece mode.
In phonebook list/redial list/call list: Press to make a call to the selected entry in the list in speakerphone mode. Press again to switch to earpiece mode.
During ringing: Press to answer a call in speakerphone mode.
Press again to switch to earpiece mode. - MICROPHONE
- VOLUME BOOST (
![]() )
)
During a call: Press to activate/deactivate the VOLUME BOOST function. - CANCEL/MUTE (
![]() )
)
In main menu mode: Press to go back to idle screen.
In sub-menu mode: Press to go back to previous menu.
In sub-menu mode: Press and hold to go back to idle screen.
In editing / pre-dial mode: Press to delete a character/digit.
In editing / pre-dial mode: Press and hold to delete all the characters / digits.
During a call: Press to mute/resume the microphone.
During ringing: Press to silence the handset ringer.
In idle mode: Press to intercom another handset.
 )
) )
) )
) )
) )
) )
) )
) )
)- TALK OFF (
![]() )
)
During a call: Press to end a call and go back to idle screen In menu/editing mode: Press to go back to previous menu.
In menu/editing mode: Press and hold to go back to idle screen.
In idle mode: Press and hold to power off the handset.
Press and hold to power on when it is off. - ALPHANUMERIC KEYPAD, STAR (
![]() ), HASH (
), HASH ( ![]() )
)
In predial or editing mode: Press to insert a digit /character![]() .
.
![]() key in idle mode: Press and hold to enable or disable the keypad lock.
key in idle mode: Press and hold to enable or disable the keypad lock.
![]() key in idle mode: Press and hold to turn on/off the ringer.
key in idle mode: Press and hold to turn on/off the ringer.
![]() key in idle/pre-dial mode/number editing mode: Press and hold to insert a pause.
key in idle/pre-dial mode/number editing mode: Press and hold to insert a pause. - R
During a call: Press to answer a new call if you subscribed to Call Waiting service from your service provider. - PHONEBOOK (
![]() )
)
In idle mode: Press to access the phonebook.
 )
) ), HASH (
  )
) .
. key in idle mode: Press and hold to enable or disable the keypad lock.
 key in idle mode: Press and hold to turn on/off the ringer.
 key in idle/pre-dial mode/number editing mode: Press and hold to insert a pause.
 )
)The phone settings are always set in the same manner:
Press Menu/OK  button to open the main menu. Then use the
 buttons to select an entry and confirm it by pressing the Menu/OK button.
The factory preset PIN code is 0000
Example:
Set the language on the base
Press MENU / OK,  then select
 language, press MENU / OK
  , then select
 desired language and then press MENU / OK
  to confirm.
Set the language on the handset
Press MENU / OK  , then select HS settings, press MENU / OK
  , then select language, press MENU / OK , than select desired language and then press MENU / OK
  to confirm.
MENU SETTING
Base
PHONEBOOK
►VIEW►ADD►EDIT►DELETE►DELETE ALL►PB STATUS
CALL LOG : ►MISSED ►RECEIVED ►DIALLED DATE & TIME : ►TIME FORMAT ►SET CLOCK
LANGUAGE
►ENGLISH ►DEUTSCH ►FRANÇAIS ►ITALIANO►NEDERLANDS...
SETTINGS
►RING SETUP ►DELETE HS ►DIAL MODE ►FLASH TIME ►KEY TONE ►CHANGE PIN ►BS DEFAULT
PAGE ALL HS
REGISTRATION
ANS. MACHINE
►MSG PLAYBACK ►DELETE ALL ►MEMO ►TAM ON/OFF►TAM SETTINGS (ANSWER MODE, OGM SETTINGS, ANSWER DELAY, RECORD TIME, TAM LANGUAGE, BS SCREENING, REMOTE ACC, COMPRESSION, CHANGE PIN, TAM DEFAULT)
Handset
PHONEBOOK
►VIEW LIST
under an entry: ►ADD ►VIEW ►EDIT ►DELETE►DELETE ALL ►PB STATUS ►FASTDIAL
CALL LIST
►VIEW LIST
under an entry: ►ADD TO PB ►DELETE ►DELETE ALL►DETAILS ►CATEGORY
BS SETTINGS
►BS RINGER ►RING VOLUME ►DELETEHS ►DIAL MODE ►FLASH TIME►CHANGE PIN
HS SETTINGS
►RING SETUP►TONE SETUP►SELECT BASE ►LANGUAGE ►RENAME HS ►HS DISPLAY ►AUTO ANSWER
DIRECT MEM : ►M1-M2-M3-M4
DATE & TIME ►DATE FORMAT ►TIME FORMAT ►SET TIME ►SET DATE
ALARM : ►ON ►OFF
REGISTRATION : ►BASE 1, 2, 3 or 4 DEFAULT : ►PIN? ----
ANS. MACHINE
►MSG PLAYBACK ►DELETE ALL ►MEMO ►TAM ON/OFF►TAM SETTINGS (ANSWER MODE, TAM LANGUAGE, OGM SETTINGS, ANSWER DELAY, RECORD TIME, COMPRESSION, BS SCREENING,REMOTE ACC, CHANGE PIN)
REGISTRATION & DE-REGISTRATION
Note: Handset and base station are pre-registered.
Up to 4 handsets can be registered to a single base station.
In the case of re-registration, the PIN code is 0000.
Registration a handset
On Handset:Press MENU/OK  select REGISTRATION, Press MENU/OK
  select BASE(1-4), Press MENU/OK
  enter PIN.
At the same time on Base: Press MENU/OK  , select REGISTRATION, press MENU/OK
  to see PLEASE WAIT
(If the registration is successful, there will be a confirmation beep).
De-Registration
On Base: Press MENU/OK  , select SETTINGS, press MENU/OK
select DELETE HS, press MENU/OK  enter PIN, press MENU/OK
select one of the handsets that you want to de-register, press MENU/ OK  to confirm.
INTERCOM
Internal Call
Base: Press INT/  /CLEAR (
  ), select HS 1 - 5, press MENU /OK
  to connect.
Handset: Press C/MUTE  , Enter the desired handset number on keypad.
Base is "7"
Call all handsets
Base: Press INT/  /CLEAR (
  ), select ALL HANDSETS, press MENU /OK
  to connect. Handset: Press C / MUTE
  , Enter "9" on keypad.
Transfer an External Call
Base: Press MENU /OK  , select handset number, press
  or
or  on handset. After connection quit the call on base.
Handset: Press MENU / OK  , select INTERCOM, Press MENU / OK
  ,
,
Enter the desired handset number on keypad. After connection quit the call on handset.
Conference Call
Handset: Press MENU / OK  , select INTERCOM, Press MENU / OK
  ,
,
Enter the desired handset number on keypad.
After connection press and hold  until CONFERENCE is shown.
Your telephone base includes a telephone answering machine that records unanswered calls when it is on. The answering machine can store up to 59 messages within the maximum recording time of approximately 15 minutes. As well as recording incoming messages, you can record memos for other users of your phone.
Press  ANS ON/OFF to switch the answering machine ON or OFF
REMOTE OPERATIONS
If you are away from your home, you can call your answering machine to switch on or off the answering machine and listen to your messages remotely using another tone-dialing phone.
- Place a call from a tone-dialing phone.
- When the answering machine answers the call and starts playing OGM, press.
- Enter the 4-digit Remote Access PIN (default PIN is 0000).
- Press the following keys to carry out your desired function.
| A | Functions | |
| While message is not playing | While message is playing | |
| 2 | Delete the current message playback | |
| 4 | Repeat playing the current message from the beginning. Press twice to skip backward to the previous message. | |
| 5 | Play the message | |
| 6 | Skip forward to play the next message | |
| 7 | Turn on the answering machine | |
| 8 | Stop the current message playback | |
| 9 | Turn off the answering machine | |
| * | Enter the 4-digit remote access PIN | |
NOTE:
When your answering machine memory is full and the answer mode is in ANS & RECORD, the answer mode will change to ANSWER ONLY automatically.
It will change to ANS & RECORD mode automatically after some messages have been deleted.
You cannot delete new messages before they were listened.
MAINTENANCE
Clean the surface of the housing with a soft, fluff-free cloth.
Do not use any cleaning agents or solvents.

Documents / ResourcesDownload manual
Here you can download full pdf version of manual, it may contain additional safety instructions, warranty information, FCC rules, etc.
Download Geemarc Amplidect Combi 295 - Telephone Quick Start
Advertisement


Need help?
Do you have a question about the Amplidect Combi 295 and is the answer not in the manual?
Questions and answers