
Summary of Contents for Realme RMV2002
- Page 1 BLUETOOTH SOUNDBAR WITH WIRED SUBWOOFER MODEL: realme soundbar MODEL: RMV2002 PLEASE READ THIS MANUAL CAREFULLY BEFORE OPERATION AND KEEP IT FOR FUTURE REFERENCE...
-
Page 2: Important Safety Instructions
IMPORTANT SAFETY INSTRUCTIONS CAUTION RISK OF ELECTRIC SHOCK DO NOT OPEN CAUTION: TO REDUCE THE ELECTRIC SHOCK, DO NOT REMOVE THE COVER (OR BACK). NO USER SERVICEABLE PART INSIDE, REFER SERVICING TO QUALIFIED SERVICE PERSONNEL. DANGEROUS VOLTAGE:The lighting flash with arrowhead symbol within an equilateral triangle is intended to alert the user to the presence of uninsulated “dangerous voltage”... - Page 3 IMPORTANT SAFETY INSTRUCTIONS Before using the unit, be sure to read all operating instructions carefully, please note that these are general precautions. Some of the following may not pertain to this unit. 1. Read these instructions All the safety and operating instructions should be read before the appliance is operated.
- Page 4 An appliance and cart combination should be moved with care. Quick stop, excessive force and uneven surfaces may cause the appliance and cart combination to overturn. 13. Unplug this apparatus during lightning storms or when unused for long periods of time. To protect your product from a lightning storm, or when it is left unattended and unused for long periods of time, unplug it from the wall outlet.
-
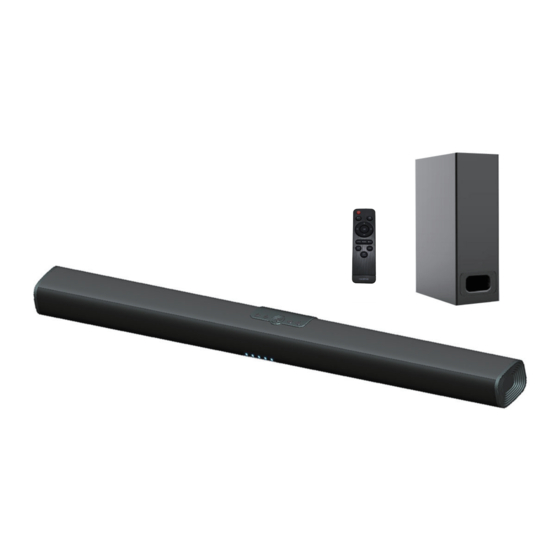
Page 5: Package Contains
If the product has been dropped or the cabinet has been damaged. f) When the product exhibits a distinct change in performance- this indicates a need for service. PACKAGE CONTAINS 1.realme soudbar 2. User Manual 6. 2xMetal Bracket 4.Remote Control 5. Power adapter 3. - Page 6 MOUNTING 1. Mounting Distance 33.6 inches (853mm) 2. Mounting to the wooden wall A. Mark the position of the mounting screws on the wall. B. Drill the screws directly into the marks you have made on the wall and leave 0.25 inches length to hook the soundbar. C.
-
Page 7: Product Overview
PRODUCT OVERVIEW TOP PANEL REAR PANEL POWER COAX DC IN 9 10 11 1. Mode button: press repeatedly to switch to bluetooth, ARC, USB, optical, AUX in or coaxial mode. 2. Play/Pause button: press to play or pause. 3. Power on/o button: press to power on or o . 4. - Page 8 FRONT VIEW 14 15 16 17 18 13. Remote sensor: for remote control 14. LED indicator 1: bluetooth mode, blinks blue for pairing, stay blue when connected successfully. 15. LED indicator 2: ARC mode, light blue 16. LED indicator 3: blinking green for indicating volume level, it will turn red while the unit enters standby mode.
-
Page 9: Remote Control
REMOTE CONTROL 1. Power on/o button Mute mode button 2. Bluetooth mode button 9. Volume up button 3. Previous button 10. Next button 4. Play/pause button 11.Volume down button 5. EQ mode(MOVIE,MUSIC,NEWS) button 12. USB mode button 6. Aux/Arc mode button 7.Optical/Coaxial mode button... -
Page 10: Power Supply
The remote control sensor at the front of the soundbar is sensitive to the remote control’s commands up to a maximum of 7 metres away and within a maximum arc of 30 degrees. Please note that the operating distance may vary depending on the brightness of the room. -
Page 11: Bluetooth Operation
LED 1 blinking blue to switch to bluetooth mode. 4. Using the native controls on your Bluetooth device, select the “realme soundbar” in your Bluetooth settings to pair and try to connect. 5. When successfully paired and connected, a beep will issue from the unit. - Page 12 HDMI(ARC) IN OPERATION 1. You will need: An audio source with an ARC Audio Output and a ARC Audio cable (not included). 2. Connect the ARC Audio cable to the ARC output on the audio source and to the ARC Input on the soundbar. 3.
- Page 13 OPTICAL IN OPERATION 1. Connect the OPTICAL OUT jack from the external audio player (such as TV, DVD player etc.) to the OPT jack on the rear of the unit. Connection is illustated below:(For PCM format only) OPTICAL OUT POWER REAR PANEL COAX DC IN...
-
Page 14: Aux In Operation
AUX IN OPERATION 1. This unit can be connected to the TV and listen through the speakers. 2. Plug one end of the AUX IN cable into the AUX jack on the unit. 3. Plug another end of the AUX IN cable into the L&R jacks on the TV. White POWER REAR PANEL... -
Page 15: Usb Operation
USB OPERATION 1. Press the USB button on the remote control or press the M button on the unit repeatedly until the LED 1 and 2 lighting blue to switch to USB mode. 2. Insert USB player to play music automatically. POWER REAR PANEL COAX... -
Page 16: Coaxial Operation
COAXIAL OPERATION 1. Connect the COAXIAL OUT jack from the external audio player (such as TV, DVD player etc.) to the COAX jack on the rear of the unit. 2. Connect the Digital Coaxial Audio cable to the optical output on the audio source and to the Coaxial Input on the soundbar. -
Page 17: Troubleshooting
TROUBLESHOOTING If the unit does not work properly as desired, please check the following. Malfunction Possible causes/measures 1、Check whether the power is switched on or o at the wall. No power / function 2、Check whether the power adaptor is properly connected to power outlet or not. 3、Press the POWER button on the unit or remote control to power on 1、Check whether cables are properly... -
Page 18: Specifications
SPECIFICATIONS INPUT:100-240V~50/60Hz 1.2A Power Supply: 20V,2.5A. OUTPUT:DC24V/2A Speaker Output Power 1 00W (Soundbar 60W+ Subwoofer 40W) 2.0'' Full range speaker x 2 Speaker Size & Number + 2.0'' Tweeter speaker x 2 Speaker Size(Wireless): 5.25" Subwoofer*1 Working environment -10~ + 50℃ (Temperature) Relative Humidity 35% ~ 85%... - Page 19 3.If the product fails due to non-human factors, the user can present the warranty card and proof of purchase to the realme customer service center for free maintenance during the warranty period. Non-warranty situation: This warranty does not cover the following cases: 1.
- Page 20 Warranty Card(Stub Copy) Dear user, thank you for using the product of our company. Please read and keep properly the warranty card after purchasing the product so that we can provide better services to you. User Information User's name Phone Number Address Email Product Information...
- Page 21 At realme we understand that our responsibility doesn't end at selling you our products. realme has been working in the area of safe disposal of electronic waste. Since mobiles, tablets and other electronic items are made of hazardous constituents. Under the Guidelines of Ministry of Environment, Forest and Climate Change, Government of India, E-waste (Management) Rule, 2016 and Amendment E-waste Rule 2018.
Need help?
Do you have a question about the RMV2002 and is the answer not in the manual?
Questions and answers