Advertisement
Quick Links
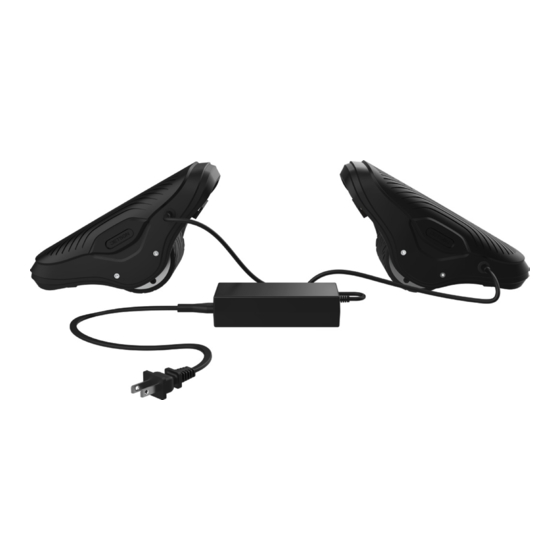
Product Overview
a. Power Button
f. Wheel
b. Mat Sensor
g. Training Bar
c. Carrying Handle
h. Training Bar Screws (x4)
d. Battery Indicator Lights
i. Side Plate
e. Charging Port
j. Charger
(On opposite side)
k. Charging Cable
i.
a.
d.
b.
e.
c.
f.
g.
h.
j.
Specs & Features
• Product Dimensions: 10.6" (L) × 5.5" (W) × 4.5" (H) (Each)
• Weight Limit: 220 lbs
• Product Weight: 6.0 lbs (Each)
• Wheel Size: 3.5"
• Max Speed: 7 mph
• Max Range: 6 miles
• Battery: 25.9V, 1.9Ah Lithium-Ion (Each)
• Motor: 250W Hub Motor (Each)
• Charger: 100-240V
• Charging Time: Up to 3 Hours
• Climbing Angle: Up to 10°
• Recommended Age: 13+
Please Note: Images may not reflect exact appearance of actual product.
Getting Started
Charging your MotoKicks
• Only use the included charger.
• Plug the charger into the wall before the charging port.
• Never turn on the MotoKicks while they are charging.
• Charge the battery until it is fully charged before using — up to 3 hours.
• Replace the cover over the charging port when done.
• Never leave the MotoKicks charging overnight.
• Charger Indicator Light:
- Charging
- Charge Complete
Battery Indicator Lights
k.
Battery Indicator Lights
Lights
Charge
> 20%
20-30%
Percentage
Important: As a safety precaution, Motokicks will automatically turn off
when they battery charge level goes below 10%.
How to Recalibrate
If your Motokicks are not performing as they should, are beeping or
spinning, or feel off balance, their internal balance mechanisms need to
be realigned. This is called "recalibrating."
Power Button
Follow these 3 simple steps:
1. Turn the MotoKicks off and place them on a flat, level surface.
2. Hold each Power Button for about 5 seconds until the lights
flash and the MotoKicks beep.
3. Restart the MotoKicks by turning them off and then back on.
Note: it can take up to 3 recalibration attempts to achieve proper internal alignment.
* Keep the
MotoKicks
leveled and still throughout the recalibration process.
While recalibrating, do not lean on or put any weight on the MotoKicks.
How it Works
If you can ride a hoverboard, you can ride Jetson MotoKicks.
• Power On: Place on level ground, then turn on each MotoKick by
quick-pressing the Power Button.
• Balance Mode: Gently tilt both MotoKicks and they will self-stabilize.
Riding your MotoKicks
Charger Indicator Light
1. Lean slightly forward to move
forward. You got this!
30% +
3. Turn by leaning to the side as
you ride. Way to go!
Helmet Safety
Proper positioning:
The forehead is covered
by the helmet.
* Wear a helmet, appropriate clothing, shoes, and safety gear. Avoid clothing
that can get caught into or under the wheels. Closed-toe, flat shoes are
recommended. Wear an ASTM F1492 approved helmet and protective gear to
prevent injury in the event of an accident.
2. Lean slightly backward to move
in reverse or brake.
Master your
MotoKicks!
Scan this for
more riding tips.
4. Step off when the MotoKicks are
at complete stop. Just step back-
wards one foot at a time.
Great riding!
Improper positioning:
The forehead is exposed.
A fall could result in serious injury.
Advertisement

Related Manuals for Jetson MotoKicks


Summary of Contents for Jetson MotoKicks
- Page 1 • Motor: 250W Hub Motor (Each) Follow these 3 simple steps: • Charger: 100-240V • Charging Time: Up to 3 Hours 1. Turn the MotoKicks off and place them on a flat, level surface. • Climbing Angle: Up to 10° Proper positioning: Improper positioning: 2.
- Page 2 Do not attempt to disassemble, modify, repair, or replace the unit or any components of the unit without Questions? Let us know. • Avoid intense physical shock, severe vibration, or impact. instruction from the Jetson Care Team. This will void any warranty, and can lead to malfunctions which may cause injury. • Protect from water or moisture.