Advertisement
Quick Links
Advertisement

Related Manuals for BANGGOOD TS-9210

Summary of Contents for BANGGOOD TS-9210
- Page 1 T S - 9 2 1 0 R a d i o m i r r o r p r o j e c t i o n c l o c k m a n u a l...
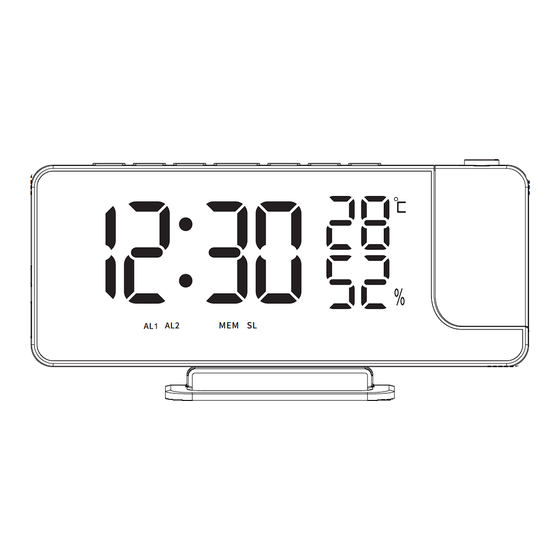
- Page 2 TS-9210 Radio mirror projection clock : 2.4cm 18.5cm --------- ---------------------------------------------------------------------------------------- ------------ 7.7cm MEM SL AL1 AL2 ------------- 1.2cm --------------------------------...
- Page 3 Function and button indication diagram TEMPERATURE TIME HUMIDITY ALARM AL1 AL2 MEM SL SAVE RADIO STATIONS RADIO SLEEP...
- Page 4 HORN CR2032 BATTERY COMPARTMENT REMOVABLE SUPPORT FRAME...
-
Page 5: Alarm Setting
VOLUME DOWN/SWITCH RADIO ALARM SETTING TEMPERATURE UNITS project radio sleep al 1.2 PHOTOSENSITIVE PORT UP/PROJECTION PROJECTOR SNOOZE/BRIGHTNESS ADJUSTMENT /AUTOMATIC SENSITIVITY USB OUTPUT PORT TYPE-C POWER PORT... - Page 6 Thank you for purchasing and using the TS-9210 radio mirror projection clock , the following is the user's operating guide. 1.Functions: LED time display The default is the brightest , six levels of brightness can be adjusted 7 function buttons:...
- Page 7 2.Power supply method: 1.Type-c power cord power supply (the LED lights always on when the power cord is powered). 2. CR2032 button batter y (The batter y is not powered and is only used to remember the time). Note: The product is shipped without batteries. Type-c (1.5m USB power cord) Back view...
- Page 8 3.Power on and reset: Default display after power on: LED white light Time: 0:00 Default time system: 24-hours format Default unit: temperature [℃];humidity [%] The initial interface display of power-on reset...
- Page 9 4.Time setting: 1. In the time display mode,press the【set】to enter the setting mode,the setting items are displayed and flashing,and the setting sequence is: hour setting → minute setting → 12/24 hour system setting → snooze hour setting. (As shown in Figure 1) 2.
- Page 10 5.Alarm setting: 1. In the time display mode,press the【al 1.2】 to enter the alarm clock setting mode, and the setting items are displayed and flashing during the setting process. and the setting sequence is:AL1 hour setting → AL1 minute setting → AL1 alarm mode selection and off alarm setting → AL2 hour setting →...
- Page 11 6.Alarm and snooze: 1. The alarm time is 2 minutes. 2. When the alarm sounds, the alarm symbol "AL1"/"AL2" flashing. 3. Snooze function: When AL1 or AL2 alarms, press 【 】to enter the snooze mode, the default is 5 minutes.Press other keys except 【 】to stop the alarm.
- Page 12 3. In the time display mode, long press【 】for 2 seconds, "ON" will be displayed to turn on the auto-sensitive function; long press【 】again for 2 seconds,"OFF" will be displayed to turn off the auto-sensitive function.(As shown in Figure 4) 4.
- Page 13 8.Projection function: 1. In the time mode, press the【project】 to turn on the projection function, and the projection lamp defaults to high brightness. press the【project】 to switch the brightness of the projection lamp, the sequence is: high→low→off. (As shown in Figure 5) 2.
- Page 14 9.FM radio function: 1. In the time mode, press the【radio/sleep】to turn on the radio function. "ON" will be displayed first, and then the FM frequency will be displayed. (As shown in Figure 6) Figure 6 2. Press the【radio/sleep】key, after the display shows "ON", press the【radio/sleep】key again to select the time to turn off the radio.
- Page 15 Figure 7 10.The radio can store up to 10 stations: 1. Turn on the radio and search for your favorite station. 2. Press and hold the【set】until "01" appears. Press set again to save station 01.(As shown in Figure 8) 3. Press【▲】/【▼】to select other stations you like. Then press and hold【set】until “01” appears.
- Page 16 4. Repeat step 2 to step 3 above to set up station 3 to station 10. 5. In the radio mode, press the 【set】to listen to the saved stations directly. 6. If you want to change a saved station, simply repeat the save station step, and the new selected station will replace the old one.
- Page 17 12.Charging function: There is a USB output port on the side of the product, which can be used to charge cell phones or other electronic devices through the USB output with an output voltage of 5V in the state of using Type-c power cable connection for power supply.(as shown in Figure 10) Figure 10 USB output port...
- Page 18 T S - 9 2 1 0 收 音 机 镜 面 投 影 时 钟 说 明 书...
- Page 19 TS-9210收音机镜面投影时钟: 2.4cm 18.5cm --------- ---------------------------------------------------------------------------------------- ------------ 7.7cm MEM SL AL1 AL2 ------------- 1.2cm --------------------------------...
- Page 20 功能及按键指示图 温度 下午 时间 湿度 闹钟 AL1 AL2 MEM SL 存台 收音机定时功能...
- Page 21 喇叭 CR2032电池仓 可拆卸支撑架...
- Page 22 收音机 设置按键 减键/切换温度单位 闹钟1/闹钟2设置 project radio sleep al 1.2 自动感光端口 加键/投影 投影灯 音量调节 贪睡/亮度调节/自动感光功能 USB输出孔 Type-c电源孔...
- Page 23 感谢您购买使用TS-9210收音机镜面投影时钟,以下是用户使用操作指南: 1.功能: LED时间显示 默认为最亮档,六档亮度可调 project radio 7个功能按键: al 1.2 sleep 投影功能,投影可以180度旋转 收音机功能 4位时间显示:小时,分 12小时制和24小时制可以切换,默认24小时制 时钟开机默认显示为0:00 两组闹钟 贪睡功能,5至60分钟可调延时响闹 自动感光功能 温湿度显示功能(温度单位可切换℃/℉)...
- Page 24 2.供电方式: 1.Type-c电源线供电(Type-c电源线供电时,产品常亮)。 2.CR2032纽扣电池(电池不供电,只用于记忆功能)。 备注:产品发货不含电池。 Type-c(1.5米USB电源线) 后视图 左视图...
- Page 25 3.上电及复位: 开机后默认显示:LED白光 时间:0:00 默认时间制式:24小时制 默认单位:温度[℃], 相对湿度[%] 上电复位初始界面显图...
- Page 26 4.时间设置: 1.在时间显示模式下,单按【set】键进入设置模式,设置项目显示并闪烁,设置顺序为:小时设置→分钟设置 →12/24小时制设置→贪睡时长设置。(如图1所示) 2.设置时,单按【▲】键,加1,长按【▲】键,快加(8步/秒),单按【▼】键,减1,长按【▼】键,快减 (8步/秒)。 3.在设置过程中10秒内无操作,将自动保存当前设置,并退出时间设置模式。 图1 贪睡时间 小时设置 分钟设置 1 2 / 2 4 小 时 制 设 置...
- Page 27 5.闹钟设置: 1.在时间显示模式下,单按【al1.2】键,进入闹钟设置模式,设置过程中,设置项目显示并闪烁。设置顺序 为:“AL1小时设置→AL1分钟设置→AL1响闹模式选择及关闭闹钟设置→AL2小时设置→AL2分钟设置→ AL2响闹模式选择及关闭闹钟设置。(如图2所示) 2. 设置闹钟1时,AL1图标显示,设置闹钟2时,AL2图标显示。 图2 AL1小时设置 AL1分钟设置 AL1响闹模式选择 AL2小时设置 AL2分钟设置 AL2响闹模式选择 及关闭闹钟设置 及关闭闹钟设置 3.设置小时和分钟时,单按【▲】键,加1,长按【▲】键,快加(8步/秒);单按【▼】键,减1,长按【▼】 键,快减(8步/秒)。 4.设置响闹模式时,默认显示“OFF”, 按【▲】键/【▼】键可切换显示“bu”或者“rd”,OFF=关闭闹钟, bu=BIBIBI声,rd=收音机声...
- Page 28 6.闹钟响闹和贪睡: 1.响闹时间2分钟。 2.闹钟响闹时,响闹符号“AL1”/“AL2”闪烁。 3.贪睡功能:当AL1或AL2响闹时,按【 】键进入贪睡模式,默认5分钟。 按除【 】键以外其他按键,停止响闹。 7.亮度选择及自动感光: 1.通电默认为高亮档。 2.单按【 】键,切换亮度顺序:100%→80%→60%→40%→20%→0%→循环。(如图3所示) 图3 AL1 AL2 AL1 AL2 AL1 AL2 AL1 AL2 AL1 AL2 100%...
- Page 29 3.在时间显示模式下,长按【 】键2秒,显示“ON”,打开自动感光功能;再次长按【 】键2秒, 显示“OFF”,关闭自动感光功能。(如图4所示) 4.自动感光:产品根据环境光暗强弱自动感应,环境光越亮,则产品背光越亮,环境光越暗,则产品背光越暗。 图4 AL1 AL2 AL1 AL2 自动感光功能开启 自动感光功能关闭 project radio 自动感光端口 sleep al 1.2...
- Page 30 8.投影功能: 1.在时间模式下,单按【project】键开启投影功能,投影灯默认为高亮。按【project】键可切换投影灯亮度, 顺序为:高亮-低亮-关闭。(如图5所示) 2.在投影功能开启状态下,长按【project】键,投影画面会旋转180°,投影柱可调:前90°,后90°。 投影柱 图5 高亮 project radio sleep al 1.2 低亮...
- Page 31 9.FM收音机功能: 1.开启收音机, 单按【radio/sleep 】键, 显示屏会先显示“ON” 再显示FM频率。(如图6所示) 图6 2.单按【radio/sleep】键,显示屏显示“ON”之后,再次单按【radio/sleep】键,可选择关闭收音机的时间。 依次是:05、10、15、30、45、60、75、90。(比如:选择“05”,收音机会在播放5分钟后自动关闭) 3.开启收音机后,单按【▲】键/【▼】键可手动选台,长按【▲】键/【▼】键可自动选台。 4.开启收音机后,单按【vol】键,可以调节音量。屏幕会显示“L10”,按【▲】键/【▼】键可调节音量大小, 由“L00”最小,至“L15”最大。(如图7所示) 5.开启收音机后,单按【 】键,可直接关闭收音机并退回时间模式。 图7...
- Page 32 10.收音机存可储存10个电台: 1.开启收音机并搜寻你喜欢的电台。 2.长按【set】键直至 出现“01”, 再单按 【set】键来储存台 01。(如图8所示) 3.再单按【▲】键/【▼】键去选其他你喜欢的电台, 然后长按【set】直至出现 “01” , 单按【▲】键/【▼】 键, “02” 出现,单按【set】键来储存台 02。 4.重复以上步骤 2至和步骤3来设定3至10的存台。 5.在收音模式下, 单按【set】键, 可直接选听已存的电台。 6.如果要改变已存的电台, 只需重复存台步骤, 这样新选的电台就会代替旧的电台。 图8...
- Page 33 11.温湿度功能: 1.产品通电,默认显示℃,长按【▼】键,可切换温度单位℃/℉。(如图9所示) 2.室内温度范围:0-50℃;室内湿度范围:20%-95%。 图9 图10 USB输出孔 AL1 AL2 AL1 AL2 12.USB输出功能: 产品侧边设置有一个USB输出孔,可在使用Type-c电源线连接供电的状态下, 通过USB输出给手机或其他电子设备充电,输出电压5V。(如图10所示) RoHS MADE IN CHINA...
Need help?
Do you have a question about the TS-9210 and is the answer not in the manual?
Questions and answers