
Related Manuals for AOC AGON AGM600


Summary of Contents for AOC AGON AGM600
- Page 1 USER'S GUIDE AGM600 Gaming Mouse CAUTION: To use this product properly, please read the user's guide before installing.
-
Page 2: Table Of Contents
Contents 1 Package Contents and System Requirements ............. 3 2 Technical Specifications ....................3 3 Device Layout ......................4 4 Windows Installation ....................5 5 Open Methods ......................7 6 Software Update ......................8 7 Home ........................... 8 8 Device Setting......................10 8.1 Mouse Settings .................... -
Page 3: Package Contents And System Requirements
Kailh mechanical switch with up to 80 million clicks lifespan ◼ Up to 1000 Hz/1ms report rate ◼ 2 onboard memory profiles ◼ Customizable RGB lighting effect syncing with other AOC gaming devices ◼ 1.8 M braided cable ◼ Approximate Size & Weight Length: 130.5 mm/ 5.13 in ◼... -
Page 4: Device Layout
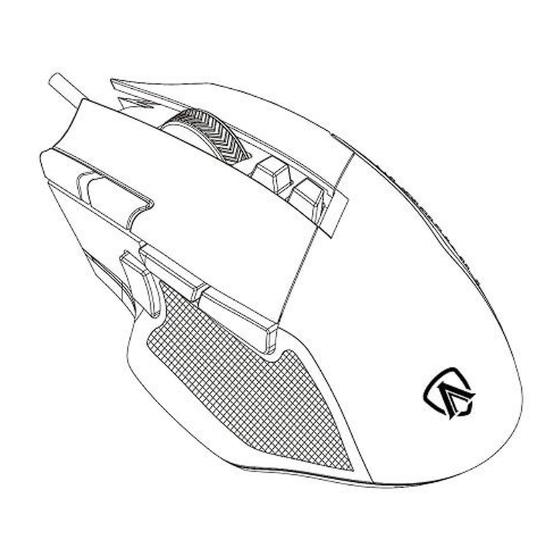
Operating Environment Operating Temperature: 0 ° C (32 ° F) to 40 ° C (104 ° F) ◼ Operating Humidity: 10% - 85% ◼ 3 Device Layout 1. Left Button 2. Right Button 3. Middle Button/Scroll Wheel 4. Volume up 5. -
Page 5: Windows Installation
4 Windows Installation 1. Download the AOC G-Menu executable, and double click the EXE file to start the installation. 2. Accept the license agreement by selecting the I Agree radio button, and clicking the Next button. 3. Select the installation folder. Select the default folder by pressing the Next button. - Page 6 4. Confirm Installation by pressing the Next button. 5. Complete the installation by pressing the Close button. Congratulations on installing G-menu!
-
Page 7: Open Methods
To uninstall G-Menu: For Windows 10: Go to Windows Settings > Apps > Apps and Features > select G- Menu and press the Uninstall button. For Windows 7/8/8.1: Go to Control Panel > Programs > Programs and Features > select G-Menu and press the Uninstall button. 5 Open Methods There are 3 ways to access the G-Menu application. -
Page 8: Software Update
After the download is complete, the interface will alert you to install the update. ⚫ Note: If there is no network connection, G-Menu will not be able to detect updates. 7 Home ⚫ Open AOC G-Menu application and enter the home page. - Page 9 1) Application name: Displayed on the top left, not clickable. 2) Brand logo, Software version: Displayed at the bottom right, not clickable. 3) Minimize/Restore: Displayed at the top right. Click to switch the interface to zoom in/restore the display. 4) Setting: Displayed at the top right. Click to enter the setting interface, where you can set the language.
-
Page 10: Device Setting
8 Device Setting 1. Top Navigation ⚫ G-Menu navigation options: Home, Monitor, Mouse, Keyboard, Mouse mat, Headset, and Macro. ⚫ The names of unconnected devices are greyed out. ⚫ Click an active button to open the device settings interface. ⚫ Click the Home button to return to the homepage. - Page 11 ⚫ Click the Meatball menu to expand the profile selection item: Add, Import, Export, Rename, and Associate. A) Add ⚫ Enter the name of the new profile. ⚫ Click the File button to open the local executable file or enter the execution path in the input box directly.
- Page 12 ⚫ Click the Save button to save the exported profile. D) Rename ⚫ Change the name of the current profile. It cannot be a duplicate of an existing profile name. ⚫ Click the Save button to save the new name. ⚫...
- Page 13 ⚫ Click the Save button to add the application to the profile. ⚫ Click the Cancel button to close the pop-up box. 6. On board memory Click the icon to open the On-Board Memory pop-up interface 1. The left side of the interface is the current device on-board, the right side is list of all local profile files.
-
Page 14: Mouse Settings
2. On-board adaptation: Drag the profile file to the back of the corresponding on-board color. After completion, the profile will be immediately applied to the on-board to take effect. 3. Delete a profile ⚫ Click the delete icon behind the profile to delete it. ⚫... -
Page 15: Customize
8.1.1 Customize 1. Mouse ⚫ Displays the currently connected mouse. 2. Key sequence number ⚫ Not clickable. 3. Button definition ⚫ Click the Mouse Button drop-down menu to display all key functions supported by the current device. ⚫ Select the Macro Manager option to enter the Macro Select to use see 8.1.1.1. ⚫... - Page 16 4. Cancel ⚫ Click the Cancel button to cancel this mouse setting and revert to the previously saved state. 5. Apply ⚫ Click the Apply button to save the current setting. 6. Reset to Factory Settings ⚫ Click the Reset button, the dialog box is as follows: ◼...
- Page 17 8.1.1.1 Macro select 1. Click the drop-down box to select an existing macro. 2. Add ⚫ Click the Add button to display the macro editing interface. 3. Delete ⚫ Click the Delete button to remove the currently selected macro. 4. Import ⚫...
- Page 18 ⚫ Repeat Times: Enter the number of times to repeat the macro action, default 1. ⚫ Repeat Until You Press Any Macro Key to End: Repeat the macro action until you press any macro key to end replay of the macro. ⚫...
-
Page 19: Sensitivity
8.1.2 Sensitivity 1. DPI Setting ⚫ Each DPI setting has a corresponding color. ⚫ DPI 1-6, click the icon to highlight, the input box and the slider below are activated. ◼ You can create up to 6 different settings. Change the setting with the slider from left to right. -
Page 20: Light Fx
⚫ Enhance Pointer Precision: Enable this checkbox for Windows OS to provide additional acceleration for rapid mouse movement. 5. Scroll Speed ⚫ Adjust mouse wheel scroll speed. ⚫ The 1 Page (Scrolls a Full Page) checkbox sets the mouse wheel to scroll entire pages. 8.1.3 Light FX 1. -
Page 21: Light Fx Sync
⚫ A color can be selected from the color palette, color block, or a color can be defined by entering RGB values. 4. Pulsation ⚫ Select how fast the color will change. 5. Brightness ⚫ Select the brightness the color will glow or turn off. 6. - Page 22 1. Light FX ⚫ Click the Light FX drop-down menu to select a light effect. 2. Color ⚫ Random: Let the computer select a random color. ⚫ Single Color: open a palette to select a single color for the LEDs. 3.
-
Page 23: Macro
4. Pulsation ⚫ Select how fast the color will change. 5. Brightness ⚫ Select the brightness the color will glow or turn off. 6. Device ⚫ Not clickable, the currently connected devices are highlighted. 7. Cancel ⚫ Click the Cancel button to cancel this setting and return to the last saved state. 8. - Page 24 1) Macro Name ⚫ Enter a name into the text box. 50 characters max. 2) Delay ⚫ Select the delay time for running the macro. ⚫ Recording: Follow the delays between actions exactly as recorded. Default. ⚫ Fixed: The trigger time between each action is fixed. Default, 20ms. ⚫...
- Page 25 5) Save ⚫ Click the Save button to save the macro, making the macro editable. 6) Cancel ⚫ Click the Cancel button to cancel the macro creation process. 3. Delete ⚫ Click the Delete button to delete the macro. Then confirm or cancel the deletion. 4.
- Page 26 ◼ Find the macro file to import. ◼ Click the Open button to import the macro file. ◼ Click the Cancel button to cancel the import, and close the dialog box. 5.Export ⚫ Click the Export button to open a Save As dialog box, the file name defaults to the current macro name.
-
Page 27: Discover
8.3 Discover Discover and share profiles with others on the G-Menu network. 1. Back ⚫ Click the < (Back) button to return to the main menu. 2. Discover ⚫ Click the Discover button in the upper left corner to refresh the screen. 3. - Page 28 ◼ New: Displays the newest profiles. ⚫ Profile Details ◼ Cover image: Each profile comes with a cover image. ◼ Publisher name: The account that created and uploaded the profile. ◼ Supported devices: Select the icon to reveal the supported model details. ◼...
-
Page 29: Download Profile
7. If the network cannot be reached the following error screen will appear. ◼ Click the Retry button to try connecting again. 8.3.1 Download profile 1. Click the Download button to start downloading the selected profile. ⚫ This display will change to 'Downloading...'. 2. -
Page 30: Configure Profile
⚫ Click the Apply button to begin configuration. ⚫ Click the Dismiss button to configure later. 3. Abnormal situation ⚫ If the download is interrupted, the software will attempt to continue or you may re-download later. 8.3.2 Configure Profile 1. When the profile download is complete, click the Apply button. ⚫... - Page 31 ◼ Click the OK button to close. 2. Configure 1) Name ⚫ Enter a name for the configuration. 2) Devices ⚫ Select your specific device models. 3) Profile ⚫ The current profile is displayed by default, and the selection cannot be switched. 4) Close ⚫...
-
Page 32: Upload
8.3.3 Upload Configure a profile and upload to share with others. 1. Title ⚫ Enter a title. This is a required field. ⚫ The number of input characters is limited to 50 characters. 2. Input short description ⚫ Enter a description of the profile. The character limit is 300. 3. -
Page 33: Search
⚫ Click the Close button to cancel upload. 9. After the upload is successful, the “Upload Successfully!” pop-up dialog box will appear. 8.3.4 Search Prerequisite: Click the search bar ⚫ Supports search of the publisher, profile name, and description text. 8.3.5 Login Log into your account. - Page 34 ⚫ Click the Create Account button to create an account. For more information, see below. 6. Privacy Policy ⚫ Click the Privacy Policy button to read the privacy policy for this software. 7. Terms of Service ⚫ Click the Terms of Service button to read the Terms of Service for this software. 8.
- Page 35 5. Verification code confirmation ⚫ Enter the verification code you received. ⚫ Click the OK button: ◼ If the verification code is correct, it will prompt that the account is created successfully, click the Login button to re-enter the account login interface. ◼...
- Page 36 8.3.5.2 Forgot Password 1. To reset your password: Enter the email address associated with your account. A recovery link will be sent. 2. Click the Email Me button to have the password reset email sent. 3. Email password reset 1) Password reset link received in the email ⚫...
- Page 37 ⚫ Alternatively, copy and paste the link into your browser to open it there. ⚫ Link valid time: 2 hours. 2) Password reset interface ⚫ Enter and confirm a password containing between 6 to 18 characters (numbers or letters). ⚫ Click the Reset Password button: ◼...
- Page 38 3) Error message: The reset password link has expired ⚫ The link sent in the email was not clicked on within the 2-hour reset period. 8.3.6 My Account Prerequisite: You must be logged in to access your account information. Click on the My Account button to display the account information. 1) Account options:...
- Page 39 ⚫ Click the My Uploads button to enter the My Uploads interface. ⚫ Click the My Downloads button to enter the My Downloads interface. ⚫ Click the Account Setting button to enter the Account Settings interface. ⚫ the Log out button to log the account out of the device. Click 8.3.6.1 My uploads 1.
- Page 40 8.3.6.2 My downloads 1. Display the profile information and download time of profiles that have been downloaded and saved locally. 2. Click the Configuration button to enter the configuration interface. 3. Click the Delete button to delete the profile file locally and return to the Profile list.
- Page 41 8.3.6.3 Account settings 1. The Email address cannot be changed, to change the email address create a new account. 2. Profile picture ⚫ Click to open a File Explorer dialog box to change the picture. 3. Edit Name 4. Edit password ⚫...
-
Page 42: Setting
8.4 Setting Change the setting for G-Menu. Switch Language ⚫ Displays all currently supported languages, among which the currently used language is highlighted. ⚫ Click the appropriate language button to switch languages immediately. Back ⚫ Click the < (Back) button to return to the previous interface. 8.5 Tray Exit ◼... -
Page 43: Safety Guide And Maintenance
6. If the troubleshooting process does not resolve the issue, unplug the device and visit www.aoc.com for support. Do not attempt to repair the device yourself. Safety Federal Communication Commission Interference Statement This device complies with Part 15 of the FCC Rules. - Page 44 —Connect the device into an outlet on a circuit different from that to which the receiver is connected. —Consult the dealer or an experienced radio/TV technician for help.
Need help?
Do you have a question about the AGON AGM600 and is the answer not in the manual?
Questions and answers