Table of Contents
Advertisement
Quick Links
SK magic Dishwasher
매직 식기세척기
Triple Care Series
Dishwasher
DWA19R0P
DWA19C0P
• Please read the safety precautions in this manual thoroughly before use to ensure safe operation.
• Please store the manual in a safe location close to the appliance for future reference.
• The structure and exterior of the appliance may be enhanced for quality improvement without prior
notice.
(REV.00)
Advertisement
Table of Contents

Summary of Contents for SK magic Triple Care Series
- Page 1 SK magic Dishwasher 매직 식기세척기 Triple Care Series Dishwasher DWA19R0P DWA19C0P • Please read the safety precautions in this manual thoroughly before use to ensure safe operation. • Please store the manual in a safe location close to the appliance for future reference.
-
Page 2: Table Of Contents
Contents Safety Information Loading Dishes Installation Guidelines Separating the Upper/Lower Racks Power Source Guidelines Suggested Loading Pattern Usage Guidelines Rack Loading Tips Product Breakdowns & Repairs Maintenance Before Using the Dishwasher Cleaning the Filter Before First Use Cleaning the Dish Racks Cleaning the Inside and Outside Preparing for Wash of the Product... -
Page 3: Safety Information
Safety Information • The following precautions are for the safe and proper usage of this product. Be sure to follow them to prevent unexpected risks and damage. • The safety-related precautions are classified according to the expected risk, the magnitude of damage, and the level of risk if used incorrectly. -
Page 4: Power Source Guidelines
Power Source Guidelines WARNING When you are removing the power plug, you must hold the plug and not operate or handle it with wet hands. • Failure to do so may cause an electric shock or fire. Connect the power plug firmly to the outlet, and do not use the outlet when it is loose. •... - Page 5 Keep the dishwasher detergent in a safe place out of the reach of children, and do not let children or pets ingest detergent or detergent water (residual water). • If swallowed, there is a risk of mouth burns, vomiting, and difficulty in breathing. •...
-
Page 6: Product Breakdowns & Repairs
CAUTION Please use detergent that is recommended for residential dishwashers only. • The use of general detergents may cause excess foaming, which may result in product failure, electric shock or fire. Do not sprinkle water directly on the dishwasher as it has electric parts inside. •... -
Page 7: Before Using The Dishwasher
Before Using the Dishwasher Before First Use 240 V Connect the power plug to the power outlet. • The product is intended for 240 V only. • Connect to a 240 V outlet with a ground wire. OPEN Open the valve of the water supply connection. •... -
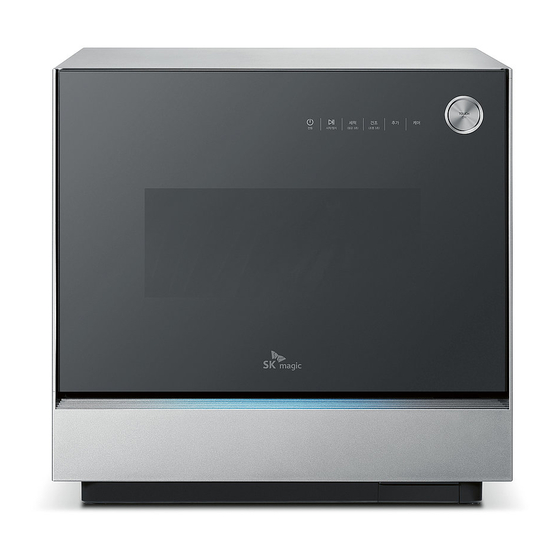
Page 8: Product Description
Product Description External Parts TOUCH ON button Safety Light Drain Hose Power plug Parts User manual Drain Hose Drain Hose Fixer Air Care Filter* Water Care Filter* (Fine Dust Filter) (Sediment Filter) Accessories marked with * after the name are limited to their corresponding models. -
Page 9: Internal Parts
Internal Parts Upper rack Cutlery rack Lower rack Detergent Compartment UV LED Dishwasher Filter Dishwasher door Separate Purchases Dishwasher Detergent Water Supply Hose Extension Pipe NOTE • Customers are responsible for the cost of additional parts required for installation. • Contact the Customer Service Center (1-800-18-7878) to purchase additional parts. -
Page 10: Display & Control Panel
Display & Control Panel Control panel Display Classification Button Description • It displays the remaining time and operational status of the Display 01 Display product. 02 POWER • You can turn the power on or off. START/ • Select start or pause. PAUSE •... -
Page 11: Cycle & Function Overview
Cycle & Function Overview • You must select the cycle before operation. The cycle cannot be changed during the operation. • Changing the washing or drying cycle is not possible after the product starts operating. To change the cycle, you must turn the product off and then on again, choose the cycle that you wish to use, and restart the process. - Page 12 2. Program description Total operation time Wash Washing Rinse Drying Normal Extra Extra Cycle Pre Wash unselected drying drying Rinse Normal - 1 time 3 times 50 minutes minutes minutes (If selected) (If selected) Heavy - 1 time 4 times 59 minutes minutes minutes...
- Page 13 Care Cycle • The care cycle keeps the dishes clean after the washing and drying cycles by using the air care filter and UV LED for 30 minutes every 2 hours. • You can select the care cycle in the washing + drying cycle, or in single drying. You cannot select the care cycle in the single washing cycle.
-
Page 14: Wash + Dry Cycle
Wash + Dry Cycle This cycle simultaneously provides washing and drying. 1. Press the [TOUCH ON] button to open the door and place the dishes to be cleaned in the dish racks. 2. Close the door. 3. Press the [WASH] button to select the cycle of your choice. -
Page 15: Single Wash Cycle
Single Wash Cycle This cycle only washes and does not dry. 1. Press the [TOUCH ON] button to open the door and place the dishes to be cleaned in the dish racks. 2. Close the door. 3. Press the [DRY] button 3 times to deactives the drying cycle. -
Page 16: Single Dry Cycle
Single Dry Cycle This cycle only dries and does not wash. 1. Press the [TOUCH ON] button to open the door and place the dishes to be cleaned in the dish racks. 2. Close the door. 3. Press the [WASH] button 3 times to deactivate the washing cycle. -
Page 17: Option Functions
OPTION Functions Use this when you add functions to the WASH cycle. 1. Press the [TOUCH ON] button to open the door and place the dishes to be cleaned in the dish racks. 2. Close the door. 3. Press the [WASH] button to select the cycle of your choice. -
Page 18: Care Function
Care Function Use this when managing dishes without the washing or drying cycles. In particular, you cannot dry the dishes only with the care function. 1. Press the [TOUCH ON] button to open the door and place the dishes to be cleaned in the dish racks. -
Page 19: Lock Function
Lock Function 1. Press the [WASH] button for more than 3 seconds. 3 seconds or more 2. The lock function is activated with a 'ding' alarm sound. • The lock status is shown as Lock on the display panel. • Press the [WASH] button for more than 3 seconds to deactivate the lock. -
Page 20: Light Function
Light Function 1. Press the [START/PAUSE] button 1 time and press the [DRY] button for more than 3 seconds 3 seconds. or more • When the light is off, Light is shown on the display panel. • Press the [DRY] button for more than 3 seconds to turn on the light, and Light on the display panel disappears. -
Page 21: Mute Function
Mute Function 1. Press the [CARE] button for more than 3 seconds. 3 seconds or more 2. The mute function is activated with a 'ding' alarm sound. • When activating the mute function, OF (OFF) is shown on the display panel. •... -
Page 22: How To Use
How To Use TOUCH ON 1. Press the [TOUCH ON] button on the front with your finger. • The door opens with an alarm sound. CAUTION • Do not open the door by force. Open it by pressing the [TOUCH ON] button after connecting to the power plug. -
Page 23: Adding Detergent
Adding Detergent 1. Put an adequate amount of powder, tablet or liquid detergent into the compartment. 2. Close the door and press the [START] button. • If using tablet detergents, you can place them directly into the dishwasher. NOTE Cycle Classification Normal Heavy... -
Page 24: Loading Dishes
Loading Dishes Separating the Upper/Lower Racks CAUTION • The shape and material of the dish rack may be changed to improve dish storage. • Do not pull out the upper and lower racks simultaneously when the dishes are stored. • When you wish to wash larger dishes, remove the upper rack. 1. -
Page 25: Suggested Loading Pattern
Suggested Loading Pattern... -
Page 26: Rack Loading Tips
Rack Loading Tips CAUTION • The shape and material of the dish rack may be changed to improve dish storage. • Put light tableware, such as cups or melamine dishes, in the upper rack. Upper Rack • It is suitable to wash dishes of lower height, such as rice bowls, coffee cups, and frying pans. •... - Page 27 Lower Rack • It is suitable for washing wide dishes, such as plates and pots. • Place the side of dishes you wish to wash facing down. • Place utensils, cutlery, forks, knives, tongs, etc., so that they do not overlap with each other. •...
- Page 28 Wine Glasses (Applicable models only) 1. Put the wine glass holders down, as shown in the image. 2. Put the wine glasses into the holder and wash them. Intensive Flow zone Put baby bottles, tumblers, and cups on the holders of the intensive flow zone to wash them.
- Page 29 Baby Basket • Place baby bottle caps on the upper hanger, as shown in the image. • Place the baby bottle holders and covers inside the box. • Place them on the lower rack to wash them.
-
Page 30: Maintenance
Maintenance Cleaning the Filter • After use, be sure to close the valve of the water supply connection and remove the power plug from the outlet for safety. • Clean the product after the inside temperature has dropped sufficiently, about 30 minutes after the operation. -
Page 31: Cleaning The Dish Racks
5. Wash the filter, outer filter, and fine filter with water. 6. After reassembling the outer filter, precisely reassemble the fine filter under it. • If the filters are not properly assembled, washing performance may deteriorate. 7. Push the filter down until it makes a 'click' sound. -
Page 32: Cleaning The Inside And Outside Of The Product
Cleaning the Inside and Outside of the Product Clean the inside of the washing tank or the door with a damp cloth. • Remove stains on the surface with a neutral detergent and wipe with a dry cloth. CAUTION • If you use bleach, benzene, or cleanser to clean the inside of the washer or the door, the product may be discolored or become rusty. - Page 33 After 20 to 30 minutes, select the Normal washing cycle to check whether the Normal product operates properly. When there is a power or water outage When there is a power outage If the product stops operating during a power outage, try using it again once the power is back.
-
Page 34: Replacing The Water Care Filter (Applicable Models Only)
Replacing the Water Care Filter (Applicable models only) 1. Remove the water care filter cover inside by turning it counterclockwise. 2. Grab the handle of the water care filter and pull it up to remove the filter. 3. Install the new filter by inserting it from top to bottom, and close the cover. -
Page 35: Replacing The Air Care Filter (Applicable Models Only)
Replacing the Air Care Filter (Applicable models only) 1. Remove the air care filter case at the bottom by pulling it forward. 2. Remove the air care filter by pulling it up. NOTE • Reuse the air care filter case by washing it with water. -
Page 36: Troubleshooting
Troubleshooting If you encounter a problem with the appliance, first check the table below and try the suggested solutions. If the problem persists, please contact the Customer Service Center. (1-800-18-7878) Problem Checklist/Solution • Press the [POWER] button. The product will not •... -
Page 37: Information Codes
Information Codes The Control Panel displays information codes to help you understand what is occuring with your dishwasher. If the same situation continues, contact the Customer Service Center. (1-800-18-7878) Code Action • There is an issue with the water supply. Check if the intermediate valve is open. -
Page 38: Specifications
Specifications 523 mm 523mm 540 mm 540mm 370mm 370 mm Product Name Triple Care Dishwasher Model DWA19R0P, DWA19C0P Max. Power 1,830 W Consumption Rated Voltage (220-240) V~, 50/60 Hz Water consumption 8.7 L Operating Pressure & 0.09 - 0.78 MPa, below 60 Temperature Dimensions (mm) 540 (W) ×... - Page 39 Memo...
Need help?
Do you have a question about the Triple Care Series and is the answer not in the manual?
Questions and answers