
Subscribe to Our Youtube Channel
Related Manuals for DEKALA WeatherStation Pro SWS-S002

Summary of Contents for DEKALA WeatherStation Pro SWS-S002
- Page 1 Dekala WeatherStation Pro™ (SWS-S002) Indoor weather station Wireless sensor User Manual Please read this manual carefully before using the product and keep it with proper storage (V1.1)
- Page 3 Download App Instruction Videos Support@dekalastore.com Please feel free to contact if you need any assistance...
-
Page 4: Table Of Contents
Content Warning Feature Description Packing List Base Unit Specification Sensor Specification Quick Guidance Installation and placement 1. Installation and placement 2. Sensor placement 3. Sensor battery charging 4. How to Pair Base Unit and Sensor APP Connection 1. Download the App 2. -
Page 5: Warning
Warning Please keep sensor in a safe place to prevent children from swallowing it. When using this product, the environmental temperature should not exceed 140℉( 60°C) or be lower than -4℉(-20°C); the humidity should not exceed 99% or be lower than 0%. This product is not fireproof, please do not throw it into the fire, do not go near the source of fire. -
Page 6: Packing List
Packing List Base Unit *1 Sensor *1 Adapter *1 Charging Cable *1 lanyard *1 User Manual *1... -
Page 7: Base Unit Specification
Base Unit Specification Model SWS-S002 Material ABS+PC Size 160×23×160mm Output USB-A 5V-1A Color Black Input Micro USB 5V-2A Weight 335g Temperature unit ℃/℉ Operating Temperature -4℉-140℉(-20℃~60℃) Humidity unit Communication WiFi (2.4G) + Bluetooth Accuracy Temp: ±0.5 ℃ Humidity : ±2 %RH Sensor Specification Power supply 3.7V 400mA lithium battery... -
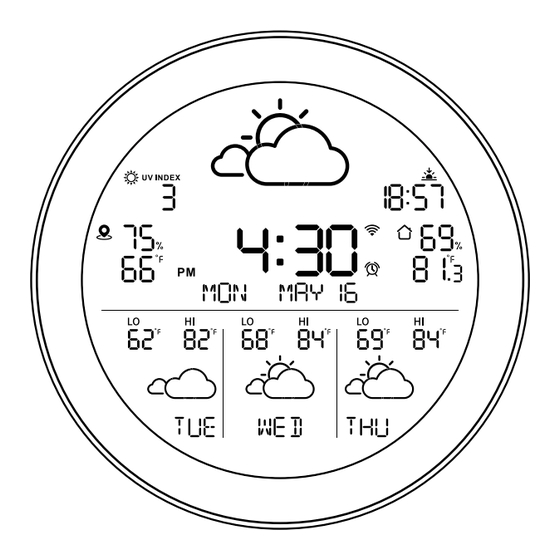
Page 8: Quick Guidance
Quick Guidance Front View Weather icon Weather Forecast: sunny, cloudy, overcast, rain, thunder, snow UV Index Sunrise and sunset time Sunrise icon Sunset icon Online city temp Temperature & humidity data & humidity data from base unit Digital clock Weather forecast for the next three days Lowest temperature WiFi... - Page 9 Back View Hanging Hole Sensor sync /reset button Power output Power input WiFi setup button Stand Power input Top View Display Brightness Control Turn off alarm clock...
- Page 10 About the Sensor LED light Pair Button (hidden) Front View Top view Lanyard slot Micro USB Interior View Back View...
-
Page 11: Installation And Placement
Installation and placement 1. Installation and placement 2 Way of Base Unit installation Power input Stand on table Back view Wall hanging hole Power input Mount on wall Side view... -
Page 12: Sensor Placement
2. Sensor placement Insert lanyard through the hole 3. Sensor battery charging ① Twist the battery cover ② Insert micro USB power ③ Twist the battery counter clock wise to unlock input charging cable cover clockwise to lock Note: the red indicator means "Charging", when fully charged the red indicatore disappears. -
Page 13: How To Pair Base Unit And Sensor
4. How to Pair Base Unit and Sensor ⑴ The Base Unit shall be placed indoors; The Sensors could be placed indoors/outdoors within the maximum communication distance. Note: The distance between Base Unit and Sensor should be 50-80m/164-262ft(without obstacles) (2) Plug in to power, then connect 2.4G WiFi (refering to page 12). Default Default display Time-Display... - Page 14 (3) Long press "SYNC/PAIR" button to enter synchronous mode, press the button on Sensor to activate it first, light spot on the front side flashing. Then press and hold the button on Sensor to sync with Base Unit. Base Unit will beep once after successful synchronization and auto exit SYNC mode. (Note: remote sensor data will not show on display, only accessible through App.) Connection Succeed WiFi icon stays solid...
- Page 15 (4) Adding 1 more Sensor if bought, please short press "SYNC/PAIR" button again to activate sync mode. Press the button on Sensor to activate it first, light spot on the front side flashing. Then press and hold the button on Sensor to sync the second Sensor, beep one time to show sync succeed. Repeat the above steps to sync the third Sensor.
-
Page 16: App Connection
1. Download the App Download "Dekala" from App Store / Google Play or Scan the QR code, sign up and log in Attention: Wi-Fi (2.4 GHz only) Please allow app access to your cellphone bluetooth before connecting, App will help you find your device automatically. -
Page 17: App Guidance
APP Guidance 1. Connect device to app ① Open up "Dekala" app, click ② Turn on Bluetooth as ③ Select the device you want to " " or "Add Device"; prompted, click on "Add"; connect and click" "on the right;... - Page 18 (make sure the smartphone the same area when your 2.4 GHz Wi-Fi, click on and Dekala App are both connecting(as closely as "Done" to complete the Wi-Fi connected to 2.4 GHz Wi-Fi); possible);...
-
Page 19: Weatherstation Pro Home Page
2. WeatherStation Pro Home Page Geographical location Time and date Sunset time Weather data (weather status; current temperature & humidity) Weather forecast for the next three days (weather status; highest/lowest temperature; day of the week) Alarm clock setting Base Unit data Historical data (temperature;... -
Page 20: Alarm Clock
3. Alarm Clock (1) Set Alarm Clock Setting alarm clock only by App;... - Page 21 (2) Turn Off Alarm Clock: ① Turn off alarm clock by App; ② Turn off alarm clock by buttons...
-
Page 22: Share Device
4. Share Device Click " " in the upper right corner to enter, find "Share Device" to share data. -
Page 23: Faqs
Please reconnect the Base Unit with 2.4G WiFi first, the weather data will be auto obtained and refresh after the network available;weather data will be updated every 15 minutes,please make sure allow Dekala(App) to access your location for an accurate data.
Need help?
Do you have a question about the WeatherStation Pro SWS-S002 and is the answer not in the manual?
Questions and answers