Advertisement
Quick Links
Advertisement

Summary of Contents for William Optics RedCat 51
- Page 1 INSTALLATION GUIDE: REDCAT51, EAF, ASIAIR BRACKET...
- Page 2 Tools you’ll need: ● 2mm Hex Key ● 2.5mm Hex Key Step 1 Using your 2.5mm hex key, remove the two screws from the saddle, and place it to the side. These screws will be replaced with screws in the kit, so I suggest storing them in a safe place, just in case you want to bring the telescope back to its default configuration.
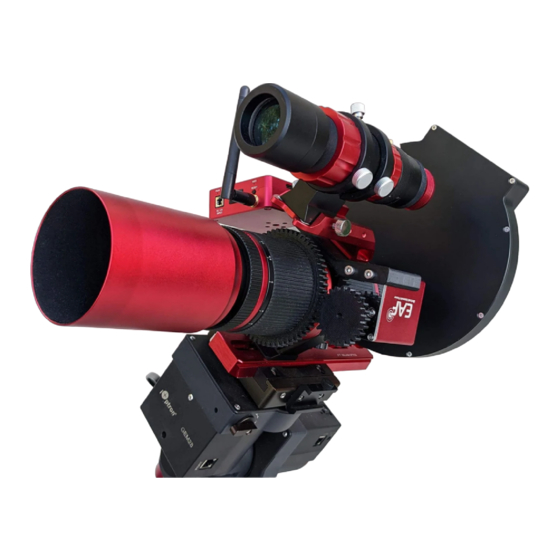
- Page 3 Step 2 Place the Electronic Auto Focuser (EAF) in the bracket. The fit should be kind of snug, this is intentional. Once the holes are lined up, use the 2 screws that came with your EAF to secure it to the bracket, using your 2.5mm hex key. The screws should be snug, but don’t need to be overly tight.
- Page 4 Step 3 Using your 2.5mm hex key, remove the 2 screws that hold the dovetail. Keep these 2 screws handy as we’ll be using them in the next step.
- Page 5 Step 4 Using the two screws from step 3, secure your ASIair Pro or Asiair Plus using your 2.5mm hex key.
- Page 6 Step 5 Remove the dew shield by spinning it to the left. It might be a little snug depending on temperature. If you can’t get it off, it’s best to bring it inside and let the telescope warm up a little bit.
- Page 7 Step 6 Slide the large gear over the front of the telescope and down the focuser. You should feel some resistance when sliding it over the rubber part of the focuser, this is by design. I’ve found that rocking it side to side while pushing it down works the best. You’ll want to slide it most of the way down, but make sure it’s still on top of the raised pieces of rubber.
- Page 8 Step 7 Place the assembled adapter on top of the telescope and mount it using the supplied M4x8 (the smaller of the two sets of screws) and your 2mm hex key. Note: the image above shows phillips head screws, we’ve since replaced them with 2mm hex screws, but the process is still the same.
- Page 9 Step 8 (Optional) If you plan on using the saddle (optional), mount it onto the top of the bracket using the supplied M4x14 screws (the larger of the two sets of screws), and your 2.5mm hex key.
- Page 10 Step 9 Align the small gear shaft with the shaft of the EAF. The gear will have a notch in it, so it can only fit onto the EAF shaft one way. You can either look at it and try and line it up, or push the gear against the EAF shaft, and slowly rotate it until it lines up and slides on.
- Page 11 Step 10 Screw the dew shield back onto the front of the telescope. Your setup is now complete.
- Page 12 Optional: If you find that the fitment of the focus ring is a little too loose, you can locate, and tighten the silver grub screw using a 1.5mm hex key, until it’s snug. You don’t have to over tighten the grub screw.
Need help?
Do you have a question about the RedCat 51 and is the answer not in the manual?
Questions and answers