Table of Contents
Advertisement
Quick Links
iSmartTTM 600 User Manual
www.newsmartsafe
Copyright Information
Copyright © 2021 by SHENZHEN SMARTSAFE TECH CO.,LTD. All rights reserved. No part of this
publication may be reproduced, stored in a retrieval system, or transmitted in any form or by any means,
electronic, mechanical, photocopying, recording or otherwise, without the prior written permission of
SMARTSAFE.
Neither SMARTSAFE nor its affiliates shall be liable to the purchaser of this unit or third parties for
damages, losses, costs, or expenses incurred by purchaser or third parties as a result of: Accident,
misuse, or abuse of this unit, or unauthorized modifications, repairs, or alterations to this unit, or failure
to strictly comply with SMARTSAFE operating and maintenance instructions. SMARTSAFE shall not be
liable for any damages or problems arising from the use of any options or any consumable products
other than those designated as Original SMARTSAFE Products or SMARTSAFE Approved Products by
SMARTSAFE.
All information, specifications and illustrations in this manual are based on the latest information
available at the time of printing. SMARTSAFE reserves the right to make changes at any time without
prior written or oral notice.
Trademark Information
SMARTSAFE is a registered trademark of SHENZHEN SMARTSAFE TECH CO.,LTD. in China and
other countries. All other SMARTSAFE trademarks, service marks, domain names, logos, and company
names referred to in this manual are either trademarks, registered trademarks, service marks, domain
names, logos, company names of SMARTSAFE or are otherwise the property of SMARTSAFE or its
affiliates. In countries where any of the SMARTSAFE trademarks, service marks, domain names, logos
and company names are not registered, SMARTSAFE claims other rights associated with unregistered
trademarks, service marks, domain names, logos, and company names. Other products or company
names referred to in this manual may be trademarks of their respective owners. You may not use any
trademark, service mark, domain name, logo, or company name of SMARTSAFE or any third party
without permission from the owner of the applicable trademark, service mark, domain name, logo, or
company name. You may contact SMARTSAFE by visiting the website at www.newsmartsafe.com, or
writing to SHENZHEN SMARTSAFE TECH CO.,LTD., 3310, Building 11, Tianan Cloud Park, Bantian
Street, Longgang District, Shenzhen, Guangdong, China, to request written permission to use Materials
on this manual for purposes or for all other questions relating to this manual.
I
Advertisement
Table of Contents

Related Manuals for SmartSafe iSmartTTM 600

Summary of Contents for SmartSafe iSmartTTM 600
- Page 1 SMARTSAFE. Neither SMARTSAFE nor its affiliates shall be liable to the purchaser of this unit or third parties for damages, losses, costs, or expenses incurred by purchaser or third parties as a result of: Accident, misuse, or abuse of this unit, or unauthorized modifications, repairs, or alterations to this unit, or failure to strictly comply with SMARTSAFE operating and maintenance instructions.
- Page 2 Safety Warnings iSmartTTM 600 Tyre Tread Depth Measuring Equipment is suitable for tread depth measuring of four- wheel passenger cars. To avoid personal injury, property damage and accidental injury, please read and follow all safety tips in this chapter carefully before using the product.
-
Page 3: Table Of Contents
Table of Contents 1. Packing List .............................. 1 2. Product Introduction ..........................3 2.1 Overview ..............................3 2.2 iSmartTTM 600 Main Frame ........................3 2.3 Technical Parameters ..........................2 3. Equipment Installation ..........................3 3.1 Installation Environment Requirements ....................3 3.2 Site Size ..............................3 3.3 Installation Steps ............................3... -
Page 5: Packing List
600 User Manual www.newsmartsafe 1. Packing List The product configuration for different markets is different. For details, please consult the local dealer or check the randomly distributed packing list. Accessory Name Reference Picture Quantity Measuring Unit (Left) Measuring Unit... - Page 6 600 User Manual www.newsmartsafe. Bluetooth Adaptor Bursting Screw (M8x60) Socket Head Cap Screw (M6x16) User Manual Packing List Certificate...
-
Page 7: Product Introduction
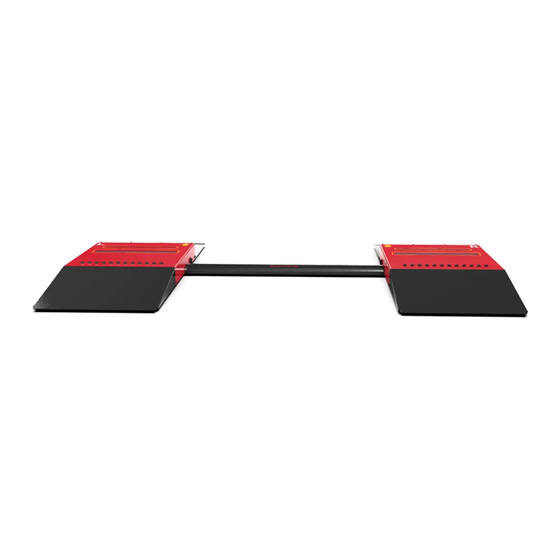
600 passenger car pass-through tyre tread depth measuring equipment is developed by SMARTSAFE to detect the tire tread data and tire wear status of four-wheel passenger cars. This equipment can accurately and quickly detect the wear status of each tire of the vehicle, and provide reference for tire replacement and vehicle maintenance. -
Page 8: Technical Parameters
600 User Manual www.newsmartsafe. 1. Inclined Bridge Slab 2. Laser Glass Window 3. Camera Glass Window 4. Usb Type-A 5. Power Port 6. Power Switch 7. Pressed Trigger Switch 8. Camera Adapter Cable Jack (Reserved) 9. Data Adapter Cable Jack 10. -
Page 9: Equipment Installation
600 User Manual www.newsmartsafe 3. Equipment Installation 3.1 Installation Environment Requirements 1. The tyre tread depth measuring equipment must be installed and used indoors. 2. Avoid installing it in an environment with direct sunlight or other strong light, so as not to affect the measurement accuracy. - Page 10 600 User Manual www.newsmartsafe. 3. Use a 10mm drill to drill holes at the positioning holes (positions ①~⑧ as shown in the figure below). 4. Place the left (L) and right (R) measuring units with reference to the installation positioning stickers, align the hole of the concrete anchor on the measuring unit with the ground, and then insert the bolt of the concrete anchor into the hole (as shown in the following figure at positions ①...
- Page 11 600 User Manual www.newsmartsafe 7. Insert the two ends of the data adapter cable B (3 pin) into the port "II" of the left and right measuring units respectively, and insert the two ends of the power adapter cable A (2 pin) into the port "I" of the left and right measuring units respectively.
- Page 12 600 User Manual www.newsmartsafe. 10. Connect the four inclined bridge slabs to the left and right measuring units respectively and fix them with screws (four screws on the top of each inclined bridge slab and one screw on each side).
- Page 13 600 User Manual www.newsmartsafe 12. Insert one end (white point upward) of the aviation plug of the power extension cable into the power port on the left side of the left measuring unit and tighten the lock nut clockwise. Connect the other end to the power adapter, and then insert the power adapter into the power socket.
-
Page 14: Initial Use
600 User Manual www.newsmartsafe. 4. Initial Use 4.1 Software Download The client is divided into PC Version (the client configures the computer host and display device) and Android Version (applicable to P01, P03 and other diagnostic devices). The minimum configuration requirements of the computer running the PC client are as follows:... - Page 15 "Bluetooth adapter connection successful", and the Bluetooth icon on the screen will be lit. Android client Bluetooth connection 1. Click "iSmartTTM 600" on the diagnostic equipment to enter the tread depth measuring function module. The system will automatically search for available Bluetooth devices, and select the Bluetooth name of the tyre tread depth measuring equipment in the Bluetooth device list (the Bluetooth name is the equipment serial number).
-
Page 16: Client Settings
600 User Manual www.newsmartsafe. 4.3.2 USB Wired Connection This connection mode is suitable for PC use. 1. As shown in the figure below, insert one end of the USB cable into the USB port on the left side of the left measuring unit, and connect the other end to the female connector of the USB extension cable. - Page 17 600 User Manual www.newsmartsafe Mode Settings The system has its own default mode. If you need to add a new mode, click "Mode Settings" and then click "Add Mode". Set parameters of different depths as required, enter the mode name, and click "Save"...
- Page 18 600 User Manual www.newsmartsafe. Shop Settings Click "Shop Settings", enter the shop information, and then click "Save". The set shop information will be displayed on the tread depth detection report. System Settings This function is only supported by the PC client, including setting the system language, setting the communication mode (USB/Bluetooth), trun on/off automatic printing, and selecting a printer.
- Page 19 600 User Manual www.newsmartsafe Mode Settings The system has its own default mode. If you need to add a new mode, click "Mode Settings" and then click "Add". Set parameters of different depths as required, enter the mode name, and click "Save" to add a new mode.
- Page 20 600 User Manual www.newsmartsafe. Shop Settings Click "Shop Settings", enter the store information, and then click "Save". The set store information will be displayed on the tread depth detection report.
-
Page 21: Start Measuring
600 User Manual www.newsmartsafe 5. Start Measuring 5.1 Precautions • Sundries such as soil, snow and stones embedded in the tire may affect the measuring results. If the measuring results are abnormal, it is recommended to clean the tires of the vehicle before measuring. - Page 22 600 User Manual www.newsmartsafe. 4. After the measuring is completed, the tire tread data of all wheels of the vehicle will be displayed on the screen, and the braking distance prediction, tire wear status and maintenance suggestions will be provided.
- Page 23 600 User Manual www.newsmartsafe Displays the right rear tire tread pattern data, each groove depth data, RR-Right Rear Tire and lists the maximum and minimum values of all groove depths. Tread Pattern Data Green indicates normal depth, yellow indicates warning depth, and red indicates dangerous depth.
-
Page 24: Detection Records
600 User Manual www.newsmartsafe. 6. Detection Records 6.1 PC Client Detection Records Click "Record" on the main page of PC client to view the historical detection records. Screen Button Description: 1. Record filtering: select the measuring time interval or enter the license plate number to filter and view the corresponding detection records. -
Page 25: Android Detection Records
600 User Manual www.newsmartsafe 6.2 Android Detection Records Click "Detection record" on the Android application software to view the historical detection records. Filter: Select the detection time interval or enter the license plate number to filter and view the corresponding detection records. -
Page 26: Backup And Restoration
600 User Manual www.newsmartsafe. 7. Backup and Restoration This function is used to back up client data and restore client historical data. On the client main page, choose "Settings" > "Backup and restore", click "…" to select the file storage path, and then click Backup to back up the client data. -
Page 27: Service And Maintenance
This WARRANTY applies only to customers and dealers who have purchased SmartSafe products through normal procedures. Within one year from the date of delivery, SmartSafe Company shall guarantee the defects of its electronic products caused by materials or processes. Damage of the equipment or components caused by abuse, unauthorized modification, use for purposes other than the design of the product, or failure to operate in the way specified in the instruction shall not be covered by this warranty.
Need help?
Do you have a question about the iSmartTTM 600 and is the answer not in the manual?
Questions and answers