Table of Contents
Advertisement
Quick Links
Advertisement
Table of Contents

Summary of Contents for Asiatelco R3Di Bright Flip
- Page 1 Bright Flip User Manual R3Di FR150...
-
Page 2: Table Of Contents
Table of Contents Getting Started ..........................6 Introduction ........................... 6 Set Up Your Phone ......................... 7 Parts and Functions ....................... 7 Battery Use ........................8 Insert the Battery ....................9 Remove the Battery ..................... 10 Charge the Battery ....................11 SIM Card ........................ - Page 3 Place a Call from Contacts ................... 30 Call from Call Log ....................31 Voicemail ........................31 Optional Calling Services ..................... 33 Call Waiting ......................33 Conference Calling ....................33 Call Forwarding ....................33 Call Settings ........................34 Contacts ..........................35 Add a Contact .......................
- Page 4 Bluetooth Information ..................55 Enable the Bluetooth Feature ................55 Pair Bluetooth Devices ..................56 Connect to a Paired Bluetooth Device ..............57 Send Information Using Bluetooth ..............58 Receive Information via Bluetooth ..............58 Apps and Entertainment ......................59 Camera and Video ........................
- Page 5 Input Methods Settings ....................80 Privacy & Security Settings ....................81 Screen Lock Settings ....................81 App Permission Settings ....................82 Do Not Track Settings ....................83 Browsing Privacy Settings ................... 83 Storage Settings........................84 USB Storage Settings....................84 Media Storage Settings ....................84 Device Settings ........................
-
Page 6: Getting Started
Getting Started The topics in this section will introduce you to your phone, help you get set up with service, provide an overview of the phone screen, and get you started with basic phone operations. Introduction Thank you for purchasing your phone. -
Page 7: Set Up Your Phone
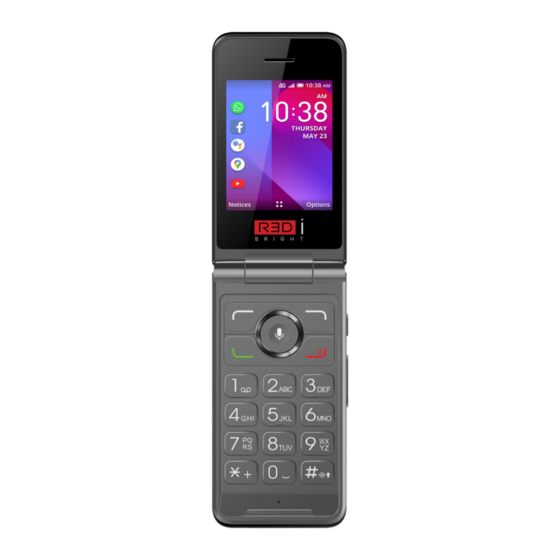
Set Up Your Phone The following topics give you all the information you need to set up your phone and wireless service the first time. Parts and Functions These topics illustrate your phone’s primary parts and key functions. Note: Your phone's screens and apps layouts are subject to change. This user guide uses sample images. -
Page 8: Battery Use
Displays all the information needed to operate your phone, such as the call status, Main Screen the Contacts list, and the date and time. Part Description External Screen Display the date, time and the notification of incoming calls or messages. Selects or confirms an option (press the middle of the key). -
Page 9: Insert The Battery
Cleaning: Clean soiled terminals between battery and phone with a clean, dry cotton swab. Soiled terminals can result in a poor connection and prevent charging, etc. Insert the Battery Follow these instructions to insert your phone’s battery safely and properly. 1. -
Page 10: Remove The Battery
Makesureallthetabsaresecureandtherearenogapsaroundthecover. Remove the Battery Follow these instructions to remove your phone’s battery. Always power the phone off before removing the battery. 1. Removethebatterycoverbygentlyliftinginthedirectionshownbelow. 2. Removethebatterybygentlyliftingupwardasshown. -
Page 11: Charge The Battery
SIM card is preinstalled and should only be accessed if directed by a customer service representative. Handling a SIM Card Keep the following in mind when handling a SIM card. YouareresponsibleforanydamagecausedbyinsertingtheSIMcardinanotherICcard reader, etc. Asiatelco Technologies, Inc. is not responsible in such an event. AlwayskeeptheICchipclean. Wipecleanwithadry,softcloth. -
Page 12: Sd Card
ReturntheSIMcardtoyour Carrierwhencancelingsubscription. ReturnedSIMcardsarerecycledforenvironmentalpurposes. NotethatSIMcardspecificationsandperformancemaychangewithoutnotice. ItisrecommendedthatyoukeepaseparatecopyofinformationthatisstoredonSIMcard. Asiatelco is not responsible for damages from stored information that is lost. AlwaysfollowemergencyprocedurestosuspendserviceifyourSIMcardorphone(SIMcard inserted) is lost or stolen. For details, contact Customer Service. Alwayspoweroffthephone beforeinserting/removingtheSIMcard. Insert SIM Card Follow these instructions to insert a SIM card. Remember to power off your phone before inserting a SIM card. -
Page 13: Insert An Sd Card
Data: Information stored on an SD card can become lost or changed accidently or as a result of damage. It is recommended that you keep a separate copy of important data. Asiatelco is not responsible for damages from data that is lost or changed. -
Page 14: Remove An Sd Card
3. Insertthebatteryandreplacethebatterycover.(SeeInserttheBattery.) 4. Makesureallthetabsaresecureandtherearenogapsaroundthecover. Remove an SD Card Follow these instructions to remove an SD card. Important: Always power off before inserting or removing an SD card. Remove the battery cover and battery. (See Remove the Battery.) PushdownontheplasticspringandremoveSDcard. 4. Insertthebattery.Alignthebatterywiththebattery outlineinthephone. 5. -
Page 15: Complete The Setup Screens
Press and hold the End/power key Your phone will power on. Depending on the settings, you may see the lock screen. SeeLockandUnlockYourScreenandScreenLockSettingsforinformationaboutusingthe screen lock. Thefirsttimeyouturnthephoneon,youwillseethestartupscreens.SeeCompletethe Setup Screens for details. Ifyourphoneisnotyetactivated,seeActivateYourPhoneformoreinformation. Turn Your Phone Off Press and hold the End/power key . -
Page 16: Basic Operations
Followtheonscreeninstructionsto complete eachsection.Foreachtopic,youwillhavethe option to skip it and continue to the next screen. Selectanetwork–Ifprompted,followthepromptstosignintoanavailableWi-Finetwork. For secured Wi-Fi networks, you will need to enter a password. See Wi-Fi for more details. SetupKaiOSAccount–UsetheNavigationkeytoselectCreateAccountand setupa new KaiOS Account or Login Account.Complete the steps to sign in to your current KaiOS Account. Press the Right soft key to skip. -
Page 17: Basics
Basics The following topics offer an overview of your phone’s basic operations. Home Screen and Applications (Apps) List Most of your phone’s operations originate from the home screen or the apps list. 1. PresstheEnd/powerkey untildisplaythehomescreen. 2. FromanyappscreenpresstheEnd/powerkey todisplaytheappslist. For information about using the home screen, see Home Screen Basics. -
Page 18: Applications
Applications The following topics describe how to access the applications (apps) list and launch apps on your phone. Launch Applications All installed apps can be accessed and launched from the apps list. 1. From home, press the Center soft key The apps list opens. -
Page 19: Phone Number
Camera/Video Set alarms, use a stopwatch, set a timer. Clock Manage your contacts from a variety of sources. Contacts Lets you listen to the radio. FM Radio A browser you can use to surf on the Internet. Browser Manage your photos and videos. Gallery Phone Number Follow the instructions below to display your phone’s wireless phone number. -
Page 20: Airplane Mode
Airplane Mode Airplane mode turns off all functions that emit or receive signals, while leaving your phone on so you can use apps that don’t require a signal or data. To turn on airplane mode: 1. Fromtheappslist,selectSettings >Network&Connectivity. 2. SelectAirplaneMode. 3. -
Page 21: Lock And Unlock Your Screen
2. 123: this mode generates only numbers. You may type ‘1’ by pressing the ‘1’ key just once, ‘2’ by pressing ‘2’ andso on. Switch back to ABC, Abc or abc mode to continue writing words. 3. Symbols: This function provides punctuation and special characters. Symbols may be accessed by pressing the key as well. -
Page 22: Update Your Phone
Update Your Phone From time to time, updates may become available for your phone. You can apply updates through the Settings >Device >Device Information>Softwareupdatemenu. Software Update CautionsDuring update: The phone cannot be used until the software update is complete. It may take time to update your phone’s software. Signal during update: Update your phone where signal reception is good, and do not change location during the update process. -
Page 23: Your Phone's Home Screen
2. SelectSoftwareupdate. You may be required to power your phone off and back on to complete the software upgrade. Confirm Your Current Phone Software 1. Fromtheappslist,selectSettings >Device>DeviceInformation. 2. LocatetheSoftwareversionread-onlyfield. Your Phone's Home Screen The following topics describe how to use your phone’s home screen and understand the status bar. Home Screen Basics The home screen is the starting point for your phone’s applications, functions, and menus. -
Page 24: Status Bar
Press the Left soft key to view numerical notifications (missed call, new mail, Notices new message,etc. Apps list Press the Center soft key to enter the apps list. shortcuts Press the Right soft key to enter shortcuts. Tip: Press the End/power key to return to the main home screen. -
Page 25: Phone Calls And Voicemail
2. SelectWallpaperandusetheNavigationkeytoselectfromGallery,Wallpaper,or Camera. 3. SelectawallpaperandthenpresstheRightsoftkey tosetthewallpaper. Making Connections The topics in this section will cover your phone’s ability to help you make connections, from phone calls and maintaining contacts, to text messages, email, Internet, and international services. Phone Calls and Voicemail The following topics outline the use of your device’s phone app to place and receive calls, use voicemail, and more. -
Page 26: Call Using The Phone Dialer
Problem: Sound pops momentarily during a call. Answer: Are you changing location while calling? Sound pops when signal is weak and the phone switches to a different area. Emergency Call Cautions Emergency calls are restricted in Airplane mode.Press a small round button on the back of the phone and the phone vibrates to automatically dial 911 for an emergency call. -
Page 27: International Call
Problem: Call does not connect. Answer 1: Was the number dialed using the area code? If not, try dialing using the full 10-digit number including the area code. Answer 2: Are you in an area with poor wireless coverage? Try calling again from another area. - Page 28 3. As long as you are in an area covered by wireless service, the emergency call is placed. 2. To call the 9-1-1 emergency number normally or when your account is restricted: Unlock the screen. For more information, see Lock and Unlock Your Screen. 2.
-
Page 29: Answer Phone Calls
Answer Phone Calls The following information lets you know how to answer incoming calls, mute the ringer on incoming calls, reject incoming calls, and more. When you receive a phone call from a contact, the sub screen appears and displays the caller name. When you receive a phone call from someone who is not stored in Contacts, the phone number appears on the Incoming call screen. -
Page 30: Place A Call From Contacts
PresstheLeft soft key againtodeactivateSpeakertousethephone’searpiece. Warning: Because of higher volume levels, do not place the phone near your ear during speakerphone use. Mute:Mutethemicrophoneduringanactivecall. PresstheCenter soft key tomutethemicrophone. PresstheCenter soft key againtoopenthemicrophone. Options: :Press the Right soft key to display the Options details as below. ... -
Page 31: Call From Call Log
Call from Call Log The call log list lets you quickly place calls to recent received, dialed, or missed. 1. Fromtheappslist,select or presstheCallkey todisplaythecallloglist. 2. PresstheRightsoftkey todisplaytheOptionsdetails. 3. PresstheCentersoftkey ortheCallkey toplaceacall. The phone dials the number. The call begins when the other party answers. 4. - Page 32 4. Select Set Speed Dial Contacts 5. Select Voicemail and edit 6. All settings are finished. Return to home screen and hold to start the voicemail. Important: Voicemail Passcode – It is strongly recommended that you create a passcode when setting up your voicemail to protect against unauthorized access.
-
Page 33: Optional Calling Services
Optional Calling Services The following topics outline additional voice-related services available with your phone, including call services and more. Call Waiting When you’re on a call, your phone’s screen informs you that another call is coming in and displays the caller’s phone number (if it is available). To respond to an incoming call while you’re on a call: Use the Navigation key to select to answer the call or to ignore the incoming call. -
Page 34: Call Settings
1. Fromtheappslist,selectSettings >Network&Connectivity>Calling>Call Forwarding. The call forwarding menu appears. 2. Configureyouroptions.Your call settings options are set. Call Settings Your phone’s Call Settings menu lets you configure a number of other settings for the phone application. Use the Call Settings Menu 1.Fromtheappslist,selectSettings >Network&Connectivity>Calling. -
Page 35: Contacts
A TTY (teletypewriter, also known as a TDD or Text Telephone) is a telecommunications device that allows people who are deaf, hard of hearing, or who have speech or language disabilities, to communicate by telephone. Your phone is compatible with select TTY devices. Please check with the manufacturer of your TTY device to ensure that it supports digital wireless transmission. -
Page 36: Add A Contact
Contacts Cautions Information saved in Contacts may be lost or changed if the battery is removed for a long period or left uncharged. Accident or malfunction may also cause loss or change to information. It is recommended that you keep a separate copy of contacts and other important information. Sprint is not responsible for any damages from lost or changed contacts. -
Page 37: View Contacts
PersonalEmail 4. Whenyouhavefinishedaddinginformation,presstheRightsoftkey andselectSave. The contact is added. Save a Phone Number You can save a phone number to Contacts directly from the phone keypad. 1. Enteraphonenumberandselectoptions ---->CreateNewContact. 2. Toaddthenumbertoanexistingcontact,selectAddtoExistingContact.Toaddanew contact, select Create new contact. 1. Foranexistingcontact,choosethecontactnameandpress toselectAdd menu to Add phone,enter the number you want to add. -
Page 38: Contacts Screen Layout
Contacts Screen Layout The following illustration show’s your Contacts app layout and describes the various features. Item Description All contacts tab Show all contacts. Speed Dial tab Show speed dial contacts. Contact Select to show contact’s details. Contact image Show thumbnail of contact entry. Search Search contacts. -
Page 39: Delete A Contact
The contact’s detailed listing appears. 3. PresstheRightsoftkey andthenselectEdit Contact. 4. Addoredittheinformation,andthenpressSave. Your changes are saved to the contact entry. Delete a Contact You can delete a contact from the contacts details page. 1. Fromtheappslist,selectContacts . You will see the Contacts list. 2. -
Page 40: Share A Contact
Share a Contact You can quickly share contacts using Bluetooth, Gmail, or text messaging. 1. Fromtheappslist,selectContacts . You will see the Contacts list. 2. Selectacontacttodisplayit,andthenpresstheRightsoftkey andselectShare. 3. IntheShareWithmenu,selectamethod: E-MailtosendtheinformationasanEmailattachment.Addressthemessage,addasubject and a message, and then select Send. See Create and Send Email for details. -
Page 41: Back Up Contacts
3. SelectImportContactsorExportContacts. 4. Followtheonscreeninstructionstocompletetheimport. The contacts are imported and stored in the selected account. Back Up Contacts If you are saving contacts to an account that does not automatically back them up via the Cloud, you can manually back them up to an optional installed SD card for re-import if needed. Before Backing Up Contacts to an SD Card You will need to have installed an SD card with previously backed up contacts information onto your phone before you can back up your contacts. -
Page 42: Messaging
Messaging With wireless service and your phone’s messaging capabilities, you have the opportunity to share information through many different channels and accounts, including personal and corporate email, and text and multimedia messaging. Text and Multimedia Messaging With text messaging (SMS), you can send and receive instant text messages between your wireless phone and another messaging-ready phone. -
Page 43: Save And Resume A Draft Message
3. Fillinoneormorerecipients.Youcan: EnterphonenumbersdirectlyintheTofield.Asyouenterinformation,anymatchingphone numbers from your contacts list are displayed. Select a match to enter that number or address directly. PresstheRightsoftkey toaddthecontactstowhomyouwanttosendthemessage. 4. Selectthe“Message”boxandthenstartcomposingyourmessage. 5. PresstheRightsoftkey andselectAddAttachment. Note: To add a subject line, press the Right soft key and select Add Subject. -
Page 44: New Messages Notification
1. Fromtheappslist,selectMessages 2. OntheMessagesscreen,selectthemessagetoresumeeditingit. 3. Whenyoufinisheditingthemessage,presstheLeftsoftkey New Messages Notification Depending on your notification settings, the phone will play a ringtone and/or vibrate when you receive a new text or multimedia message. A notice icon also appears in the notifications area of the status bar to notify you of a new text or multimedia message. -
Page 45: Text And Mms Options
Note: If you are concerned about the size of your data downloads, check the multimedia message size before you download it. Reply to a Message 1. Fromtheappslist,selectMessages 2. OntheMessagesscreen,selectaconversationtoopenit. 3. SelecttheMessageboxatthebottomofthescreen,enteryourreplymessage,andthenpress the Left soft key to send. Note: To reply to a text message with a multimedia message, open the text message, press the Right soft key and then select Add Subject or Add Attachment. -
Page 46: Sos Message
SOS Message SOS message is a message you should have pre-edited in the phone. When you call emergency numbers, SOS message will be sent to the SOS contacts automatically 1. Edit SOS message, select Settings >Personalization>SOS Message. 2. Set the SOS contacts, you can set 5 five contacts as the SOS contacts at most. a. -
Page 47: E-Mail
e. Add SOScontacts E-Mail Use the E-Mail application to send and receive email from your webmail or other accounts, using POP3 or IMAP, or access your Exchange ActiveSync account for your corporate email needs. Set Up an Email Account Your phone supports several types of email accounts and allows you to have multiple email accounts set up at one time. -
Page 48: Add Another Email Account
Add Another Email Account If you have multiple email accounts that you wish to view on your phone, you can add several types of personal email accounts, such as POP3 and IMAP accounts on your phone. 1. Fromtheappslist,selectE-Mail 2. PresstheRightsoftkey andselectSettings.ThenpresstheLeftsoftkey account. -
Page 49: Open Email Messages
Note: To view your draft email messages, in the inbox, press the Right soft key >View Folders >Local Drafts. Note: To view your sent messages, in the inbox, press the Right soft key >Outbox. Open Email Messages You can also open and read email messages directly from the email inbox. Reading and replying to email on your phone is as simple as on your computer. -
Page 50: Manage Your Email Inbox
Manage Your Email Inbox Your email inbox provides management options for viewing, sorting, and deleting your email messages. View Your Email Inbox 1. Fromtheappslist,selectE-Mail . The email inbox opens. 2. PresstheRightsoftkey >ViewFolders>Inboxtoseeallyouremailinboxesatonce. Refresh an Email Account Whatever your automatic synchronization settings are, you can also synchronize your sent and received email messages manually at any time. -
Page 51: Browser
fuller icon means a better signal. 4G LTE data service: Your phone is connected to a 4G LTE network. Wi-Fi connection: Your phone is connected to a Wi-Fi network for data. Browser Your phone’s Web browser gives you full access to both mobile and traditional websites on the go, using 2G, 3G, 4G, or Wi-Fi data connections. -
Page 52: Browser Options
Browser Options Customize your experience with the Internet through the browser options menu. 1. From the apps list, select Browser 2. PresstheRightsoftkey toopenbrowseroptions. Your browser options are displayed. Connectivity The following topics address your phone’s connectivity options, including Wi-Fi and Bluetooth. -
Page 53: Wi-Fi
Wi-Fi Wi-Fi provides wireless Internet access over distances of up to 300 feet. To use your phone’s Wi-Fi, you need access to a wireless access point or “hotspot.” The availability and range of the Wi-Fi signal depends on a number of factors, including infrastructure and other objects through which the signal passes. -
Page 54: Wi-Fi Settings
Note: Wi-Fi networks are self-discoverable, which means no additional steps are required for your phone to connect to a Wi-Fi network. It may be necessary to provide a user name and password for certain closed wireless networks. Wi-Fi Settings Use the Wi-Fi settings menu to manually set your Wi-Fi connection options. 1. -
Page 55: Bluetooth
Bluetooth ® Bluetooth is a short-range communications technology that allows you to connect wirelessly to a number of Bluetooth devices, such as headsets and hands-free car kits, Bluetooth-enabled handhelds, computers, printers, and wireless phones. The Bluetooth communication range is usually approximately 30 feet and can vary by device. -
Page 56: Pair Bluetooth Devices
The Bluetooth settings open. 2. Select the On icon to turn Bluetooth on . Bluetooth is enabled. TodisableBluetooth,selecttheOfficon Note: Turn off Bluetooth when not in use to conserve battery power, or in places where using awireless phone is prohibited, such as aboard an aircraft and in hospitals. Pair Bluetooth Devices ®... -
Page 57: Connect To A Paired Bluetooth Device
2. Selectadevicefromthe“DevicesintheArea”list,andfollowtheonscreeninstructionstopair with the device. The Bluetooth device is paired to your phone. MethodstoacceptaBluetoothconnectiondifferdependingonthedevicesused. Paired Device 1. FromtheBluetoothsettingsmenu,selectPairedDevicestoconnected. 2. PresstheRightsoftkey toforget.The device is unpaired from your phone. To make another connection with the device, you will need to pair again. Connect to a Paired Bluetooth Device You can listen to music over a Bluetooth stereo headset, or have hands-free conversations using a compatible Bluetooth headset or car kit. -
Page 58: Send Information Using Bluetooth
Note: Due to different specifications and features of other Bluetooth-compatible devices, display and operations may be different, and functions such as transfer or exchange may not be possible with all Bluetooth-compatible devices. Send Information Using Bluetooth You can use Bluetooth to transfer information between your phone and another Bluetooth-enabled device such as a phone or notebook computer. -
Page 59: Apps And Entertainment
Media files and documents are usually opened directly in a compatible application. For example, if you open a music track, it starts playing in the Music application. For a vCard contact file, if there are multiple vCard files on your storage card, you can choose to import one, several, or all of those contacts to your contacts list. -
Page 60: Take Pictures And Record Videos
The camera viewfinder appears. Take Pictures and Record Videos The following topics teach you how to take pictures and record videos with your phone’s camera. Capturing Pictures/Videos File Format for Pictures: The file format for pictures is JPEG. File Format for Videos: The file format for videos is 3GPP. -
Page 61: View Pictures And Videos Using Gallery
Note: If you have an SD card installed, pictures and videos are stored to the SD card. If no card is installed, pictures and videos are saved to your phone’s memory. 1. From the apps list, select Camera . The camera viewfinder appears. 2. -
Page 62: Edit Pictures
The list of pictures opens. 2. Selectanimagetoviewthepicture. The picture opens. PresstheLeftsoftkey tozoominorzoomout. PresstheRightsoftkey toopenoptionsmenuandchoosewhattodowiththepicture. Pictures and Videos: Review Screen After capturing a picture or video, from the camera screen, press the Left soft key to see the item in the review screen. From there, you can access options such as view, share, set aswallpaper or delete the picture. - Page 63 Rotate a Picture 1. Fromtheappslist,selectGallery. The list of pictures opens. 2. Selectthepictureyouwanttorotate. 3. PresstheRightsoftkey andthenselectRotate. The picture is rotated. Edit a Picture 1. Fromtheappslist,selectGallery The list of pictures opens. 2. Selectthepictureyouwanttoedit. 3. PresstheRightsoftkey andthenselectEdit. An edit screen appears on the picture. ...
-
Page 64: Share Pictures And Videos
Share Pictures and Videos The Gallery application lets you send pictures using email, Bluetooth or multimedia messages. 1. Fromtheappslist,selectGallery The list of pictures opens. 2. Selectthepicturesyouwanttoshare. Toselectmultipleitems,presstheRightsoftkey >SelectMultipletoturnonmultiple select. Select all the items you want to include. 3. PresstheRightsoftkey >ShareandthenontheShareviamenu,selectE-mailor Bluetooth. Follow onscreen prompts to complete and send the message. -
Page 65: Productivity
1. Fromtheappslist,selectCamera The camera viewfinder appears. 2. PresstheRightsoftkey toopenoptionsmenu. The camera settings menu opens. 3. Selectyourdesiredsettings. The settings are applied. Settableitemsdifferdependingonthecameratypeinuse. Productivity Use your phone to stay ahead of the game with calendar, alarm, calculator and more productivity apps. Calendar Use Calendar to create and manage events, meetings, and appointments. -
Page 66: View Calendar Events
1. Fromtheappslist,selectCalendar .The Calendar app opens. 2. PresstheLeftsoftkey toaddnewevent. The add event window opens. 3. Enteraneventtitle,startdate/time,enddate/time,etc.,andthenpresstheRightsoftkey to save the event is added to your calendar. View Calendar Events You can display the Calendar in daily, weekly or monthly view. 1. Fromtheappslist,selectCalendar . -
Page 67: Sync Calendars
Sync Calendars You can select which calendars you’d like to sync on your phone, along with what types of information you want to sync. 1. Fromtheappslist,selectCalendar The Calendar app opens. PresstheRightsoftkey >Synccalendar. The sync settings have been updated. Calculator Your phone’s convenient built-in calculator lets you perform basic mathematical equations. 1. -
Page 68: Clock
Clock Your phone has a clock app that lets you set alarms, use a stopwatch, and set a timer. Check the Time You can check the clock any time on your phone. The current time displays in the center of the hone screen. -
Page 69: Entertainment And Activities
Timer The stopwatch lets you time events down to the hundredth of a second. 1. Fromtheclockapp,pressthe NavigationkeytoenterTimerscreen. 2. Setthetimeandpress tobegintiming 3. Press tostoptiming. Stopwatch The timer provides a countdown timer for up to 99 hours, 59 minutes, and 59 seconds. 1. -
Page 70: Music Screen Layoutenglish Screen Shot
1. From the apps list, select Music . The Music app opens. 2. UsetheNavigationkeytoselectalibrarycategorysuchasArtistorAlbums. 3. ChooseanitemfromthecategorywindowandthenSelectasong. The song begins playing. Music Screen LayoutEnglish screen shot The following picture outlines the main features of the Music app player screen. Feature Description Select to shuffle all Shuffle All songs. -
Page 71: Settings
Settings The topics in this section will cover your phone’s settings menus and options. For an overview of the settings menu, see Basic Settings. Connections Settings The following topics introduce your phone’s basic settings menus and cover your phone’s Connections settings options. Basic Settings From the app screen, select Settings to access your phone’s settings menu. -
Page 72: Wi-Fi Settings Menu
Category Description End user storage Check application storage status. Access important phone information and view legal and safety Device Information information. Downloads Check downloads on your phone. Battery Monitor your phone’s battery usage. Set accessibility options such as invert colors, hearing aid compatibility, Accessibility and more. -
Page 73: Bluetooth Settings
2. SelecttheOnicon toturnWi-Fion.Wi-Fi is enabled. You will see the names and security settings of in-range Wi-Fi networks. TodisableWi-Fi,selecttheOfficon 3. SelectaWi-Finetwork,enterthepassword,andpresstheRightsoftkey toconnect. Your phone is connected to the selected Wi-Fi network. 4. ConfigureyourWi-Fisettings. Your Wi-Fi settings changes are saved. Thepassword,forahouseholdwirelessLANrouter,issometimesfoundonastickeronthe router (WEP, WPA, KEY, etc.). - Page 74 Visible to All: Select On or Officon to enable this function. Whenenabled,yourphonecanbediscoveredbyotherdevices.ThissettingisavailablewhenBluetoothisena bled. My Phone’s Name: Check your phone’s current name. Rename My Phone: You can set the phone’s name as it appears to other device. Notice: Emojiscannotbeusedinadevicename. ThissettingisavailablewhenBluetoothisenabled.
-
Page 75: Cellular & Data
Cellular & Data The mobile network & date menu lets you view your SIM card’s carrier, enable data connection, enable VoLTE, and more. From the apps list, select Settings >Network & Connectivity >Mobile network& Data. The Cellular & Data window opens. Mobile network&... -
Page 76: Display Settings
Sound Settings Overview The sound settings menu allows you to configure the following options: Sound Setting Description Volume Set volume for ringtones, alarms, and media. Tones Set your phone’s default ringtone, alerts tone and manage tones options. Other Sounds Set sounds for dial pad, camera and sending message. Access Sound Settings 1. -
Page 77: Search Settings
Access Display Settings Fromtheappslist,selectSettings >Personalization>Display. The display window opens. 2. Setyourdisplayoptions. our display settings are saved and applied. Search Settings The search settings menu lets you manage search engine and enable search suggestions. Search Settings Overview The search settings menu allows you to configure the following options: Search Setting Description Search Engine... -
Page 78: Notices Settings
Notices Settings The notices settings menu lets you enable notices show on lock screen or after reboot. Notices Settings Overview The notices settings menu allows you to configure the following options: Access Notices Settings 1. Fromtheappslist,selectSettings >Personalization>Notices. Notices Setting Description Show on lock screen Set to enable notices shown on lock screen. -
Page 79: Language Settings
Access Date & Time Options 1. Fromtheappslist,selectSettings >Personalization>Date&Time. The date & time window opens. 2. Setavailabledateandtimeoptions. Your date and time settings are applied and saved. Language Settings Your phone’s language settings let you select a language for the phone’s menus and keyboards. Language Settings Overview You can set the following options in the Language settings menu: Language Setting... -
Page 80: Input Methods Settings
The Language settings menu opens. 2. Setoptions. The language settings are applied and saved. Input Methods Settings Your phone’s input settings let you select and configure keyboard settings, and set your phone’s input languages. Input Methods Settings Overview You can set the following options in input methods settings menu: Input Methods Setting Description Use Predictive... -
Page 81: Privacy & Security Settings
The input settings menu opens. 2. Setoptions. The input settings are applied and saved. Privacy & Security Settings The following topics cover your phone’s privacy & security settings, including screen lock settings, app permissions, Do Not Track, and browsing privacy. Screen Lock Settings You can increase the security of your phone by creating a screen lock. -
Page 82: App Permission Settings
App Permission Settings Set installed applications’ permissions. App Permissions Settings Overview Items that can be checked in the App permissions settings menu are the following. App Permissions Setting Description Camera Set the camera’s geolocation permission. System Set the system’s geolocation permission. Access App Permissions Settings 1. -
Page 83: Do Not Track Settings
Do Not Track Settings Set your preference for Do Not Track. Access Do Not Track Settings 1. Fromtheappslist,selectSettings >Privacy&Security>DoNotTrack. 2. Selectoptions.The do not track settings are applied and saved. Browsing Privacy Settings Set your browsing privacy settings. Access Browsing Privacy Settings 1. -
Page 84: Storage Settings
Storage Settings The storage settings menu lets you manage internal storage on your phone and provides menu choices for an optional SD card (not included). USB Storage Settings The following topics address your phone’s connectivity options, including USB file transfer, Wi-Fi, Bluetooth, and more. -
Page 85: Device Settings
External Media: The media storage window opens. Device Settings The following topics including device information, downloads, battery, accessibility, etc. Device Information Settings The device information menu lets you access important phone information, and view legal and safety information. Device Information Overview The following device information items may be reviewed or set:... -
Page 86: Downloads Settings
Device Information Item Description Phone Number Check your phone number. Model Check the phone’s model. Software Check the phone’s software version. Software update Check for software updates Check more information about your phone: OS Version,HardwareRevision, MAC Address,IMEI, More Information Build Number,ICCID,IP Address,PlatformVersion, Build Address,BluetoothAddress Legal information Check Health &... -
Page 87: Battery Settings
Battery Settings Monitor your phone’s battery usage through this settings menu. Check the battery consumption and percentage. 1. Fromtheappslist,selectSettings >Device>Battery. The Battery window opens. 2. Selectitemstoviewdetails. Check your battery condition and access additional options. Accessibility Settings The accessibility menu lets you enable and manage accessibility-related applications. Accessibility Settings Overview... -
Page 88: Developer
The following accessibility options may be configured: Accessibility Option Description Invert Colors Set color inversion (may affect performance). Backlight Set to enable backlight. Large text Set to enlarge the screen text. Captions Set to enable captions settings. Readout Set to enable readout mode. Mono Audio Set to enable mono audio. -
Page 89: For Assistance
For Assistance The following topics address areas of support for your phone, including troubleshooting, specifications, and account information. Troubleshooting Check the questions and answers below for troubleshooting solutions for common phone issues. Check Here First Problem: Phone freezes/operation is unstable Answer: Turn the phone on again. - Page 90 WIFI: 802.11b/g/n (2.4G) Connectivity USB: micro-USB 2.0 SIM type: Nano SIM Expandable memory:microSD GPS: GLONASS,GPS, aGPS Battery Li-ion battery 1600mAh Dimensions 111x55.6x19.1 mm Weight 135g © 2020 Asiatelco Technologies, Inc. All right reserved. For additional information, visit support@atel-usa.com or visit www.atel-usa.com.
- Page 91 Safety and Precautions This product meets applicable national SAR limits of 1.6 W/kg. The specific maximum SAR values can be found in the Radio waves section. When carrying the product or using it while worn on your body, either use an approved accessory such as a holster or otherwise maintain a distance of 15 mm from the body to ensure compliance with RF exposure requirements.
- Page 92 Additional information on SAR can be found on the Cellular Telecommunications & Internet Association (CTIA) Web site: http://www.ctia.org/ The World Health Organization (WHO) considers that present scientific information does not indicate the need for any special precautions for use of phones. If individuals are concerned, they may choose to limit their own or their children’s RF exposure by limiting the length of calls, or using “hands-free”...
- Page 93 “T” rating that enables the phone to be used with hearing aids operating in the tele-coil mode thus reducing unwanted background noise. HOW WILL I KNOW WHICH WIRELESS PHONES ARE HEARING AID COMPATIBLE? The Hearing Aid Compatibility rating is displayed on the wireless phone box. A phone is considered Hearing Aid Compatible for acoustic coupling (microphone mode) if it has an “M3”...
Need help?
Do you have a question about the R3Di Bright Flip and is the answer not in the manual?
Questions and answers