
Summary of Contents for GEARGO H2
- Page 1 H2 Product Manual ! The actual product may slightly differ from this manual due to continuous improvement and please refer to the actual product.
-
Page 2: Product Features
Introduction Product features Air-proof design and efficient cooling channels can greatly enhance the overall stability and service life; LED lamp with a service life of 30,000 hours, more beautiful colors and richer details; Electronic zooming allows free adjustment of image sizes; Professional failure diagnosis and protective measures;... - Page 3 Introduction 2. Precautions 1. Please read this manual carefully before using the projector; 2. In order to ensure the stability of the power supply of this projector, please use a power supply line that meets the national power consumption standard and a power socket with protective measures such as grounding;...
- Page 4 Introduction 4. Parameters Image system Product model Native 800*480 Resolution 1920*1080 Resolution Lamp Input voltage 110 220V Chinese Aspect Ratio Language 16:9/4:3 English, etc. Contrast ratio 1,000:1 Lens F=140 Image size Projection distance 40-140inch 1.0 5.5 m Front Projection Colour 16777K projection mode...
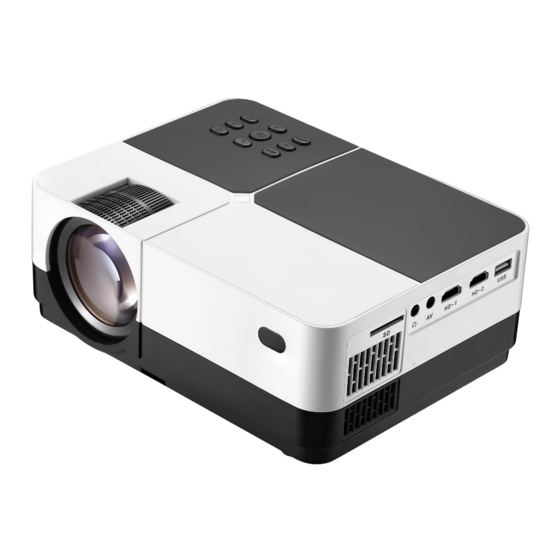
- Page 5 Introduction 6、Product function structure diagram Focusing ring Keystone correction Video input interface Earphone output HD-1 HD-2 USB interface ² HD-1 H D - 2 U S B...
- Page 6 Introduction The lens...
- Page 7 Introduction 7.Key function diagram Menu Power button Right Left Source Play / pause Down Left: used to move to the left, confirm the signal source channel, or lower the volume Right: used to move to the right, or increase the volume Up: used to move upward Down: used to move downward Menu: used to select functions...
-
Page 8: Installation And Debugging
How to quickly install and debug the projector Installation and debugging Projector installation Place horizontally Focal length setting ! Lens Effects Focus Precaution Trapezoid correction ABCD Adjust the keystone correction and focusing ring on Keystone distortion the projector to obtain the satisfactory imaging effect. When keystone distortion occurs (see Figure 1 on the right), it is recommended to adjust the keystone correction ring. -
Page 9: Startup And Shutdown
How to quickly install and debug the projector Installation and debugging Adjust the image projected ! Precaution onto the screen Check the horizontal and vertical settings of the screen ñ ò ò ñ ABCD When the projector is suspended from the ceiling or in a rear projection system, please change the projection direction in the settings ( See Projector settings on... - Page 10 How to quickly install and debug the projector Signal source switch Switch signal sources in the following ways: 1. Press the "source" button on the projector panel or the remote controller to display the menu shown in the following figure. ”and “...
-
Page 11: Play Video
Start to use Play video Play the video files on the storage according to the following steps ! 1.Play the video file, first select "video" on the main Note interface, and press the "OK" key on the projector panel or the remote controller. The picture on the left is only a sketch for operation instructions. -
Page 12: Play Music
Start to use Play music Play the music files on the storage according to the following steps: ! 1. To play a music file, firstly select “Music” on the Note home screen, and press the “OK” button on the projector panel or remote control. The picture on the left is only a sketch for operation instructions. -
Page 13: Play Pictures
Start to use Play pictures Play the picture files on the storage according to the following steps ! 1. To open an image, firstly select “Images” on the Note home screen, and press the “OK” button on the projector panel or remote control. The picture on the left is only a sketch for operation instructions. - Page 14 Start to use Play texts Play the text files on the storage according to the following steps ! 1. To open a text file, firstly select “Texts” on the Note home screen, and press the “OK” button on the projector panel or remote control. The picture on the left is only a sketch for operation instructions.
-
Page 15: Projector Settings
Start to use Projector settings Properly set up the projector for better film experience. Main parameters of projection can be set up through the following steps. 1. Open the video page and press “MENU” on the projector panel or remote control to the interface as shown below. Image modes Color temperature ¾... - Page 16 Start to use Projector settings 3. Press “ ◄ ► ”“ ” on the projector panel or remote control, choose between different options. In addition to “Images” shown in the above diagram, there are “time”, “settings” and other options as shown below. Acoustic pattern Balance Autovolume...
- Page 17 Start to use Projector settings Function table language Factory restore Transparency ◄ ► Settings Software updates (USB) System settings Function table language : To sets up the language displayed in the operation interface. Factory restore : To restore factory system settings . Transparency: To adjust the background transparency of settings menu.
- Page 18 Safe shutdown Correct shutdown and storage Power off the projector through the following steps and store the device safely 1. Press on body panel of the projector or remote control, and power off the device according to the prompts. 2. Rotate the focusing ring into the device to ensure that the lens is fully contained inside the device.
-
Page 19: Projection Distance And Size
The data is only for reference Projection distance and size Unit: Meter Width Screen size Projector Alleged width x height distance screen size (inch) 40" 1.4 0 0.50(H)x0.89(W) Screen size (diagonal) 50" 1.8 2 0.62 (H)x 1.10 60" 2.1 1 0.75 (H)x 1.33... - Page 20 H2 Bedienungsanleitung Wegen ständiger Verbesserung an der Funktion des Produktes ! kann sich das eigentliche Produkt von dem Benutzerhandbuch abweichen. Bitte sich an dem eigentlichen Produkt orientieren.
- Page 21 Produktbeschreibung 1. Eigenschaften des Produktes 1.1 Dichtung, hocheffiziente Kanäle zur Wärmeableitung. Die Stabilität und Lebensdauer der gesamten Maschine werden großzügig erhöht; 1.2 LED-Licht, Lebensdauer bis zu 30000 Stunden; 1.3 Elektronisches Zoom, beliebige Anpassung der Bildgröße; 1.4 Professionelle Überprüfung der Fehler und Schutzmaßnahmen;...
- Page 22 Produktbeschreibung 2. Hinweise 1. Vorm Benutzen bitte diese Bedienungsanleitung sorgfältig durchlesen; 2. Damit die Stromversorgung für diese Maschine stabil ist, bitte Versorgungskanäle und Steckdosen mit Schutzmaßnahmen wie Erdungsstab verwenden, die den nationalen Normen zum Stromverbrauch entsprechen; 3. Bitte den Netzanschluss verwenden, der auf dem Beamer markiert ist. Und das beigefügte Aufladekabel zum Aufladen verwenden;...
-
Page 23: Spezifikationen
Produktbeschreibung 4. Spezifikationen Produkttyp Abbildungseinheit Physikalische Unterstützte 800X480 1920*1080 Auflösung Auflösung Leuchtmittel Eingangsspannung 110-220V Chinesisch/ Sprachen 16:9/4:3 Abbildungsverhältnis Englisch usw. Kontrast 1000:1 Objektiv F=140 Bildgröße 40-140 Zoll Abstand Projektion 1.0-5. 5m Normalprojektion Farbe Art Projektion 16777K 4Ω* 3W Lautsprecher Leistung Maschine 58 W Gewicht 1.32kg... - Page 24 Produktbeschreibung 6. Struktur der Funktionen des Produktes Fokussierrring Perspektivkorretkur Eingangsanschluss Video Sprachausgabe Kopfhörer HD-Anschluss USB-Anschluss ² HD- 1 H D -2 U SB...
- Page 25 Produktbeschreibung The lens...
- Page 26 Produktbeschreibung 7. Abbildung zur Funktion der Knöpfe Oben Knopf Netzanschluss Menü Rechts Links Auswahl des Signals Abspielen/ Pause Unten Bestätigen Linker Knopf: dient zur Bewegung nach links und zur Bestätigung des Signalkanals oder Reduzierung der Lautstärke Rechter Knopf: dient zur Bewegung nach rechts und Erhöhung der Lautstärke Oberer Knopf: dient zur Bewegung nach oben Unterer Knopf: dient zur Bewegung nach unten Menü: dient zur Anpassung der Funktion...
- Page 27 Wie kann man den Beamer schnell installieren und testen Installieren und Testen Installation Beamer Horizontal legen Brennweite anpassen ! Hinweise Fokussierring Perspektivkorrektur ABCD Aliasing Zufriedenes Bild erhalten, indem die Perspektivkorrektur und der Fokussierring angepasst werden. Wenn das Bild leiterförmig verzerrt ist (wie Abb. 1 rechts), bitte Perspektivkorrektur anpassen.
- Page 28 Wie kann man den Beamer schnell installieren und testen Installieren und Testen ! Hinweise Bild auf dem Bildschirm anpassen Die horizontale und senkrechte Einstellung des Bildschirms prüfen ñ ò ò ñ ABCD Wenn der Beamer an der Decke hängt, oder wenn er sich in der Rückprojektion befindet, bitte die Projektionsrichtung in der Æ...
- Page 29 Wie kann man den Beamer schnell installieren und testen Wechsel der Signalquelle Es bestehen folgende Möglichkeiten, die Signalquelle zu wechseln 1. Die Taste „source“ auf dem Beamer oder der Fernbedienung drücken. Folgendes Menü kommt vor. 2. Die Taste “ ”“ ”...
-
Page 30: Video Abspielen
Anfängen zu benutzen Video abspielen Nach folgenden Schritten kann man Videodateien auf Speicher abspielen ! 1. Videodatei abspielen. Zuerst „Video“ auf dem Hinweis Hauptmenü wählen. Dann die Taste „OK“ auf dem Beamer oder der Fernbedienung drücken. Das linke Bild dient nur als vereinfachte Abbildung zur Erklärung der Bedienung. - Page 31 Anfängen zu benutzen Audio abspielen Nach folgenden Schritten kann man Audiodateien auf Speicher abspielen ! 1. Audiodatei abspielen. Zuerst „Musik“ auf dem Hinweis Hauptmenü wählen. Dann die Taste „OK“ auf dem Beamer oder der Fernbedienung drücken. Das linke Bild dient nur als vereinfachte Abbildung zur Erklärung der Bedienung.
- Page 32 Anfängen zu benutzen Bilder abspielen Nach folgenden Schritten kann man Bilder auf Speicher abspielen ! 1.Bilddatei abspielen. Zuerst „Bild“ auf dem Hinweis Hauptmenü wählen. Dann die Taste „OK“ auf dem Beamer oder der Fernbedienung drücken. Das linke Bild dient nur als vereinfachte Abbildung zur Erklärung der Bedienung.
- Page 33 Anfängen zu benutzen Text abspielen Nach folgenden Schritten kann man Textdateien auf Speicher abspielen ! 1.Textdatei abspielen. Zuerst „Text“ auf dem Hinweis Hauptmenü wählen. Dann die Taste „OK“ auf dem Beamer oder der Fernbedienung drücken. Das linke Bild dient nur als vereinfachte Abbildung zur Erklärung der Bedienung.
- Page 34 Anfängen zu benutzen Einstellung Projektion Durch angemessen Einstellung können Sie besseres Bild bekommen. Nach folgenden Schritten können Sie den Hauptinhalt der Projektion einstellen 1. In der Oberfläche zum Abspielen direkt die Taste „MENU“ auf dem Beamer oder der Fernbedienung drücken, um zur folgenden Oberfläche zu gelangen. Modi der Bilder Farbtemperatur ¾...
- Page 35 Anfängen zu benutzen Einstellung Projektion 3. Die Taste “ ◄ ► ”“ ” auf dem Beamer oder der Fernbedienung drücken und die unterschiedlichen einzustellenden Inhalte wählen. Neben dem „Abbild“ in der obigen Abbildung gibt’s noch Optionen wie „Stimme“, „Zeit“, „Einstellung“, wie unten gezeigt ist. Modi Stimme Ausgeglichen Automatische Lautstärke...
- Page 36 Anfängen zu benutzen Einstellung Projektion Timing Schlafzustand · ◄ ► Zeit Zeiteinstellung Zeit des Schlafzustandes des Systems einstellen. Dann wird das Timing Schlafzustand: System zu dem Zeitpunkt automatisch zum Schlafzustand um Energie zu sparen. Sprache der Funktionenliste Werkeinstellung zurücksetzen Durchsichtigkeitsgrad ◄...
- Page 37 Sicher ausschalten Richtiges Ausschalten und Aufbewahrung Den Beamer nach folgenden Schritten ausschalten und das Gerät sicher aufbewahren 1. Die Taste auf dem Beamer oder auf der Fernbedienung drücken und das Gerät nach dem Hinweis des Systems ausschalten. 2. Den Fokussierring in das Gerät drehen und sicherstellen, dass das Objektiv sich komplett im Gerät befindet.
- Page 38 Daten dienen lediglich als Referenz Projektionsabstand und -Größe Einheit: Meter Breite Größe des Größe des Bildschirms Projektionsabstand Bildschirms Breite und Höhe (Zoll) (Meter) (Meter) Größe des Bildschirms 40" 1.40 (diagonal) Höhe0.50 Breite0.89 50" 1.82 Höhe0.62 Breite1.10 60" 2.11 Höhe0.75 Breite1.33 Toleranz beim Design: +/-8% 70"...
- Page 39 H 2 取扱 い 説 明 書 ごあいさつ お買いあげいただきありがとうございました。 本取扱説明書をよくお読みの上、安全にお使いください。 本書は大切に保管してください。...
- Page 40 製品説明 1.製 品特徴 1.1 密閉された設計、効率的な冷却経路、大幅に機械全体の安定 性と寿命を向上させます。 1.2 LED光源、30000時間の平均使用時間、よりカラフルな色、 より豊富なデザイン。 1.3 電子ズーム機能、画像サイズを自由に調整できます。 1.4 プロな故障診断と保護対策。 1.5 軽い小型の全機 1.6 16:9と4:3の画像モードを自由に変えることができます。 1.7 超静音性の防塵設計、内部清掃必要がありません。 1.8 58Wの超低電力消費、より省エネルギー、より環境にいい。 1.9 多機能のインターフェース:HD/SD/USB/AV/VGA/AUDIO OUT 1.10 きれいかつ簡潔な外観デザイン...
- Page 41 製品説明 2.安全上の ご 注 意 1.この製 品 を 使 用 する前に、 取 扱 い 説 明書をきちん と 読 ん で ください。 2.電源の 安 定 性 を 確保するた め に 、 国 家規格に準拠 し た 電 源 ライン及 び 地 面 に接触するこ と な ど の 保護措置を設 置 さ れ た 電源コンセン ト を...
- Page 42 製品説明 4.仕様 イメージ 製 品 モデル ン グユニット 物理 支持 80 0X4 80 1920*1080 解 像 度 解像 度 LE D 入力 電圧 110 ~2 2 0V ライトタイプ 言語 メ ニ ュー 日 本語/英語 な ど 画像 比 率 4: 3 /1 6:9 F=1 40m m 10 00: 1 レン...
- Page 43 製品説明 6、商品機能構成図 レンズフォーカス 台形補正 イヤホンサウンド出力 ビデオ入力インターフェース ハイビジョン.インターフェース USBインターフェース ² HD - 1 H D -2 U SB...
- Page 44 製品説明 レンズ...
- Page 45 製品説明 7、本体ボタン機能図 上 電源押しボタン メニュー 右 左 放送/一時中止 信号源 下 確認 左ボタン:左に移動したり、信号源チャンネルを決定したり、音を下げた りするのに使用できます。 右ボタン:右に移動したり、音を上げたりするのに使用できます。 上ボタン:上に移動するのに使用できます。 下ボタン:下に移動するのに使用できます。 メニュー:機能調整に使用できます。 信号源:信号入力チャンネル選択用 電源ボタン:ブートやシャットダウン 再生/一時停止:USBでファイル、写真、ビデオの再生や一時停止に使用で きます 8、リモコンボタン機能 電源 消音モード メニュー 放送/一時中止 SOURCE MENU 信号選択 上、下、左、右のボタン ボリューム- ボリューム+ 巻き戻し 戻る 早送り 前の曲 次の曲 ご 注 意 : リモコンの電 池 は 別 売 です。...
- Page 46 プロジェクターの迅速な取 り付けと 調整 方法 取 付 と調整 プロジェクターの取り付け 水平面に置く 焦点距離の調整 ! 注意事項 レンズフォーカス 台形補正 ABCD 台形ゆがみ 良好な結像結果を得るために、本体の台形補正および フォーカスリングを調整する。 画像が台形歪み(右側の画像1のように)として表示 されるときは台形補正リングを調整してください。 画像がぼやけている場合(右側の画像2のように)、 画像の鮮明度を高めるためにフォーカスリングを調整 してください。 ぼやけた画像 調整によって満足の解決が得られない場合は、製品を 前方または後方に慎重に移動してください。...
- Page 47 プロジェクターの迅速な取 り付けと 調整 方法 取 付 と調整 ! ス クリーンに投 影 さ れ る 画像を調整す る 注意事項 スクリーンの水平と垂直の設定を確認する ñ ò ò ñ ABCD プロジェ ク タ ーが天井 に 吊 り 下げ られてい る と きやリア プ ロ ジ ェク ションシ ス テ ムの場合 は 、 設 定に Æ...
- Page 48 プロジェクターの迅速な取 り付けと 調整 方法 信 号 源の切り替え 信号源を切り替えるいくつかの方法 1. 本体パネルあ る い は リ モコンの「s o u rce」ボタン を 押 し て 、 以下のような メ ニ ュ ー が出ます。 2. 本 体パネルあ る い は リ モコンの“ ”“ ”ボタ ン を 押 し て適当な入力 ソ ー ス を 選び、本体パ ネ ル あ る...
- Page 49 使い始めます ビデ オの再生 次の手順では、メモリ上のビデオファ イルを再生できます。 1.ビデオファイルの再生 まずメインインター ! フェースで「ビデオ」を選択し、本体パネル 注意事項 あるいはリモコンの「OK」ボタンを押します 左の画像は、操作説明書の簡 略図です。 人間とコンピュータの相互作 ¯ 用を絶えずに最適化している ¸ ため、この製品のソフトウェ アのインターフェイスは不規 テキ 則に維持管理され、更新され 音楽 写真 ビデオ スト ます。予告なしに変更するこ とがありますので、実際の製 品を参照してください。 2.本体パネルあるいはリモコンの「 」「 」 ◄ ► ボタンを押して、ビデオが保存されているデ ! 注 意事項 バイスを選択し、「OK」を押して次のステッ プに進みます。 異なる記憶装置はディスク の形で表示されます。右の C、Dのように、それぞれSD カードとU SBを表示されます。...
- Page 50 使い始めます 音楽 の再生 次の手順では、メモリ上の音楽フ ァイルを再生できます。 1.音楽ファイルの再生 まずメインインター ! フェースで「音楽」を選択し、本体パネルあ 注意事項 るいはリモコンの「OK」ボタンを押します。 左の画像は、操作説明書の簡 略図です。 人間とコンピュータの相互作 ¯ 用を絶えずに最適化している ¸ ため、この製品のソフトウェ アのインターフェイスは不規 テキ 則に維持管理され、更新され 音楽 写真 ビデオ スト ます。予告なしに変更するこ とがありますので、実際の製 品を参照してください。 2.本体パネルあるいはリモコンの「 」「 」 ◄ ► ボタンを押して、音楽が保存されているデバ ! 注 意事項 イスを選択し、「OK」を押して次のステップ に進みます。 異なる記憶装置はディスク の形で表示されます。右の C、Dのように、それぞれSD カードとU SBを表示されます。...
- Page 51 使い始めます 写真 の再生 次の手順では、メモリ上の写真フ ァイルを再生できます。 1.写真ファイルの再生 まずメインインター ! フェースで「写真」を選択し、本体パネルあ 注意事項 るいはリモコンの「OK」ボタンを押します。 左の画像は、操作説明書の簡 略図です。 人間とコンピュータの相互作 ¯ 用を絶えずに最適化している ¸ ため、この製品のソフトウェ アのインターフェイスは不規 テキ 則に維持管理され、更新され 音楽 写真 ビデオ スト ます。予告なしに変更するこ とがありますので、実際の製 品を参照してください。 2.本体パネルあるいはリモコンの「 」「 」 ◄ ► ボタンを押して、写真が保存されているデバ ! 注 意事項 イスを選択し、「OK」を押して次のステップ に進みます。 異なる記憶装置はディスク の形で表示されます。右の C、Dのように、それぞれSD カードとU SBを表示されます。...
- Page 52 使い始めます テキストの再生 次の手順では、メモリ上のテキスト ファイルを再生できます。 1.テキストファイルの再生 まずメインインター ! フェースで「テキスト」を選択し、本体パネ 注意事項 ルあるいはリモコンの「OK」ボタンを押します。 左の画像は、操作説明書の簡 略図です。 人間とコンピュータの相互作 ¯ 用を絶えずに最適化している ¸ ため、この製品のソフトウェ アのインターフェイスは不規 テキ 則に維持管理され、更新され ビデオ 音楽 写真 スト ます。予告なしに変更するこ とがありますので、実際の製 品を参照してください。 2.本体パネルあるいはリモコンの「 」「 」 ◄ ► ボタンを押して、テキストが保存されている ! 注 意事項 デバイスを選択し、「OK」を押して次のス テップに進みます。 異なる記憶装置はディスク の形で表示されます。右の C、Dのように、それぞれSD カードとUS Bを表示されます。...
- Page 53 使用の開始 投 影設定 よりよい表示結果を得るために適切な設定を行います。 以下の手順でメインプロジェクションを設定できます。 1.再生ページに入ったら、本体パネルあるいはリモコン の 「MENU」ボタンを押して、以下のようなインター フェイスに入ります。 画像モード 色温度 ¾ ズームモード ◄ 画像 ► 騒音抑制 投影方向 縮小表示 画像設定 画像モード:「標準」「ダイナミック」「ソフト」「ユーザー定義」など、 さまざまな画像モードをプリセットされ、それぞれの投影コン テンツに適しています。 色温度:「標準」 「暖かい」「ユーザー定義」など、さまざまな色温度モー ドをプリセットされ、それぞれの色の好みに適しています。 ズームモード:「オートマッチ」「16:9」「4:3」などのオプションをプリ セットされ、画面の表示比率を調整します。 騒音抑制:画像の騒音抑制レベルを設定します。 投影方向:画面の表示方向を設定します。 プロジェクタの取り付け方法が異 なる場合は、画面の表示方向を調整します。 縮小表示:比率に基づいて画面を75%〜100%の範囲で縮小ます。 2.本体パネルあるいはリモコンの「 」「 」を押してそれぞれの選択肢 を選び、 「Ok」を押してサブメニューに入り、適切なモードを設定しま す。 3.本体パネルあるいはリモコンの 「◄」「►」を押して、それぞれの設定を 選択します。上の図の「画像」の他に、「サウンド」、「時刻」、「設...
- Page 54 使用の開始 投 影設定 サウンドモード バランス 自動音量 ◄ サウンド ► サラウンドサウンド サウンド設定 サウンドモード:「標準」 「映画」 「音楽」 「スポーツ」など、さまざ まなサウンドモードをプリセットされ、それぞれの投 影コンテンツに適しています。 バランス:左チャンネルと右チャンネルのゲイン差を設定します。 自動音量: 音の大きさをインテリジェントに調整します。 サラウンドサウンド:サラウンド効果を設定します。 スリープタイマー · ◄ 時刻 ► 時刻設定 スリープタイマー: システムのスリープ時間を設定すると、自動的にス リープしてエネルギーを節約します。...
- Page 55 使用の開始 投 影設定 メニュー言語 初期化 透明性 ◄ 設定 ► ソフトウェアのア ップデート(USB) システム設定 メニュー言語:ユーザーインターフェイスの表示言語を設定します。 初期化:システム設定を初期化します。 透明性:メニューの背景の透明性を調整また設定します。 ソフトウェアのアップデート(USB):システムのソフトウェアバージョ ンを更新する(USBストレージデバイスを挿入すると同時に、デ バイスに正しいアップロードがインストールされている)。...
- Page 56 安全のシャットダウン 正 確なシ ャットダウンと保管 プロジェクタの電源を切り、次のように 装置を安全に保管してください 1.プロジェクターパネルあるいはリモコンの ボ タンを押して、システムの提示に基づいて設備 をオフにしてください。 2.フォーカスリングをデバイスに回して、レンズ がデバイス内に完全に収まるようにします。 3.防塵レンズのキャップをレンズに覆い、そして 装置を涼しく乾燥した場所に保管してください。 ! 注意事項 使用時間を延長するために直射 日光の当たる場所に置かないで ください。...
- Page 57 データは参照用です 投 影距離 とサイズ 単位:m 広さ 画面サイズ 既知の画面 投影距離 広さx高さ サイズ (メートル) (インチ) (メートル) 高 画面サイズ(対角線) さ 40" 0.50(高 さ) 0.89(広 さ) 1.40 50" 0.62 (高 さ) 1 .10 (広さ) 1.82 60" 0.75 (高 さ) 1.33 (広 さ) 2.11 設計 に は+/-8%の 誤差を容 認で 70"...
- Page 58 免責事 項 に関するご注意 次のような場合は、当社は一切の責任を負いかね ます。あらかじめご了承ください。 1.自然災害、当社の責任以外の火災、第三者による行為、その ほかの事故によって生じた損害 2.取扱説明書に記載された内容を守らないことによって生じた 損害 3.取扱説明書に記載されていてない接続機器、部品、メディ ア、ソフトウェアを使用したことによって生じた損害 4.本製品の使用または使用不能によって生じた不利益または損 害(事業の中断など)...
- Page 60 RoSH Model: H2 MADE IN CHINA FCC ID:JHC160910101F This device complies with Part 15 of the FCC Rules. Operation is subject to the following two conditions: (1) this device may not cause harmful interference, and (2) this device must accept any interference received, including...
Need help?
Do you have a question about the H2 and is the answer not in the manual?
Questions and answers