Table of Contents
Advertisement
Quick Links
Advertisement
Table of Contents

Summary of Contents for KATILAI PELEMAX
- Page 1 PELEMAX User Manual Instalation, Operation, Maintenance...
-
Page 2: Table Of Contents
PELEMAX MODEL CONTENTS SAFETY NOTICE 1. Introduction 1.1. General information 1.2. Standards and rules 2. Technical details 3. Structure 3.1. Boiler components 3.2. Boiler 3.3. Pellet container 3.4. Rotational burner 3.5. Controller 4. Installation 4.1. Boiler set 4.2. Boiler and pellet container placement 4.3. -
Page 3: Safety Notice
PELEMAX MODEL SAFETYY NOTICE During the operation of the boiler separate parts including doors, chimney, various casing points may get hot enough and can cause burns on contact! Do not allow children to touch or use the boiler without adult supervision. -
Page 4: Introduction
Industrial PELEMAX model boilers consist of 5-6 horizontal heat exchangers resulting in a very high heat exchanger surface area, allowing to reach burning efficiency of over 90%. PELEMAX boilers can be used in fully automatic mode to burn pellet fuel or can be used in semi-automatic mode with non-pellet fuel. -
Page 5: Technical Details
PELEMAX MODEL 2. TECHNICAL DETAILS PELLEMAX PELEMAX PELEMAX Parameters Type Rated power Rotational burner power range 10-50 15-70 20-100 Heat exchanger surface area 12.2 Non-pellet fuel load volume liters Depth of fuel chamber (max. fuel length) Number of horizontal heat... -
Page 6: Structure
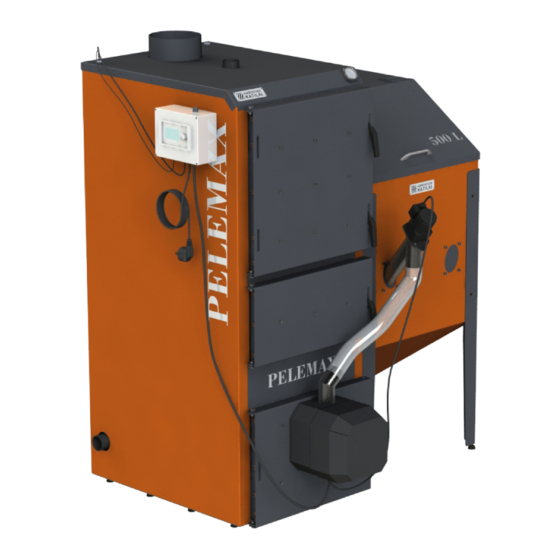
PELEMAX MODEL 3. STRUCTURE 3.1. Boiler components: 1. Chimney 2. Heat exchanger 12. Water feed valve 3. Cleaning door 13. Thermometer 4. Non-pellet fuel load door 14. Pellet loading cover 5. Burning chamber 15. Door handle 6. Cast iron grates 16. -
Page 7: Boiler
PELEMAX MODEL 3. STRUCTURE 3.2. Boiler: Boiler consist of 3 main zones. In top door zone there is 5-6 horizontal heat exchangers(2). The top door(3) is used to access the heat exchanger for cleaning. Middle door(4) zone is used to load and burn non-pellet fuel. -
Page 8: Pellet Container
3.4. Rotational burner: PELEMAX boilers use „KIPI” rotational pellet burners which allow burning of medium quality pellets. This new generation rotational burner is long-lasting with automatic ignition. Burner has a self- cleaning functionality due to rotating combustion chamber which prevents slag formation and helps to get rid of ash. -
Page 9: Controller
PELEMAX MODEL 3. STRUCTURE 3.5. Controller Boilers are equipped with the newest generation „PLUM” controllers. Controller is an electronic device responsible for maintaining boiler and building functions. Controller takes information about the burning process through various sensors such as optical flame sensor, and temperature sensors. - Page 10 PELEMAX MODEL 3. STRUCTURE A module. Standard set Fan, flue gas exhaust control, automatic pellet feeding and ignition, central heating and water heating pump control, mixing pump and valve control, room and outside temperature sensor control, flue gas temperature sensor control, summer and winter modes, emergency shutdown, possibility to connect Lambda λ...
-
Page 11: Installation
MODEL 4. INSTALATION 4.1. Boiler set: PELEMAX boilers are delivered to the customer with all required parts unless requested otherwise. The boiler and pellet container are fixed to separate wooden pallets using screws. Rotational burner, pellet feed mechanism and controller are supplied in a cardboard box. -
Page 12: Changing Door Opening Side
PELEMAX MODEL 4. INSTALLATION 4.3. Changing door opening side: 1. Screw DIN 912 M10x16 5. Door handle 2. Plug 6. Spring nut 3. Screw DIN 912 M10x12 7. Screw DIN 912 M8x14 4. Eccentric M10 Upper and middle door opening side is changed by unscrewing the doors WITH the hinges and fixing them on the other side since these doors are symmetrical. -
Page 13: Rotational Burner Installation
PELEMAX MODEL 4. INSTALLATION 4.4. Rotational burner installation: 1. Flexible pellet feeding hose 2. Metal elbow connection 3. Screw DIN 912 M8x25 4. Rotational burner Rotational burner with components is supplied in a cardboard box. The burner is attached to the bottom door M8 screws (3) using M8 nuts. -
Page 14: Pellet Container Installation
PELEMAX MODEL 4. INSTALLATION 4.5. Pellet container installation: LEFT SIDE RIGHT SIDE 1. Pellet feeding mechanism 2. 3 mm rivet 3. Transparent plastic plate. 4. Adjustable legs Make sure to read whole chapter 4.4 before beginning the installation. Pellet container can be installed on both sides of the boiler or elsewhere. - Page 15 PELEMAX MODEL 4. INSTALLATION 5. Pellet container lid 6. Nut DIN 934 M6 7. Spacer DIN 125 M6 8. Spring spacer DIN 127 M6 9. Bolt DIN 931 M6x16 10. Pellet feeding motor 11. Pellet feeding mechanism securing bracket 12. Maintenance door Supplied pellet feeding mechanism is longer than needed to allow for a more flexible installation position.
-
Page 16: Chimney Connection
Chimney must be mounted as to meet the legislation of the country in which the boiler is operated in. Minimum chimney draft for PELEMAX boilers is 20 Pa. Chimney must be of T600 temperature class. In case of too high draft, a draft regulator must be installed. -
Page 17: Boiler Distance From The Walls
PELEMAX MODEL SKYRIAUS PAVADINIMAS 4. INSTALLATION 4.8. Boiler distance from the walls: 1. Granulinis katilas 2. Granulių talpa 3. Degiklis 4. Granulių padavimo šnekas www.akatilai.lt info@akatilai.lt... -
Page 18: Recommended Connection Schemes
PELEMAX MODEL 4. INSTALLATION 4.9. Recommended connection schemes: Fig. 4.9.1. Scheme with a 4-way valve: 1 – boiler, 2 – rotational burner, 3 – controller, 4 – boiler temperature sensors, CT4, 5 – flue gas temperature sensor, 6 – 4-way valve motor, 7 – heating contour pump, 8 – heating contour temperature sensor, 9 –... - Page 19 PELEMAX MODEL 4. INSTALLATION Fig. 4.9.2. Scheme with accumulative reservoir: 1 – boiler, 2 – rotational burner, 3 – controller, 4 – boiler temperature sensor, 5 – flue gas temperature sensor, 6 – boiler pump, 7 – accumulative reservoir, 8 – hot water pump, 9 – hot water reservoir, 10 –...
-
Page 20: Controller Installation
PELEMAX MODEL 4. INSTALLATION 4.10. Controller installation: Controller can only be installed by certified personnel. Controller is provided in a cardboard box with a boiler and is installed at the side of the boiler as shown in previous figures. Controller electrical connections are provided in controller‘s user manual. -
Page 21: Starting Rotational Burner And Controller
PELEMAX MODEL 4. INSTALLATION 4.11. Starting rotational burner and controller: When a boiler is used for the first time a certified person MUST inform the user on how to use the controller, rotational burner and boiler safely. Once the user was trained a commissioning paper is signed as well as a warranty paper. -
Page 22: Boiler Operation
Industrial PELEMAX model boilers consist of 5-6 horizontal heat exchangers resulting in a very high heat exchanger surface area, allowing to reach burning efficiency of over 90%. PELEMAX boilers can be used in fully automatic mode to burn pellet fuel, or can be used in semi-automatic mode with different solid fuels. -
Page 23: Boiler Opperation In Automatic Mode
PELEMAX MODEL 5. BOILER OPERATION 5.3. Boiler operation in automatic mode: Properly connected boiler can work fully automatically depending on the needed heating level. The burning process is controlled depending on photodetector data as well as other data from temperature sensors. The burning process and boiler temperature can also be adjusted through the controller depending on predefined parameters. -
Page 24: Maintenance
PELEMAX MODEL 5. BOILER OPERATION Before using non-pellet fuel make sure that cast iron grates are installed in correct position (narrower space on the top side“VVVVV“). Non-pellet fuel is loaded through the middle door. 5.5. Maintenance: Boiler maintenance: Boiler maintenance and cleaning is performed periodically. The periodicity depends on the fuel type and other conditions. -
Page 25: Boiler Warranty
PELEMAX MODEL 6. BOILER WARRANTY Model: ..................Rated power: ................Serial No: ................. Year of production: ..............Date of firs use: ............... Comments: ..............................................Name, surname and signature of a certified person who installed the boiler www.akatilai.lt info@akatilai.lt... -
Page 26: Rotational Burner Warranty
PELEMAX MODEL 7. ROTATIONAL BURNER WARRANTY Burner type/model: ..............Serial No: ................. Year of production: ..............Selling date: ................Comments: ............................................Name, surname and signature (Filled at the place of purchase) Fulfillment warranty (for a yearly checkup according to the warranty conditions):.............. - Page 27 PELEMAX MODEL 7. ROTATIONAL BURNER WARRANTY Rotational burner maintenance and repair Maintenance, Specification Sellers signature/ repair date stamp www.akatilai.lt info@akatilai.lt...
-
Page 28: Warranty Conditions
21 working days from receiving the notice. 8. If it is determined that the fault was NOT manufacturer caused, the customer covers the relevant expense. UAB „Aukštaitijos katilai“ Linų g. 85, Ukmergė. El. paštas: info@akatilai.lt Telefono numeris: +370 683 33388...