
Summary of Contents for SPANARCI SANDY 2000
- Page 1 SANDY 2000 AIR INFLATOR User Manual Read this manual carefully and keep it for future reference.
-
Page 2: Table Of Contents
Thank you for choosing Spanarci. Thank you for purchasing the Spanarci Sandy 2000 air inflator. With a large LED screen and easy-to-use interface, this excellent air inflator has a wide range of applications. Contents 1. PRODUCT OVERVIEW - - - - - - - - - - - - - - - - - - - - - - - - - - - - - - - - - - - - - - - - - - - - - - - - - - - - - - - - - - - - - - - - - - - - - - - - - - - - - - - - - - - - - - - - - - - - - - - - - - - - - - - - - - - - - - - - - - - - - - - - - - - - - - - - - - - - - - - - - - - - - - - - - - - - - - - - - - - - - - - - - - - - - - - - 2. - Page 3 - - - - - - - - - - - - - - - - - - - - - - - - - - - - - - - - - - - - - - - - - - - - - - - - - - - - - - - - - - - - - - - - - - 7.
-
Page 4: Product Overview
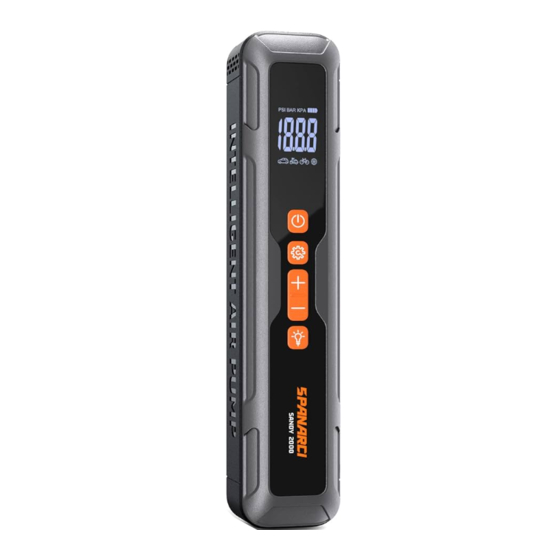
1. PRODUCT OVERVIEW 5 6 7 8 9 1. Battery indicator “+” button 2. Pressure unit “-” button 3. Pressure value Light button 4. Preset mode USB-A port 5. Power button USB-C port 6. Settings button Air outlet 10 11 - 03 -... -
Page 5: Package Contents
USB charging Charger × 1 Needle valve Air tube × 1 cable × 1 adaptor × 1 Warranty Card Sandy 2000 User manual Warranty Card Storage bag × 1 Schrader-Presta Tapered adaptor × 2 Air inflator × 1 × 1 ×... -
Page 6: Battery Level Indicator & Charging
3. BATTERY LEVEL INDICATOR & CHARGING Battery Level Indicator The battery level is shown by four bars, with each bar representing 25%. 1 bar = under 25% 2 bars = between 25% and 50% 3 bars = between 50% and 75% 4 bars = between 75% and 100% Note:The battery indicator will flash when the battery level is below 20%. - Page 7 Charging Fully charge the inflator before using it for the first time. Please use the equipped certified PD20W charger and charging cable to charge the tire inflator. While charging: 1 bar flashing = under 25% 1 bar solid, 2nd bar flashing = between 25% and 50% 2 bars solid, 3rd bar flashing = between 50% and 75% 3 bars solid, 4th bar flashing = 75% and 100% All 4 bars solid = fully charged...
-
Page 8: Turning The Inflator On/Off
4. TURNING THE INFLATOR ON/OFF Long-press for 1.5 seconds to turn on. When the inflator is turned on, long press 1.5 seconds to turn off. The inflator will automatically turn off in the cases below: 1. After 1.5 minutes of inactivity. 2. -
Page 9: Connecting The Air Tube And Nozzle
5. CONNECTING THE AIR TUBE AND NOZZLE Schrader Valve Tires on cars, motorcycles, e-bikes, and most mountain bikes use a Schrader valve. Inflation Adapter To inflate: The inflator can be directly connected to a Schrader valve to start inflating. To deflate: Use an proper tool (such as 4mm Allen wrench) to press the pin inside the air valve to release air. Valve Type - 08 -... - Page 10 Presta Valve Adapter Road bicycles and certain mountain bikes use a Needle Valve Adapter Presta valve which requires the included To inflate balls like basketballs and footballs, the Presta valve adapter to be used. included needle valve adapter will need to be used. To inflate: Screw the needle valve adapter onto the To inflate: Schrader valve adapter, then insert the needle into...
-
Page 11: Detecting The Current Pressure
6. DETECTING THE CURRENT PRESSURE When the inflator is turned on, connect the air tube to the device to be inflated, then the LED screen will display the current pressure value. 7. DETERMINING THE RIGHT PRESSURE VALUE To avoid injuries from bursting items due to over-inflation, make sure you are aware of the maximum inflation pressure before you start. - 10 -... - Page 12 Tires The recommended air pressure of tires for cars, bicycles, and motorcycles is indicated on the tire's sidewall. The recommended tire pressure for cars is also indicated on the inside of the driver's side door. For details concerning load carrying capacity and recommended air pressures, refer to your vehicle's instructions or manual. Balls The recommended air pressure for footballs, basketballs, volleyballs, and other balls is indicated near the ball's air valve.
- Page 13 Air Pressure Reference Table Recommended Recommended Category Type Category Type Pressure Range Pressure Range Electric Folding Bike tires Motorcycles Scooter & street motorcycle tires 1.8 - 3.0bar 10 - 50psi 12-, 14-, & 16-inch bicycle tires 30 - 50psi Car tires Cars 2.2 - 2.8bar 20-, 22-, &...
-
Page 14: Preset Pressure Value
8. PRESET PRESSURE VALUE Note 1. Press the once to choose the usage scenario from 2. Press the for a few seconds until the icon of the unit blinks, press once to choose the units you want from KP PSI and Bar. 3. - Page 15 Note: When you have finished inflating an item, the manual mode will remeber the target pressure value as its default pressure value. For the best results, we suggest you inflate items like balls via the ball mode. Adjusting the Preset Pressure After selecting a mode, press to increase or decrease the target pressure value.
-
Page 16: Light
9. LIGHT Press the 1.5 seconds to turn the inflator's light on/off. The bright light makes it easier to operate in the dark, especially while connecting the air compressor to a valve. When the light is on, press the to cycle through Spotlight, SOS and OFF. - 15 -... -
Page 17: Inflating
10. INFLATING Start Inflating Press the to start inflating. When inflating, the air compressor may be as loud as 75 - 80 dB. Please take appropriate precautions to protect your hearing. The air compressor and air tube can get very hot after running for a while. To avoid skin burns, avoid prolonged exposure to the air tube with bare skin. -
Page 18: Disconnecting The Air Tube
Battery Information The inflator's battery lasts about 40 minutes on a full charge, running without a load at an ambient temperature of 25°C. Using the air compressor under a heavy load or at lower ambient temperatures may reduce its battery life. 11. -
Page 19: Power Bank Function
12. POWER BANK FUNCTION This inflator can be used as a PD20W&5V/3A power bank when it is not being charged or inflating other devices. The battery needs to have a reasonable level of charge in order to work as a power bank. Note: In energy saving mode, when disconnecting the charged device from the inflator, it will automatically turn off. -
Page 20: Troubleshooting
13. TROUBLESHOOTING Problem Solution :Air pressure changes less than 2psi in two minutes.Please check the connection carefully to make sure that there is no air leaking. :The power of the product is too low, please fully charge it before using it. Three kinds of error display :temperature protection function. - Page 21 Problem Solution 1. Check whether the air compressor's battery level is sufficient. 2. Check whether the air hose is leaking. Slow inflation speed 3. Check whether both ends of the air hose are securely connected. 4. Check whether the item that is being inflated is leaking Air compressor turns on 1.
- Page 22 Problem Solution Air leakage after connecting Make sure the air hose is securely connected. the air tube Comparing with the standby state, The voltage level of lithium battery will significantly drop while discharging power, which causes the battery the battery level indicator is level indicator showing different displays when inflating comparing with the standby state.
-
Page 23: Specifications
14. SPECIFICATIONS Name Air Inflator Working Noise Lower than 80dB within 1 meter Model Sandy 2000 Input PD20w Dimensions 331×97×91mm(Excluding air tube) Output PD20W & 5V/3A Inflation Pressure Range 3-150psi / 0.2-10.3bar Input Port USB Type-C Operating Temperature Charging:0℃~45℃,Discharging:-10℃~45℃ Output Port USB-A &... -
Page 24: Safety Instructions
15. SAFETY INSTRUCTIONS • This product is not a toy and should not be used by children. Users should be above 16 years old. • Keep a safe distance between children and the inflator while inflating. There is a built-in lithium battery inside the product. Don't place the product in fire or dump the battery. - Page 25 • Before setting the inflation pressure value, make sure the pressure unit is correctly selected. Mixing up psi and bar could lead to dangerous overin- flation. • Unit conversion: 1bar = 14.5psi, 1bar = 100kPa • Do not leave the inflator unattended while it is in operation. •...
- Page 26 Ningbo Morepin Electrical Technology Co.,Ltd. MADE IN CHINA E-mail: automotive@spanarci.net ADD: No.25,Xingye Road,Yangming Industrial Park, Yanging Street,Yuyao,Zhejiang...
- Page 27 材质:105g铜版纸 尺寸:200 x75 mm 印刷:单黑 装订:骑马钉 注:封面封底背面不印刷...
Need help?
Do you have a question about the SANDY 2000 and is the answer not in the manual?
Questions and answers