Table of Contents
Advertisement
Advertisement
Table of Contents

Summary of Contents for Aerial Industries AIHT652
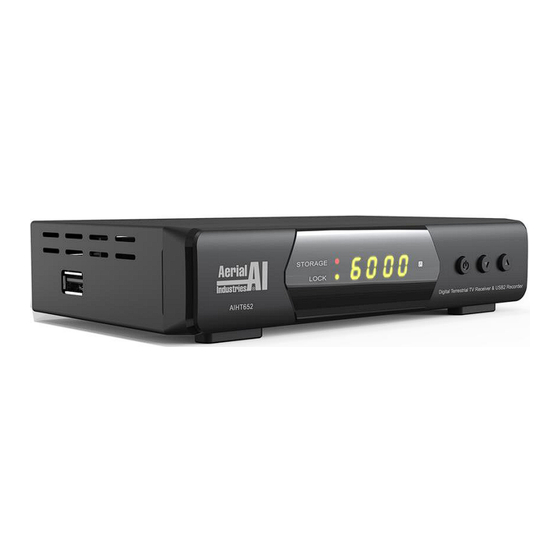
- Page 1 Model AIHT652 Digital Terrestrial TV Receiver with USB Recorder & Media Player...
-
Page 2: Table Of Contents
Contents 1. Reference.................. 3 1.1 General Features ............3 2. Product Overview ..............4 2.1 Front Panel ..............4 2.2 Rear Panel..............5 2.3 Remote Control Unit ............6 3. Channel List functions ............. 11 3.1 TV Channel List ............11 3.2 Radio Channel List ............ - Page 3 6.4 Video effects ..............14 6.5 Audio Out ..............14 6.6 Audio Description / AD ..........14 6.7 AD Volume Offset ............14 7. Time ..................14 8. System ..................15 8.1 System Information ............15 8.2 Factory Default ............15 8.3 Booking Manager ............
-
Page 4: Reference
1. Reference 1.1 General Features DVB-T, DVB-T2 Compliant MPEG-II, H.264, H.265 PAL & NTSC Conversion 8 favorite channel groups and Parental Lock Multi-language menus Multi-language audio support Multi-language DVB Subtitle output 7 day Electronic Program Guide (EPG) Teletext output through VBI and OSD where transmitted USB 2.0 Interface... -
Page 5: Product Overview
2. Product Overview 2.1 Front Panel 1. STORAGE red LED: USB Recording or Playback activity indicator. 2. SIGNAL green LED: Transmission Lock Indicator. The green LED also flashes to acknowledge receipt of Remote Control commands. 3. LED numbers: tuned channel number. In standby, local time - dimmed 4. -
Page 6: Rear Panel
2.2 Rear Panel 1. ANTENNA: Coaxial cable TV signal input. 2. D.AUDIO: Digital Audio output to HiFi amplifier etc. 3. HDMI: High Definition Audio Video cable output to TV or display. 4. VIDEO / AUDIO L&R: Composite video & analogue audio RCA cable outputs. -
Page 7: Remote Control Unit
2.3 Remote Control Unit Functions of fixed or standard RCU keys : Switches between Operate & Standby modes I◄◄: Previous item in Menu or Media Player ►►I: Next item in Menu or Media Player ◄◄: Rewind, x 2 to x 64 ►►: Fast Forward, x 2 to x 64 ►I I: Play / Pause, TimeShift or Media Player... - Page 8 down in Menus OK: Display program list in viewing mode, or in a menu confirm a selection EPG: view Electronic Program Guide, access Timer Record FAV: Display your favorite channel list FIND: Quickly find channels you want RECALL: Select the last viewed channel(s) : Mute Audio, press again to release Display: Select the HDMI AV output screen resolution PAGE+/-: Menu Page Up / Down...
- Page 9 2. Hold the 'SET' key for 3 seconds until the red light glows more brightly. 3. Press the glowing ' ' POWER key, it will flash „available‟ for 10 seconds. 4. Press the 'POWER' key on the original remote control. 5.
- Page 10 press the „OK’ key to start Auto Search. Default Output Resolution is set to 720p to maximize display compatibility, but can be changed by the user before or after Auto Search. The receiver lists the channels as they are found. If more than 1 transmitter is being received you can limit the channels found by removing the antenna plug as the channels not required are passed, or allow the receiver to manage repeat channels.
- Page 11 The „Info‟ panel is a rich source of useful information. Now & Next program names and times, Signal Level & Quality bars, channel Centre Frequency, program broadcast Resolution and Compression standard are included. USB2.0 Compatibility The receiver is compatible with most USB storage devices, and has been tested with up to 3TB size storage devices.
-
Page 12: Channel List Functions
3. Channel List functions 3.1 TV Channel List Select FAVourites, Lock, Skip, Move and Edit channels from TV channel list. 3.2 Radio Channel List Similar function to the TV Channel List. 3.3 TV Channel Recycle List See the channels you delete from the TV channel list. 3.4 Radio Channel Recycle List See the channels you delete from the Radio channel list. -
Page 13: Global Volume
3.7 Global Volume Off (default), all channels have the same volume level. Select On to enable different volume levels for each channel. 4. Channel Search 4.1 Auto Search Receiver searches automatically to find and save available channels (default). 4.2 Manual Search Select particular channels by Frequency to search for programs. -
Page 14: Language
5. Language 5.1 Language A different Menu Language can be selected. Default: English. 5.2 First Audio Select preferred audio language. In Australia only English is available. 5.3 Second Audio Select the second audio language, where broadcast. 5.4 Subtitle Language Select subtitle language. In Australia only English is broadcast. Media Center Recordings include Subtitles, &... -
Page 15: Video Out Resolution
6.2 Video Out Resolution Select between 1080p, 1080i, 720p, 576i or 576p. Default is set to 720p. 6.3 Aspect Mode Match the display shape to the screen ratio, either 4:3 or 16:9. 6.4 Video effects Select from Default, Standard and Vivid. 6.5 Audio Out Select between BS Bitstream and LPCM Linear Pulse Code Modulation Outputs. -
Page 16: System
from GMT references broadcast in each multiplex. Time zone can also be selected manually. Eastern Australian Time is +10Hrs, South Australia & Northern Territory are +9.5Hrs and Western Australia is +8Hrs from GMT. 8. System 8.1 System Information Displays basic information about the receiver. 8.2 Factory Default Reloads factory default parameters. -
Page 17: Osd Settings
or CH-▼‟ keys. Then press „VOL+►‟ to move to the program list of the selected TV channel. Details may take some seconds to load. To view EPG & details, press the „OK‟ key. To reserve a recording press the Blue colored key. -
Page 18: Media Center
9. Media Center 9.1 Play PVR Recordings Connect a USB Flash or HDD storage device to the side USB port. Until the receiver has recognized the device, receiver may prompt „No USB device connected’. The larger the storage capacity the more time recognition may take. -
Page 19: Play Music
9.2 Play Music Plays *.mp3, *.mp2, & *.aac, music & audio files. 9.3 Picture Show Plays *.jpg, *.png, *.bmp, *.jpeg, & *.gif, format picture files. 9.4 Play Movie Plays *.mkv, *.avi, *.mp4, *.vob, *.ts, *.mt2s, *.flv, *.mpg, *.3gp & *.mov format movie files. Player enters full screen mode after the “OK”... -
Page 20: Dvr Configuration
9.7 DVR Configuration Select USB storage device partitions for TimeShift and Digital Video Recorder. 9.8 TimeShift Record A useful way to pause live program and return to it a few minutes later. If not already prepared, connect & format a USB storage device. -
Page 21: Yahoo News
Network menu. 10.2 Yahoo News A selection of world wide News stories provided by Yahoo. Select Yahoo News & press OK to load. 10.3 Web Radio CH+▲ or CH-▼ Press and OK keys to load or reload. broadcaster links may change without notice, service is not guaranteed. - Page 22 2. No picture • Ensure the product has power and press the STANDBY key. • Ensure the HDMI or AV cables are firmly connected to the display. • Ensure the antenna cable is properly connected to the receiver. • Reset to Factory Default from the System Menu. •...
-
Page 23: Technical Specifications
• Check RCU‟s send Red LED and RECEIVER receive Green LED flashes. • Look on an Andriod phone camera (without IR filter) to see the emitter flashing. • Remove batteries, check polarity and reinsert in the remote control. • Replace the batteries in the remote control with a fresh set. 6. - Page 24 Resolution Audio MPEG-1/2 layer I/II/III, Dolby AC3 / Decoding AC3+(optional), DRA 2 CH/5.1 CH (optional) Audio Stereo, Joint Stereo, Dual Channel or Single Modes Channel Power Supply Input Voltage 12V 1A Power Max. 7.5W Consumption Protection Separate internal fuse. Protect input against lightning Physical Specification Operating...
Need help?
Do you have a question about the AIHT652 and is the answer not in the manual?
Questions and answers
How do I connect the AIHT652 to my tv. Does the antenna cable go into the tv or the AIHT. Thank you.
To connect the Aerial Industries AIHT652 to your TV:
1. Select a stable and well-ventilated location for the receiver.
2. Connect the antenna cable to the ANT IN port on the back of the receiver.
3. Connect an AV or HDMI cable from the receiver’s AV OUT or HDMI OUT port to your TV.
4. Plug in the power supply to the receiver.
5. Connect the mains power to turn it on.
6. The receiver will display "boot" on the front panel.
7. Press "OK" on the remote when prompted to start Auto Search for channels.
This setup ensures that the receiver gets the TV signal from the antenna and transmits video and audio to your TV.
This answer is automatically generated
I HAVE A T2100 SET TOP BOX AND I AM CONSIDERING ADDING AN AIHT652 TO MY EQUIPMENT . CAN I BE ASSURED THAT THE REMOTE CONTROLER FOR THE NEW DEVICE WILL NOT OPERATE THE EXISTING T2100 DEVICE.