
Summary of Contents for Rogue Waves RX Ultra
- Page 1 RX Ultra Wireless Video Receiver User Operation Manual V1.0 April 2021 Rogue Waves Ltd PO Box 13104 Sudbury CO10 3EP info@rogue-waves.com www.rogue-waves.com...
-
Page 2: Table Of Contents
4.3.3 Decoder Status Screen 4.3.4 Controller Status Screen 4.3.5 Unit Status Screen 4.4 Preset Select Screen 5. Connecting the RX Ultra to a Computer 5.1 Connecting via Apple MacOS 5.2 Connecting via Microsoft Windows 10 6. Using the Web Interface 6.1 The Config Tab... - Page 3 6.2 Unit 6.2.1 Ethernet Controller 6.2.2 Global 6.2.3 Packet Diversity 6.2.4 General 6.3 Upgrade 6.3.1 Decoder Firmware 6.3.2 Decoder Licence 6.3.3 Controller 6.3.4 Demodulator Upgrade 6.3.5 Demodulator Licence 6.4 Presets 6.4.1 Manage 6.4.2 Create 6.4.3 Import 6.5 Info 6.5.1 Codec 6.5.2 SRT 6.5.3 Controller 6.5.4 Demod...
-
Page 4: About This User Manual
1.1 Warranty and Support In the unlikely event that the receiver becomes unusable, the user should in the first instance, contact Rogue Waves for support. This can be done by emailing info@rogue-waves.com, or by telephone: +44 (0)208 242 6043 Should the fault persist, or if the technical team is unable to resolve any faults, it may be necessary to return the unit for further investigation. -
Page 5: Introduction To The Rx Ultra
The RX Ultra is a broadcast quality H.265 decoder, offering exceptional compression ratios on video resolutions up to 4K Ultra High Definition. The RX Ultra has been designed to be integrated with ease into existing contribution links, flyaway systems or SNG trucks, providing a cost-effective upgrade to the latest hardware decoding technology. -
Page 6: Technical Specifications
2.1 Technical Specifications Connectors Power Network RJ45 Audio Out 2 x 3-Pin XLR Genlock BNC Female, 75Ω ASI Out 4 x BNC Female, 75Ω Data NEED 1 x BNC Female, 75Ω 4 x BNC Female, 75Ω Video Decoder Profiles 4K UHD – 4:2:2/4:2:0, 8/10-bit 2160p/23.98/24/25/29.97/30/50/59.94/60 HD –... -
Page 7: Connecting The Rx Ultra
4. Hardware Configuration – RX Ultra Unit The RX Ultra unit is designed to be configured from both the web interface (chapter *) and from the unit itself. This is achieved by utilising the touch screen AMOLED display, using touch and swipe. -
Page 8: Navigation
The unit is equipped with an AMOLED touchscreen allowing quick and easy configuration. All interactions with the RX Ultra are carried out using swipe and touch. The main screen is laid out so that there are two areas that will accept swipe commands. These are:... -
Page 9: Configuration
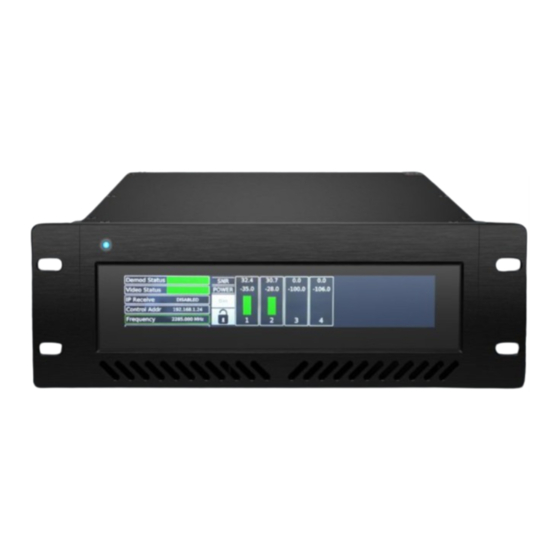
4.3 Configuration As discussed earlier, access the configuration menu buttons by swiping left on the main screen: -107.0 -107.0 -107.0 -107.0 -130.0 -130.0 -130.0 -130.0 POWER Home Decode Controller Swipe the four buttons up to show more: -107.0 -107.0 -107.0 -107.0 -130.0 -130.0... - Page 10 Demod Type DVB-T -107.0 -107.0 -107.0 -107.0 -130.0 -130.0 -130.0 -130.0 POWER Pedestal Mode SINGLE QPSK | 1/2 | -- | -- Resolution 1080p50 TX Status 0.0V | 0°C TX Status 0.0V | 0°C -107.0 -107.0 -107.0 -107.0 -130.0 -130.0 -130.0 -130.0 POWER Demod Temp 57°C...
- Page 11 Description Demod Status Locked if demodulator has a lock, LOCKED NO LOCK otherwise No Lock Video Status OK if video connected to the RX Ultra ERROR unit, otherwise Error IP Receive Enabled/Disabled IP receive disabled or enabled Control Addr 192.168.2.29 IP Address for unit controller.
-
Page 12: Rf Status Screen
LNB Voltage Modulation ASI Bitrate Guard Interval 1720.000 DVB-T 0.00 Mbps This screen will show statuses relating to the RF configuration on the RX Ultra unit. It is laid out in the following way: Function Option Description Downconverter Manual/Individual/UHF Set the downconverter in manual or... - Page 13 9.000 The options to the left of the screen allow the user to choose which downconverter is to be used with the RX Ultra unit (subject to change). The first two options show specific downconverters, the BWSDC-200270 and the RogueWavesDC: Unit 1 192.168.1.24...
- Page 14 Swipe down to show more options: Unit 1 192.168.1.24 RF Status Demod Not Locked 2405.000MHz LNB Power Frequency Side RogueWaves LNB Voltage 0.000 Manual LNB Gain Offset 9.000 Swipe down here Selecting Individual will allow the user to select options for individual downconverters. The options are: Function Option...
- Page 15 Select other frequencies by swiping up or down, and enter the required information as above: Unit 1 192.168.1.24 RF Status Demod Not Locked 2405.000MHz LNB Power Manual Frequency Side Invert 1720.000 LNB Voltage Individual 1720.000 LNB Gain Offset 9.000 1720.000 Swipe up/down here Unit 1 192.168.1.24...
- Page 16 The Polarity is set by touching the Polarity box: Unit 1 192.168.1.24 RF Status Demod Not Locked 2405.000MHz Norm 8MHz DVB-T Guard Interval Auto 7MHz Auto 6MHz Polarity Auto Touch the right-hand arrow to progress to the next screen: Unit 1 192.168.1.24 RF Status Demod Not Locked...
-
Page 17: Decoder Status Screen
4.3.3 Decoder Status Screen The Decoder Status screen is accessed by swiping to the left on the main screen, and touching the Decode button: -107.0 -107.0 -107.0 -107.0 -130.0 -130.0 -130.0 -130.0 POWER Home Decode Controller The following screen will appear: Unit 1 192.168.1.24 Decoder Status... - Page 18 This screen will show statuses relating to the status of the Decoder on the RX Ultra unit. It is laid out in the following way: Function Option Description Mode HEVC The working mode of the RX Ultra. Def Vid Support QuadSync –...
- Page 19 If a value between 51 and 100 (High) is chosen, freeze frame is preferred over picture break-up. Enter the selection by using the onscreen number selector. Press Enter to input the value into the RX Ultra. Press Delete to delete a single digit. Press Clear to clear the number selection.
- Page 20 The next option is QuadSync: Unit 1 192.168.1.24 Video Output Demod Not Locked 2405.000MHz Video Source Error Conceal HD-SDI 1080i Sample Format HD-SDI 1080psf QuadSync HD-SDI 1080p Touch the QuadSync menu item, and select from the following: Standard mode for single HD/UHD operation. HD-SDI 1080i QuadSync conversion to requested standard is applied to video outputs where possible.
- Page 21 On input stream interruption, the output will go to blue screen. When the required settings have been added to the RX Ultra, touch the arrow on the right-hand side of the screen to move to the next set of menu options.
- Page 22 The next menu item is Ancillary: Ancillary channel is ignored Ancillary data packets are inserted onto SDI outputs when stream present in ASI/IP input Touch the right-hand arrow to move to the next screen, Genlock: Unit 1 192.168.1.24 Genlock Demod Not Locked 2405.000MHz Line Offset Genlock Mode...
- Page 23 The UDP Port is set using this menu option. There are four buttons below the port number selector. Use these buttons to increase or decrease the port number. The number will increase one digit at a time The number will increase ten digits at a time The number will increase one hundred digits at a time 1000 The number will increase one thousand digits at a time...
-
Page 24: Controller Status Screen
4.3.4 Controller Status Screen The Controller Status Screen shows information relating to the connectivity of the RX Ultra unit to a network. Unit 1 192.168.1.24 Controller Status Demod Not Locked 2405.000MHz IP Address Subnet Address Dark Mode Default Brightness 192.168.2.29 255.255.255.0... - Page 25 Delete will clear the selected number. Clear will clear all fields. Enter will enter the displayed IP number into the RX Ultra unit. The X in the top left corner will close the menu without entering any changes. Touch the Default Brightness entry to edit: Use the numbers displayed on the screen to enter a valid brightness value (1 to 100).
-
Page 26: Unit Status Screen
To view the Unit status screen, swipe left. It may be necessary to swipe up afterward to view the Unit button: Touch the Unit button to enter the Unit Status screen: The screen is laid out in the following way: Unit name The name of the RX Ultra unit. Packet Diversity On or Off. Software Codec software version. - Page 27 Touch the Licence Options button to view the active licences on the RX Ultra unit: Swipe left and touch the Unit button to go back. Touch the Restore Defaults button to reset the RX Ultra unit back to factory defaults.
- Page 28 Diversity mode is the setting for Antenna Diversity. The options are: 1 x 2 One transmitter, two receivers 1 x 4 One transmitter, four receivers Touch the Audio Out setting: Select either Analogue for analogue audio, or Digital for digital audio. Touch the Packet Diversity setting: Packet Diversity helps to prevent packet loss, delay, or delay jitter.
-
Page 29: Preset Select Screen
Please refer to chapter * to see how to save presets. When the required preset is selected (the button will be shaded light grey), touch the Set button. When the preset has been applied, the RX Ultra unit will revert to the home screen: 04/2021... -
Page 30: Connecting The Rx Ultra To A Computer
5. Connecting the RX Ultra to a Computer While some of the settings on the RX Ultra can be changed by using the menu system on the unit, it is highly recommended that the settings are changed using the embedded web page on the device. -
Page 31: Connecting Via Apple Macos
Status Screen. It is recommended that an IP Address in the range 192.168.2.*** is used. When the IP Address has been input into the RX Ultra unit, make sure to touch the “Save” button. 5.1 Connecting via Apple MacOS The computer used should have an RJ45 port free. - Page 32 Click “Network” and the following screen will open: Select the Wired network: Select “Manually” from the “Configure IPv4” dropdown menu. Enter the following: IP Address 192.168.2.1 Subnet Mask 255.255.255.0 Router *Leave Blank* Click the “Apply” button to save the changes. 04/2021 Page 32 of 51...
-
Page 33: Connecting Via Microsoft Windows 10
Open a web browser, and type the IP Address chosen when configuring the RX Ultra Unit above: Press the Enter key and the web interface for the RX Ultra will open: 5.2 Connecting via Microsoft Windows 10 The computer used should have an RJ45 port free. - Page 34 Select Settings: The settings window will open. From here select “Network & Internet: 04/2021 Page 34 of 51...
- Page 35 Click “Ethernet”: Followed by “Unidentified Network”: The network settings page for the network will open: 04/2021 Page 35 of 51...
- Page 36 IP Address 192.168.2.1 Subnet Prefix Length 24 Gateway 192.168.0.1 Preferred DNS 8.8.8.8 Alternate DNS 8.8.8.4 Click the save button. Open a web browser, and type the IP Address chosen when configuring the RX Ultra Unit above: 04/2021 Page 36 of 51...
-
Page 37: Using The Web Interface
6. Using the Web Interface The first screen to be displayed when opening the Web Interface is the Unit Status Screen: The tabs at the top of the screen allow the user to fully configure the Unit, as well as load and save configurations. -
Page 38: General
6.1.1.1 General Function Option Description Diversity Mode 1x2 Way 1x4 Way Antenna diversity mode Modulation Type DVB-T High-definition broadcast modulation Enable SNMP Disable SNMP Enable SNMP 6.1.1.2 Demodulator Function Option Description Frequency (MHz) 8MHz Demodulator Frequency Bandwidth 8MHz 7MHz Demodulator Bandwidth 6MHz Guard Interval 1/32... -
Page 39: Buttons
6.1.1.4 Buttons Function Description Apply any changes made Apply Refresh the webpage. Use if changes have been made, but not applied to Refresh clear changes 6.1.2 Video 6.1.2.1 Decoder Defaults Function Option Description Video Format 480i59 576i50 May speed up start time if set to match expected video stream. -
Page 40: Video Output
6.1.2.2 Video Output Function Option Description Video Source Decoder Decoded video is output on SDI 1. Pattern Video Pattern & tones based current configuration. Sample Format 4K video outputs in 2 sample interleave format. 4k video outputs in Square Division format. QuadSync The standard mode for single HD/UHD operation HD-SDI 1080i... -
Page 41: Buttons
6.1.2.4 Buttons Function Description Apply any changes made. Apply Refresh the webpage. Use if changes have been made, but not applied to Refresh clear changes. 6.1.3 Audio 6.1.3.1 Analogue Output 1 Function Option Description Reference Level +24dBu Set 0dBFS reference for digital to analogue conversion. -
Page 42: Audio Stream
6.1.3.4 Audio Stream 2 Function Option Description Adjust Delay (ms) -1000 to +1000 -1000 to +1000 ms audio delay adjustment to -4ms accuracy. Negative numbers may result in loss of decoding if set earlier than possible. 6.1.3.5 Audio Stream 3 Function Option Description... -
Page 43: Audio Stream
6.1.3.10 Audio Stream 8 Function Option Description Adjust Delay (ms) -1000 to +1000 -1000 to +1000 ms audio delay adjustment to -4ms accuracy. Negative numbers may result in loss of decoding if set earlier than possible. 6.1.3.11 Buttons Function Description Apply any changes made. -
Page 44: Ancillary
6.1.4.1 Service 1 Function Option Description Service Selection Manual Service decoding is based on provided PID’s. Auto Service decoding is based on program number Program number 1 - 65535 1 to 65535 program number to be searched for in PAT. Service name Service 1 32-character name to be searched for in SDT. -
Page 45: Unit
Subnet of the Sapphire HEVC 4K unit Link State Down Status of the IP Link 6.2.2 Global Function Option Description Unit Name Sapphire RX Name of the RX Ultra 6.2.3 Packet Diversity Function Option Description Packet Diversity Packet diversity off Packet diversity on Diversity Source... -
Page 46: Upgrade
6.3 Upgrade 6.3.1 Decoder Firmware From time to time the decoder firmware or licence files will require an update. The process of updating these files is an easy one, requiring the user to download the new files and to upload them to the unit. To upgrade, click the “choose file”... -
Page 47: Controller
6.3.3 Controller Function Option Description Select file to update Firmware update files are typically labelled Choose file controller b110_update_vX.X.tar. firmware. Latest firmware can be obtained via our FTP site, for Upload the updated details see Info page. Upload firmware file to the Sapphire unit. -
Page 48: Manage
Delete Download a copy of the selected preset. Download Load the selected preset into the RX Ultra unit. Load To load a previously used preset, click the load button. The preset will load, and the following dialog will appear, asking for confirmation: Click the OK button and a confirmation dialog will appear: To delete a previously saved preset, click the delete button. -
Page 49: Create
Select a file on the local computer to import Choose file Upload the updated licence file to the RX Ultra unit. Upload To import a setting saved on the local computer, click the choose file button. Navigate to the folder where the *.json file resides, select it and click Open. -
Page 50: Info
6.5 Info The Info page displays information that is useful when using the RX Ultra unit. 6.5.1 Codec Software Version v2.4 The codec software version Serial Number 3492fe21 The codec serial number Licence Mask 000005be 6.5.2 SRT Software Version v1.4.2... -
Page 51: Decode Licence
6.5.5 Decode Licence Codec Encode The codec licences installed on the RX Ultra unit. Decode Please note: If the codec is greyed out, no licence is H.265 HEVC installed on the unit H.264 AVC MPEG-2 Ultra-Low Latency 10-Bit 4:2:2 QuadSync...
Need help?
Do you have a question about the RX Ultra and is the answer not in the manual?
Questions and answers