Table of Contents
Advertisement
Quick Links
Advertisement
Table of Contents

Summary of Contents for STOBE HPX
- Page 2 We promise, all the projectors have been carefully checked and packaged before shipping. Therefore, if you have any questions, please contact us and give us an opportunity to help you. We guarantee that we will provide you a satisfactory solution. Thanks for your understanding! Kind Regards, STOBE.
-
Page 3: Table Of Contents
List of Contents Product Packing List ..........1 Product Description ..........1 Projector Specification ..........3 Remote control ............5 Thank you ..............7 Note ................. 7 Safety ............... 7 Installation ..............8 Supply ..............8 Cleaning ..............8 FAQ ................9 PROJECTOR CONNECTIONS ...... -
Page 4: Product Packing List
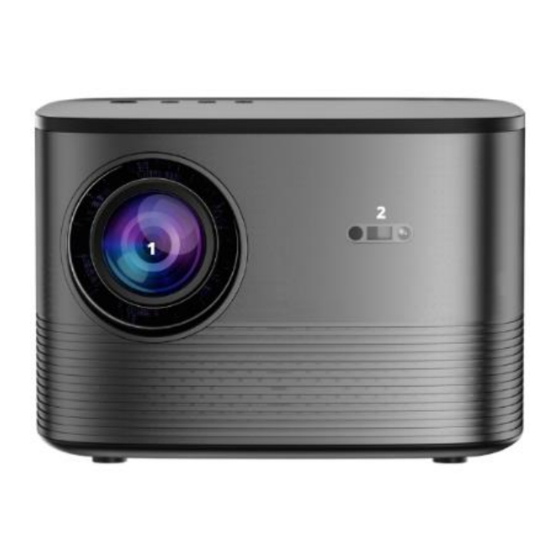
Product Packing List ● Smart Projector * 1 ● Power Cord * 1 ● User Manual * 1 ● HDMI Cable * 1 ● Remote Control * 1 (Batteries not included) Product Description 01.Lens 02.IR receiver front 03. IR receiver back 04. - Page 5 09. Power Port 10. ON/OFF 11. Left (focus) 12. OK 13. Right (focus) Name Description Lens Beamer lens IR receiver front Frontside remote controller receiver IR receiver back Backside remote controller receiver Earphone Input earphone Audio input HDMI HDMI Cable plug in USB port 1 USB T port for screen mirror Power Cable Port...
-
Page 6: Projector Specification
Projector Specification Model No projection technology Product size 210*190*145 LED chipset useful life 30000h Lens focus High transmission all glass lens Illumination uniformity contrast ratio 10000/1 Projection Range 1.2-3.0m optimum dimension 40-100 inch Trapezoidal correction Electronic trapezoidal Electronic zoom screen size at the same Electronic scale distance input interface... - Page 7 Electronic scale Electronic zoom screen Support optional size at the same language distance input interface USB*2/HDMI*1/headset Support the 1080P 2k 4k *1/bluetooth support resolution The multimedia Play U disk, USB*2/HDMI*1/ headset *1/ Bluetooth support version mirroring version In addition to multimedia functions, the following functions are added: A: support Apple Android mobile phone wireless B: Apple wireless screen interaction C: LAN APP push hardware...
-
Page 8: Remote Control
Remote control *Voice Version:Smart Voice Remote Control (Only equipped with voice version) For the first time use, please follow this method to pair: • Press and hold the • • keys at the same time to enter the automatic pairing mode. Manual pairing: 1. - Page 9 1: power supply 2: Mute 3. Retreat quickly 4: Focus + 5: Focus – 6: Fast forward 7: signal source 8: The menu 9: The direction key 10: The home page 11: the number keys 12: The volume – 13: the volume + 14: Switch 15: Settings 16: The mouse...
-
Page 10: Thank You
Thank you Thank you very much for purchasing the mini projector. Please read this instruction manual carefully before using it. Also, please do not throw the manual away, so you can check it at any time. If in doubt, do not hesitate to contact the customer service. We provide after-sales service to ensure satisfaction. -
Page 11: Installation
Installation 1. For the best projection, use the projector in a dark room. 2. Place the projector on a flat, level surface in a dry area away from dust and moisture. 3. Exposure to direct sunlight, smoke or steam may damage internal components. -
Page 12: Faq
1. While switching on, the indicator light does not work ①. The power supply may not be connected correctly ②. Check the overheating protection system 2. Using the power button on the remote control does not turn on the projector ①. - Page 13 ②. Volume at minimum or silent ③. Check that the audio format of the video is in the supported list ④. Dolby sound is not supported, exit to play again. - Fire stick: Enter “Setting” and find “Display & Sound”. Then select “on”...
- Page 14 7. Unable to play video ①. Is the video format correct? ②. Is the file corrupted? ③. The device is damaged 8.The image has color distortion ①. Make sure the video source has a fine resolution ②. Adjust the colors: enter Menu-Picture-Color Temperature, then select different modes and adjust the value accordingly.
-
Page 15: Projector Connections
②. Place projector on a flat surface horizontally or vertically. An inclination of any angle may result in blurry displays or uneven colors. ③. Darker environment suggested to achieve the best projection performance. ④. Check the distance of the projector to the screen. There should be 1.12m-2.8m/44inch-110inch between the projector and projection wall/screen. - Page 16 The default option – only displays on the main Computer only monitor. Duplicate Duplicating the desktop on each monitor connected. Makes all of your monitors act like one big Extend monitor extending the desktop across all of them Projector only Displays only on the secondary monitor like a projector (7) You can change your screen resolution:...
-
Page 17: Adjust The Tilt Base And Hang Ceiling
Adjust the Tilt Base and Hang Ceiling Adjust the tilt base: Install the screws (not included in the package) in the screw holes dedicated for it, lift the front edge of the projector to the desired height, turn the foot and release the button to lock the tilt base to the appropriate position. - Page 18 5. Adjust the focus ring or rotate the lens of the projector to get the best image performance. (If it is still blurry, please try to adjust the projection distance.) 6. If you connect other devices, be sure to select the corresponding source.
-
Page 19: Projection Distance And Size
Note: If the Keystone correction fails to resolve image shape, please adjust the projector position. The projected image may be blurry or difficult to see, this is due to lack of Focus adjustment with the lens, please follow the processes below to adjust the Focus. - Page 20 Source settings • Select the desired signal source channel in the pop-up interface, such as "HDMI","AV",etc.; • Select the desired signal source channel in the pop-up interface, such as "HDMI","AV",etc.; • Press the "OK" button on the remote control to enter the corresponding signal source state.
- Page 21 Multimedia playback Insert the USB flash drive that has stored multimedia filesinto the USB port; • In the maininterface,press the signal source "-[)" button on the remote control,and select "Mobile Storage" in the pop-upinterface; After enteringthe interface, find the multimedia file you want to play and play it. WiFi settings •...
- Page 22 • In the pop-up interface, select "Wireless Network". • In the network settings interface, turn on the "WIFI switch" to search for the network, and select the WIFI to be connected.
- Page 23 • After entering the password through the keyboard, click Confirm connection. Electronic Keyston e Settings •In the main page, use the arrow keys to select and enter "Settings";...
- Page 24 •In projection setting interface, choose to enter "four-point trapezoi d"; Use the arrow keys to adjust the four corners until the picture is corrected.
- Page 25 Bluetooth settings • On the main page, use the arrow keys to select to enter "Settings" ; • Select "Projection Settings" in the pop-up interface;...
- Page 26 In the bluetooth settings interface, turn on the ‘’bluetooth switch’’, after searching for devices select the bluetooth device that needs connected.
- Page 27 A pplication ma rket On the main page, use the arrow keys to select "App Store’’ • Search to find the application you want to install,select the corresponding icon to download and install.
- Page 28 Wireless projection On the main page, use the arrow keys to select "DLNA" Open the Mobile video software, find the ‘’TV’’ icon in the upper right corner of the playback interface. Click the ‘’TV’’ icon, search for your device, and click the device to cast screen.
- Page 29 Cast screen guide 1.Make sure your device and box are on the same LAN’’ WIFI network’’ 2. Choose whatever you like on apps with cast screen capability 3. Click TV button on your device, select this box for screencasting.
Need help?
Do you have a question about the HPX and is the answer not in the manual?
Questions and answers